Panda Jetpack V2
- Product Link: Click to Buy
Revision Log
| Version | Date | Update Notes |
|---|---|---|
| v1.00 | Sept 6, 2025 | Initial Release |
Introduction
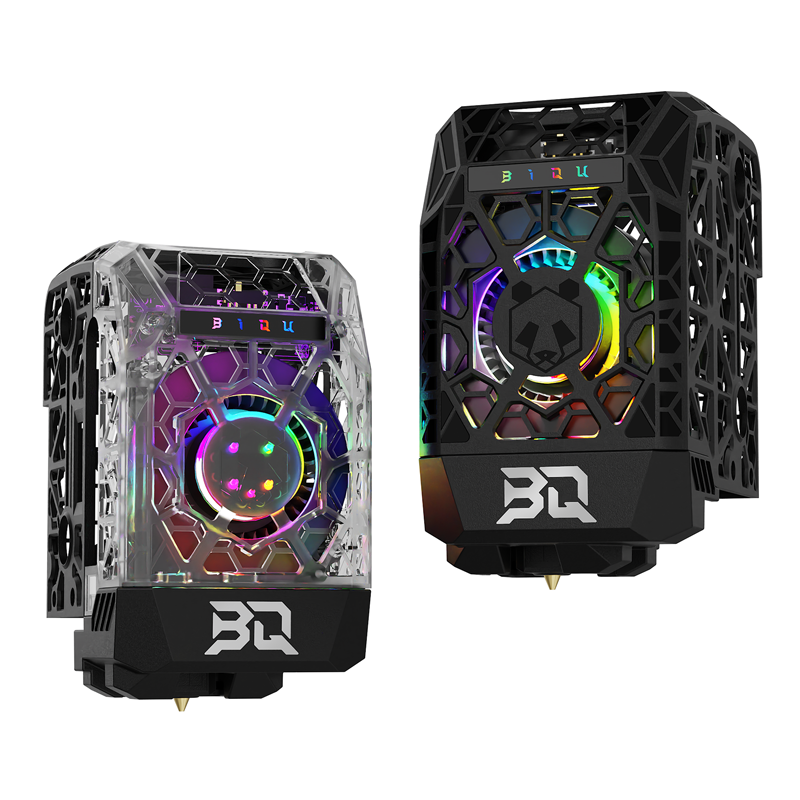
The Panda Jetpack V2 is a precision-engineered front cover upgrade for Bambu Lab P1 and X1 printers, designed to significantly enhance print quality and performance. It delivers omnidirectional cooling for superior overhangs and fine details, while its optimized mass distribution allows for increased printhead speed and accuracy. Equipped with customizable RGB lighting, it provides both practical print monitoring through visual alerts and aesthetic personalization - all within a sleek, form-fitting design that maintains the printer's original profile.
Feature Highlights
-
Ultra-Light Structural Design
Achieves smoother, higher-precision prints by reducing mass and inertia, while its enhanced cooling effectively prevents nozzle clogs.
-
Omni-directional Part Cooling Fan Duct
Features a corner-outlet design that distributes airflow evenly. This improves bridging and overhang performance. The compact shape also ensures a clear, unobstructed view of the nozzle and printing process.
-
Precision Injection Molded
Provides an enhanced surface finish, resulting in a more visually appealing and premium-feeling product.
-
Web UI Wireless Control
Use the intuitive web interface to customize your lighting. Adjust effects, color, brightness, and speed.
-
H2D Style Status Color Indicator
Use the vibrant LED lighting to receive instant feedback on device status and dynamic visual alerts for notifications.
Specifications
-
Product Name: BIQU Panda Jetpack V2.0
-
Material/Process: Injection-Molded Engineering Plastic
-
Color Options: Black, Transparent
-
Lighting Effects: Static, Breathing, Strobing, Wave, Marquee, Color Cycle, Rainbow, Warning: Hot, Fan Speed, H2D Style Status Indicator
-
Custom Control: Web UI + BIQU APP
-
Compatibility: For Bambu Lab P1P, P1S, X1C, X1E 3D printers; BIQU Panda Revo™, Panda Revo™ DiamondBack®
Installation
Tools Required
- H1.5 Hex Key
Preparation
Before starting, completely unload the filament and turn the printer's power off.
Disassembly
-
Step 1 – Remove the Front Housing Assembly
After disconnecting the fan's electrical connector, you can remove the front housing assembly.

-
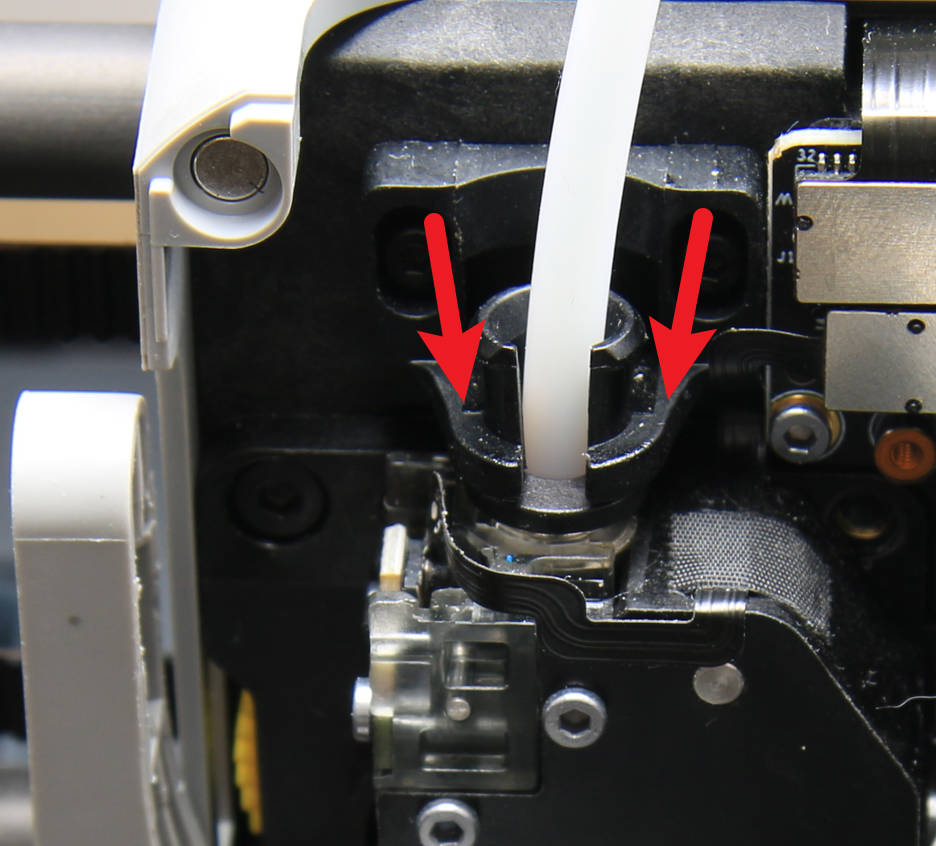
Step 2 – Remove PTFE Tube
Proceed to disconnect the PTFE tube by pressing down on the pneumatic joint.
-
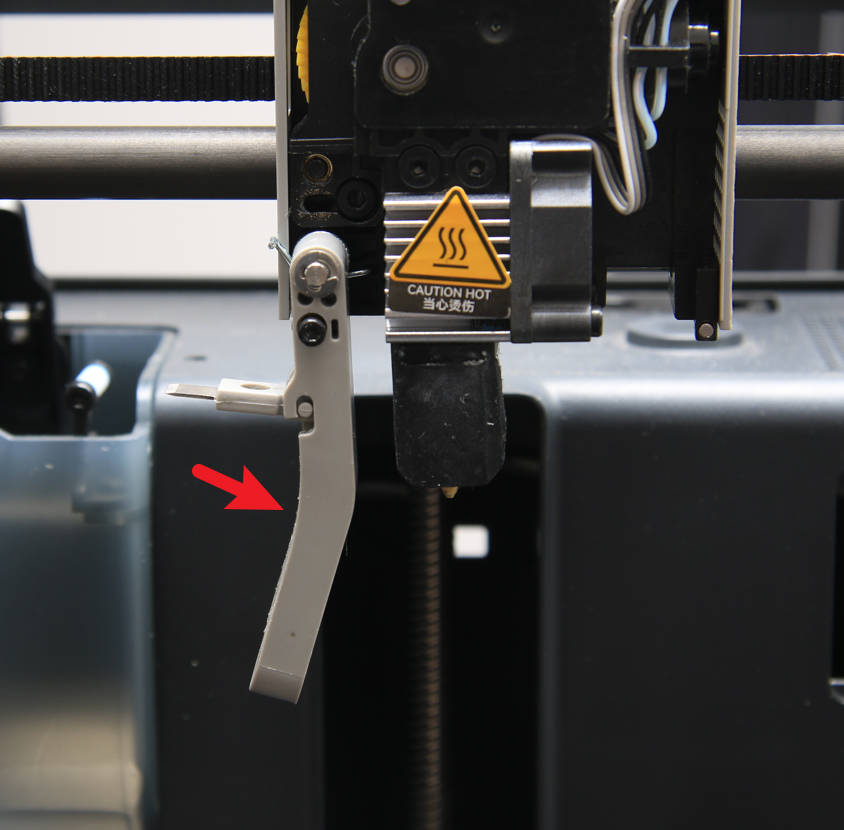
Step 3 – Release the Cutter
Using a H1.5 hex key, loosen the cutter lever screw just enough to release the lever assembly from the extruder body.

-
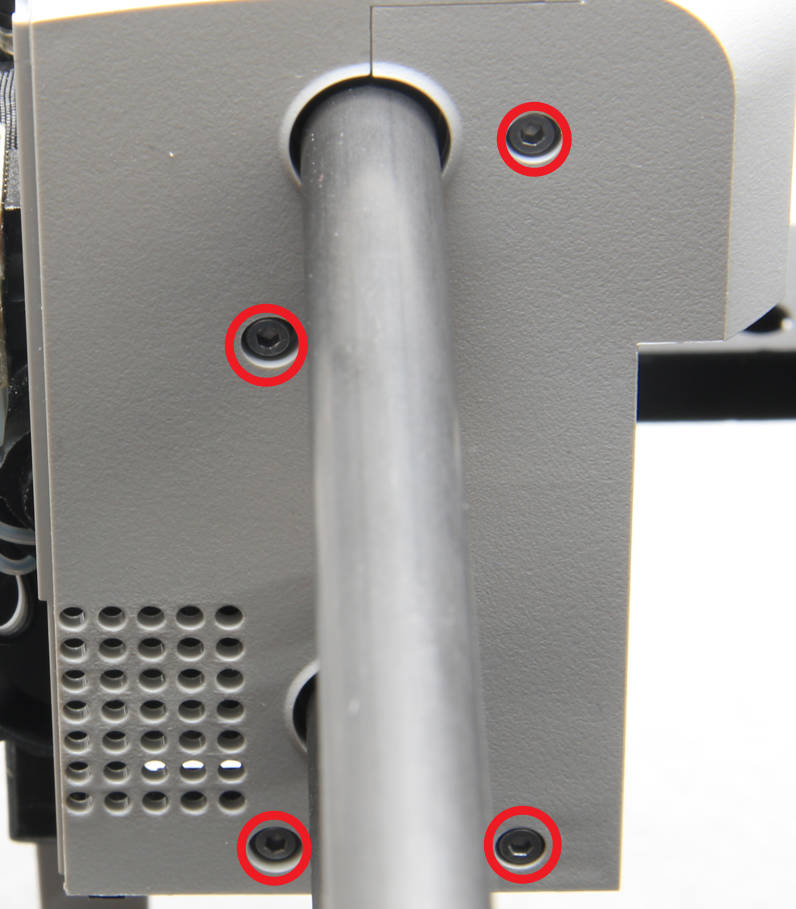
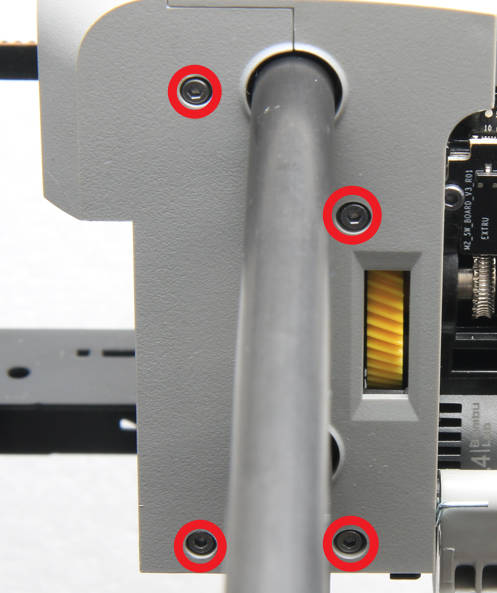
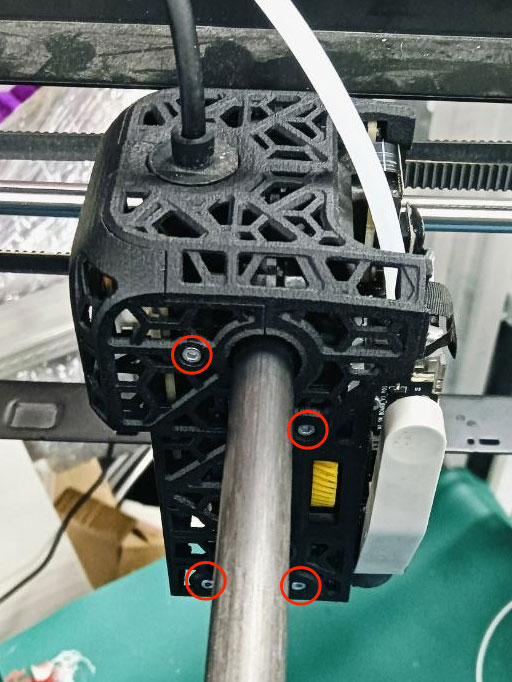
Step 4 – Remove Screws
Locate the eight screws securing the housing - four on each side. Using a hex key, remove all eight screws. These screws will be used later to secure the Panda Jetpack Back Shell.
-
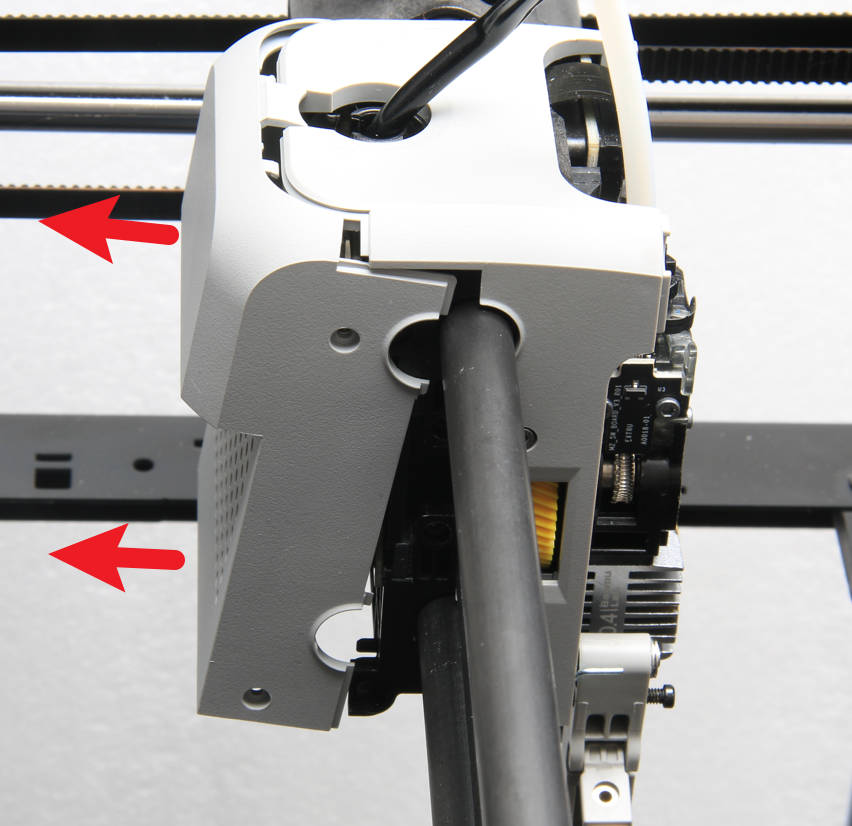
Step 5 – Remove Toolhead Rear Housing
Separate the toolhead rear housing from the middle housing and remove it.
-
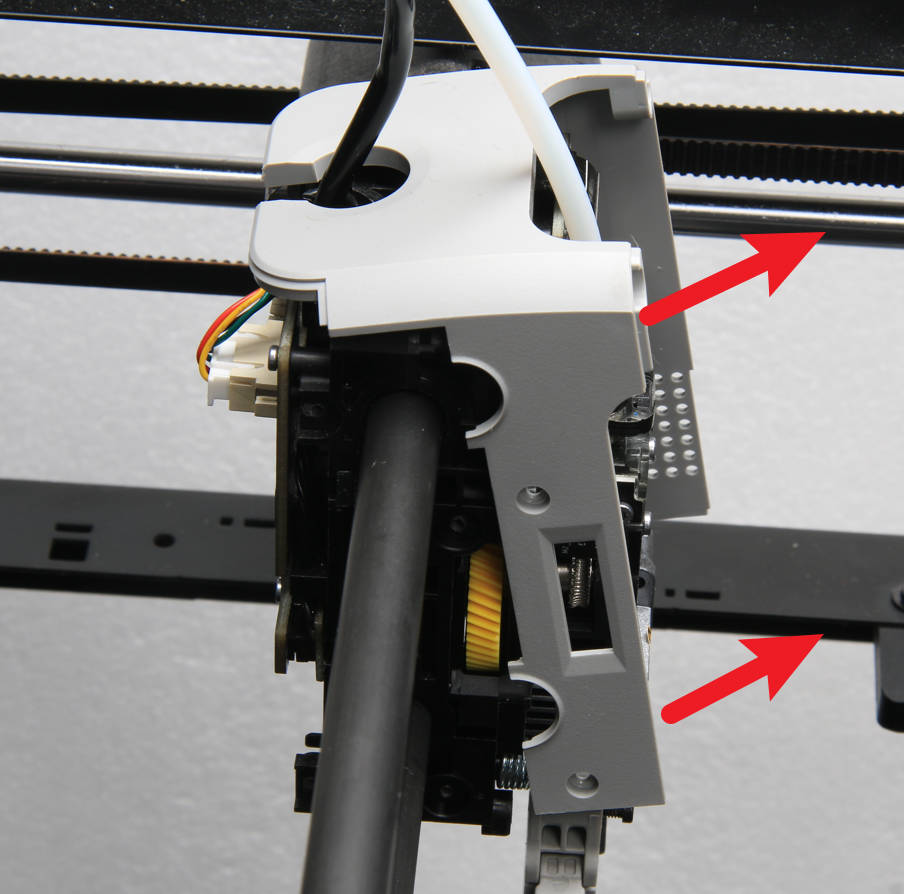
Step 6 – Remove Toolhead Middle Housing
Remove the middle housing carefully to avoid injury from the blade.
Assembly
-
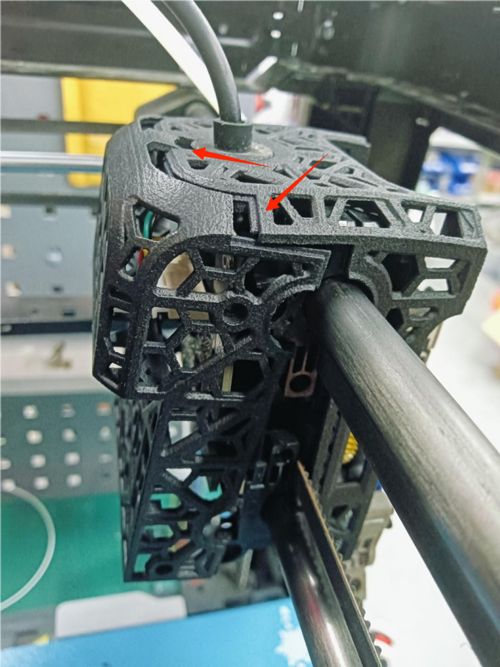
Step 1 – Install Panda Jetpack Back Shell Middle Housing
Correctly install the Panda Jetpack back shell middle housing by aligning it with the toolhead and pressing firmly until it clicks into place.

-
Step 2 – Install Toolhead Panda Jetpack Back Shell Rear Housing
Attach the Panda Jetpack back shell rear housing onto the toolhead, ensuring the top latch is aligned.
-
Step 3 – Secure Screws
After aligning the housings, secure them by inserting and tightening the eight previously removed screws.
-
Step 4 – Install Cutter Lever
Using your hand, lift the cutter lever and carefully slide the cutter blade into the designated slot within the extruder, and tighten the screw.

-
Step 5 – Connect PTFE Tube
Insert the PTFE tube straight into the pneumatic fitting and push firmly until it is fully seated.

-
Step 6 – Attach Jetpack Front Housing Assembly
Remove the screw securing the fan, then push on the fan’s outer frame from the front face of the housing to dislodge it.
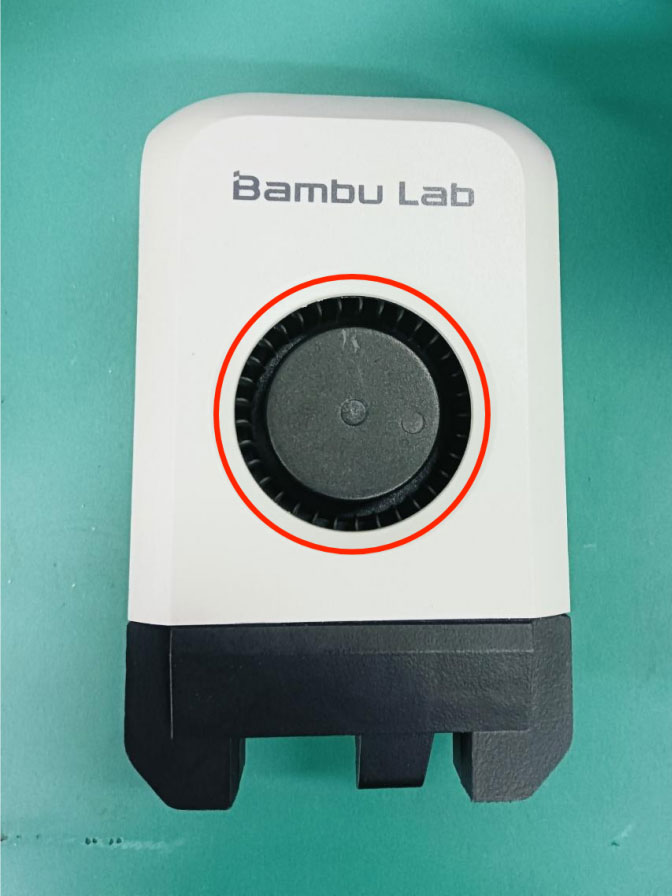
Position the fan into its location on the Panda Jetpack V2, aligning its mounting holes with those on the housing. Insert the previously removed screws and tighten them securely to mount the fan. Connect the fan's cable to the designated FAN port on the Panda Jetpack V2 printed circuit board assembly (PCBA).
Connect the Panda Jetpack V2 front housing cable to the toolhead fan port.
Close the Panda Jetpack V2 to complete installation.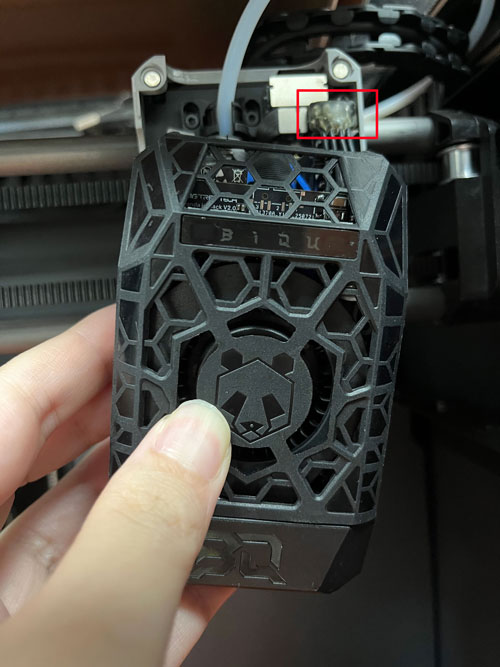

Light Cover Removal & Installation
Remove Light Cover
-
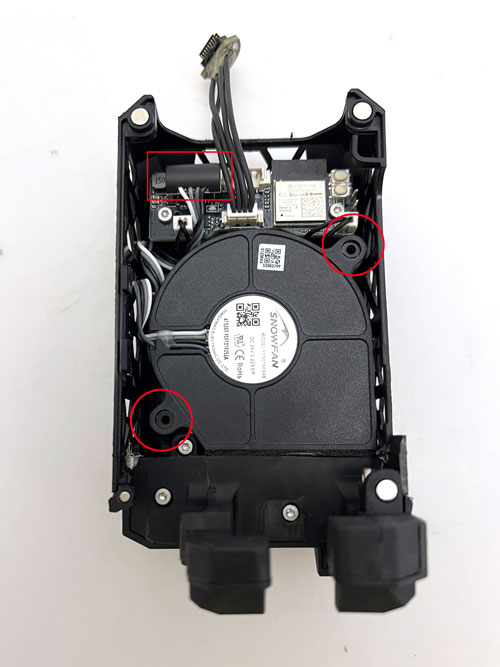
Unscrew the two screws securing the control board, then remove the board.


-
Use a screwdriver to push out the light cover.

Install Light Cover
-
Align the slot and press the light cover directly into place.
Initial Connection
When you power up for the first time or restore factory settings, you'll see a blue flowing light, indicating that Panda Jetpack is not yet bound to the printer.
WiFi Connection Guide
-
Connecting to the Panda Jetpack's WiFi_AP Hotspot
-
Connect to the Panda_Jetpack AP hotspot:
Panda_Jetpack_XXXXXXXXXX. The default password is987654321.
-
-
Accessing the AP Webpage
- After connecting to the AP, open a browser on your computer and enter the default IP address:
192.168.254.1. On mobile devices, the Panda_Jetpack Web UI will automatically appear, or you can manually enter the IP address in the browser:192.168.254.1. Below, the mobile version will be used as an example for explanation. The web version operates similarly. For Mobile:
- After connecting to the AP, open a browser on your computer and enter the default IP address:
-
Select Language (Default: English)
-
After selecting a language, tap
Next.
-
-
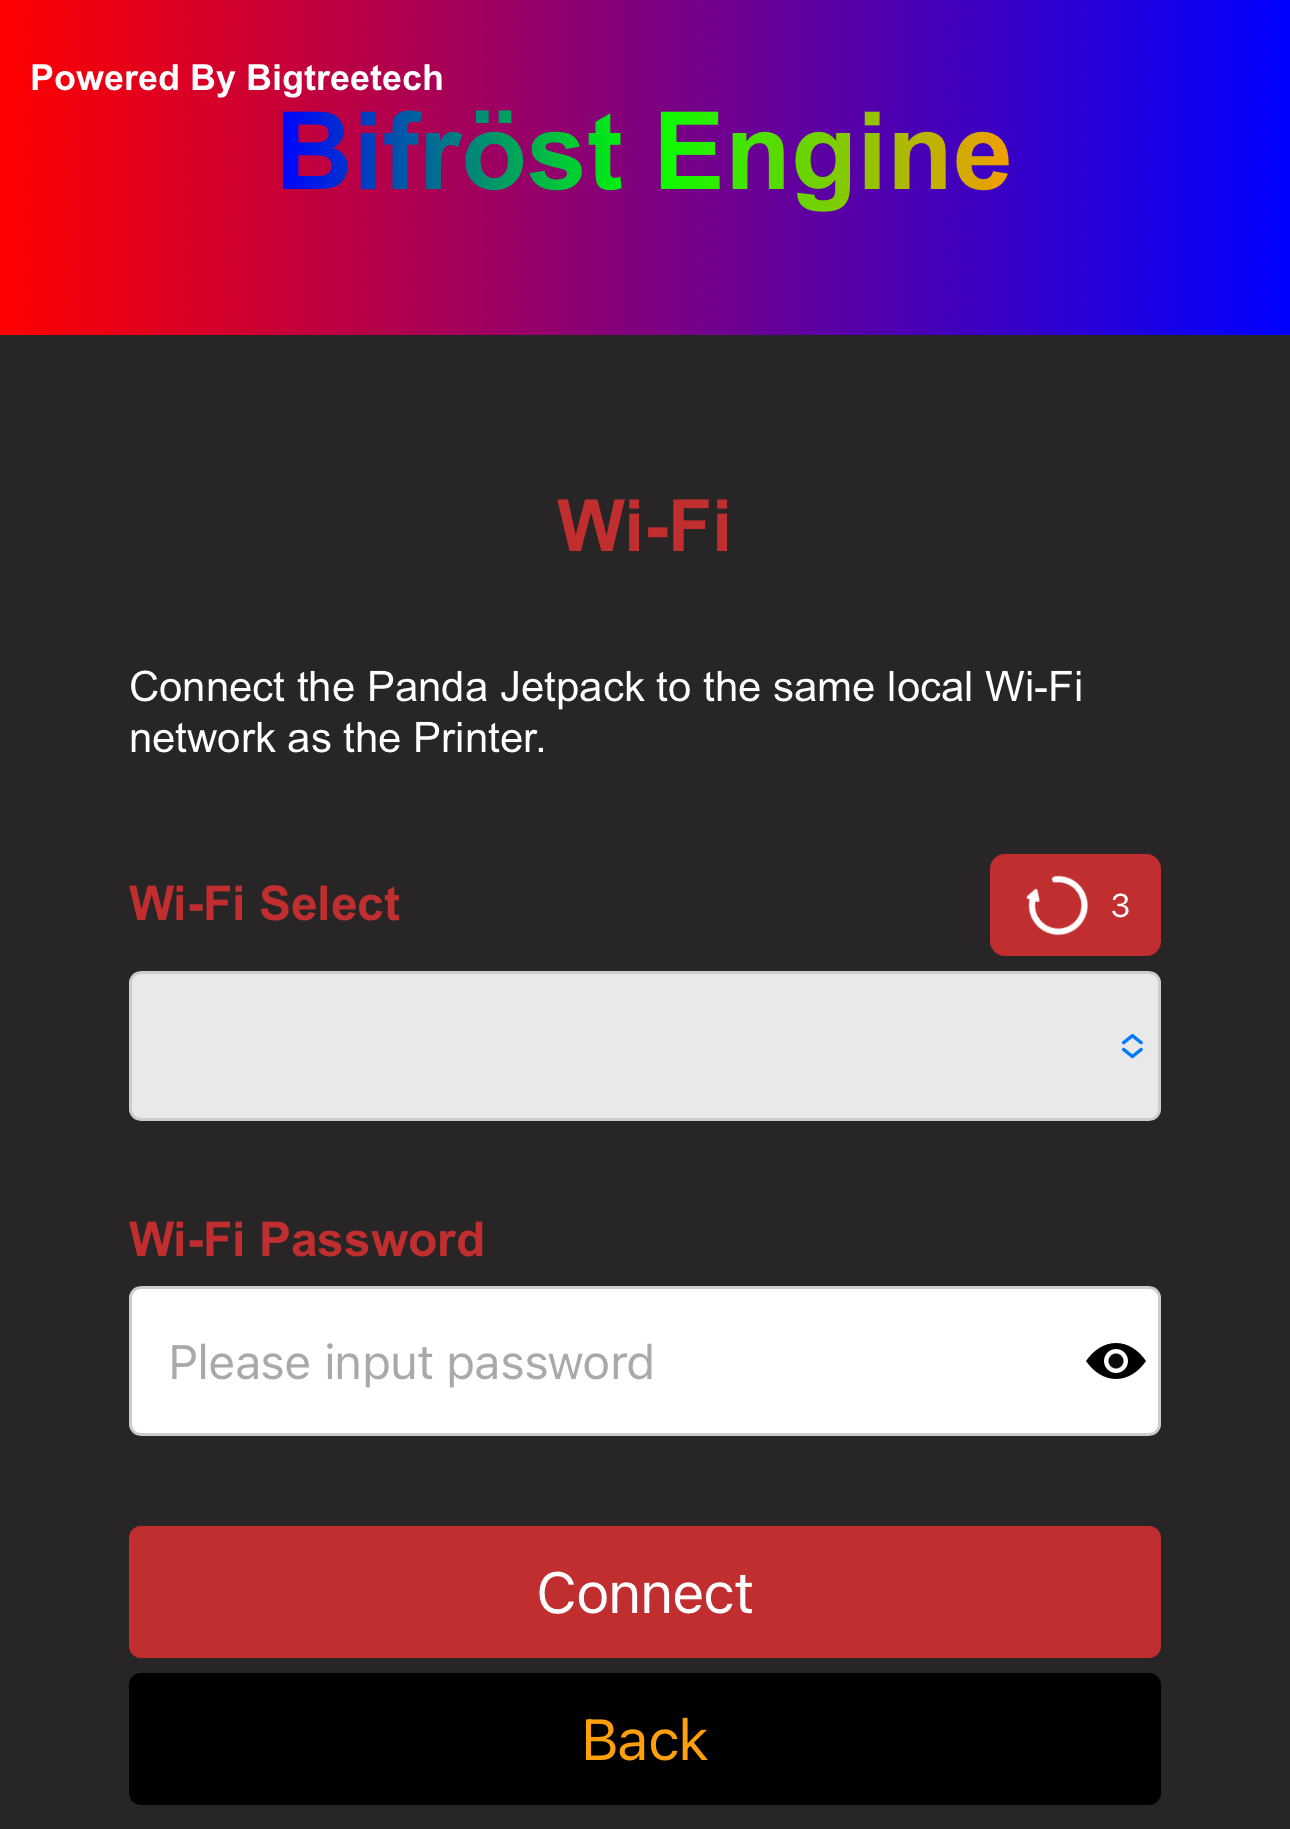
WiFi Connection Page
-
After initial setup or a factory reset, the interface will automatically scan for available Wi-Fi networks. If your network is not listed, tap Scan to refresh the list manually.
-
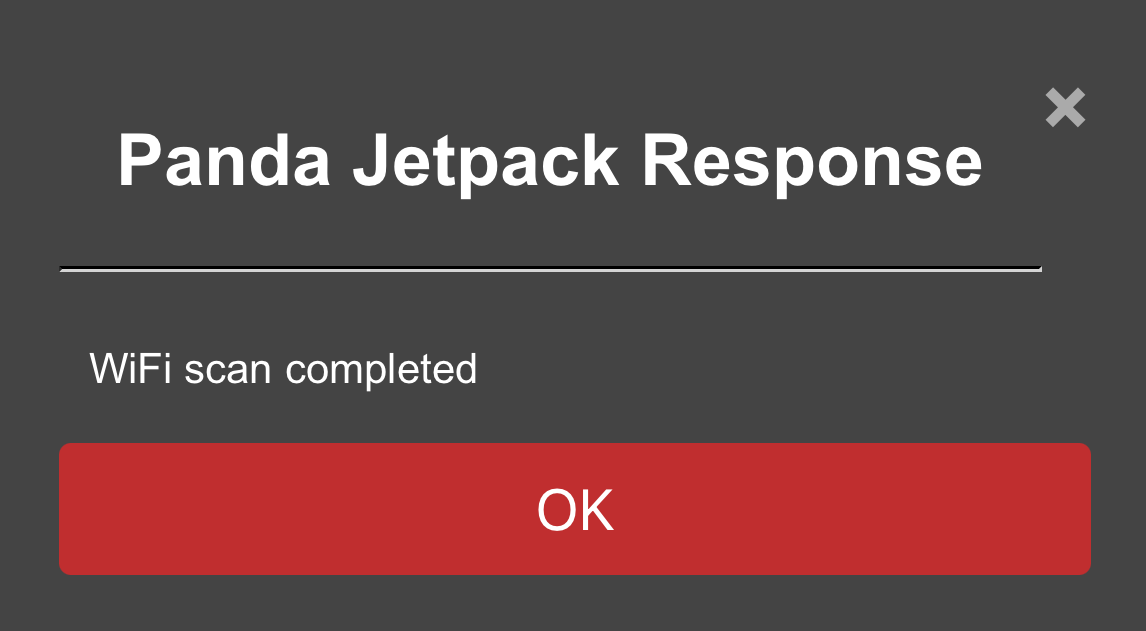
A confirmation message will appear when the scan is complete.
-
Select the WiFi network you want to connect to.

-
Type your password and tap the
eye iconif you'd like to see the password you've entered.
-
Tap Connect, and the interface will switch to the WiFi connection page, showing
Connecting to WiFi.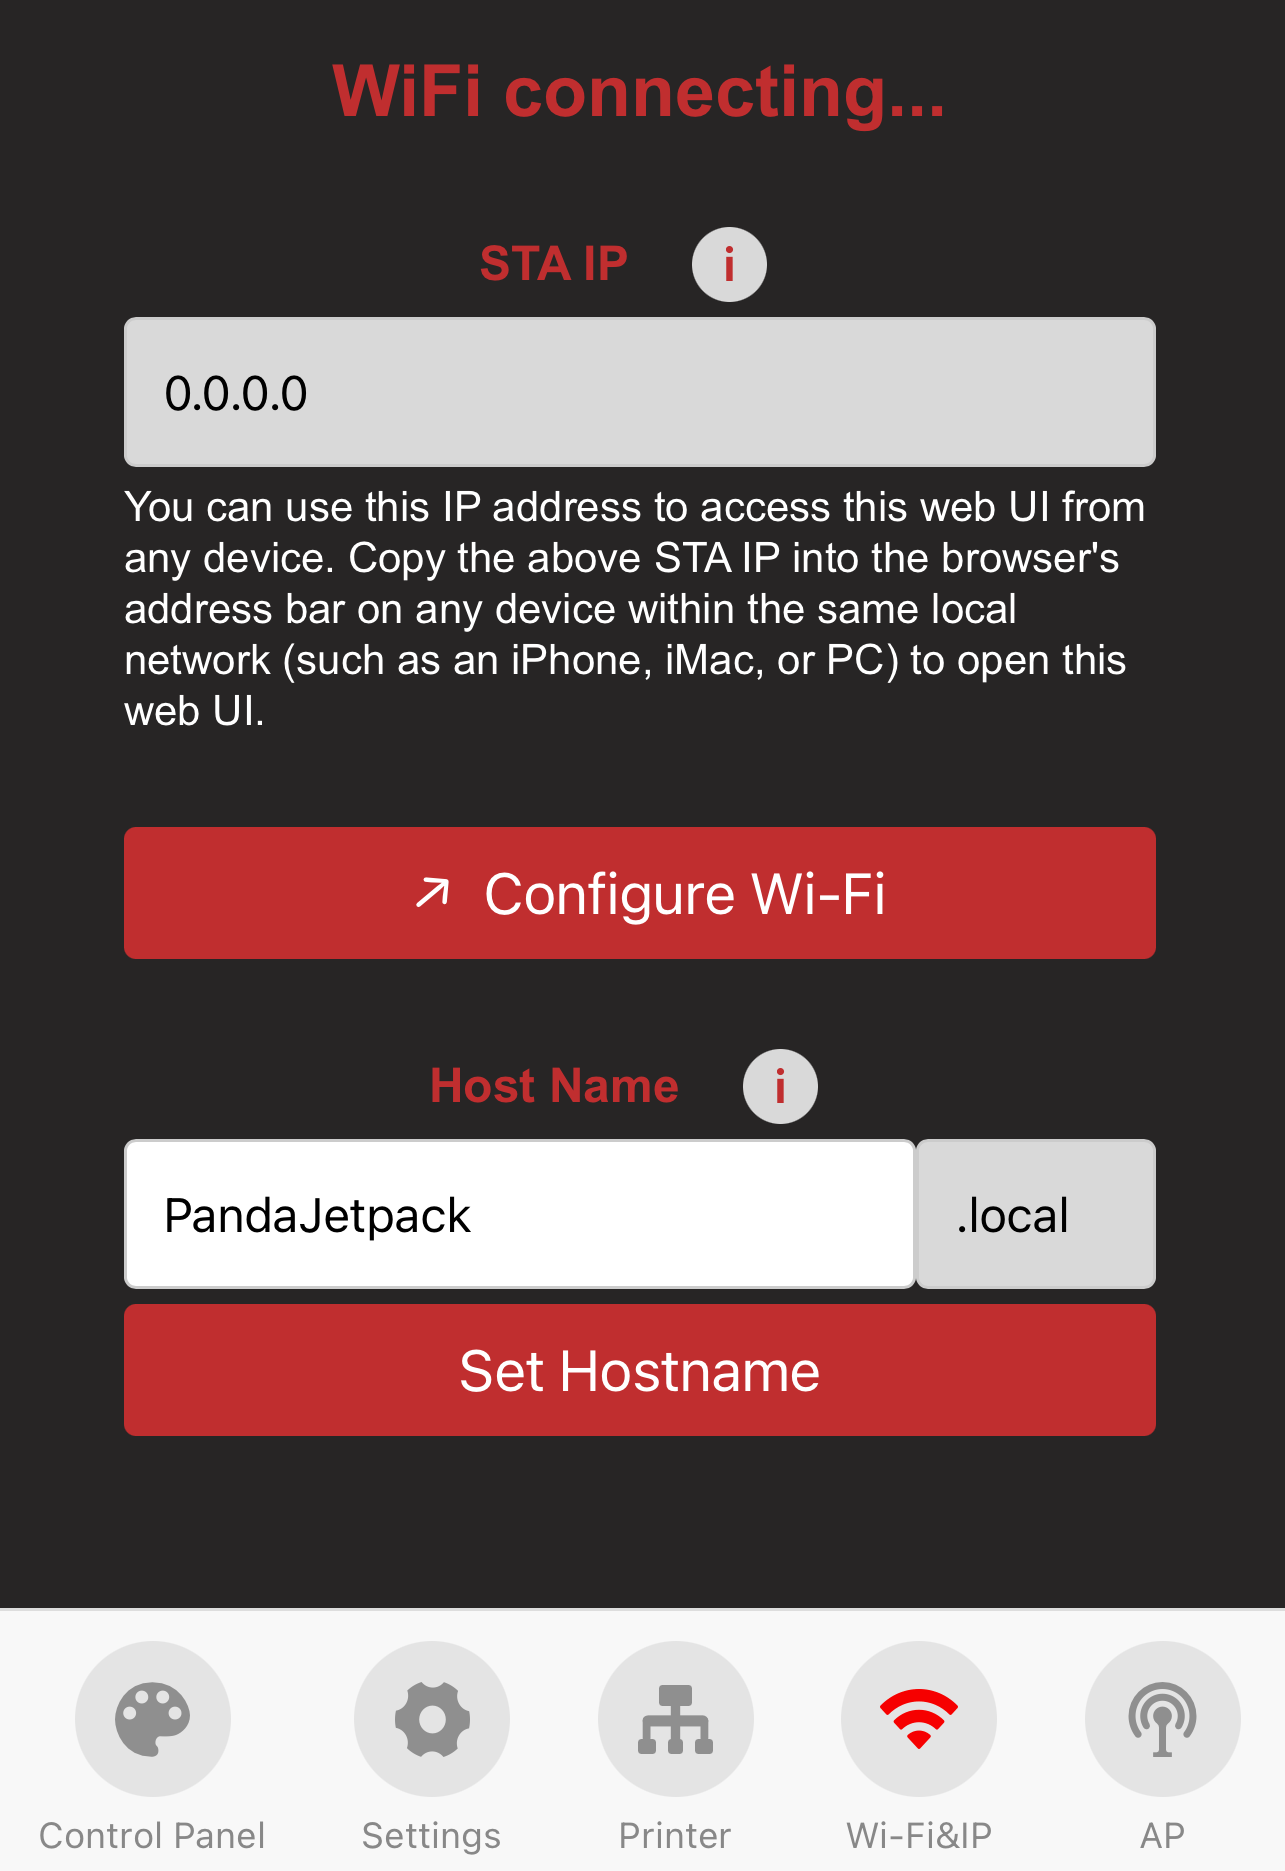
-
Wait a moment, and a WiFi connection status pop-up will appear.
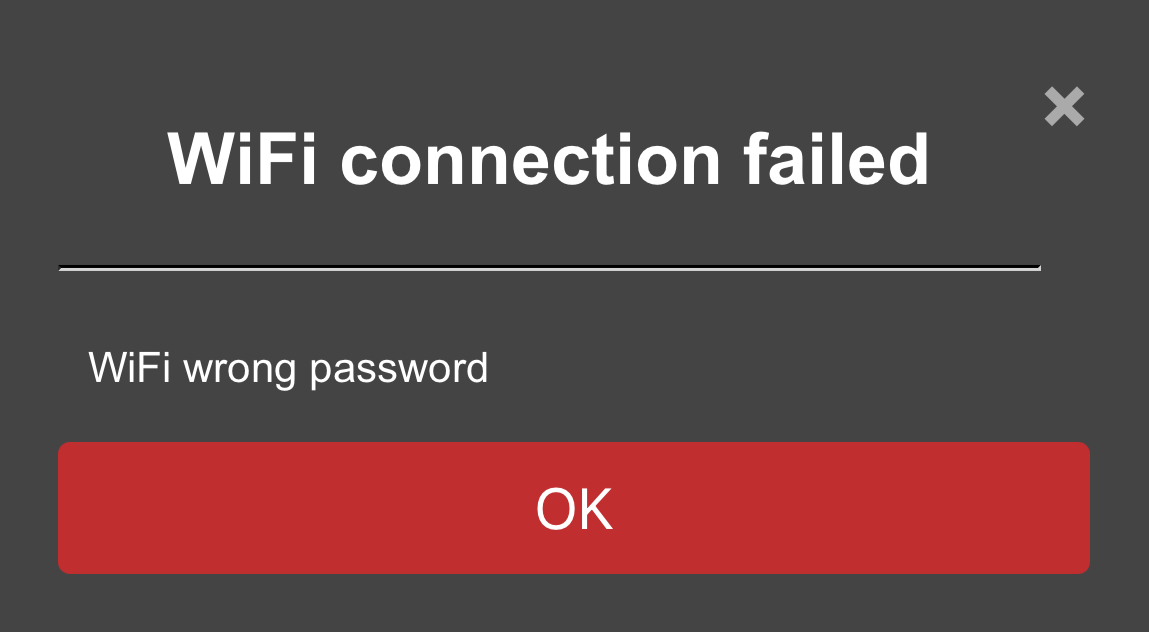
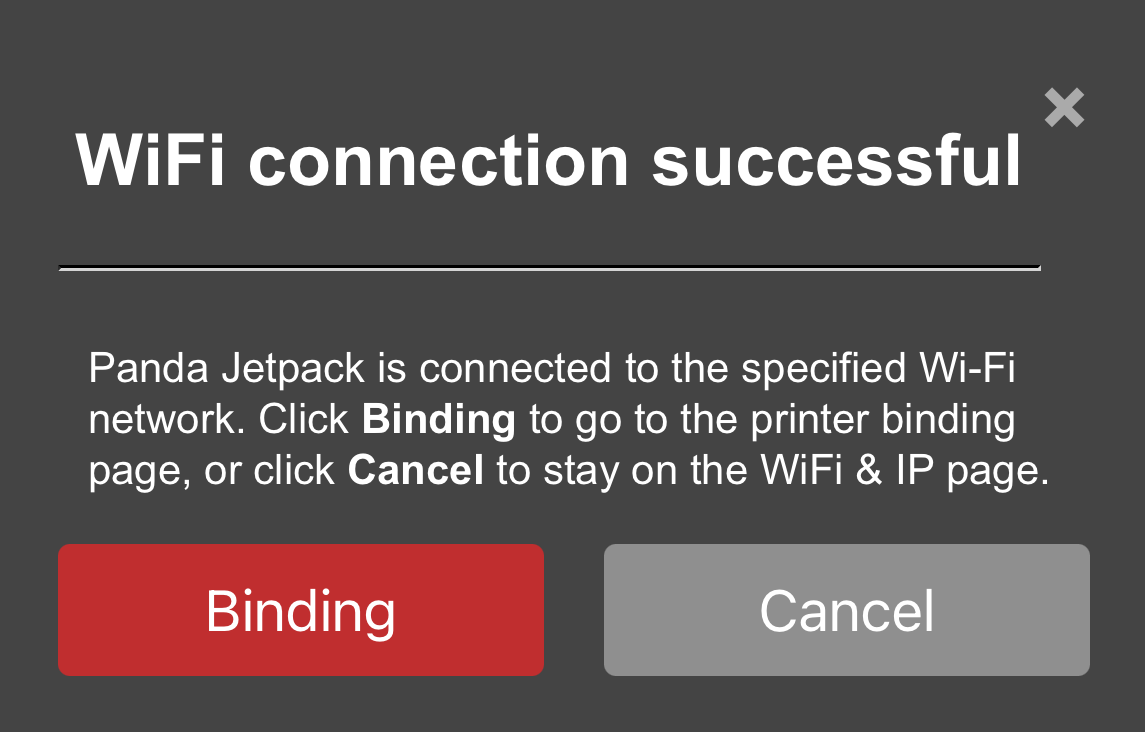
- Connection Failed:
- Connection Successful: You can either bind the printer and proceed to the printer interface or tap
Cancelto stay on the WiFi page.
-
Introduction to Each Page
The WiFi connection is complete. Below are the elements and functions of each page.
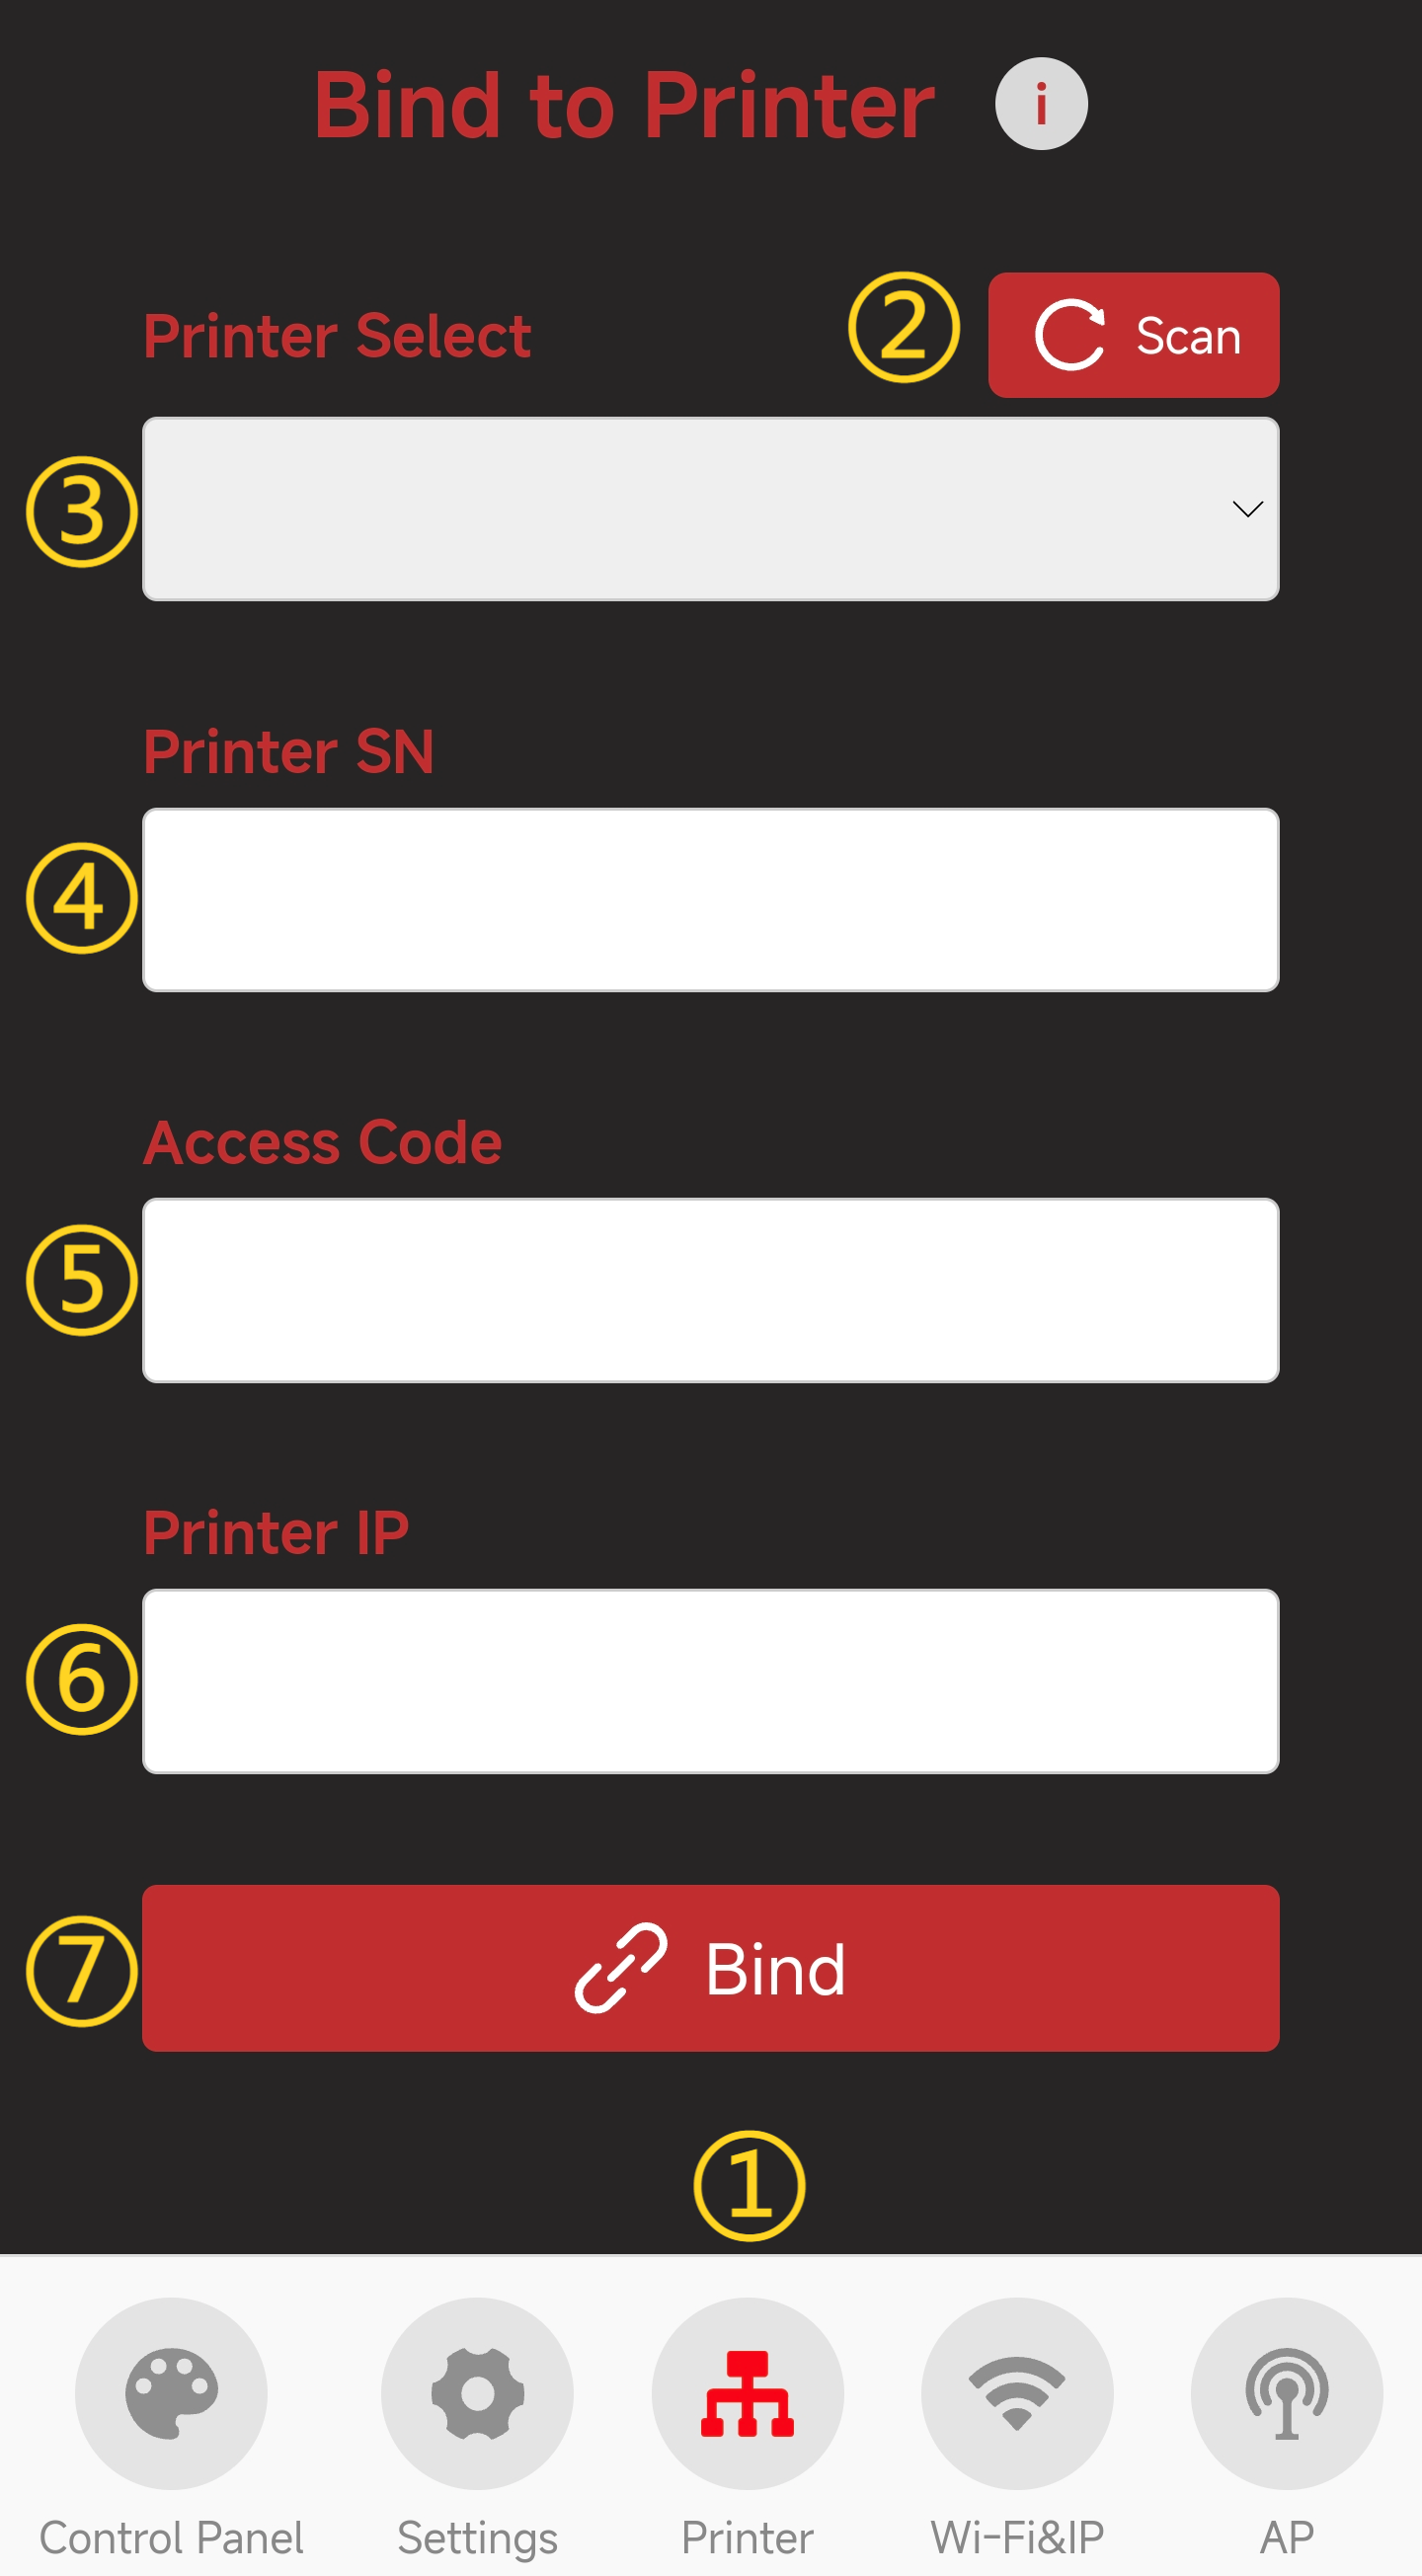
Printer Binding Page
-
① Printer Page Selection: When you tap the icon, it will turn red to indicate that you are on the Printer page.
-
② Scan for Printers on the Same Local Network
-
③ Select the Detected Printer
-
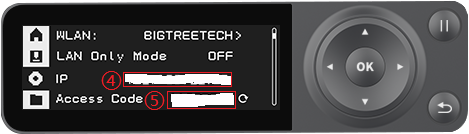
④ Enter Printer's SN Code
-
⑤ Enter Printer's Access Code
-
⑥ Enter Printer's IP Address
-
⑦ Confirm to Bind This Printer
-
How to Bind a Printer (Using P1P as an Example)
-
Tap
Scanbutton. After a short wait, a pop-up will appear confirming that the scan was successful.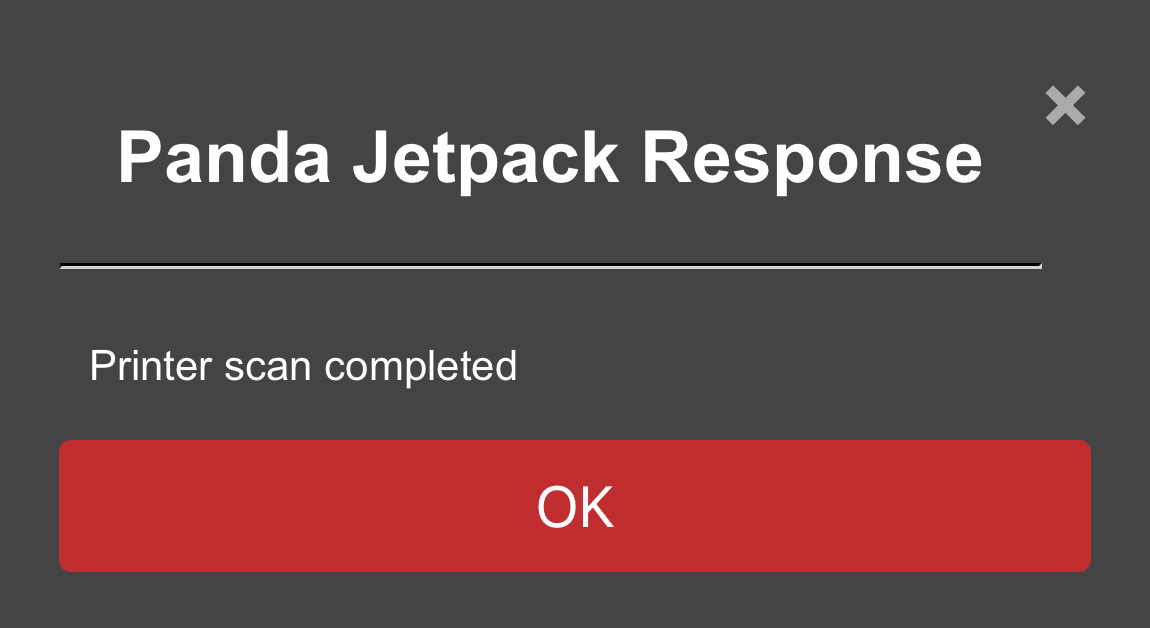
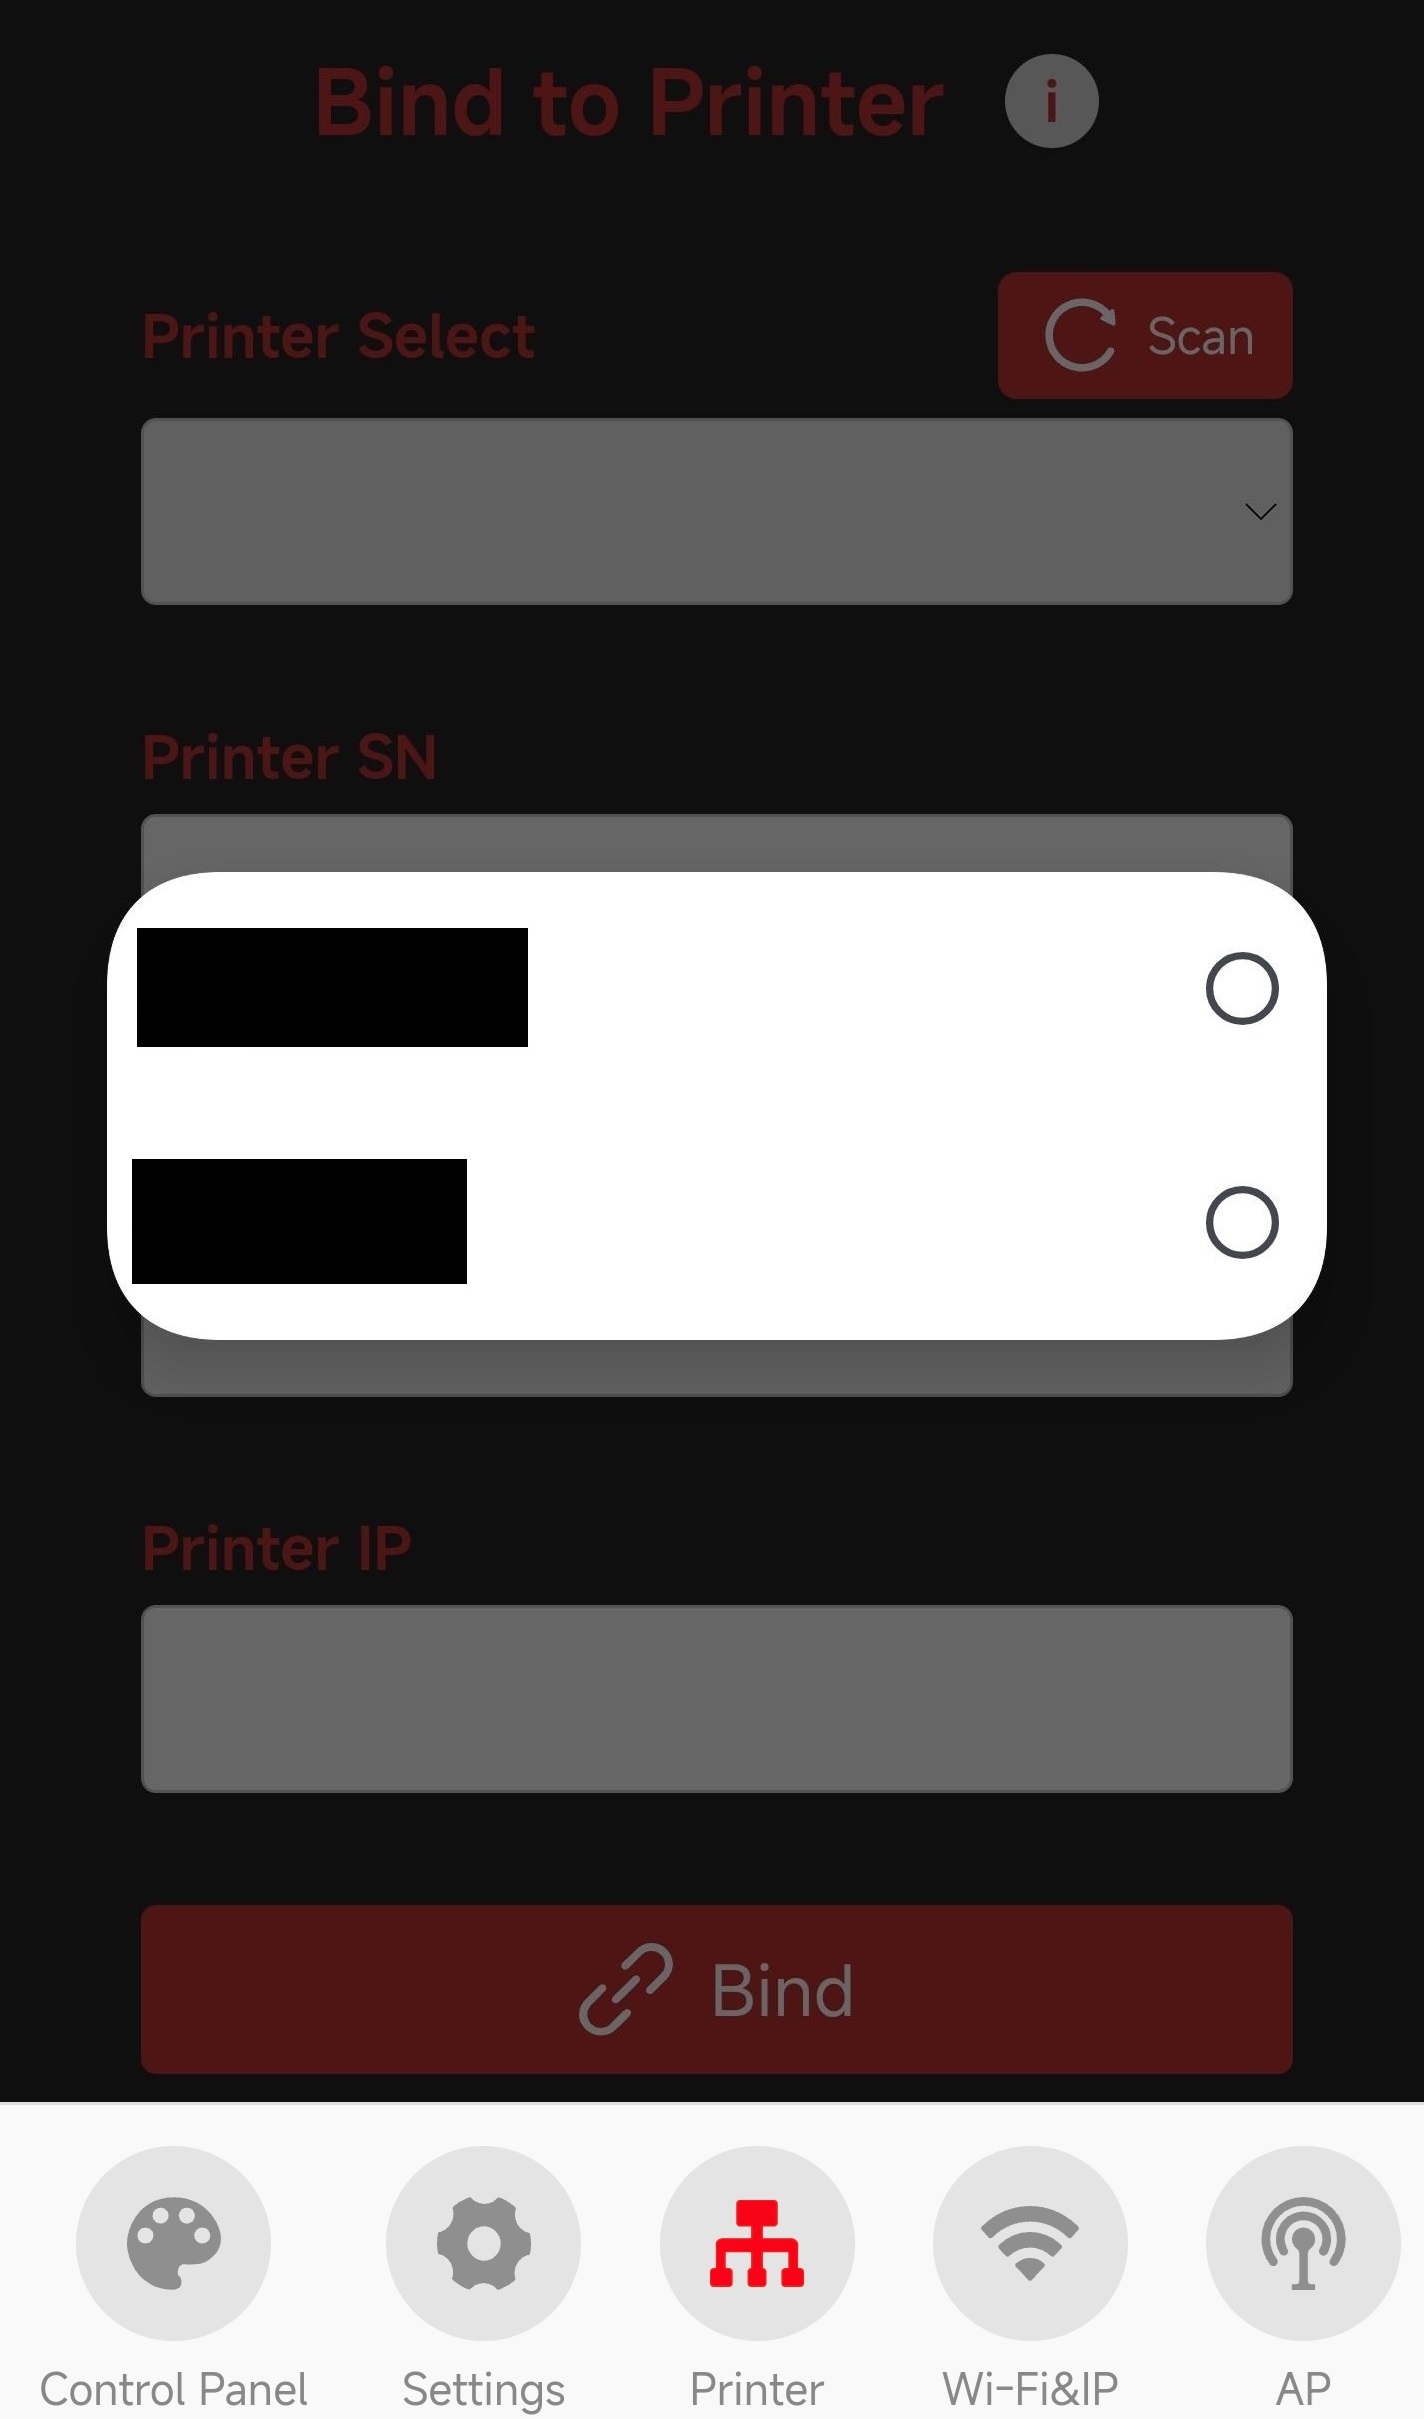
-
Select the printer from the list. The printer's SN code and IP address will automatically fill in.
-
Enter the printer's
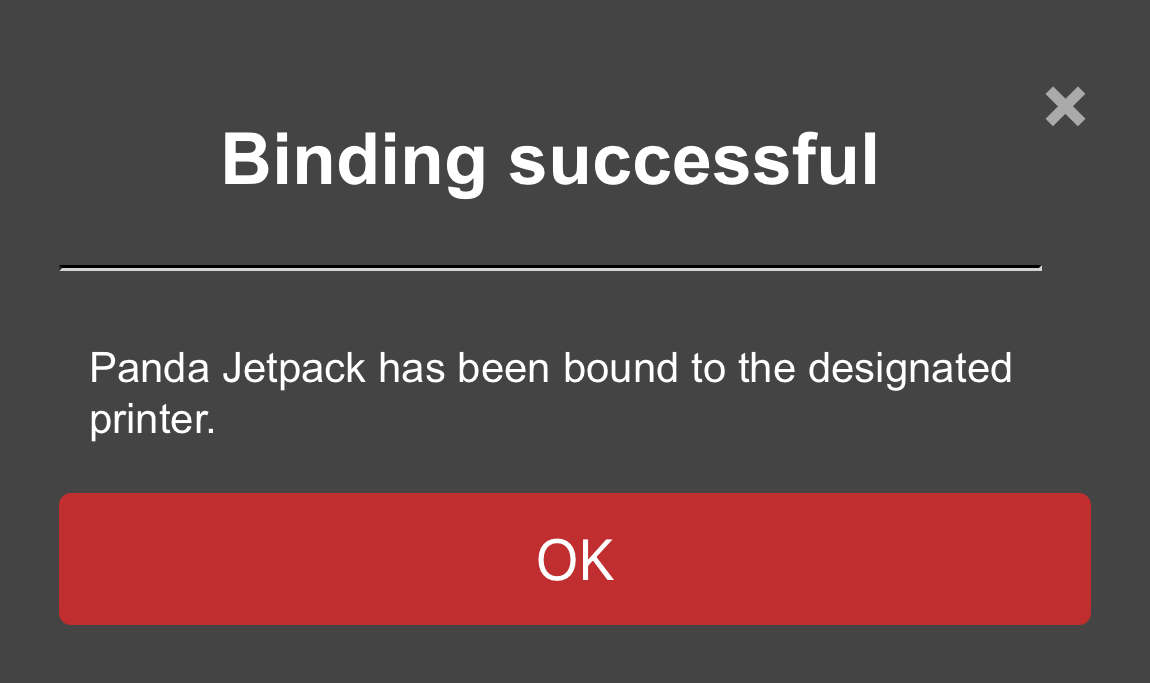
Access Code: Find the access code in the printer's settings, enter it in the box, and tapBindto successfully bind the printer.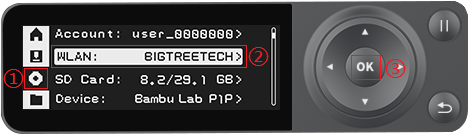

-
WiFi Page

-
① WiFi Page Selection: When you tap the icon, it will turn red to indicate that you are on the WiFi page.
-
② Current WiFi Connection Status
-
③ IP Address Icon: Tap the icon to display a pop-up. If the IP field is blank, ensure Panda_Status shows "Connected." If it says, "Not Connected," check your network settings.
-
④ IP Address Display: Entering this IP in your browser will take you to the Web page, as long as you're on the same local network.
-
⑤ WiFi Network Configuration Button: Tap to go to the WiFi connection page
-
⑥ Host Name: The default hostname is "PandaJetpack." If you forget the IP, you can use the hostname followed by "local" in the browser (e.g., http://PandaJetpack.local). To modify the hostname, tap the text box to edit it, then tap "Set Hostname" to confirm.
-
⑦ Confirm Hostname Modification
AP Page

-
① AP Page Selection: When you tap the icon, it will turn red to indicate that you are on the AP page.
-
② AP Hotspot Switch
-
③ AP Name: Default is
Panda_Jetpack_XXXXXXXXXX -
④ AP Password: Default is
987654321 -
⑤ Hotspot IP: Default Hotspot IP is "192.168.254.1." If your router's IP range is "192.168.254.xxx," an IP conflict will prevent the device from binding to the printer. Change the Panda_Jetpack hotspot IP to a different range.
-
⑥ Confirm Button: Tapping this button will restart the device. After the restart, you can connect to the AP hotspot.(How to connect to the AP hotspot)
Settings Page
-
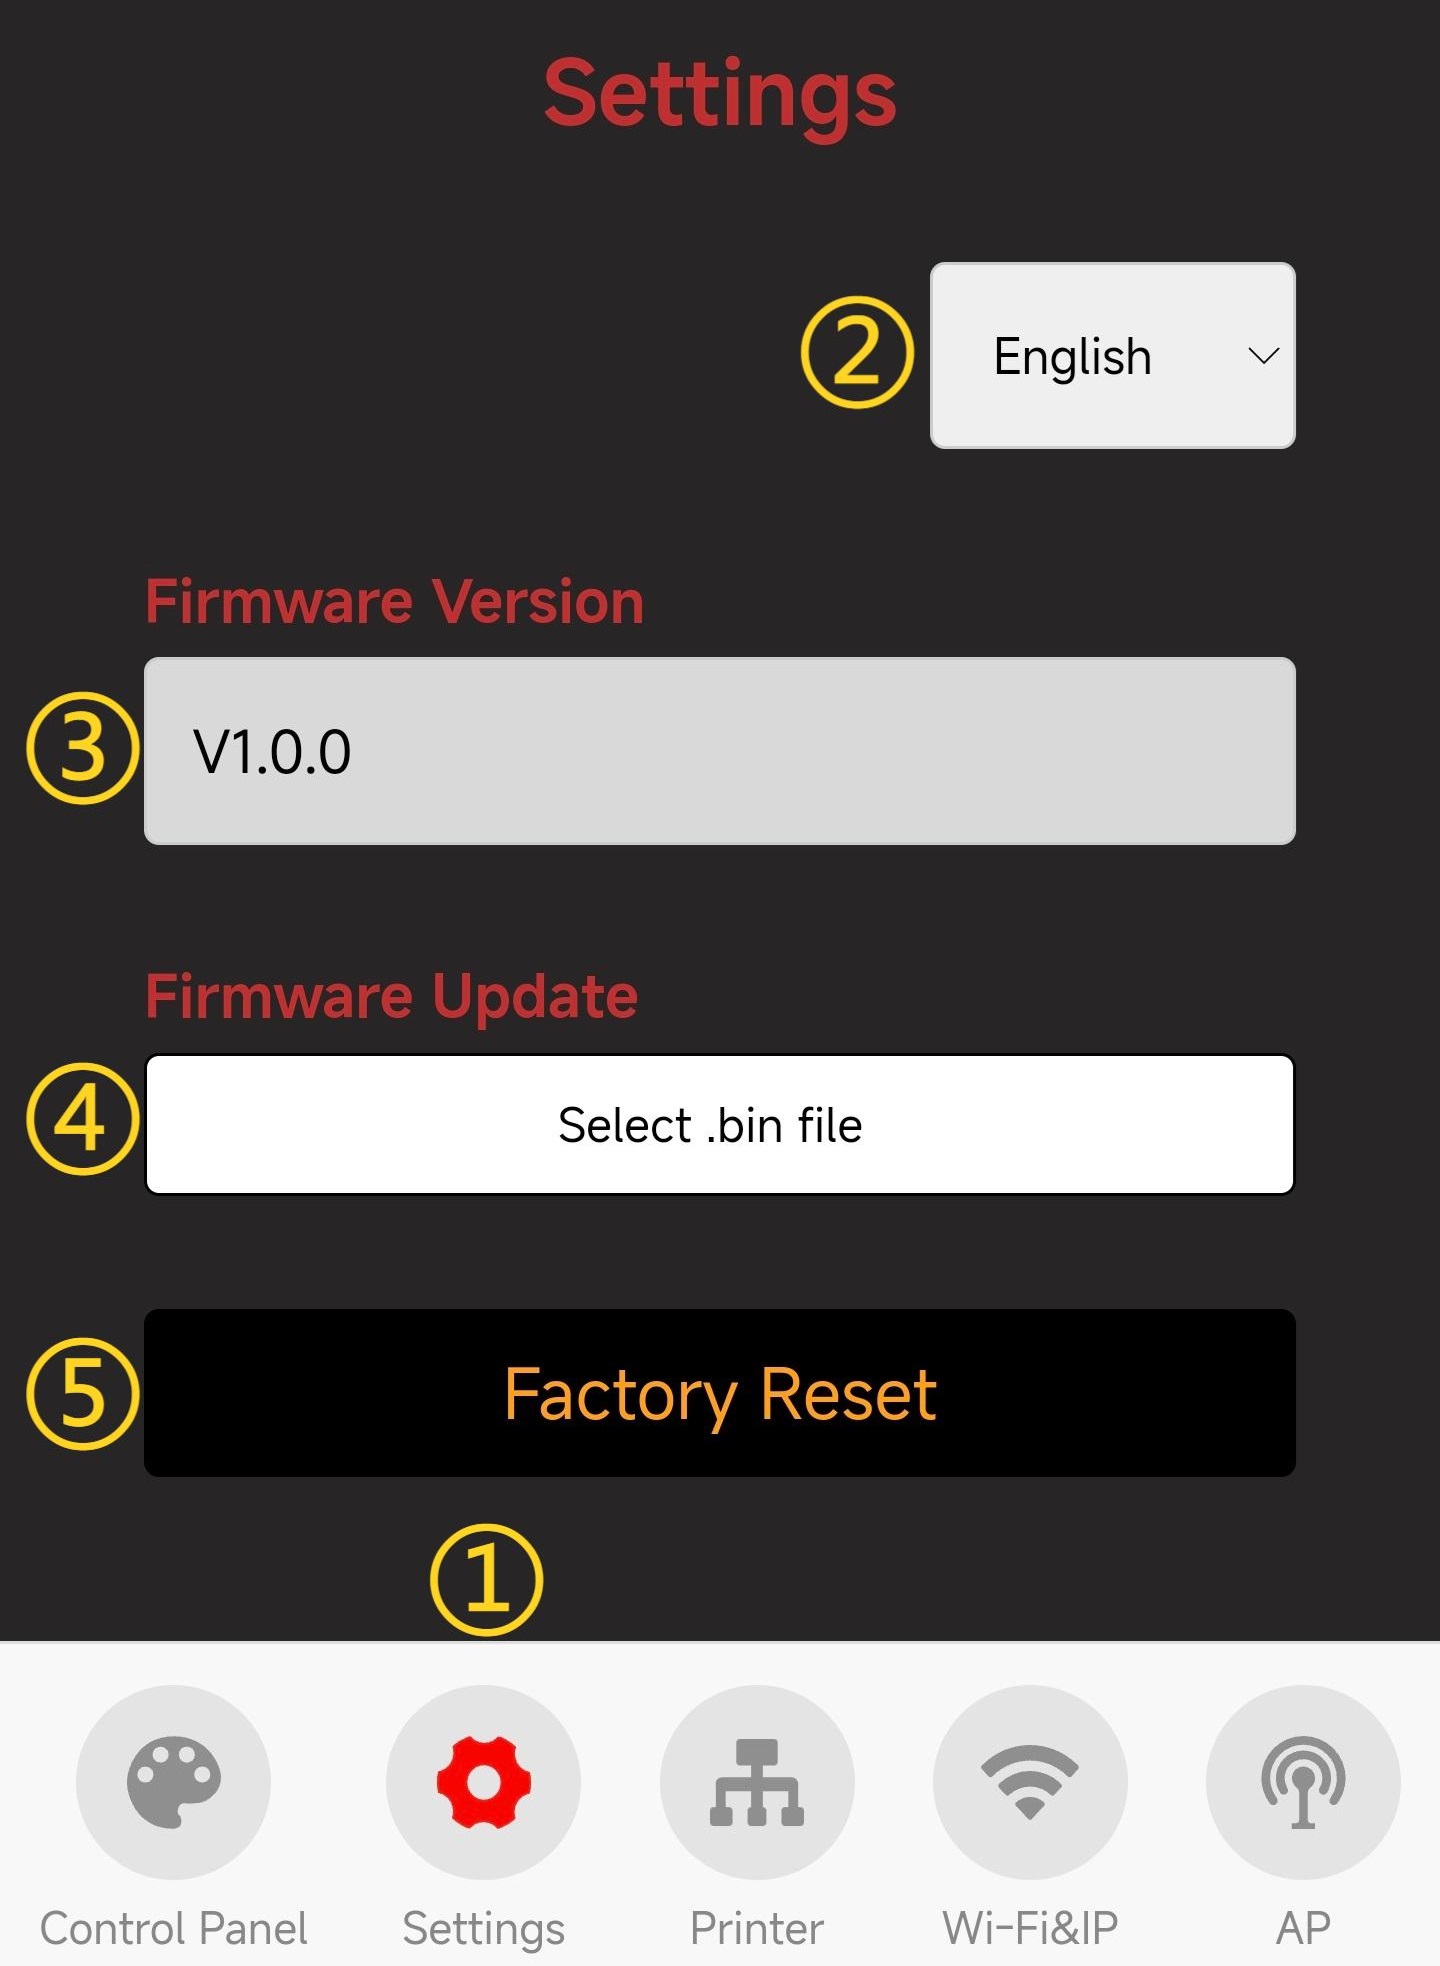
① Settings Page Selection: When you tap the icon, it will turn red to indicate that you are on the Settings page.
-
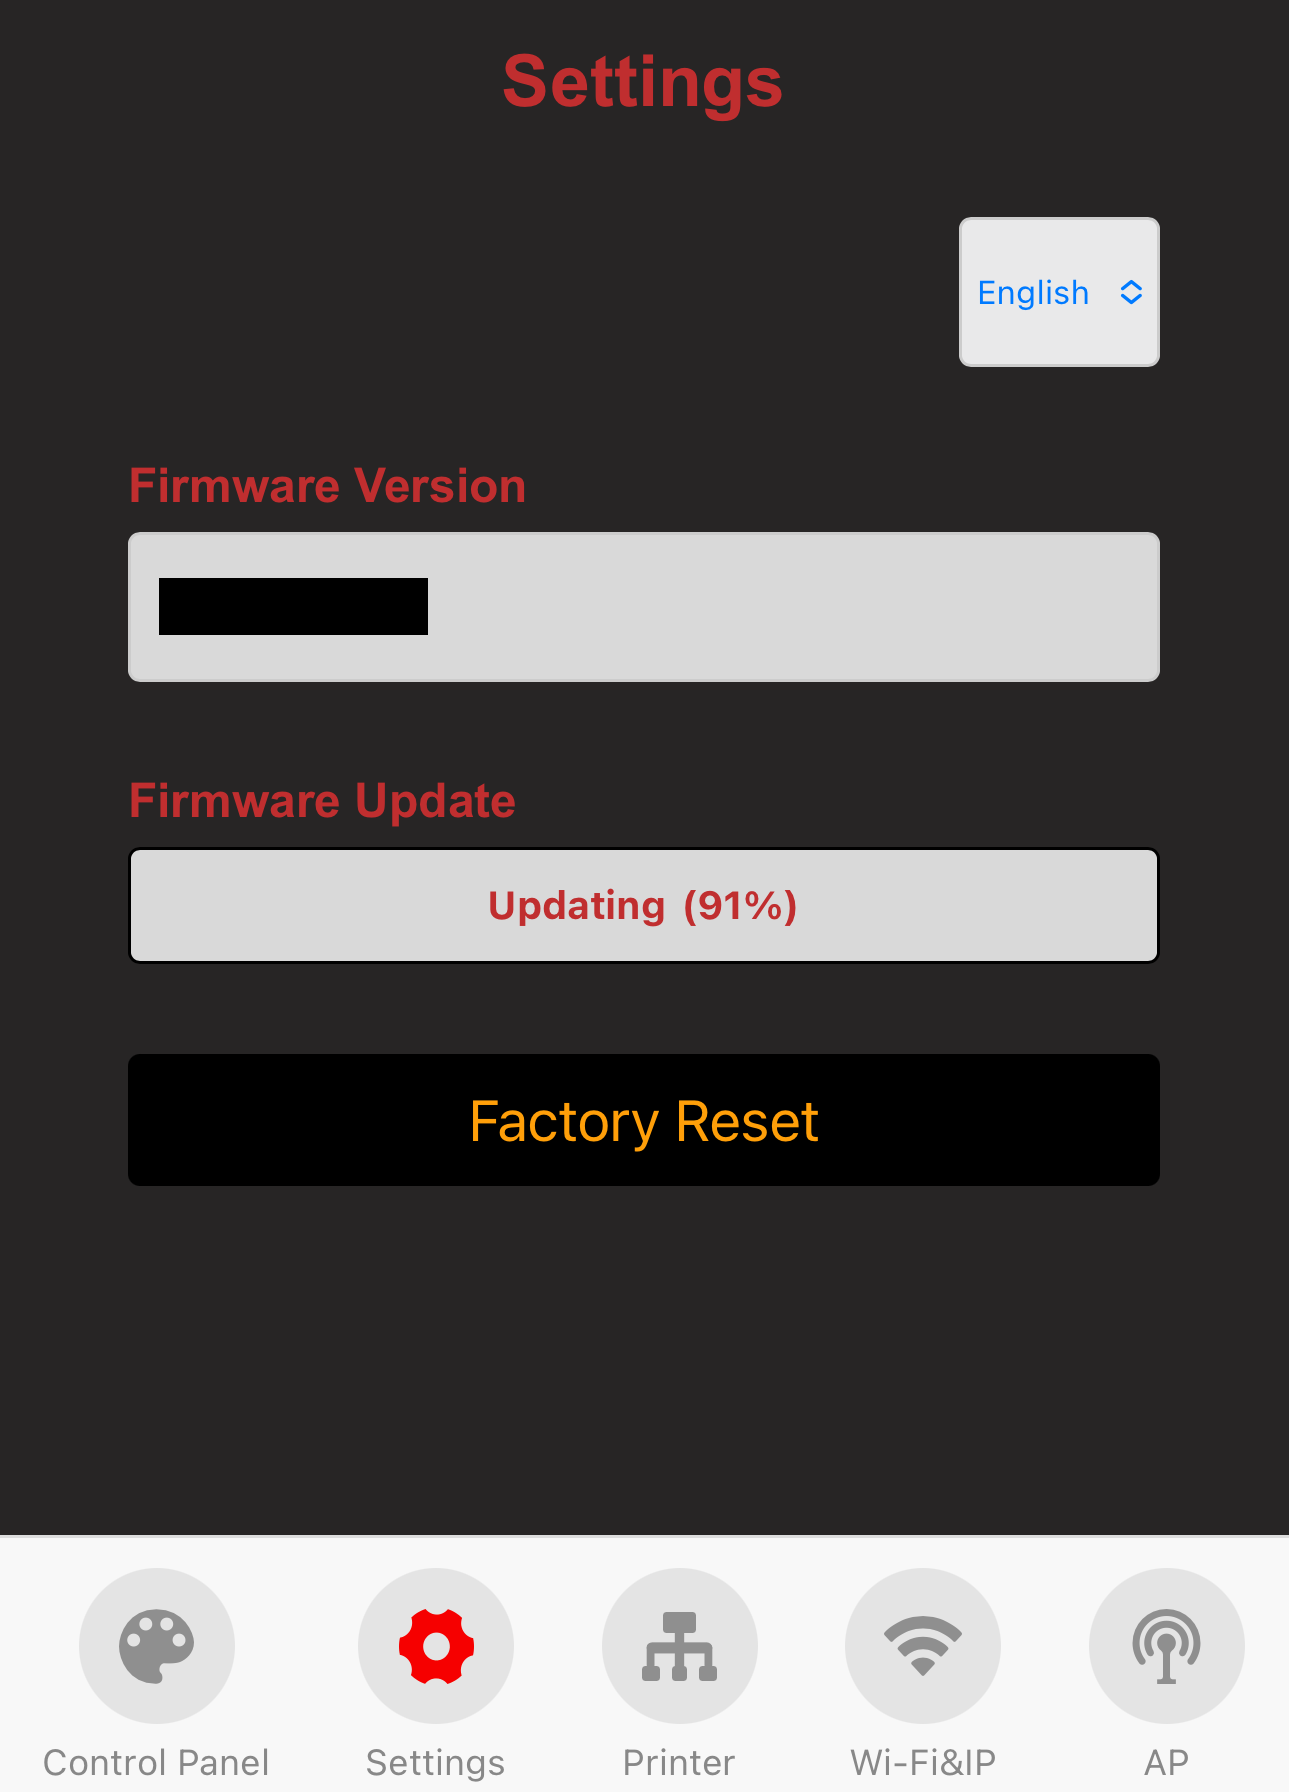
② Choose Language (Default: English)
-
③ Show Current Firmware Version
-
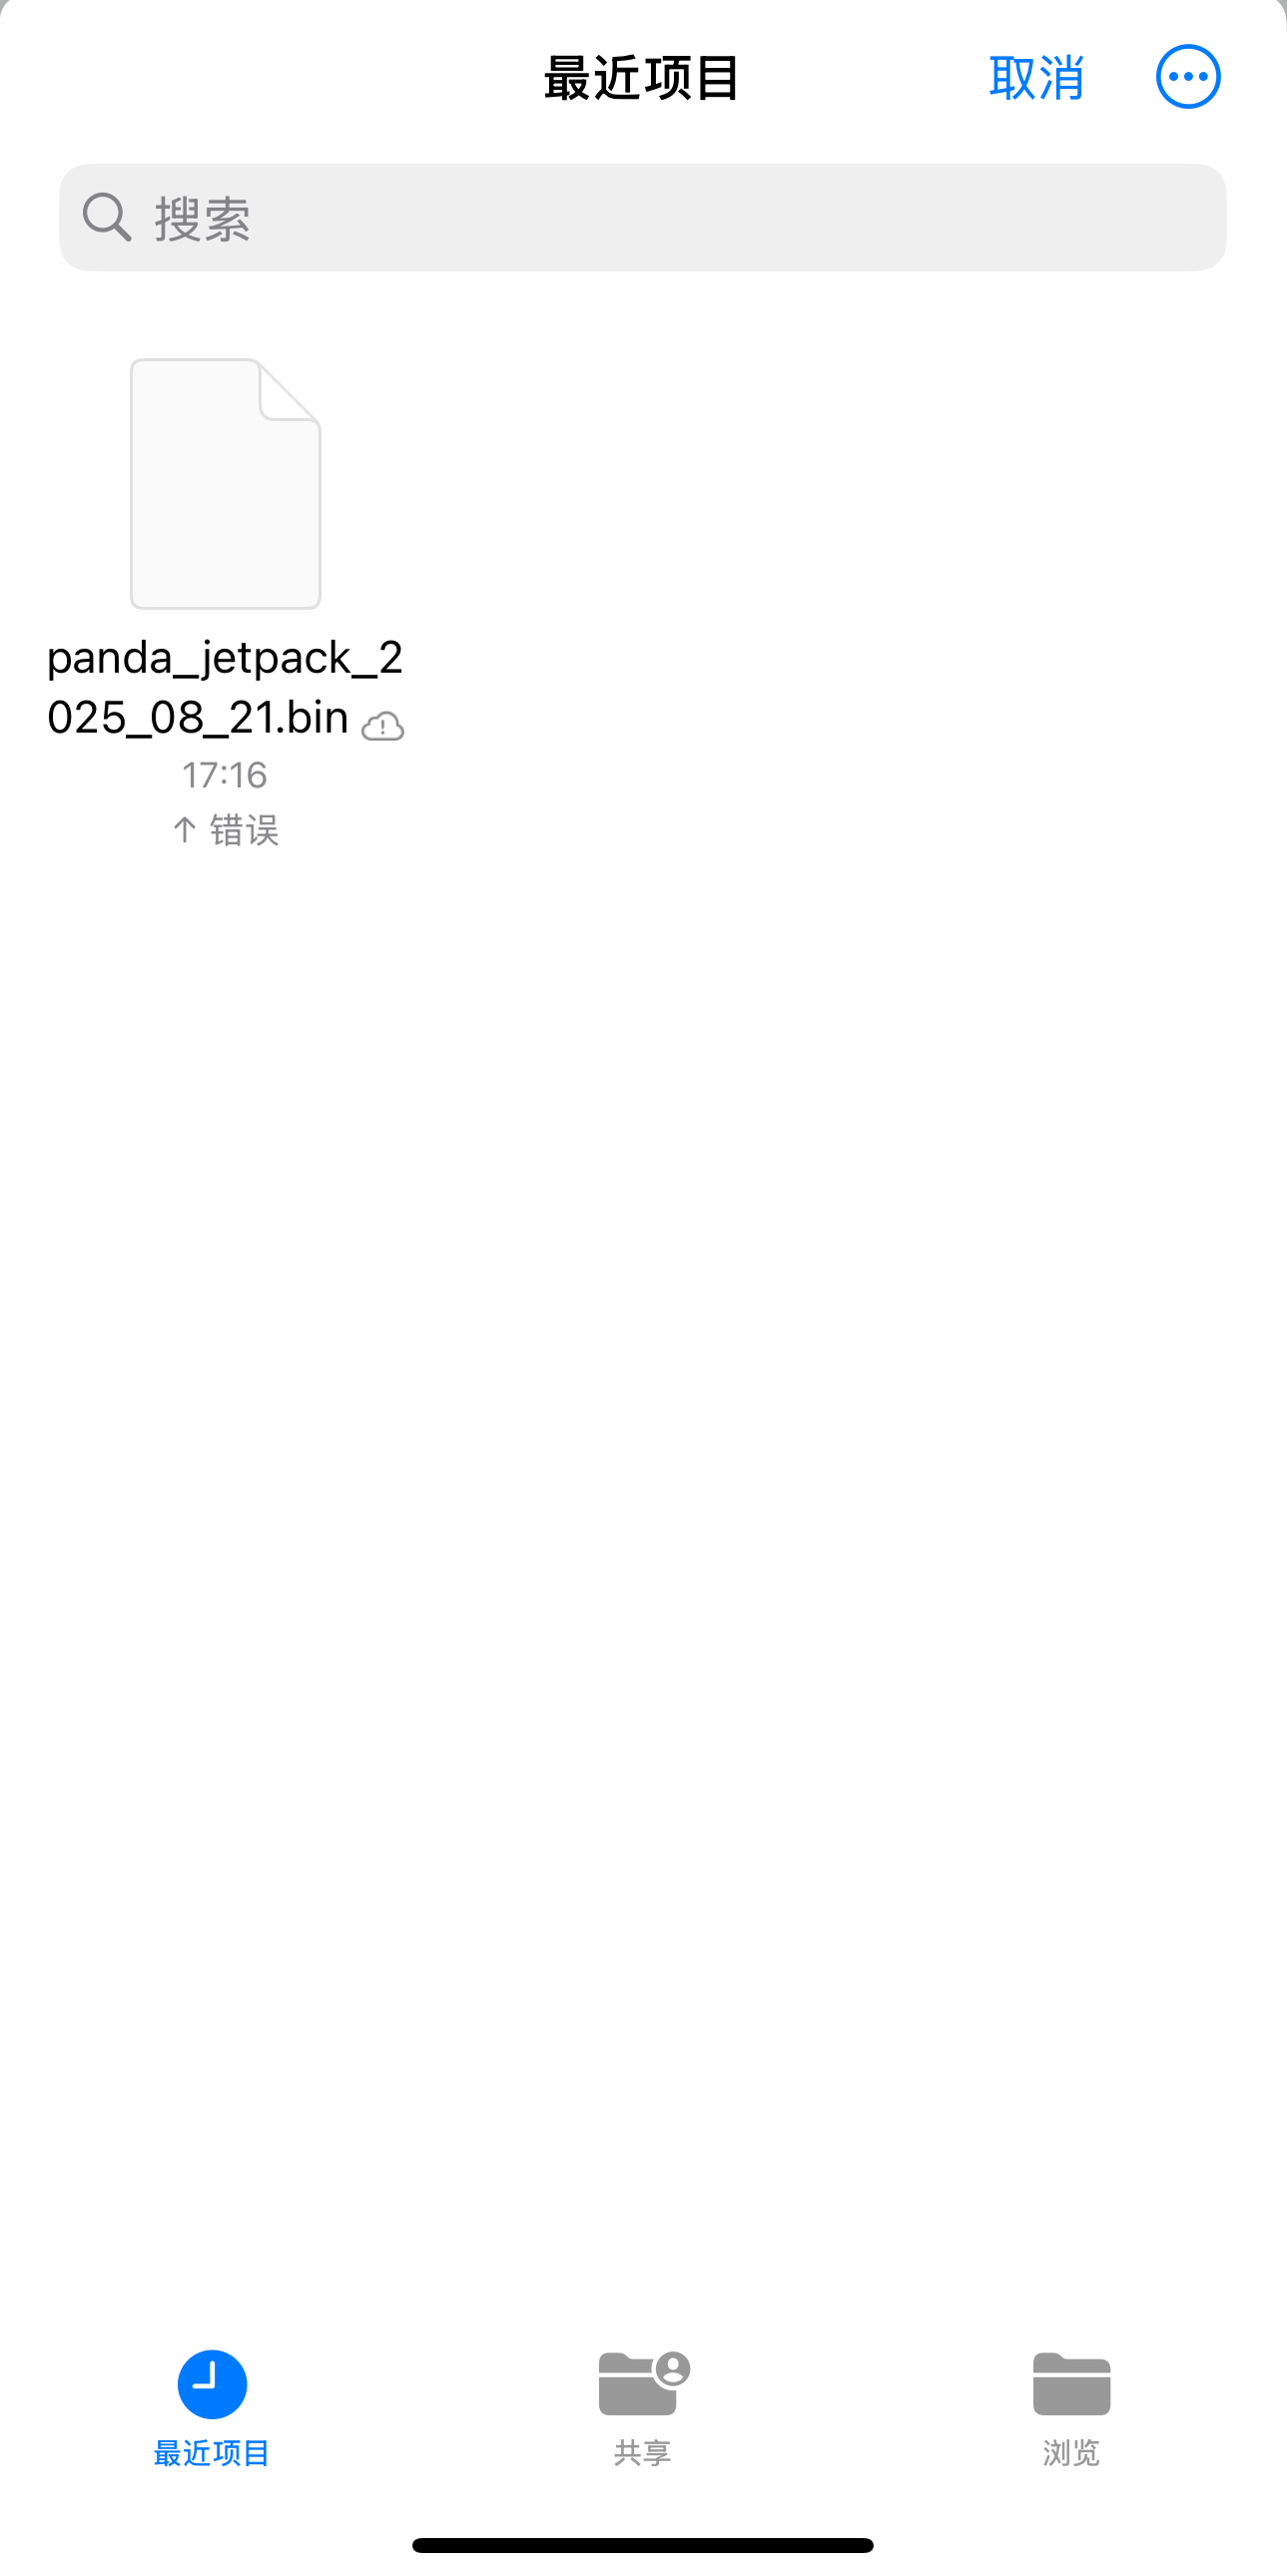
④ Firmware OTA Update: Select a
.binfile for the update.-
Tap the 'Select .bin File' button to choose the bin file that requires OTA.
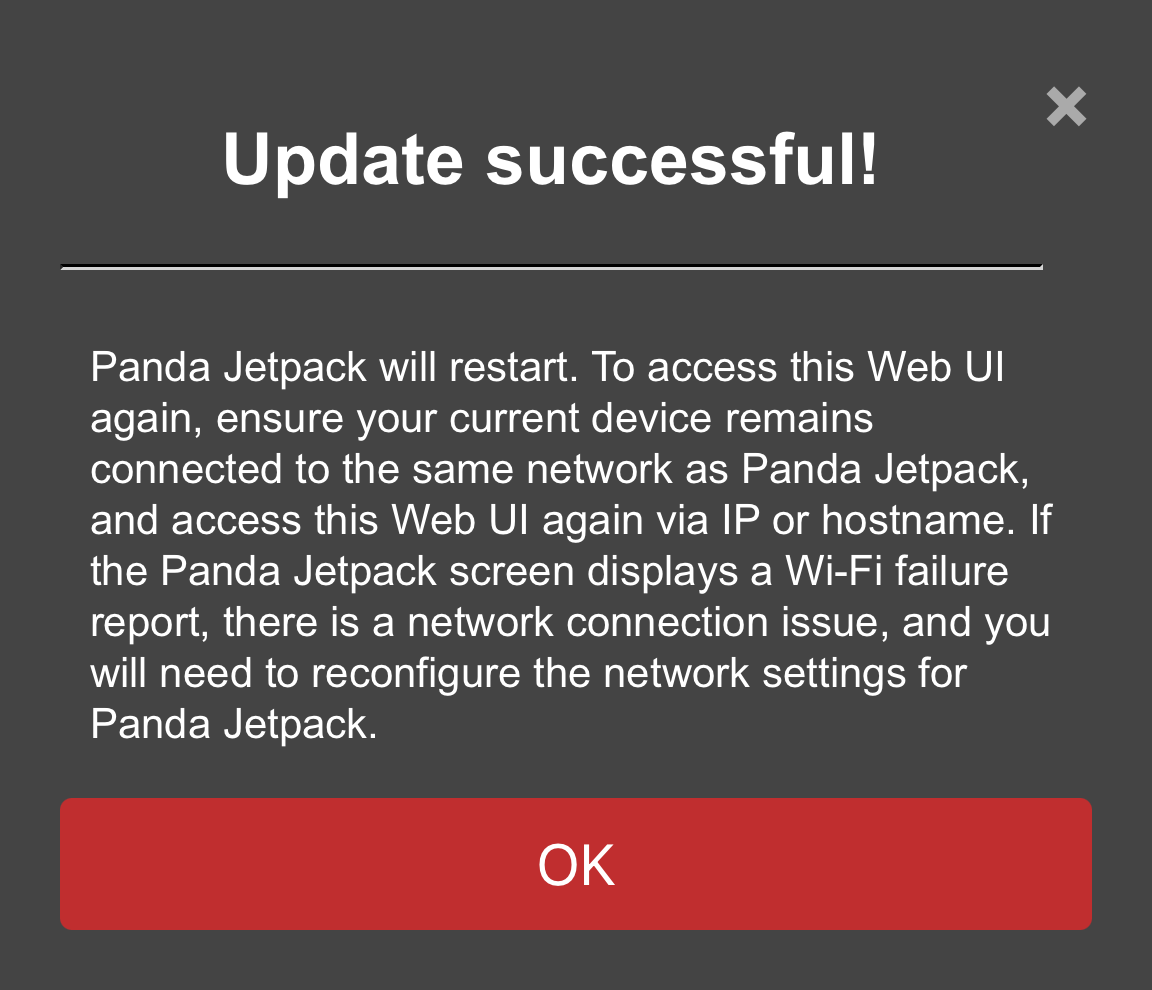
-
Wait for the progress to complete. The device will automatically restart once the update is finished.
-
-
⑤ Tap to Confirm Restore Factory Settings
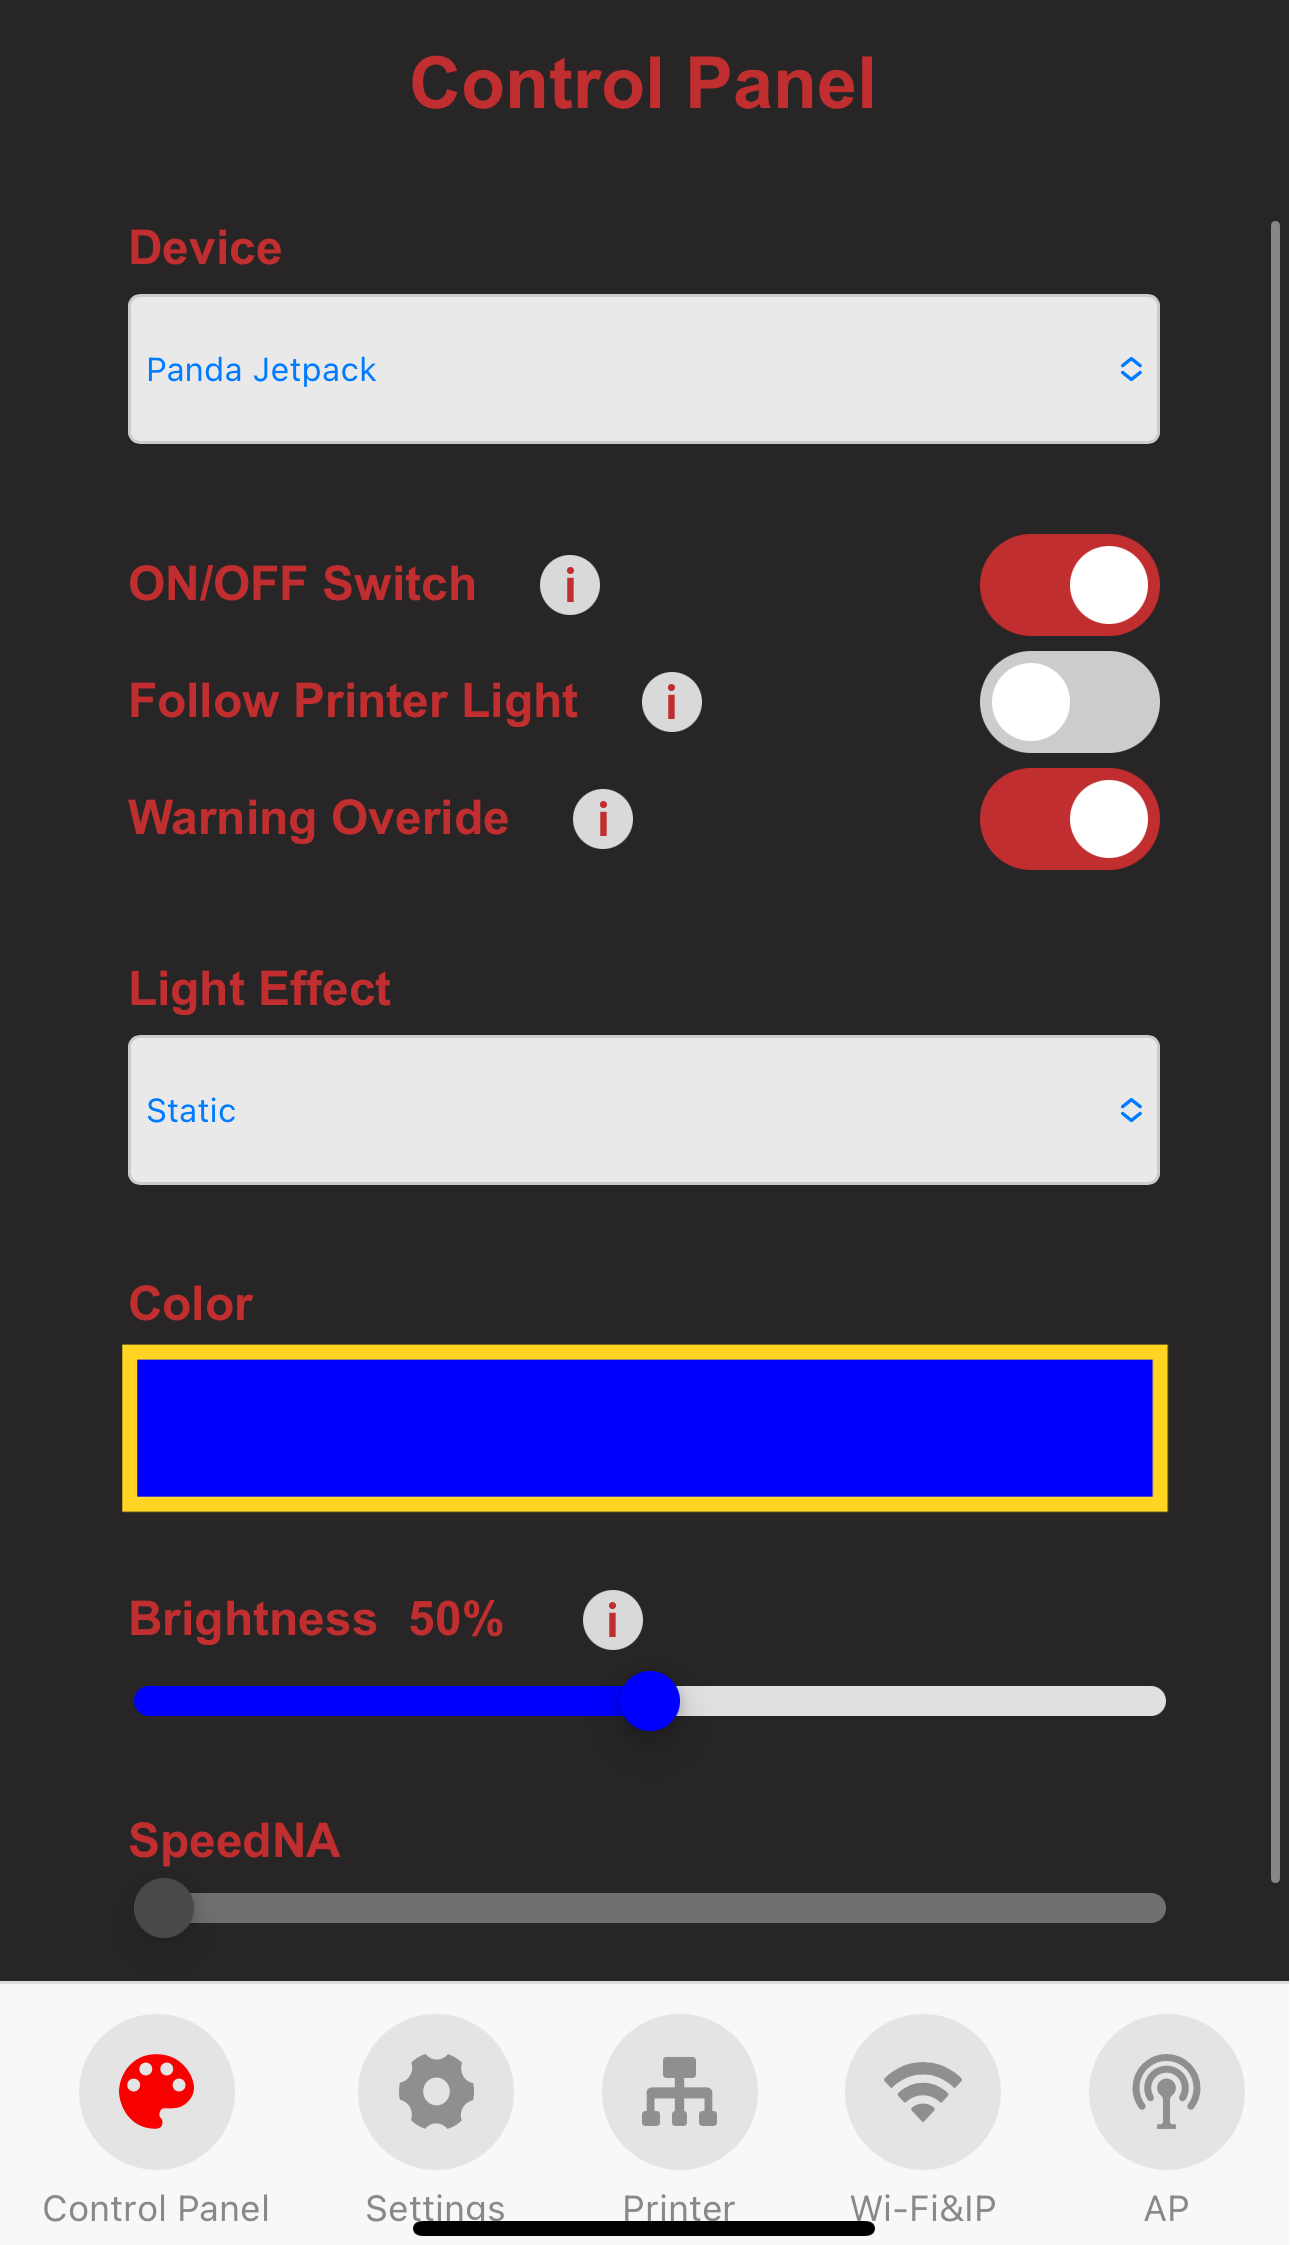
Control Page
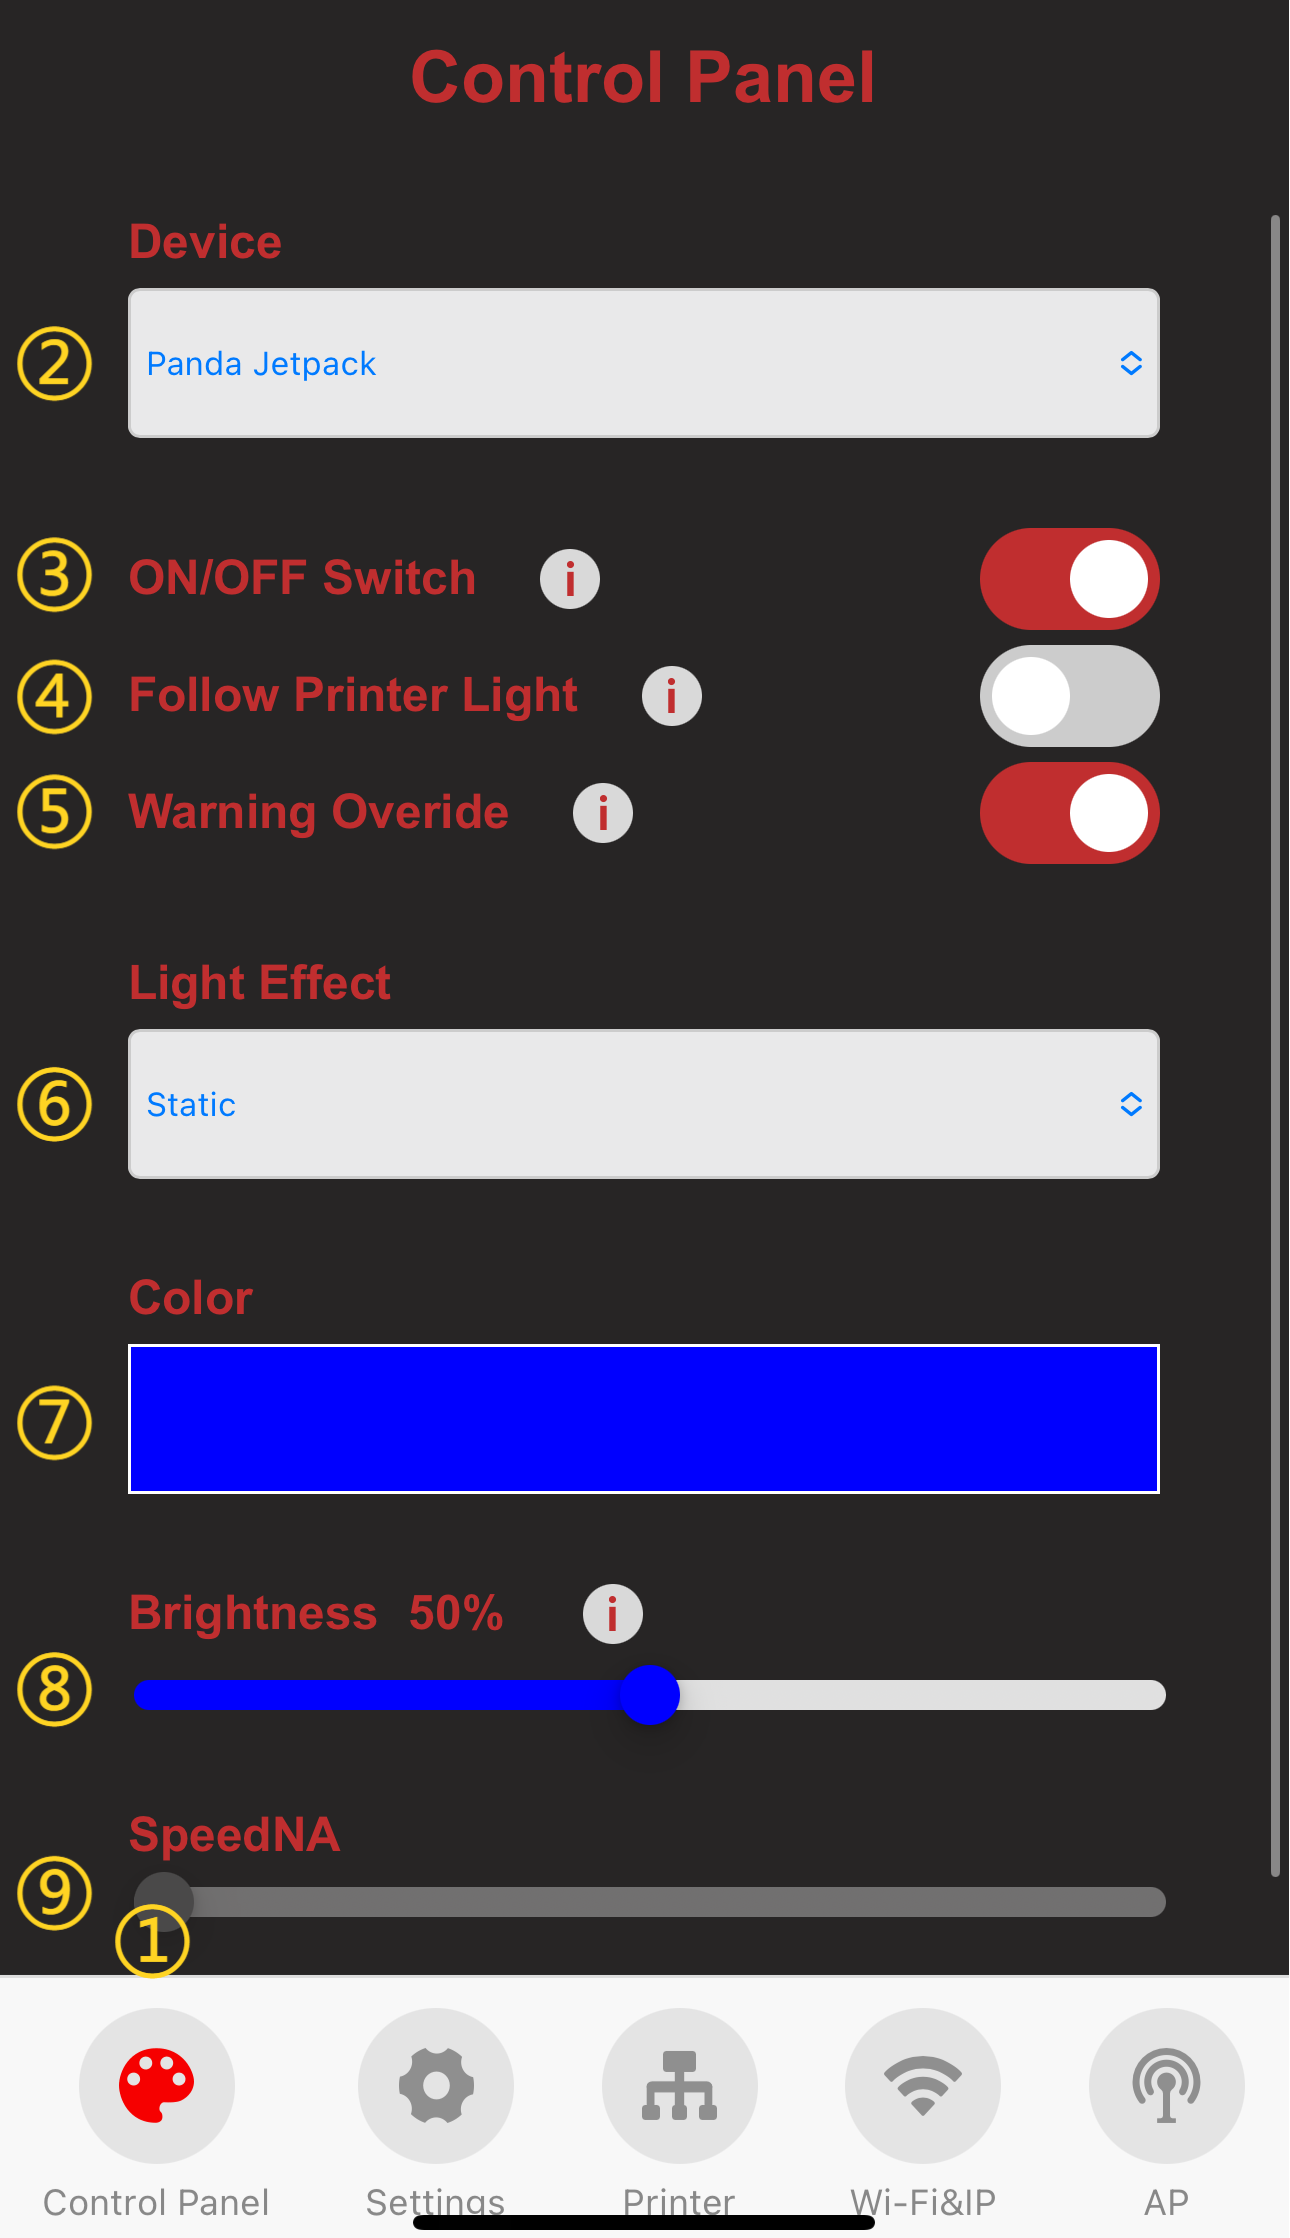
-
① Control Page Selection: When you tap the icon, it will turn red to indicate that you are on the Control page.
-
② Current Device Name
-
③ Turn on and off the RGB Light effects.
-
④ Automatically turns RGB effect ON and OFF following the printers stock light.
-
⑤ Override Red flashing warning light when printer is in error state.
-
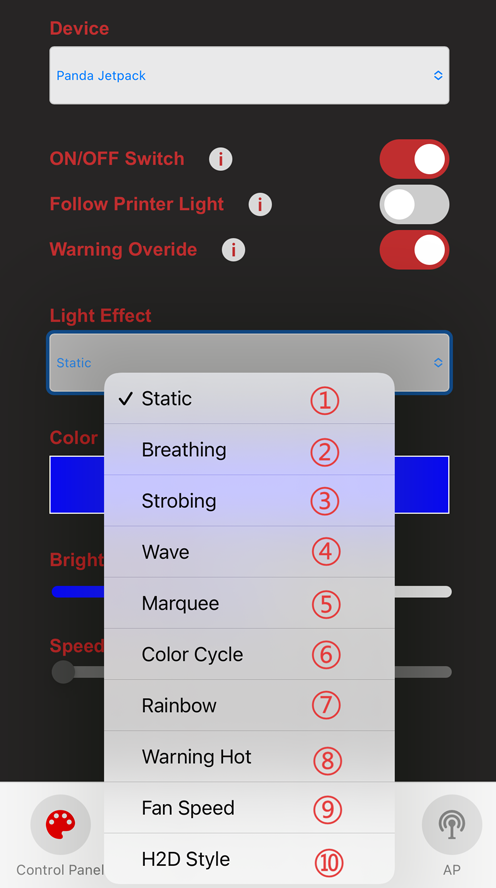
⑥ Select the lighting effect and the current effect.
-
⑦ Light color setting.
-
⑧ Brightness.
-
⑨ Speed.
-
Light Effect
-
①-⑦ After selection, the corresponding lighting effect will be displayed immediately.
-
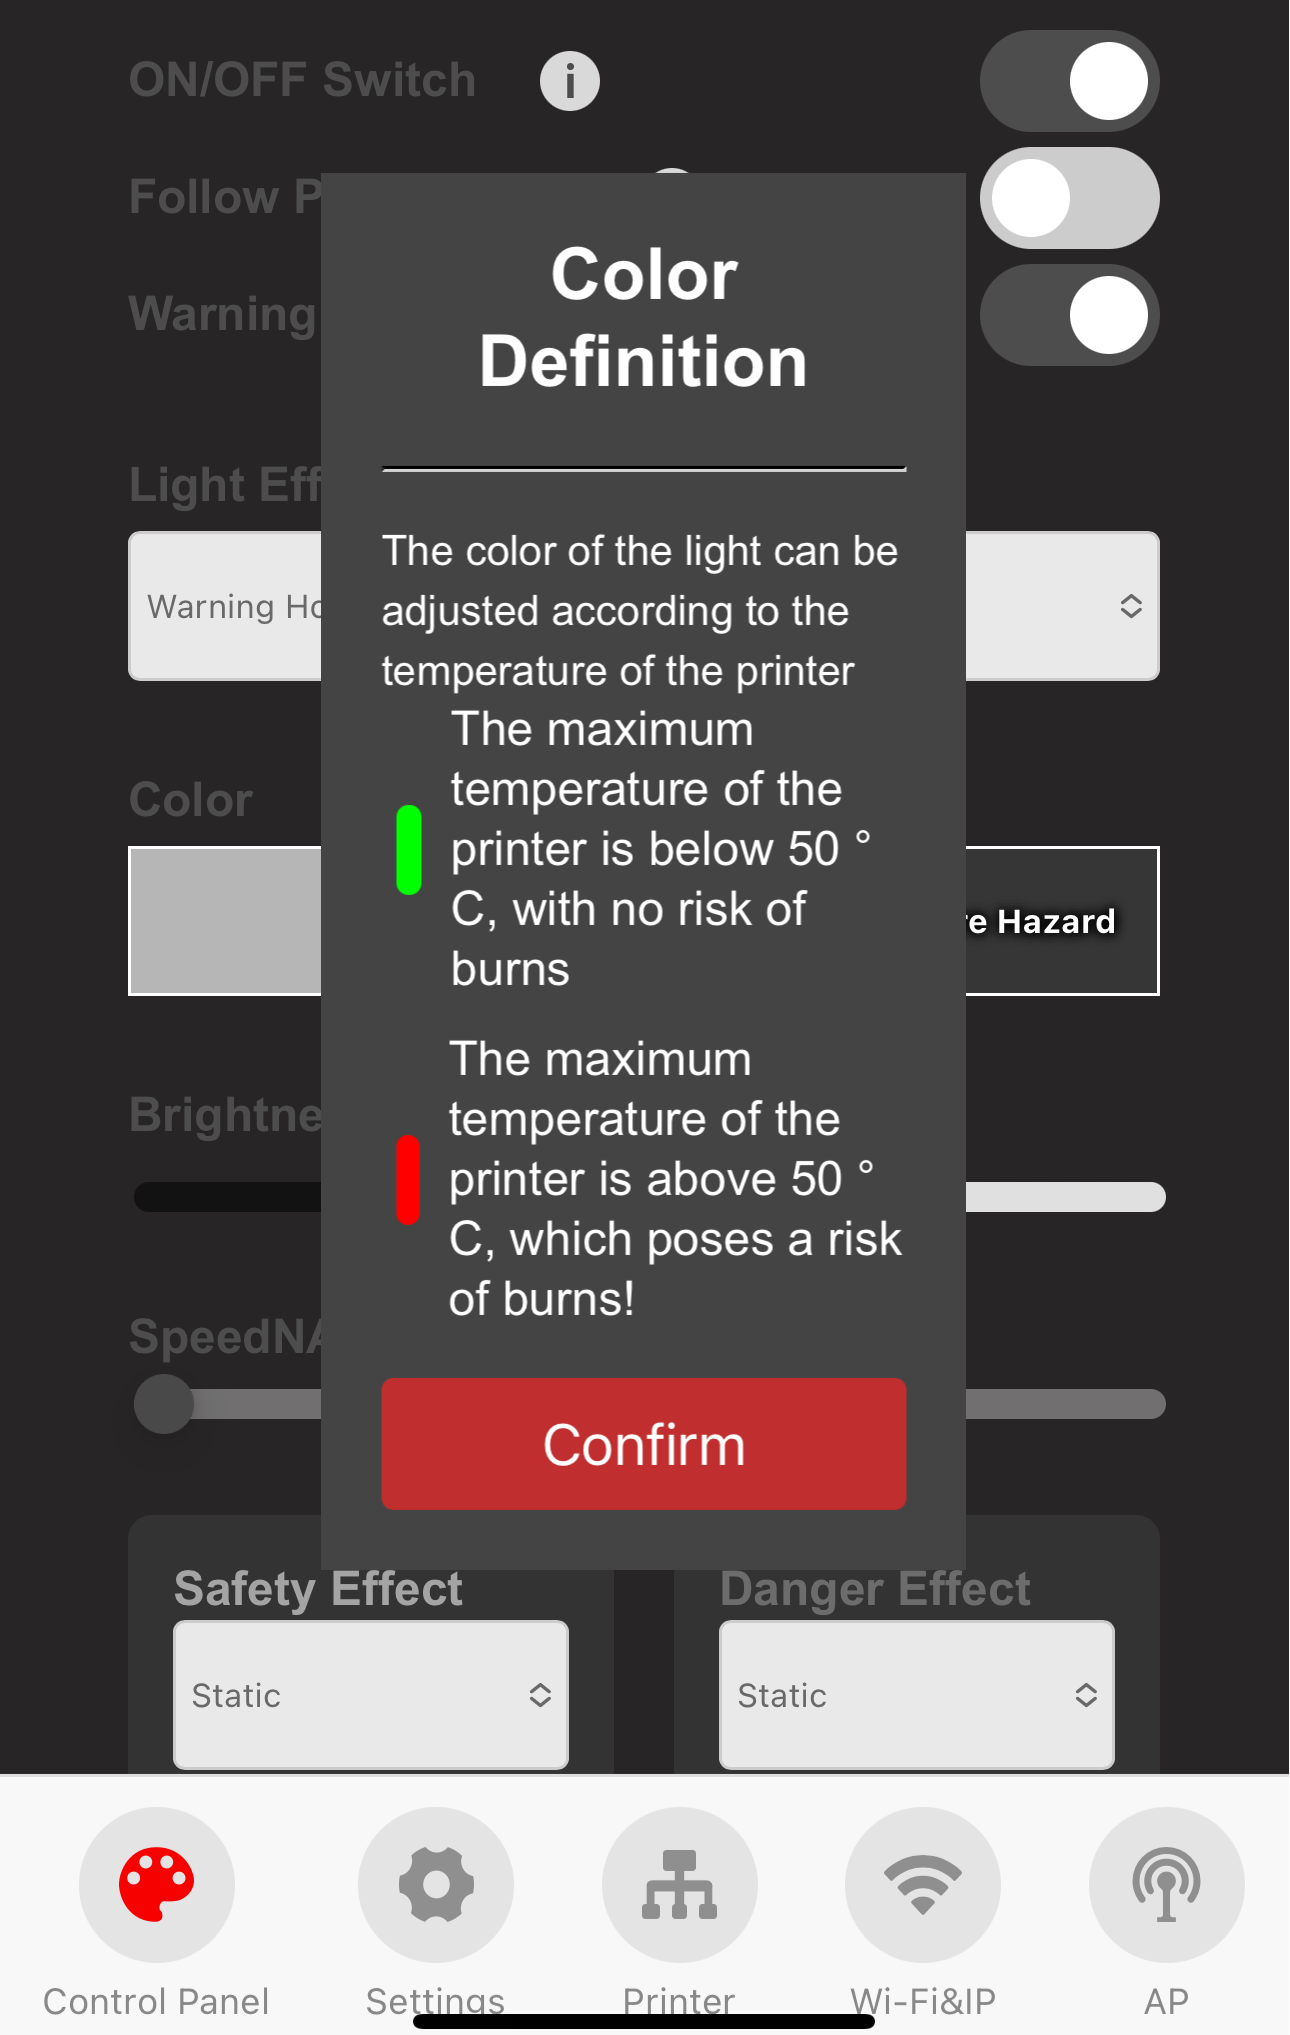
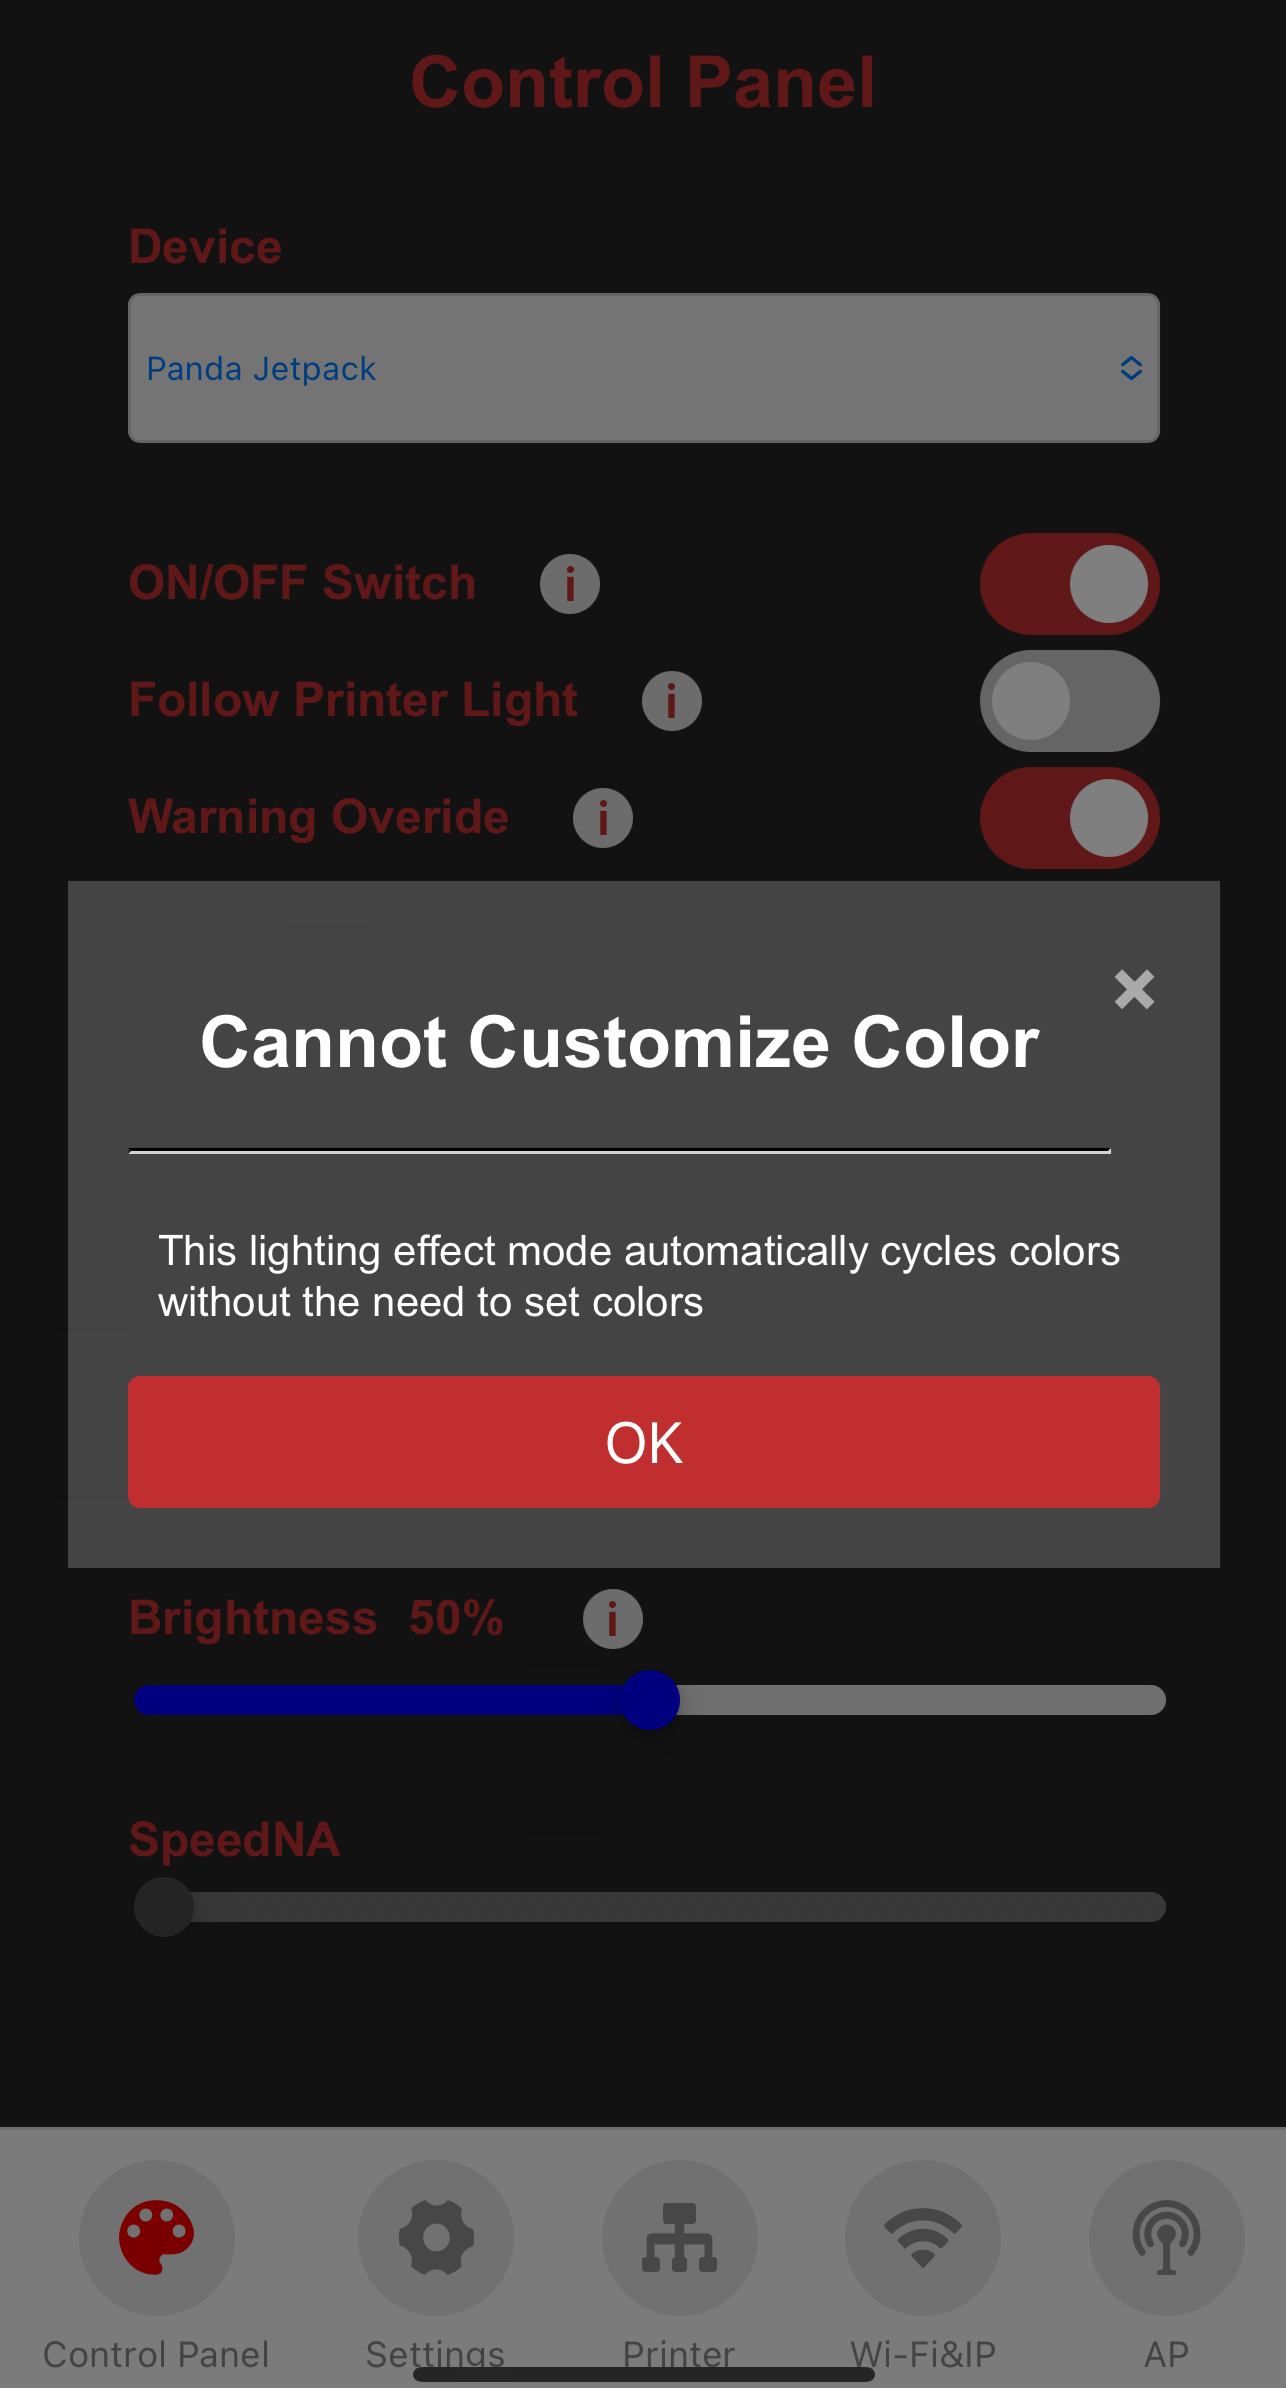
⑧ The light color can change based on the printer’s temperature. Additionally, you can choose between two lighting effects—Static or Strobing—under Safety Effect and Danger Effect.
-
⑨ After selection, the light color can be adjusted based on the fan.
-
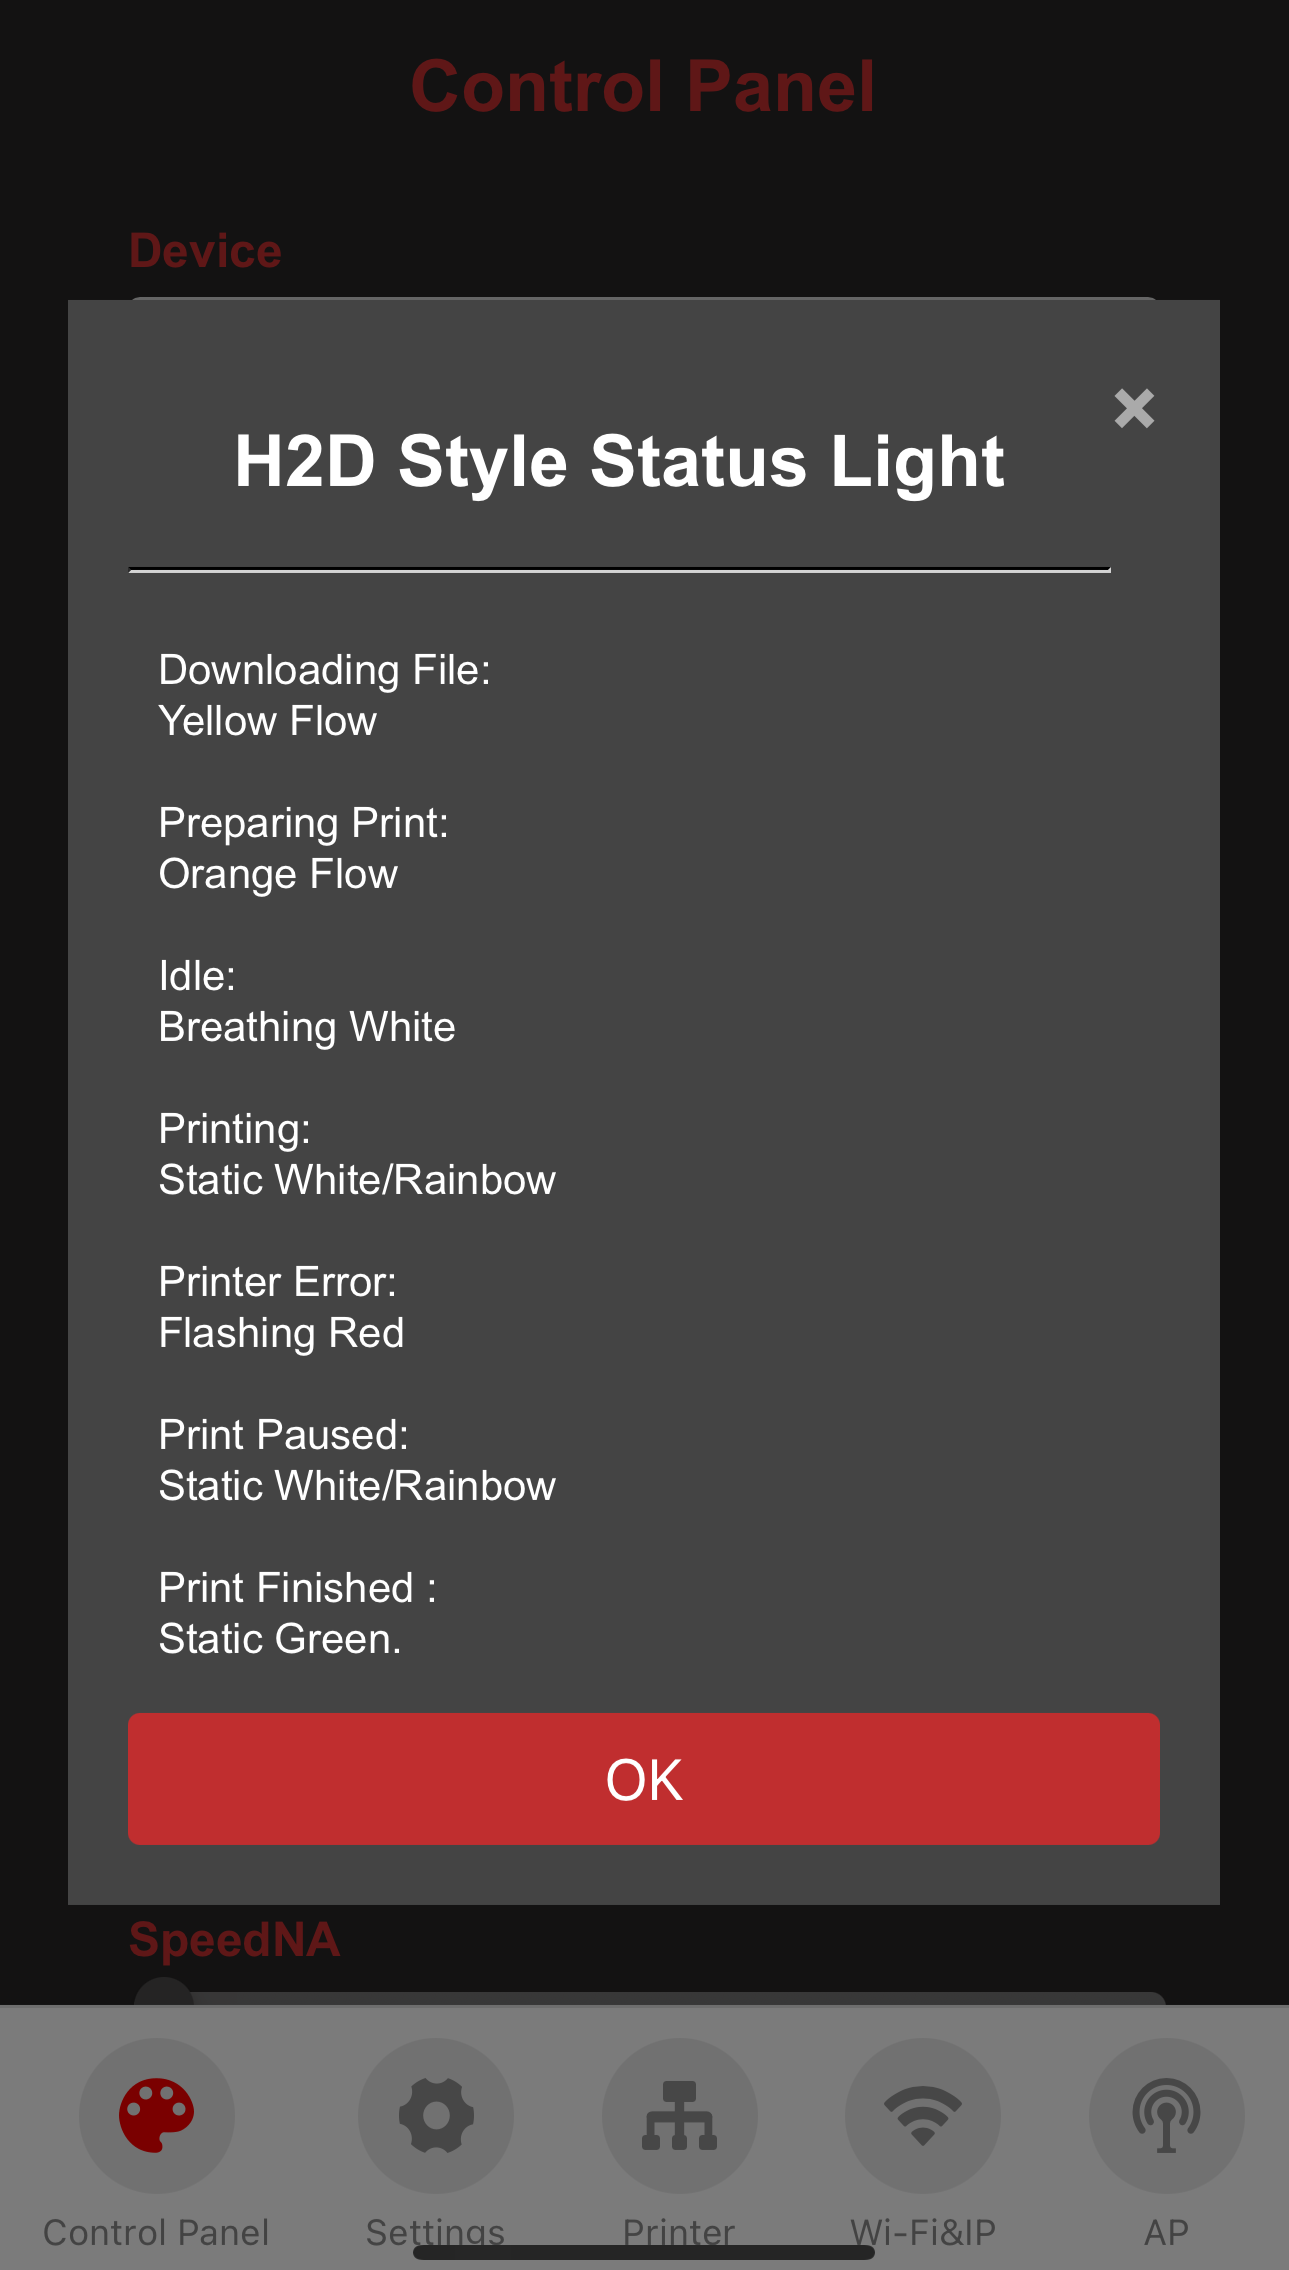
⑩ After selection, the color of the light can be adjusted according to the printer. You can choose between the Static or Rainbow lighting effects in the printing.
-
-
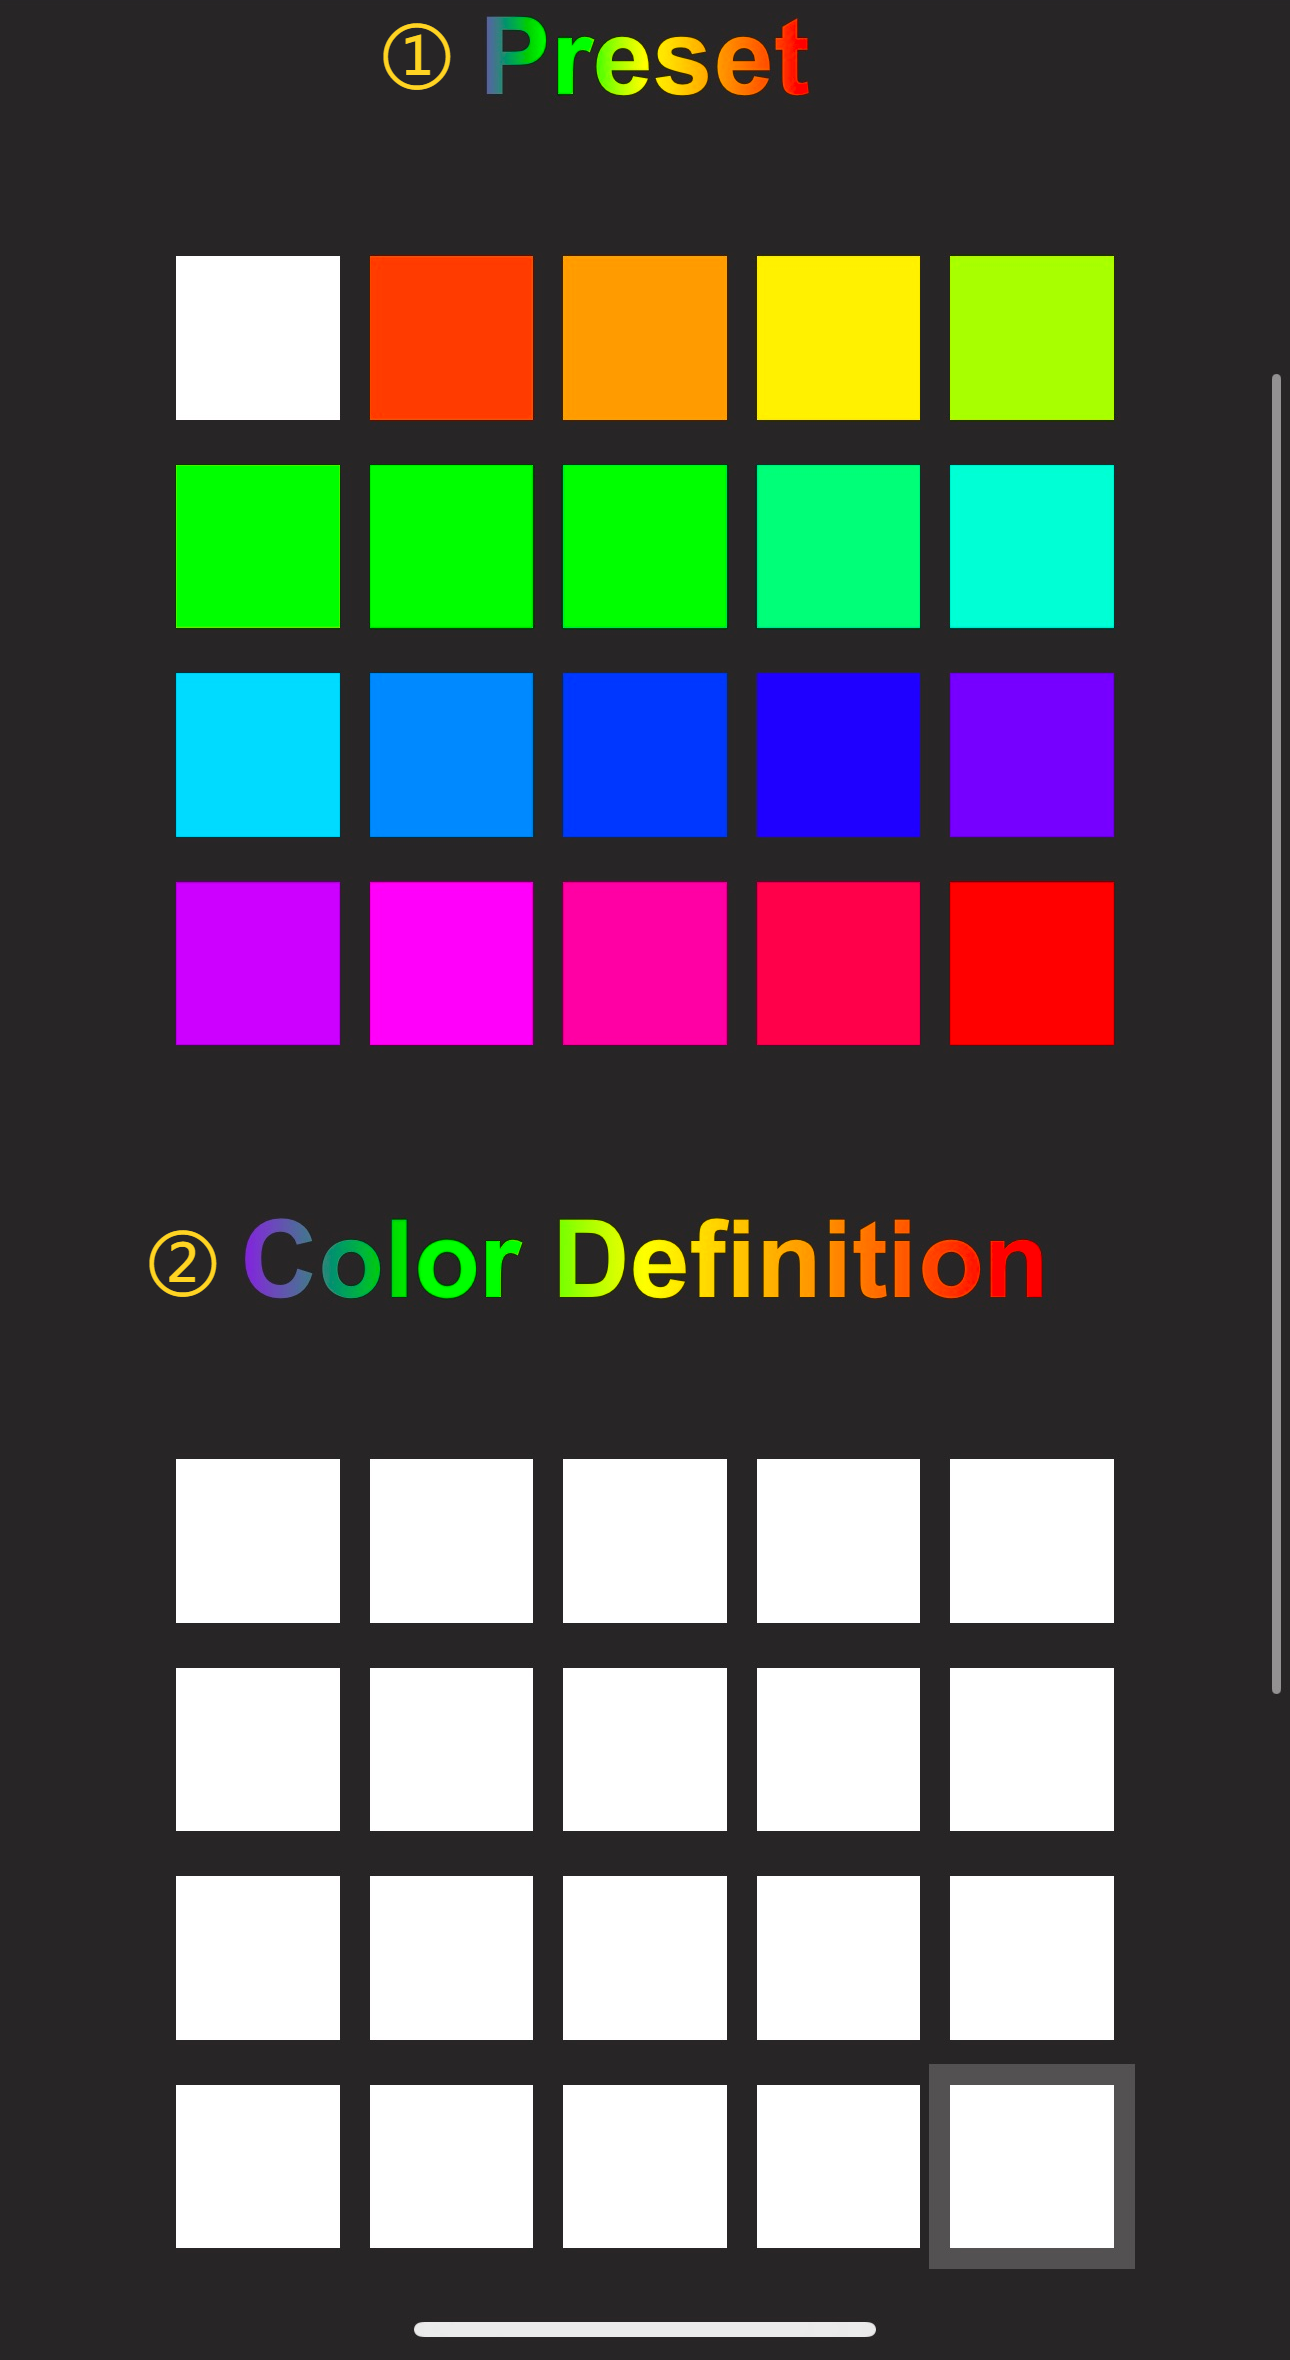
Customizing Light Color (using Static mode as an example):
-
Tap on the color setting box, and you will be directed to the color selection page.
-
Choose the desired color.
-
① Factory default preset color.
-
② Custom color.

-
-
After selecting a color block, tap
Confirm. If you tap on the color block in "Color Definition," you can set it to your preferred color.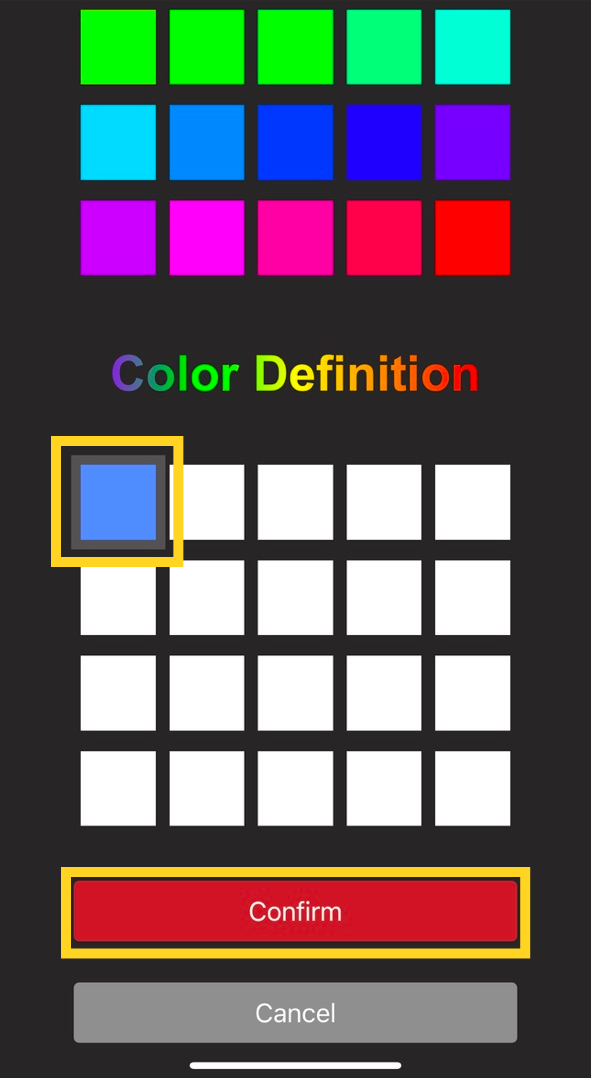

-
Firmware History
V1.0.0
- First-release factory firmware.
Feature Requests
If you'd like to see certain features in the upcoming firmware release, please submit a feature request on the official GitHub repository. Feature Requests.