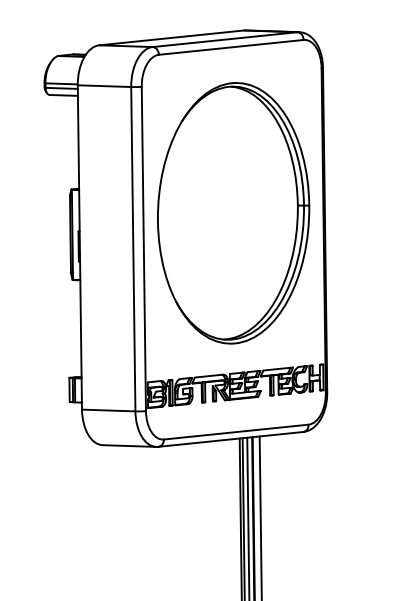
Panda Knomi

IMPORTANT NOTES
- Since the Panda Knomi only uses "non-critical", status communication from printers, it is not affected by any authentication processes that have recently been announced by Bambu Lab. For more information on what is and is not affected, please refer to the official Bambu Lab announcement.
- Always make sure you are running the latest Panda Knomi firmware which you can find here
- We are actively developing a repository where users can share their Panda Knomi themes. We will share this link with users as soon as the repository is ready.
- You can find various printable mounts for the P1, X1 and A1 series as well as cable management tools here
- Panda Knomi only supports connections to 2.4G Wi-Fi. Please ensure that your router is broadcasting a 2.4GHz access point.
- If the Panda Knomi is unable to communicate with the printer after being bound to it, it will display the message:
Invalid IP, Adjusting. This message should display for a maximum of 2 minutes while the Panda Knomi finds the printer on the local network and reestablishes a connection. If it is displayed for an extended period then either the printer or the router may need to be power cycled. In such an instance you would also have connectivity issues when trying to use Bambu Studio or Bambu Handy locally. - The Panda Knomi implements a special feature that automatically displays the webUI as soon as you connect to the WiFi access point that it creates. Some browsers and devices have security limitations with this kind of implementation that prevent uploading or downloading of files. If you find that you are unable to upload or download files using the webUI then please exit the web page that automatically popped up and revisit it from the native browser on your device.
- If you encounter any issues during use or have suggestions for future hardware or firmware releases then feel free to visit our GitHub page to submit an issue and stay in touch with us.
- If you have any issues that are not solved by this wiki then please contact customer support at:
support01@bigtree-tech.com.
Specifications
| MCU | Xtensa dual-core 32-bit LX6 ESP32 up to 240MHz clock speed. |
|---|---|
| Memory | PSRAM-8MB(4MB RAM + 4MB Himem), Flash-16MB |
| Logic Voltage | 3.3V |
| Input Power Voltage | 5V-24V |
| Rated Power | 0.65W |
| Dimensions | 34.6mm x 37.9mm x 3.5mm |
| Display Size | 1.28” |
| Resolution | 240 x 240 |
| Display Area | 32.4(H)mm x 32.4(V)mm |
| Screen Driver Chip | GC9A01 |
| Viewing Angle | 178° |
| Backlight Brightness | 400 Cd/m² |
| Connectivity | 2.4G Wi-Fi (IEEE 802.11 b/g/n) |
| Operating Temperature | Panda Knomi:-20°C to +70°C Plastic Shell:-30℃ to +130℃ |
| Storage Temperature | -30°C to +80°C |
| Backlight Life | Over 20,000 hours |
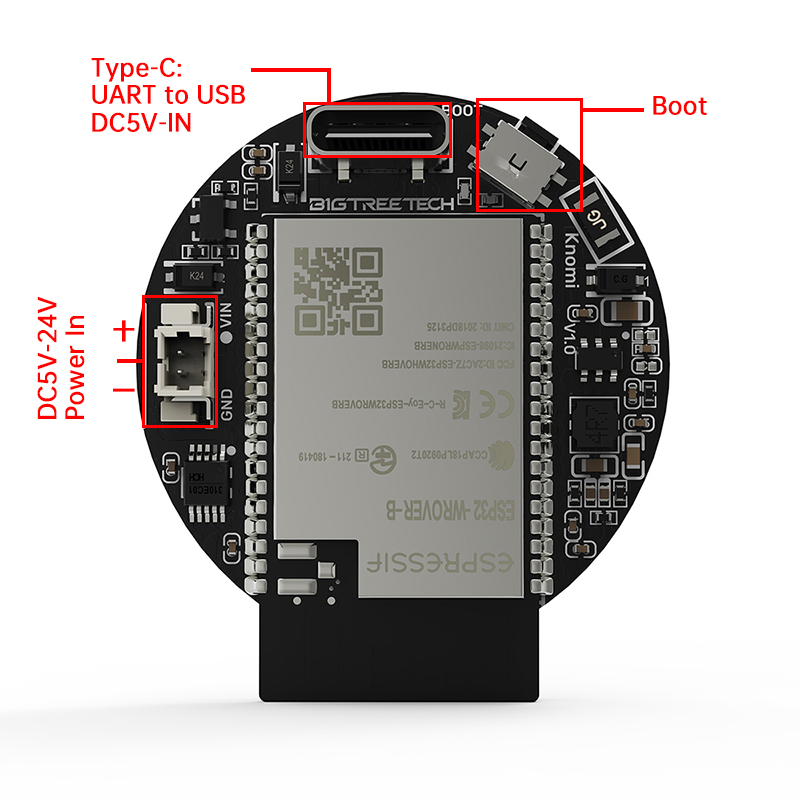
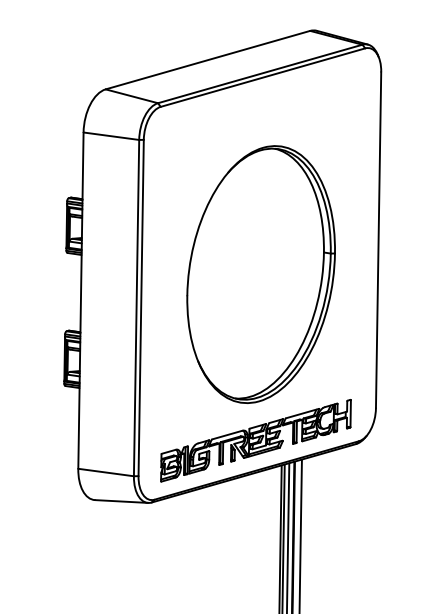
Dimensions & Interface

Installation Guides
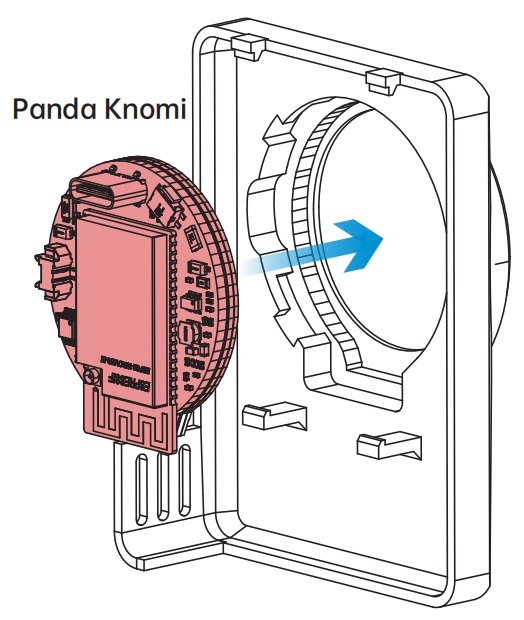
The Panda Knomi can be mounted to A1, P1 and X1 series machines.
In this initial section, you will learn how to install the Panda Knomi onto the A1 Series toolhead using the BIGTREETECH plastic shell. Later, installation instructions are provided for the gantry mount on the A1 as well as the P1 and X1 series.
A1 Series Mounting
A1 Series Toolhead Mount
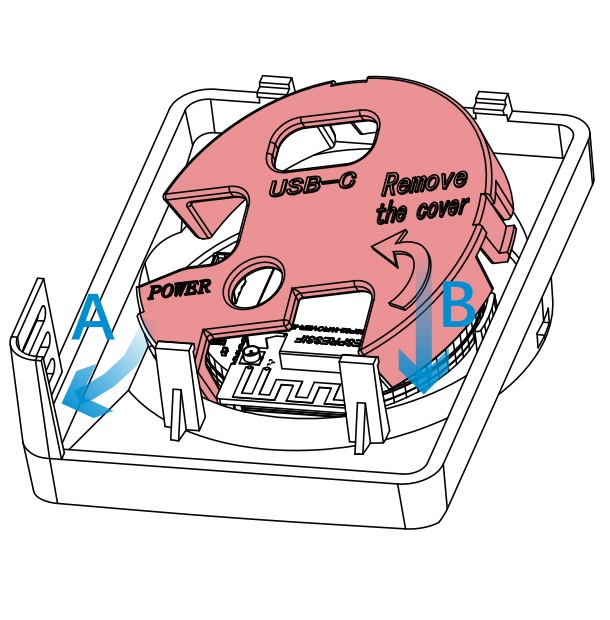
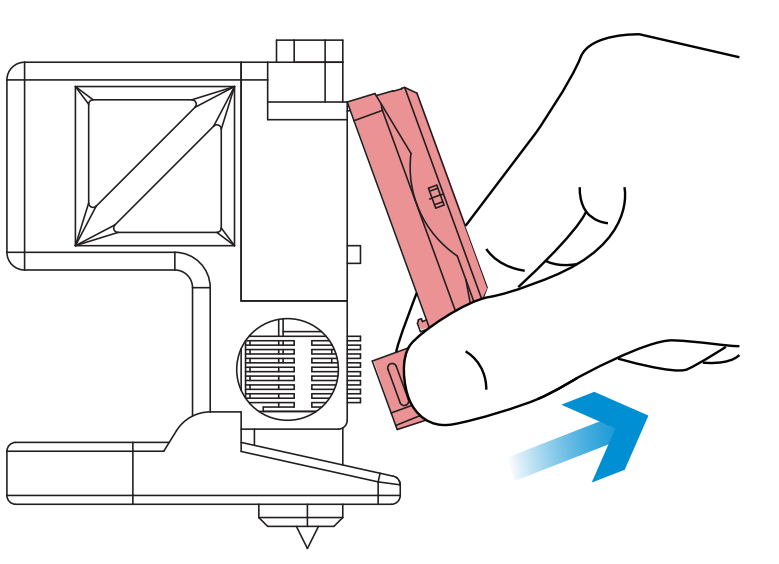
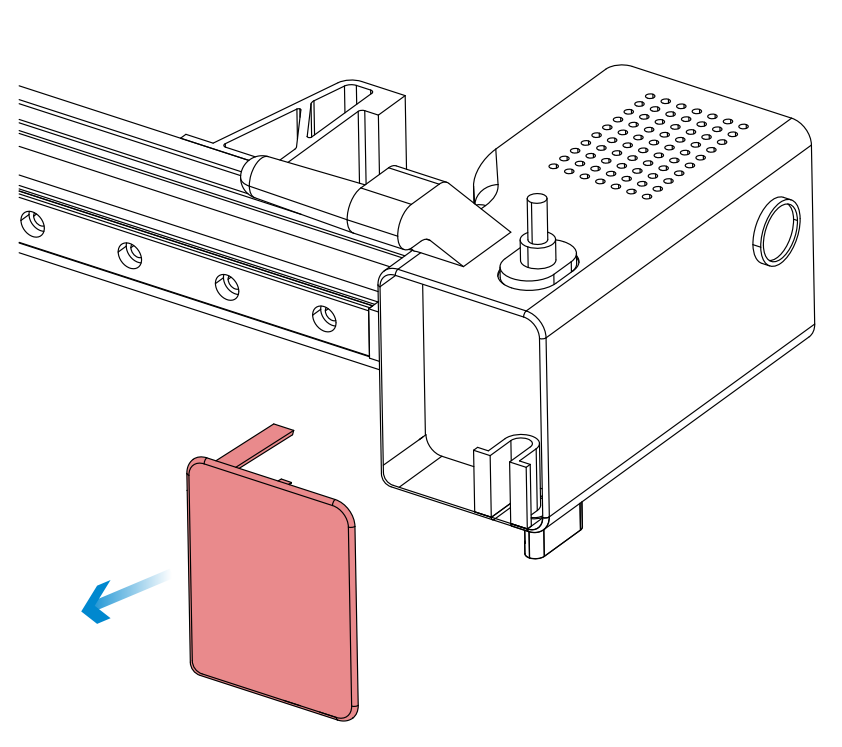
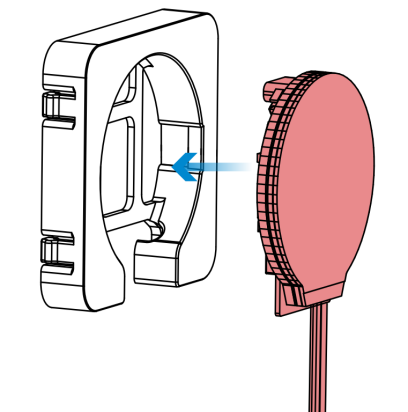
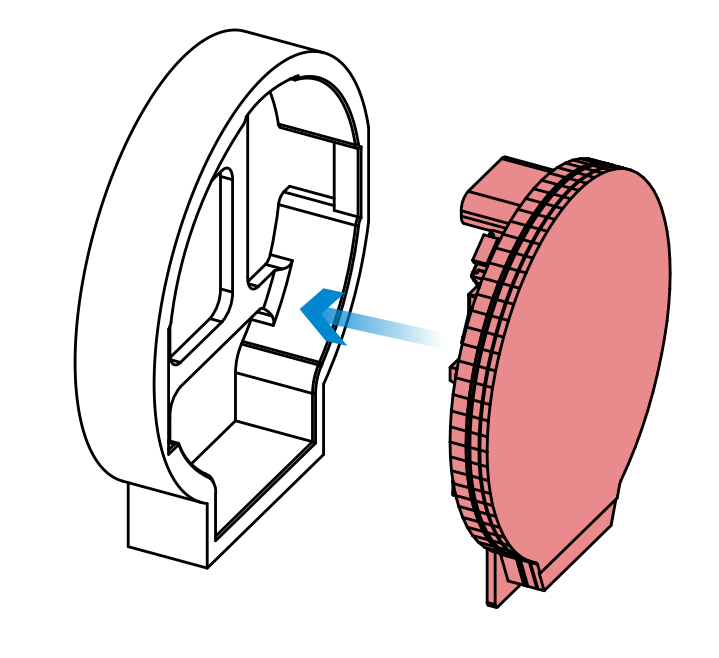
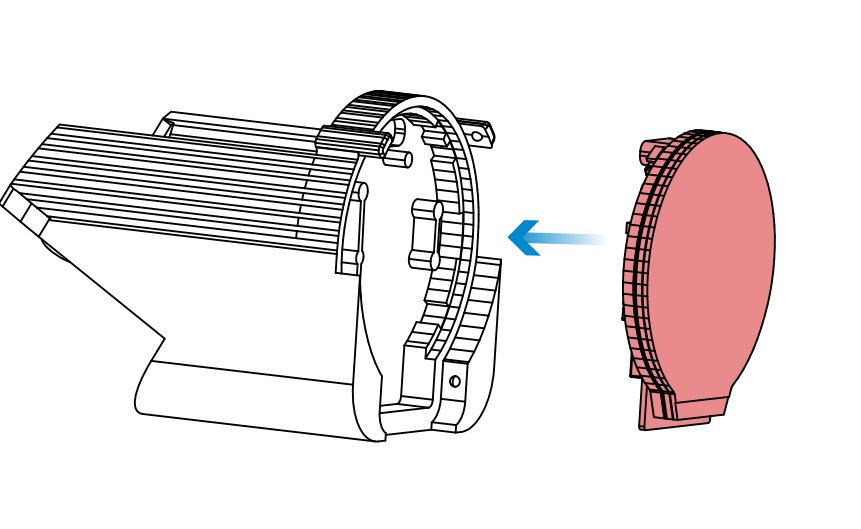
- Gently peel off the protective cover.

- Position the Panda Knomi directly into the shell.
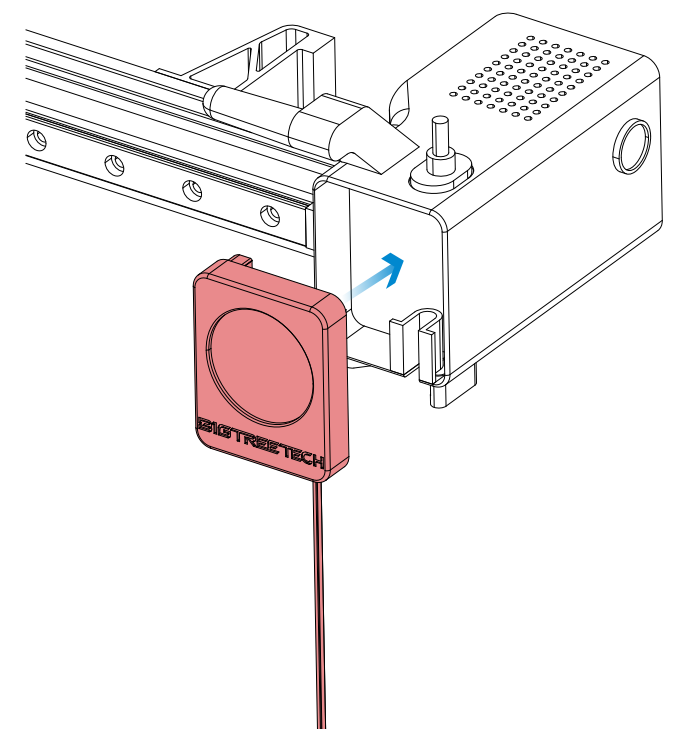
- Align the cover with the locking tab, as shown by Arrow
A. Then, gently press down in the direction of ArrowBuntil it clicks past the tab, securing it in place.
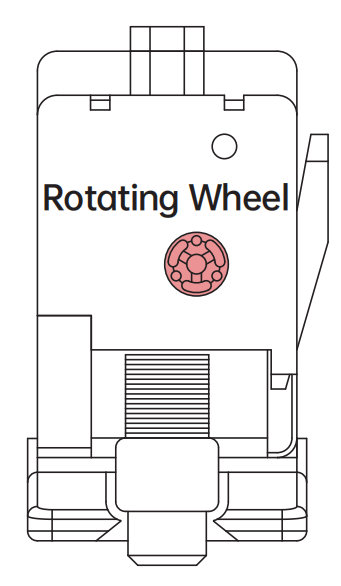
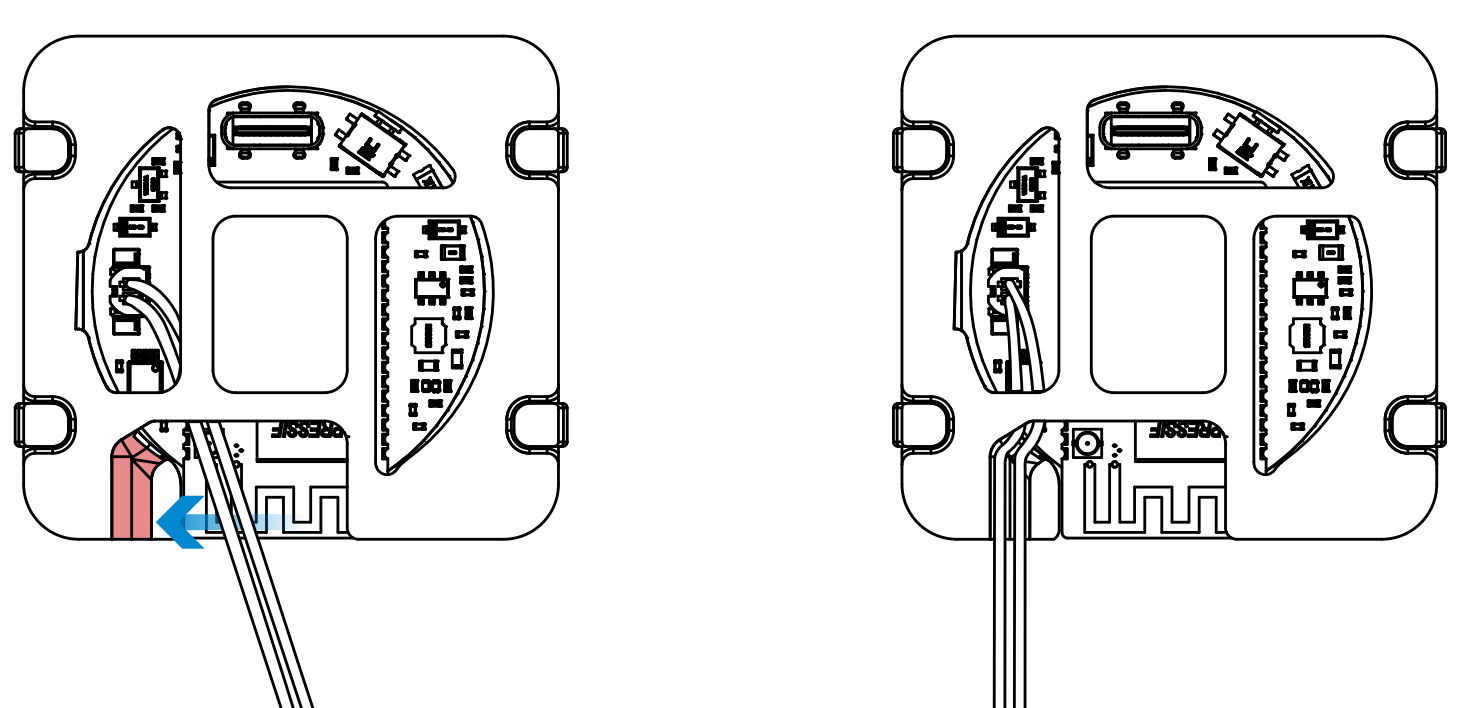
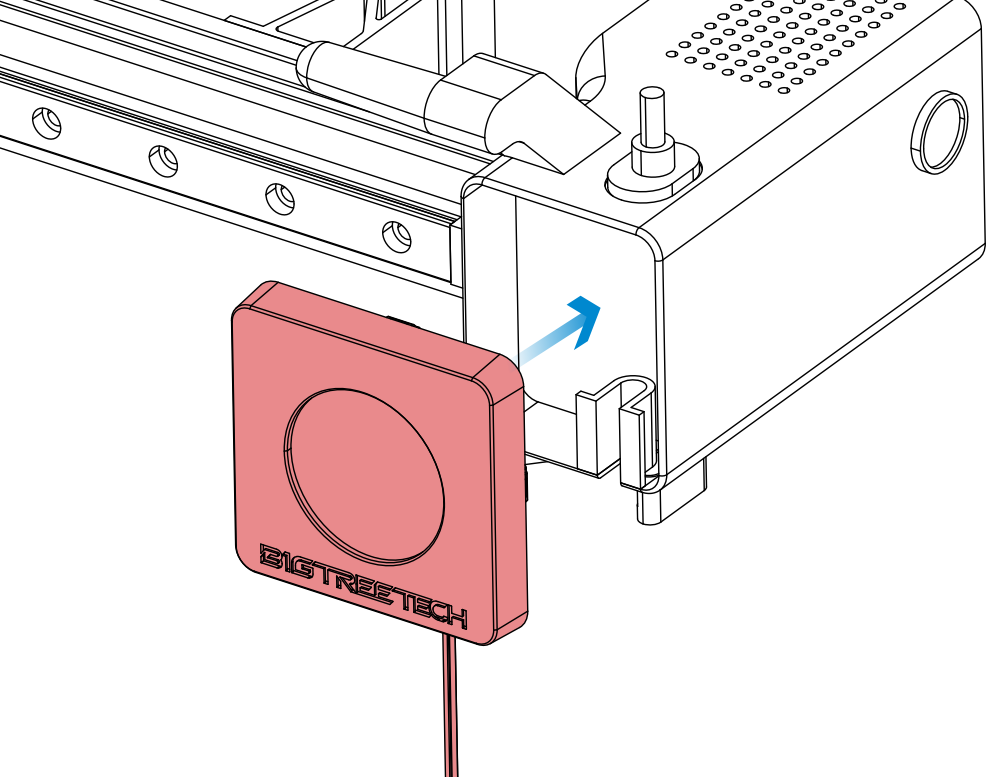
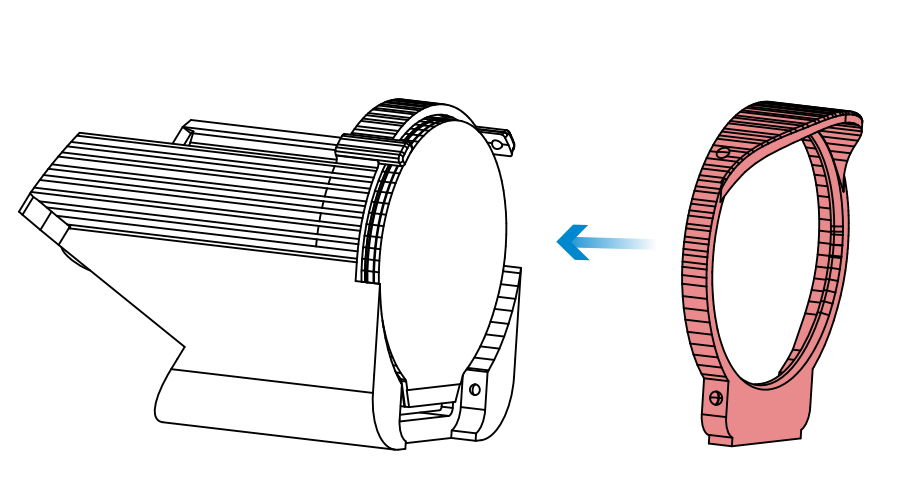
- Press the Toolhead Cover from both sides to unlock and remove the cover.
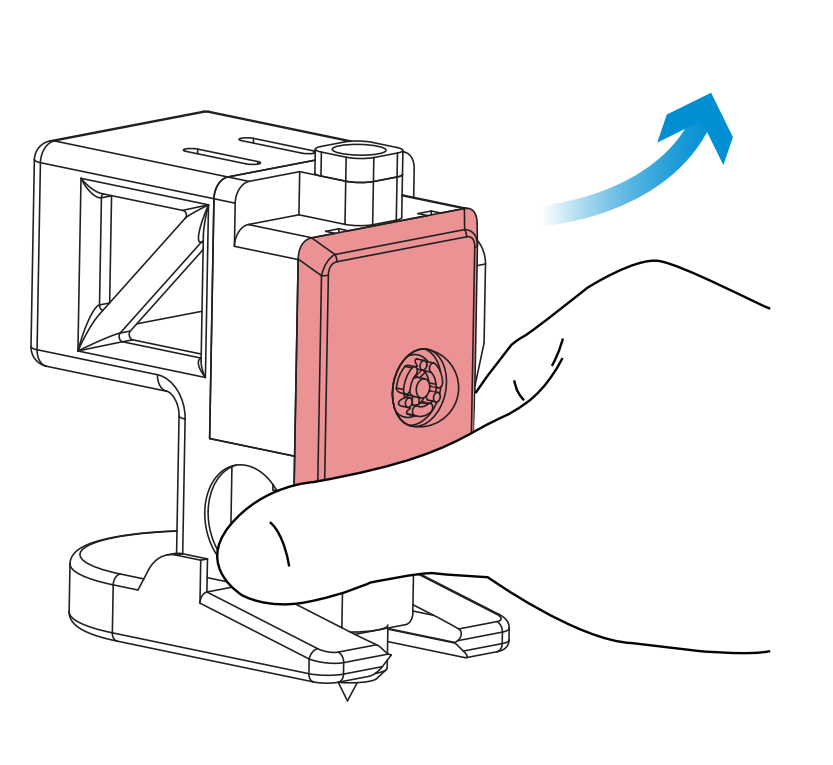
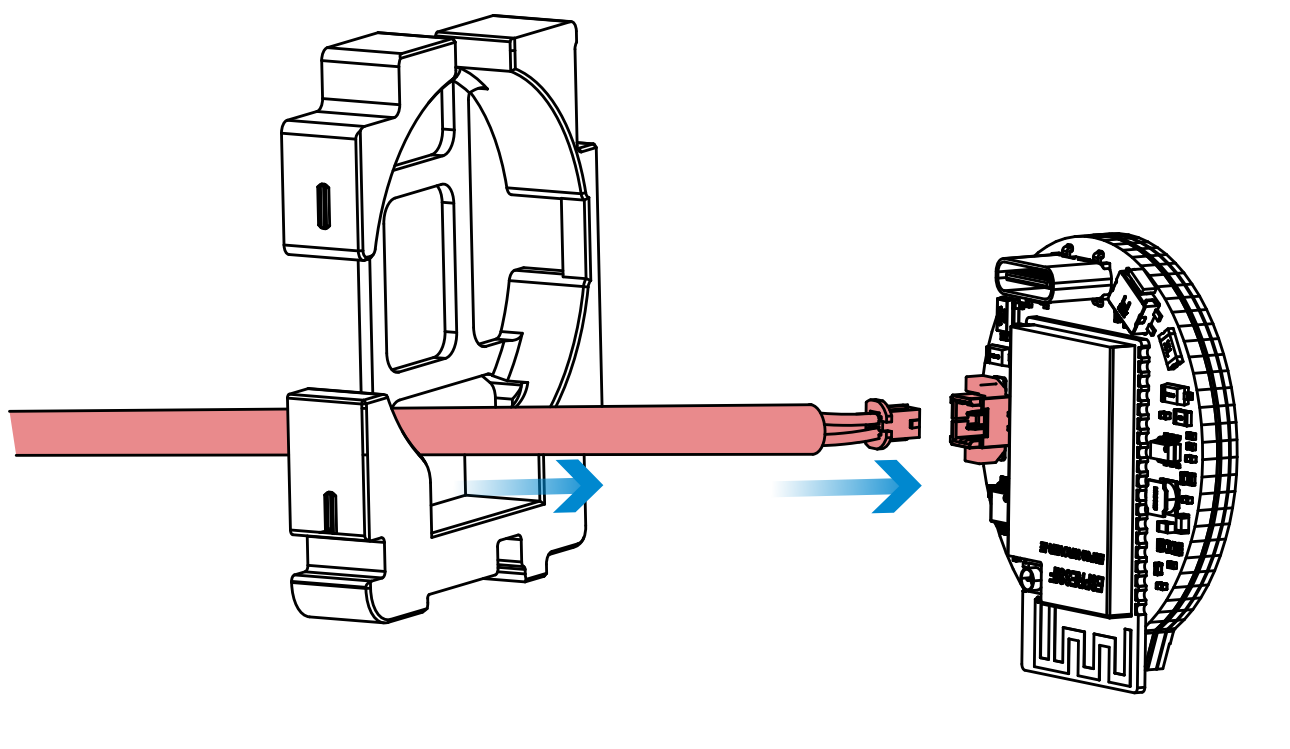
- Then remove the rotating wheel.
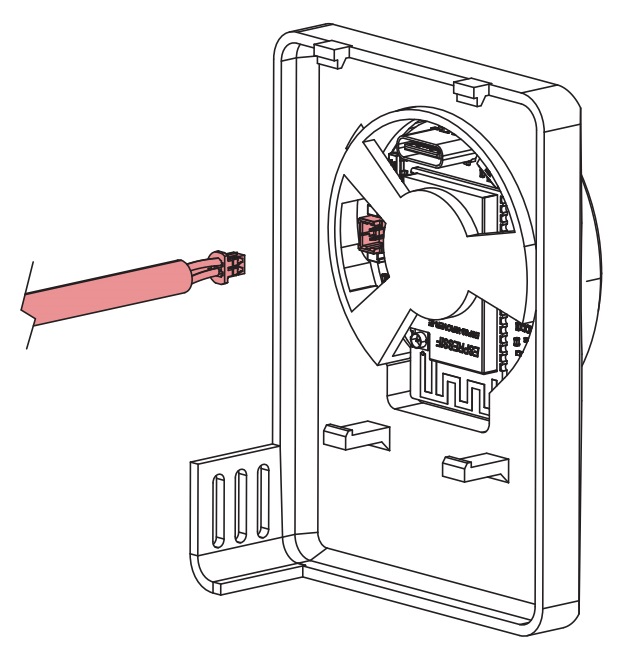
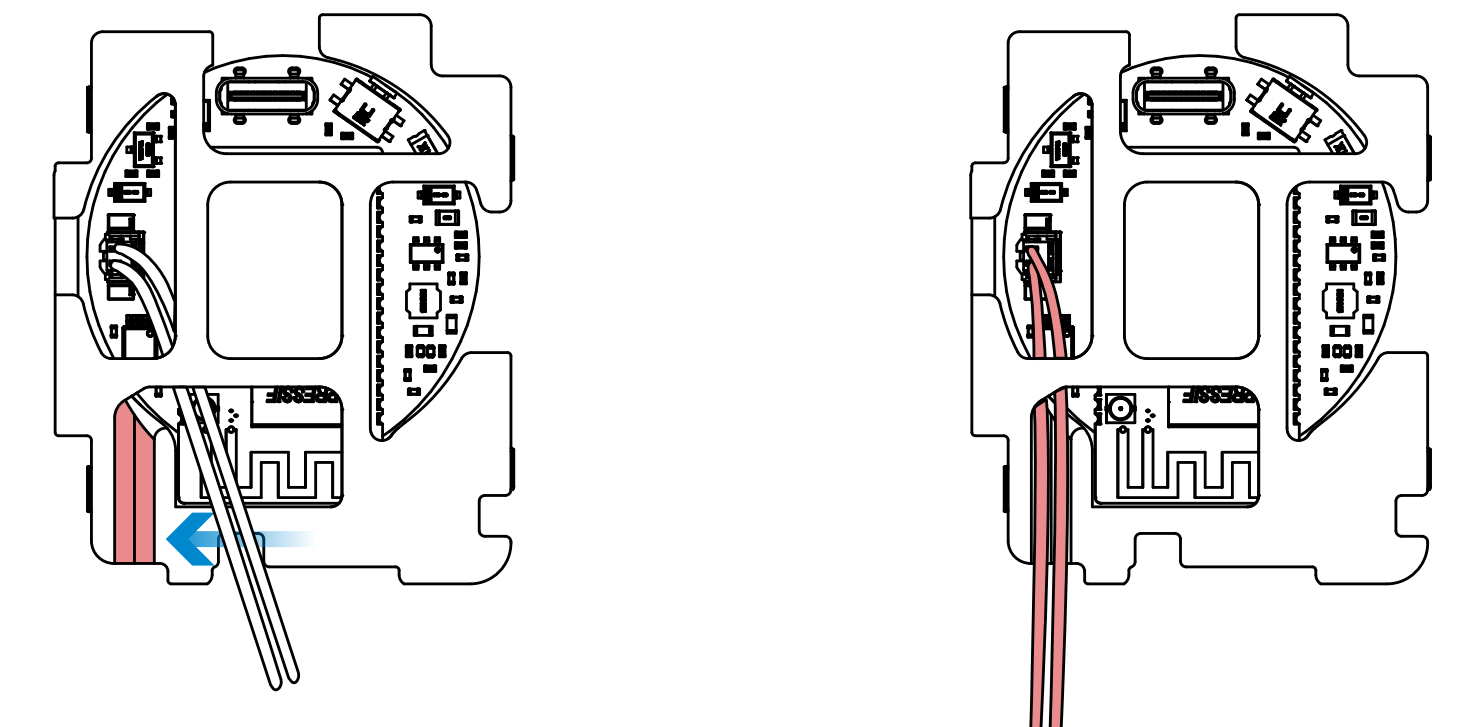
- Pass the power cable through the designated holes.
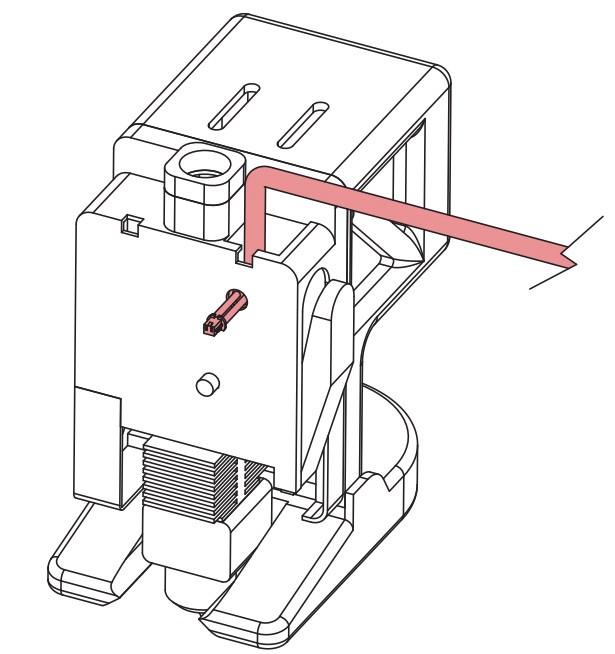
- Then connect it to the Panda Knomi power interface.
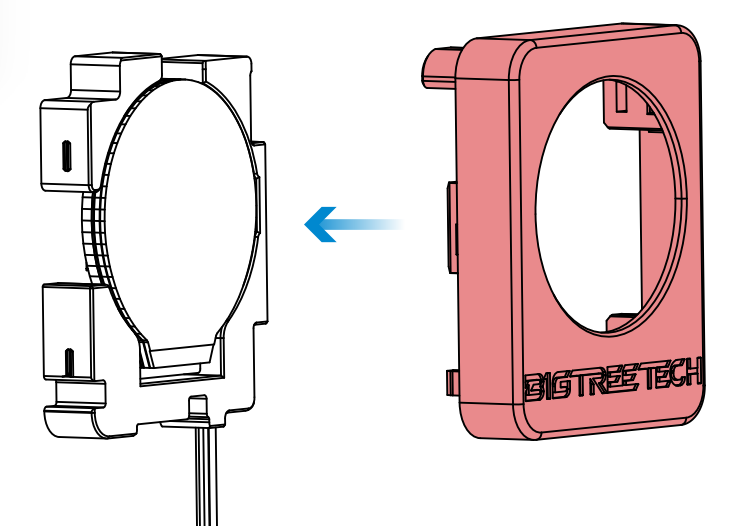
- Snap the Panda Knomi from the top, then gently press to secure.

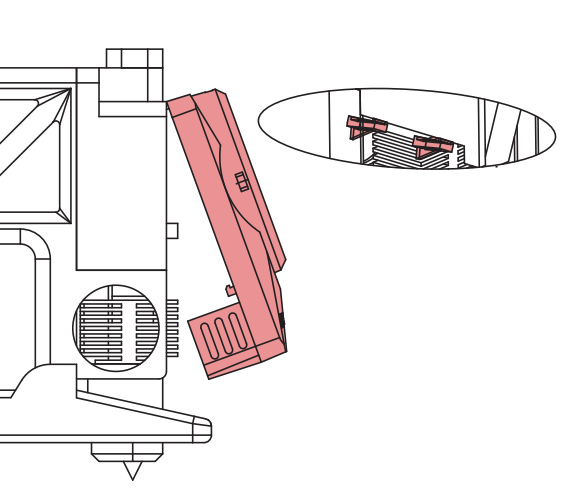
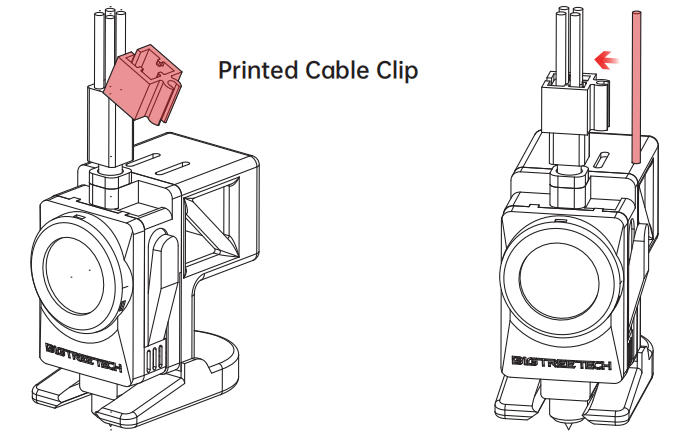
- Finally, you will need to secure the power cable neatly so that it does not interfere with the print. Start by installing the printable cable clip and then securing the power cable to it.
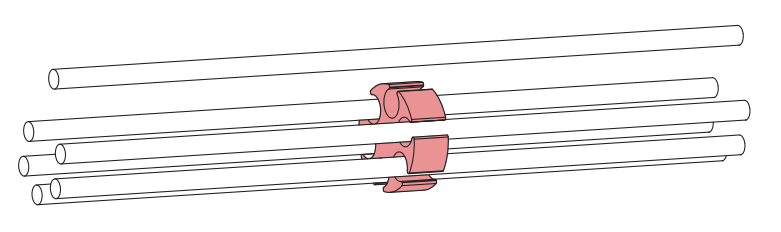
- If you are using an AMS Lite you will also want to make use of the printable cable organizer which will allow you to bind all of the PTFE tubes, the toolhead cable and the Panda Knomi power cable together.
- We also recommend using the supplied cable ties to gently bind the toolhead power cable and the Panda Knomi power cable together at points along their length. The cable ties should not be so tight that the pinch the wires only so that they remain in place.
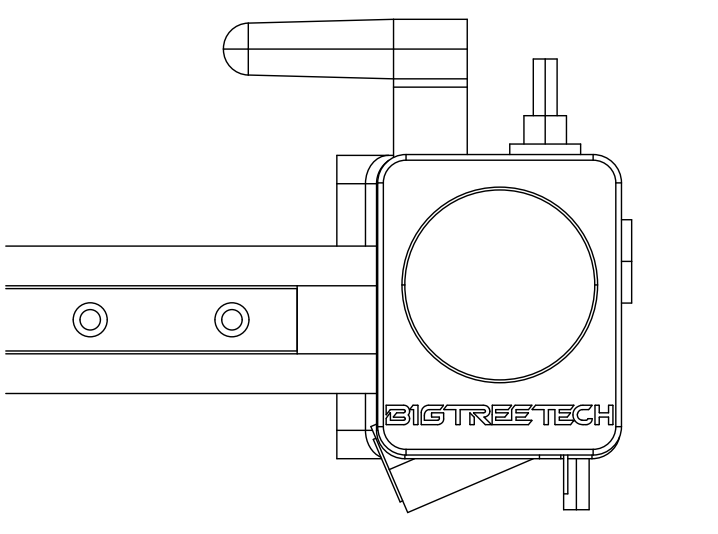
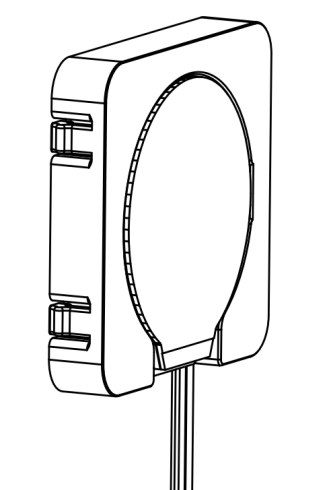
- A1 Toolhead installation Completed
Congratulations on successfully installing your Panda Knomi on the A1 series toolhead. We now present the alternative mounting location guide and then the guide to provide power for A1 series installations.
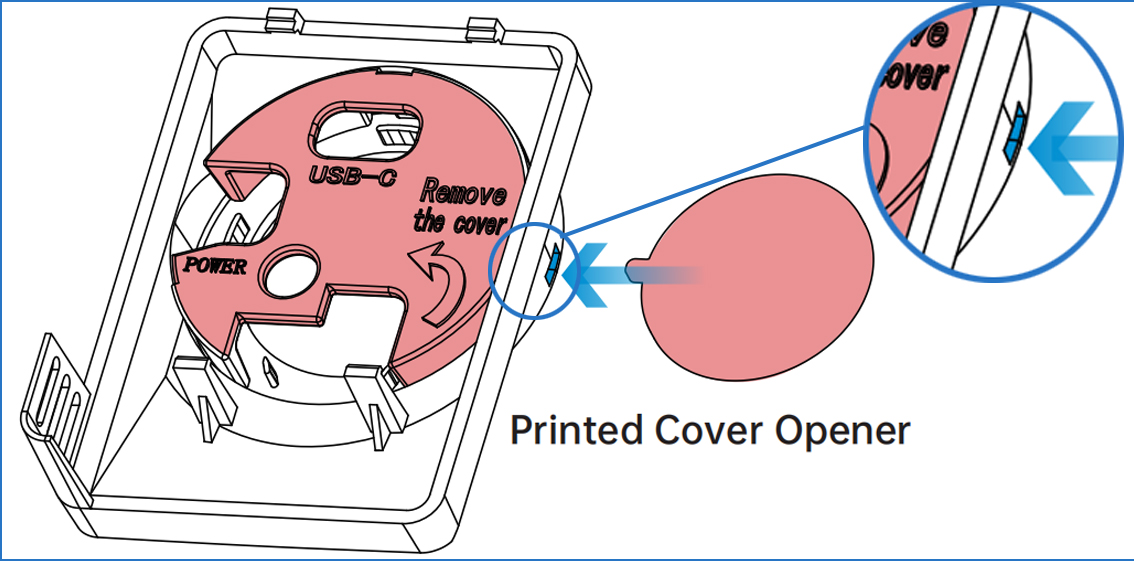
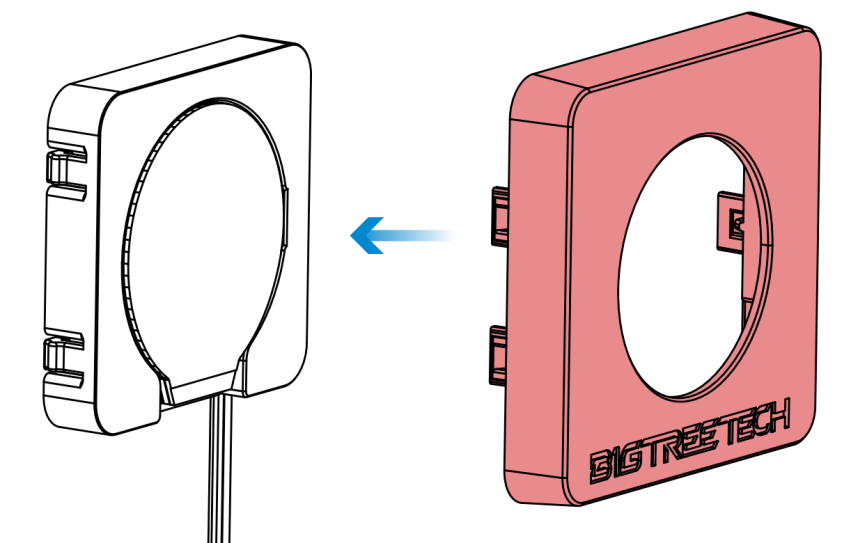
Disassembly Guide For A1 Series Toolhead
To disassemble the plastic shell’s back cover or to detach the Panda Knomi from the A1 series toolhead, please follow the method below.
-
Press the shell from both sides to unlock and carefully remove it from the toolhead.
-
Press the blue-highlighted slot using the cover opener, and the cover will pop open. (You will need to download the cover opener model file from GitHub and print it ahead of time.)
A1 Series Gantry Mount
A1 Alternative Gantry Mount
-
Download the installation file and pre-print them using a 3D printer.
-
Gently peel off the protective cover.
-
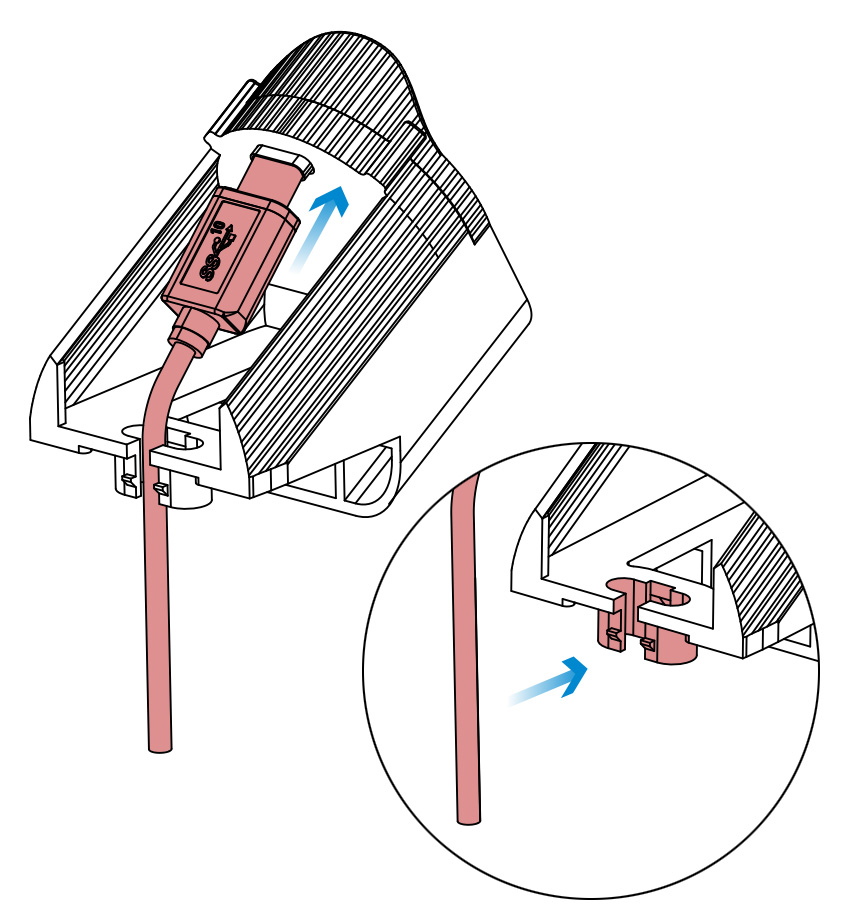
Thread the power cord through the designated hole on the base (as shown in the image below) and connect it to the Panda Knomi's power interface.
-
Position the Panda Knomi directly into the base and route the power cord through the pre-designed groove on the back.


-
Align and place the cover onto the base, pressing evenly until it clicks into place.
-
Remove the front cover that is installed over the A1 gantry motor mount.
-
Align the Panda Knomi's casing wiring groove with those on the printer, then secure it in place by first clipping the bottom left and then moving on to the remainder of the mount.
Congratulations on installing your Panda Knomi in the gantry mount position. You can now move on to the power guide for the A1 series.
A1 mini Alternative Gantry Mount
-
Download the installation file and pre-print them using a 3D printer.
-
Gently peel off the protective cover.
-
Connect the power cord to the Panda Knomi’s power interface.

-
Position the Panda Knomi directly into the base.
-
Route the power cord through the pre-designed groove on the back.
-
Align and place the cover onto the base, pressing evenly until it clicks into place.
-
Remove the front cover that is installed over the A1 mini gantry motor mount.

-
Align the Panda Knomi's casing wiring groove with those on the printer and then secure it onto the printer.
Congratulations on installing your Panda Knomi in the gantry mount position. You can now move on to the power guide for the A1 series.
A1 Series Power
It's now time to get your device powered up. MAKE SURE THAT YOUR PRINTER IS POWERED OFF BEFORE PERFORMING THIS STAGE.
- Locate an unused, 4 pin power port at the rear or side of the machine (A1 or A1 mini).

- If there are no available power ports then you can make use of the Panda Branch (sold separately) which will split one port into four. If using the Panda Branch for this purpose please take note that it is not designed to provide power to arbitrary peripherals. Only use it within the recommendations of BIGTREETECH to ensure that you do not overload the internal PSU of the printer. The Panda Knomi consumes only 0.65W of power and is well within the specification of what the internal PSU can provide. With that in mind, please set the Panda Branch USB power switch to the 2A setting after connecting the Panda Knomi to ensure that any connected USB peripherals are appropriately current limited.
It's now time to power up the Panda Knomi and get things configured so head over to the First Time Use Guide
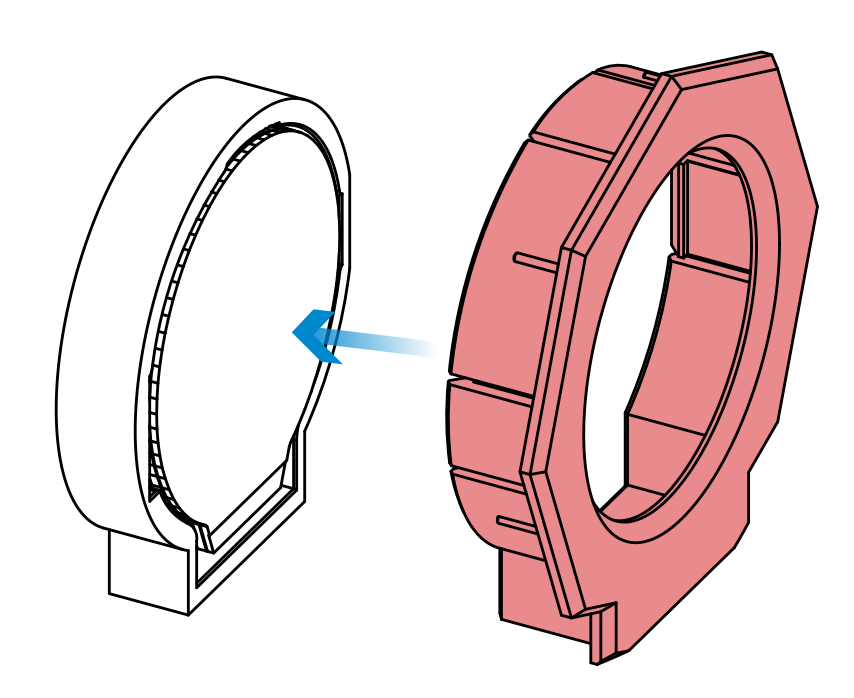
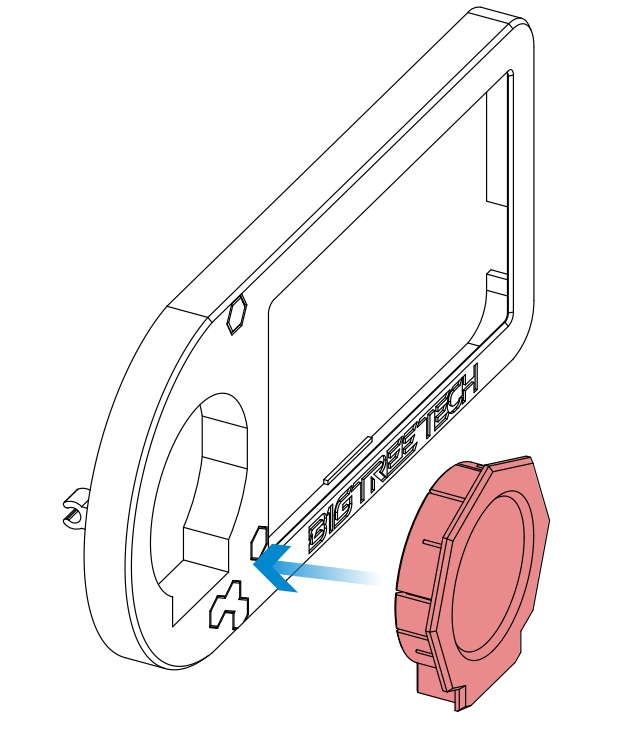
X1 Series Mounting
Shell mounting
-
Ensure that you have printed out the X1 series mount before you start installation.
-
Gently peel off the protective cover.
-
Place the Panda Knomi into the back cover with the screen facing forward.

-
Clip the back cover into the round panel.
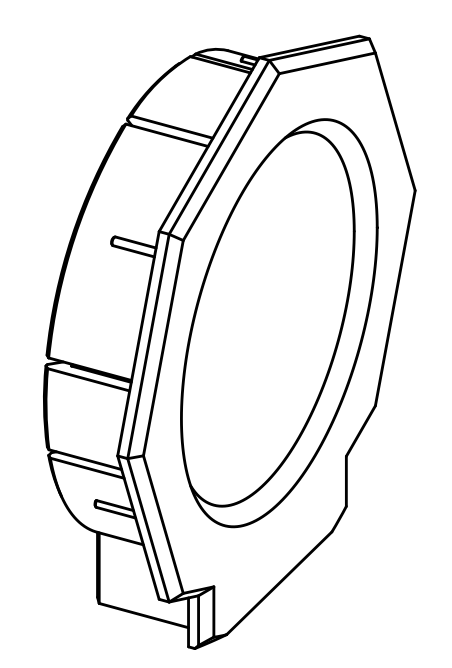
-
Press fit the round panel into the TFT panel.
-
Insert the power plug into the power socket on the rear of the Panda Knomi.

-
Organize the power cord within the designated wiring slot on the panel.

-
Install the whole assembly onto the printer’s TFT, starting from the top and pressing downward to secure it in place.

Congratulations on installing your Panda Knomi in the X1 series. You can now move on to the power guide for the X1 series.
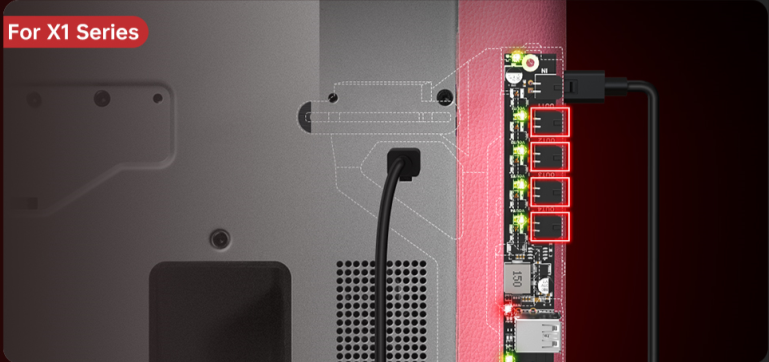
X1 Series Power
There are several options to provide power to the Panda Knomi when using an X1 series machine.
- If you are not using an AMS then you can connect it directly to the AMS output port at the rear of the machine.
-
If you are using an AMS then you will need to use a Panda Branch to expand the four pin AMS port and then connect the Panda Knomi to one of the expansion ports. Please take note that the Panda Branch is not designed to provide power to arbitrary peripherals. Only use it within the recommendations of BIGTREETECH to ensure that you do not overload the internal PSU of the printer. The Panda Knomi consumes only 0.65W of power and is well within the specification of what the internal PSU can provide. With that in mind, please set the Panda Branch USB power switch to the 2A setting after connecting the Panda Knomi to ensure that any connected USB peripherals are appropriately current limited.
It's now time to power up the Panda Knomi and get things configured so head over to the First Time Use Guide
P1 Series Mounting
Shell mounting
-
Ensure that you have printed out the P1 series shell before you start installation.
-
Gently peel off the protective cover.
-
Position the Panda Knomi directly into the base.

-
Align and gently place the round panel, pressing down evenly to secure.

P1 Series Power
The Panda Knomi can be powered through its rear power interface or USB-C interface, depending on where you are sourcing power from.
-
Power supplied through the internal USB port.
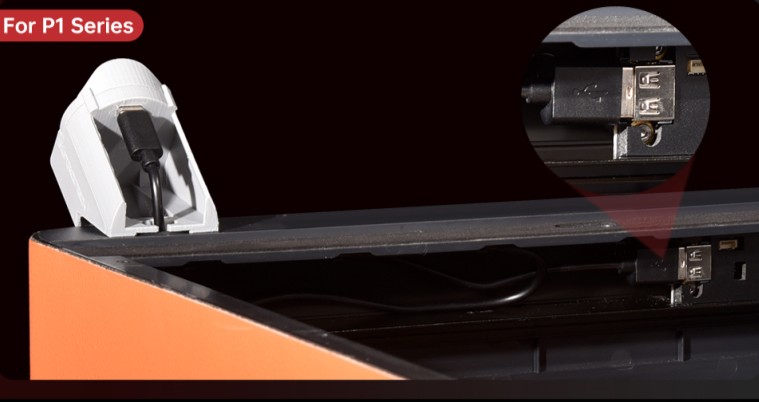
-
please route the power cable using the cable clips that exist within the machine along the top of that channel. Then route the USB cable out through the designated hole on the machine.
-
Secure the USB cable within the wire clip of the base and connect it to the Panda Knomi's USB-C port.
-
Attach the base onto the designated hole to complete the installation.


-
-
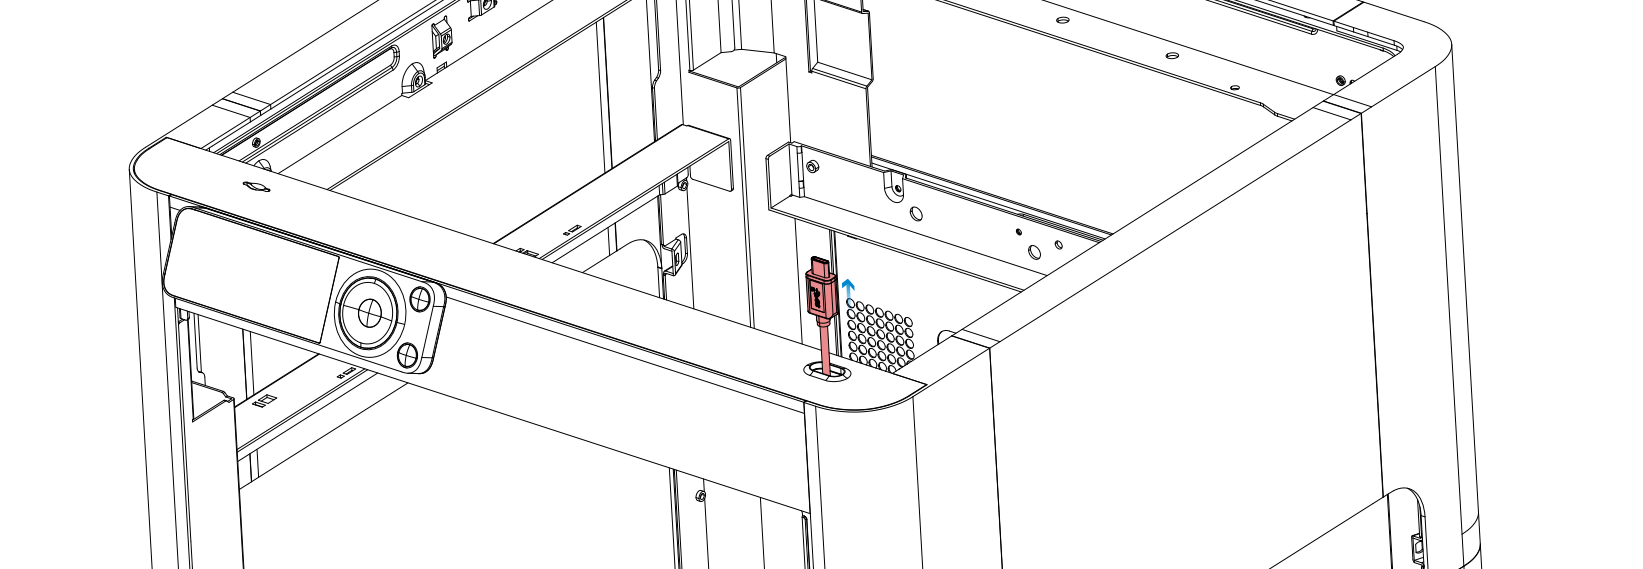
If you are sourcing power from the rear of the machine then select a cable route that works best for you.
-
If you are using an AMS then you will need to use a Panda Branch to expand the four pin AMS port and then connect the Panda Knomi to one of the expansion ports. Please take note that the Panda Branch is not designed to provide power to arbitrary peripherals. Only use it within the recommendations of BIGTREETECH to ensure that you do not overload the internal PSU of the printer. The Panda Knomi consumes only 0.65W of power and is well within the specification of what the internal PSU can provide. With that in mind, please set the Panda Branch USB power switch to the 2A setting after connecting the Panda Knomi to ensure that any connected USB peripherals are appropriately current limited.
It's now time to power up the Panda Knomi and get things configured so head over to the First Time Use Guide
User Interface Instructions
First Time Use Guide
Access the Web UI
-
Start by connecting to the Panda Knomi hotspot. After booting for the first time or a factory reset, you'll see the screen below.
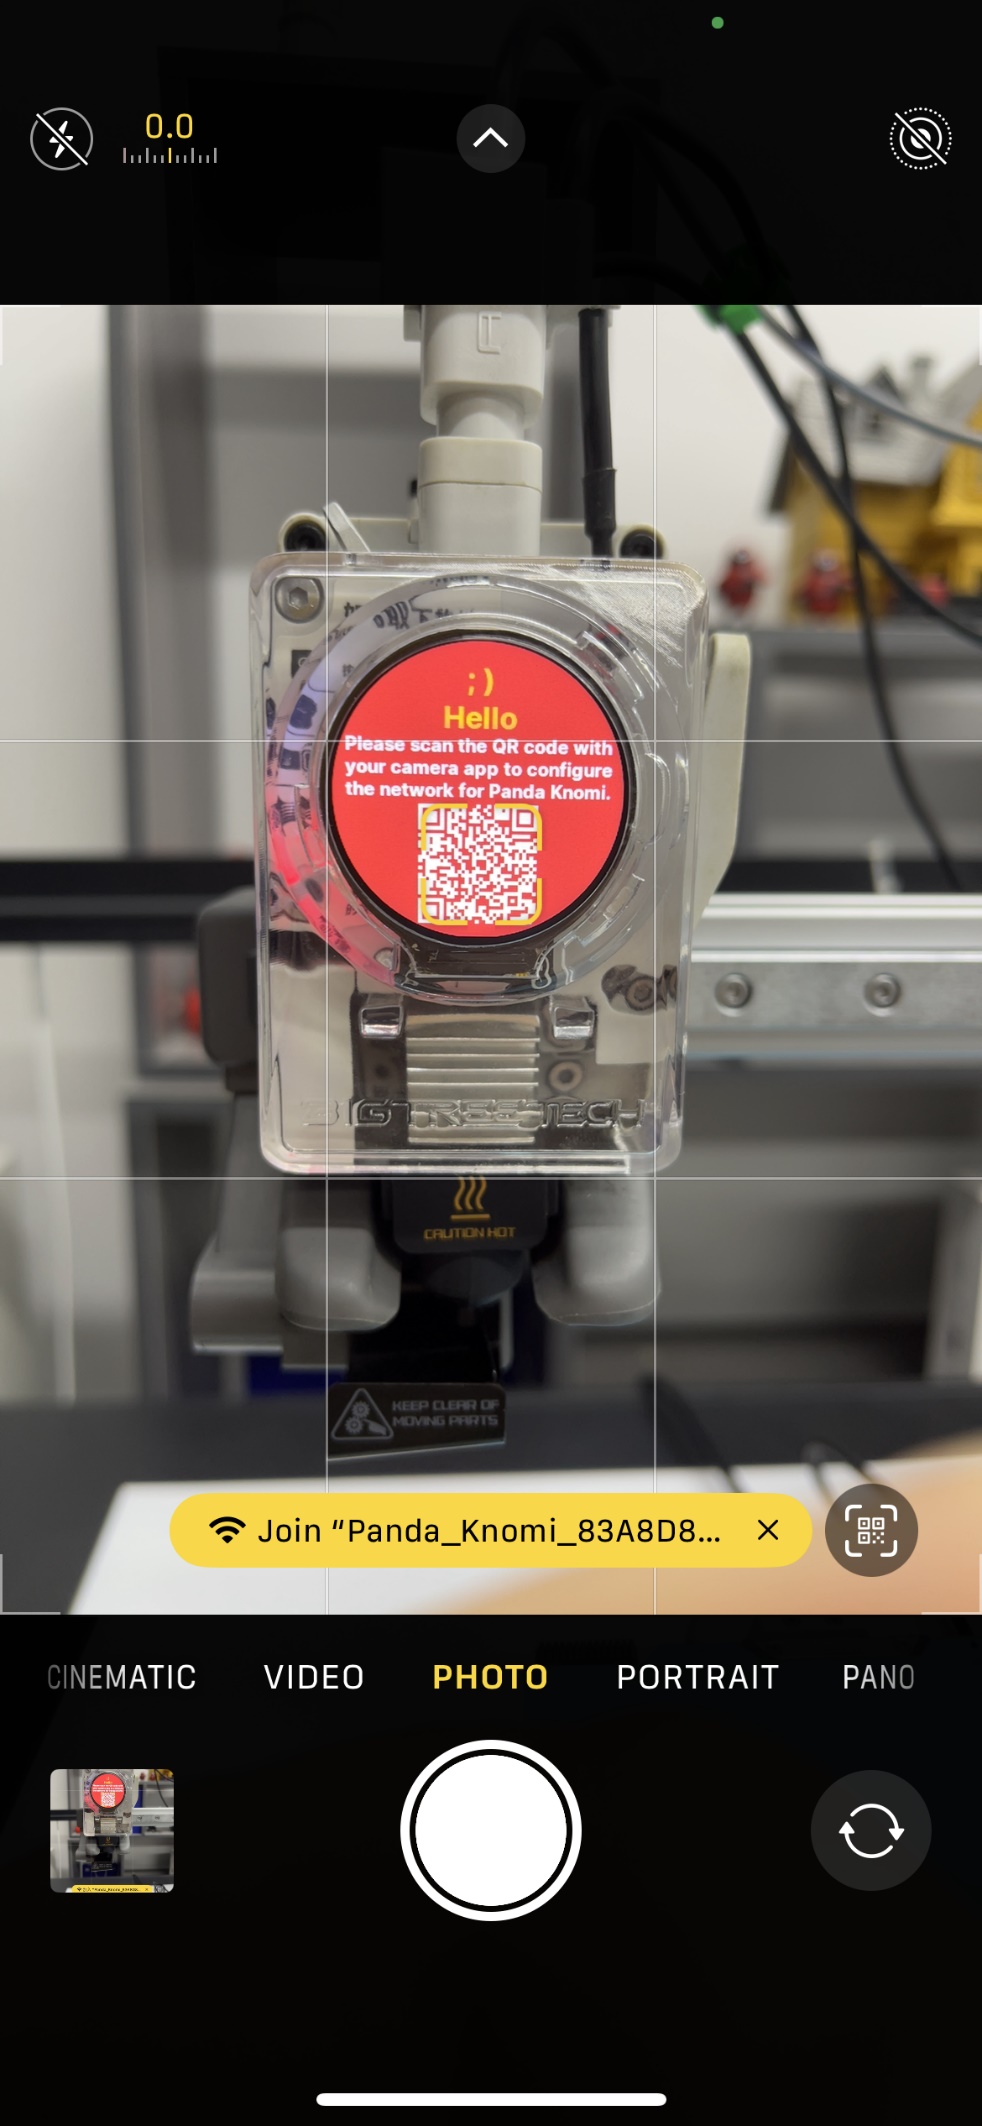
- You can either scan the QR code to connect to the hotspot directly or perform a WiFi scan on your device and connect manually using the credentials below.
Default credentials:
Wi-Fi SSID:Panda_Knomi_xxxxxxxxxxxx
Wi-Fi Password:987654321Note: Most modern smartphones are equipped to scan QR codes directly through their camera app. This feature is typically available on devices running iOS 11 or later, and Android 9.0 or later. If you are using an iPhone then you may need to hold the phone a little away from the screen and pinch to zoom in for the phone to recognise the QR code.
- If scanning the QR code doesn't work, you can go to the
settingsmenu on the device to connect to the hotspot manually.
Using an iPhone as an example:- On your phone home screen, go to
Settings→WLAN. - Turn on
WLAN. Your device will automatically search for available networks.
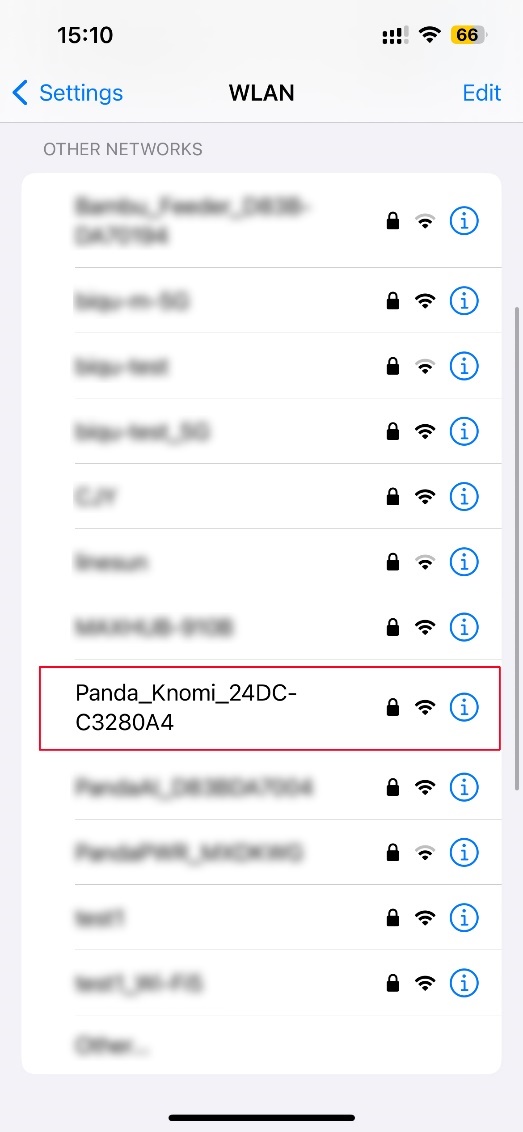
- Tap on the network name starting with
Panda_Knomi_and enter the default password:987654321. - After successfully connecting to the Panda Knomi network, you will see a blue checkmark next to the network, and the Wi-Fi icon indicating a connection will appear in the top-right corner of the screen.
- On your phone home screen, go to
- You can either scan the QR code to connect to the hotspot directly or perform a WiFi scan on your device and connect manually using the credentials below.
Default credentials:
-
After connecting to the Panda Knomi hotspot, the webUI should automatically appear once you close the camera app on an iPhone or on Android there should be a prompt of
Connected (Login/Authentication required)which you should click to enter the Web UI configuration interface. Sometimes due to network reasons, you need to wait for 10~20 seconds for this to appear. If you still cannot enter the Web UI configuration interface after waiting, you can manually enter 192.168.254.1 for firmware versionsV1.0.4.1and later (and use 192.168.4.1 for previous versions) in the browser to access the Web UI configuration interface.
Connect Panda Knomi to the same Wi-Fi network as your printer
- You will be prompted to select a language. After setting the language, tap
Nextto proceed to the Wi-Fi connection interface.

- The Panda Knomi will automatically search for available Wi-Fi networks in the vicinity. Please select the Wi-Fi that the printer is connected to to connect. If the Wi-Fi that the printer is connected to is not found. you can tap the
Scanbutton to initiate a new search for networks.

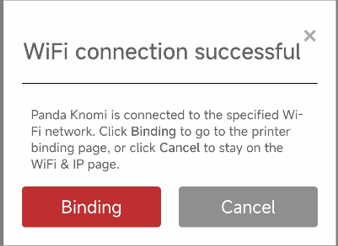
- Once the connection is established, tap
Bindingto proceed to thePrinterinterface where you will bind the printer.
Printer Binding
Note: If the access code field is blank, the printer may be in cloud mode and not linked to a cloud account. Please switch the printer to
LAN Only Modeor use Bambu Handy/Bambu Studio to bind the printer to a cloud account.
Automatic Scanning
- In the
Printerinterface, tapScanto scan for printers on the same local network. A full scan takes about 30 seconds. Each additional Bambu printer adds up to 20 seconds to the scan time. Panda Knomi supports up to 20 printers per scan. If the number of printers in your LAN exceeds 20, it may not be able to scan all printers. If the scan fails to identify the printer you want to connect, you can click theScanbutton to scan again, or manually input all the information to bind the printer.

- After scanning, select the printer you wish to connect to. After selecting a printer, the
SN CodeandIPwill be automatically filled in, but you will need to manually enter theAccess Code.- For A1 Series
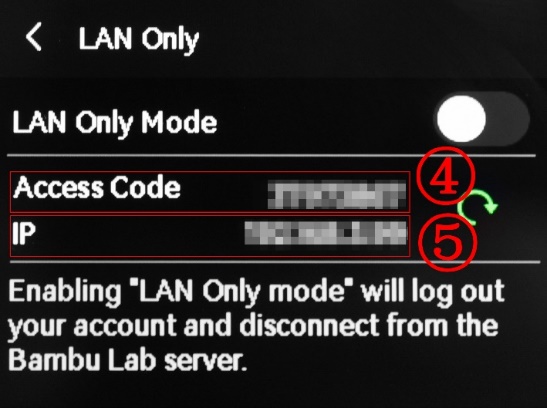
- ①
Setting

- ② -> ③
LAN Only Mode
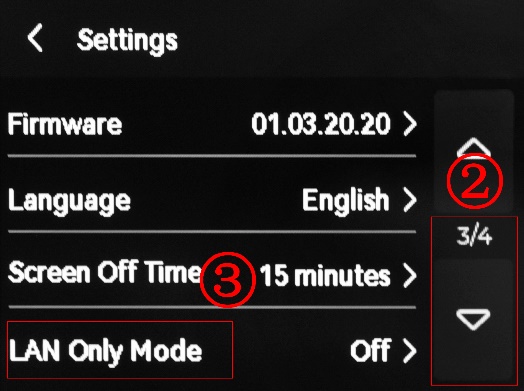
- ④
Access Code
- ①
- For P1 Series
- ①
Setting-> ②WLAN-> ③OK

- ⑤
Access Code
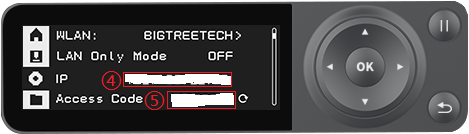
- ①
- For X1 Series
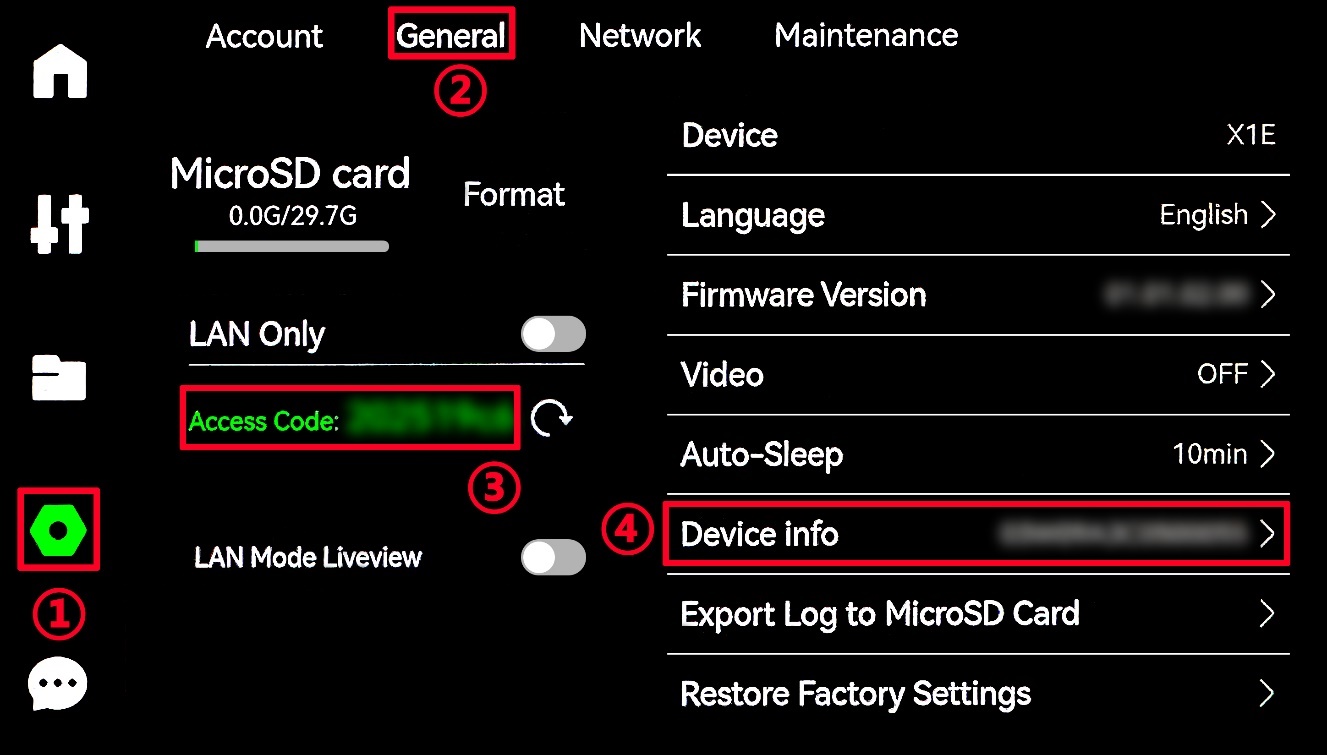
- ①
Setting-> ②General-> ③Access Code
- ①
- For A1 Series
- Tap
Bind. ABinding successfulpopup will confirm that the Panda Knomi has connected to the printer.

Congratulations! You can now enjoy your Panda Knomi.
Manual Input
- Panda Knomi supports identifying up to 20 printers per scan. If the number of Panda Knomi printers in your LAN exceeds 20, it may not be possible to scan all printers. We can
Manually Inputall the information needed to bind the printer.- If you don't have many Bambu Lab printers in your LAN, but still can't scan the printer, we can also try to
Manually Inputall the information required to bind the printer. If Panda Knomi cannot connect to the printer, it may be that some security features of your router prohibit devices in the LAN from communicating with each other. This is typical for guest networks on routers where device to device communication is restricted. If you are using a guest network then please enable device to device communication on the router or move to a non-guest network. If these suggestions fail then please contact customer servicesupport01@bigtree-tech.comto assist you with further investigation.
- Find the
Printer SN,Access CodeandIPon the printer, and enter them into the corresponding input fields on the Web UI.- For A1 Series
Printer SN- ①
Setting
- ②
Device
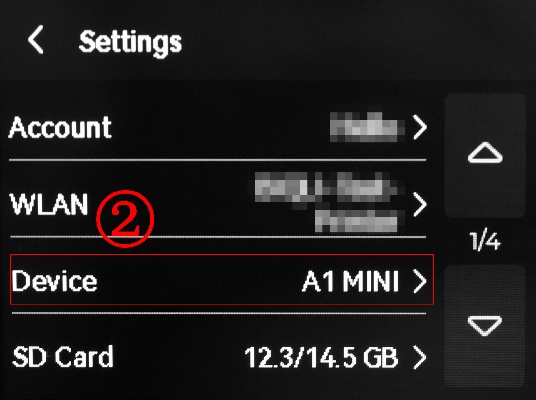
- ③
Printer SN
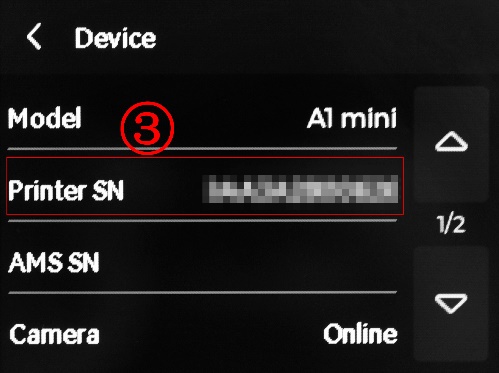
- ①
Access CodeandIP- ①
Setting
- ② -> ③
LAN Only Mode
- ④
Access Code, ⑤IP
- ①
- For P1 Series
Printer SN- ①
Setting-> ②Device
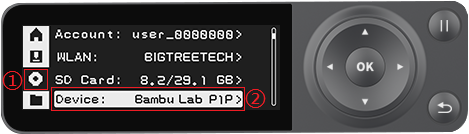
- ③
Printeris thePrinter SN
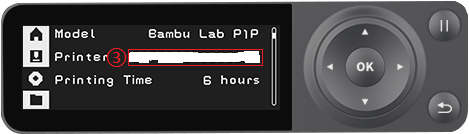
- ①
Access CodeandIP- ①
Setting-> ②WLAN-> ③
- ④
IP, ⑤Access Code
- ①
- For X1 Series
Printer SN和Access Code- ①
Setting-> ②General-> ③Access Code, ④Device infois thePrinter SN
- ①
IP- ①
Setting-> ②Network-> ③IP

- ①
- For A1 Series
- Tap
Bind. ABinding successfulpopup will confirm that the Panda Knomi has connected to the printer.
Congratulations! You can now enjoy your Panda Knomi.
Wi-Fi & IP Settings
The first tab that will appear when connecting to the Panda Knomi webUI is the WiFi and IP settings tab.

- ① Tap the
Wi-Fi & IPoption. - ② To change the Wi-Fi network that Panda Knomi connects to, tap "Configure Wi-Fi", this will take you back to the Wi-Fi configuration interface.
Note: When the Panda Knomi switches to a different Wi-Fi network, it will connect to a new local network and IP address. If your device is connected to the same Wi-Fi network as Panda Knomi at the time of this change, you will lose the ability to communicate with it. To reconnect, you'll need to join the new Wi-Fi network to which Panda Knomi has connected. However, to avoid losing connection during this transition, it is recommended to connect your device to the Panda Knomi's hotspot before initiating any changes to the Wi-Fi settings. This way, you can manage the network settings without disrupting your connection to the device.
- ③ After configuring the network you'll see the IP address that the Panda Knomi has been assigned on the network appear here. Make a note of this IP address because it is one of the methods you can use to access the web UI again in the future. To access the web UI using the IP address, type http://IPAddress into your browser, substituting the string "IPAddress" for the address listed in this field.
-
④ Alternatively, if your devices are on the same network as Panda Knomi, you can access the web UI using the hostname, which by default is
PandaKnomi(accessible via http://pandaknomi.local , hostname is not case-sensitive).
Note that if a VPN is active on your device, you may need to use the IP address directly, as accessing by hostname might fail.
Setting the Hostname:- The hostname must consist only of letters (a-z, A-Z), numbers (0-9), and hyphens (-), and must start with a letter.
- The hostname must be at least 8 characters long and no more than 32 characters.(On firmware version
V1.0.2and earlier, please do not exceed 15 characters, otherwise the device will not start and needs to be updated to firmware versionV1.0.3or later)
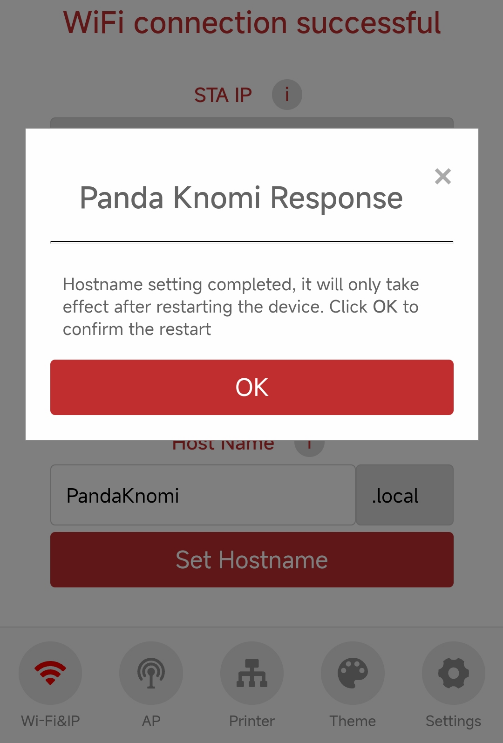
After choosing a new hostname, tap
Set Hostnameto update Panda Knomi. A popup will confirm the successful change. The device must be restarted for the hostname change to take effect. This can be initiated by tappingOKin the confirmation popup, or postponed by closing the popup with thexbutton. After changing the hostname, you will need to make sure that you use that new hostname to access the web UI.
AP Interface
The next UI page is the Panda Knomi access point configuration page. The Panda Knomi AP is a hotspot that the Panda Knomi broadcasts that allows you to connect directly to it instead of via another WiFi network. If you do not want this hotspot to be broadcast then you can turn it off but the Panda Knomi will turn it back on in case it is ever unable to connect to the WiFi network that you have programed into it. This provides a failsafe way of reconnecting to the Panda Knomi in case the primary network becomes unavailable.
If your device is connected to the Panda Knomi AP hotspot to access the Web UI, any changes or shutdown of the Panda Knomi AP settings will disconnect the device. To prevent this, it is recommended to connect your device to the same local network as Panda Knomi before making changes.
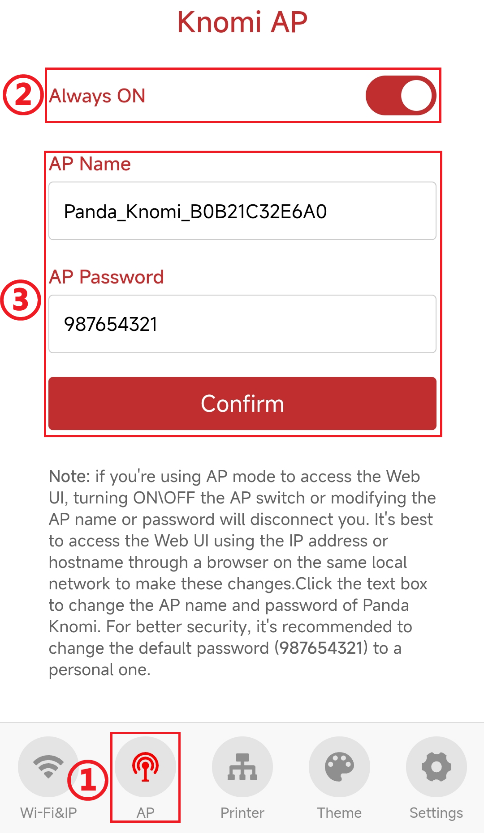
- ① Access the
APinterface. - ② Toggle the Panda Knomi AP hotspot on or off. When the AP hotspot is off, the Panda Knomi will no longer broadcast its own WiFi network and you will only be able to connect to the web UI using the WiFi network that it has connected to. Before disabling it, ensure you record the Panda Knomi’s IP address and hostname on the current Wi-Fi network. Note that if the Panda Knomi loses connection to the primary WiFi network then it will re-enable the AP hotspot regardless of this setting so that you can connect to it and reconfigure the primary network.
- ③ Modify the Panda Knomi AP hotspot settings. Note that this is specifically for the network that the Panda Knomi broadcasts and not for the network that it connects to. The default configuration is:
Wi-Fi SSID:Panda_Knomi_xxxxxxxxxxxx
Wi-Fi Password:987654321
After modifying settings, there is no need to restart Panda Knomi. It will automatically create the new AP hotspot in the background.
Theme Settings and IMG sharing
GIF Status Explanation
This section just explains what the factory default GIFs represent. If you really want to have some fun and define your own GIFs or colours then see the theme settings section.
- Due to hardware limitations, Panda Knomi requires that the size of a single GIF not exceed 1.5MB (1536KB, 1MB = 1024KB), and the total size of all GIFs must not exceed 3MB (3072KB, 1MB = 1024KB).
- In the factory state, the total size of all GIFs is 2664.25KB (slightly different from the sum of all sizes in the table above due to rounding each GIF's size to two decimal places), leaving 407.75KB of available space.
| File Name in Web UI | GIF Effect | Conditions for Display (Printer must be bound) | Factory GIF Size | Factory GIF Resolution (Width x Height) | |
|---|---|---|---|---|---|
| 1 | gif_idle_standby.gif |  |
The printer is idle. | 63.61KB | 240 x 240 |
| 2 | gif_nozzle_heating.gif |  |
Nozzle is heating up. | 135.7KB | 240 x 240 |
| 3 | gif_bed_heating.gif |  |
Bed is heating up. | 128.55KB | 240 x 240 |
| 4 | gif_bed_leveling.gif |  |
Auto-leveling. | 111.28KB | 240 x 240 |
| 5 | gif_homing.gif |  |
Homing. | 142.75KB | 240 x 240 |
| 6 | gif_nozzle_cleaning.gif |  |
Nozzle is being cleaned. | 164.02KB | 240 x 240 |
| 7 | gif_calibrating_flow.gif |  |
Calibrating extrusion flow. | 1023.41KB | 240 x 240 |
| 8 | gif_xy_mesh_mode_sweep.gif |  |
Calibrating resonance compensation. | 78.45KB | 240 x 240 |
| 9 | gif_filament_check_location.gif |  |
Checking filament location. | 225.3KB | 240 x 240 |
| 10 | gif_filament_cut.gif |  |
Cutting filament. | 54.09KB | 240 x 240 |
| 11 | gif_filament_pull_back_cur.gif |  |
Retracting filament. | 139.41KB | 240 x 240 |
| 12 | gif_filament_push_new.gif |  |
Loading new filament. | 164.94KB | 240 x 240 |
| 13 | gif_filament_purge_old.gif |  |
Purging old filament. | 52.98KB | 240 x 240 |
| 14 | gif_printing_ok.gif |  |
Printing complete. | 22.37KB | 240 x 240 |
| 15 | gif_printing.gif |  |
Printing in progress. | 157.41KB | 240 x 240 |
Screen Saver
To prevent screen burn-in from long exposure to static images, Panda Knomi includes a built-in screen saver. Every 15 seconds, a screen saver GIF (non-customizable) will appear for 2 seconds.
- The screen saver GIF is as follows:

- The screen saver is active on the following interfaces:
- Invalid IMG interface
- Hello screen after first power on
- Wi-Fi scan completion
- Wi-Fi connection failure
- Wi-Fi password error
- Binding printer interface
- Printer scan completion
- Printer SN error
- Printer Access Code error
- One printer HMS QR code interface
- Multiple printer HMS error interface
Theme Settings
Theme settings are where the real fun begins with the Panda Knomi. Within this tab of the web UI you will be able to tweak colour settings for the factory GIFs or upload your own, custom GIFs.

- ① Go to the
Themeinterface. - ② Choose how to display printing progress:
Only percentage: Displays real-time printing progress as a percentage.Only GIF: Displays a GIF representing the printing process.Alternating percentage and GIF: Alternates between showing the percentage and GIF every 10 seconds.
- ③ Set GIF Colors
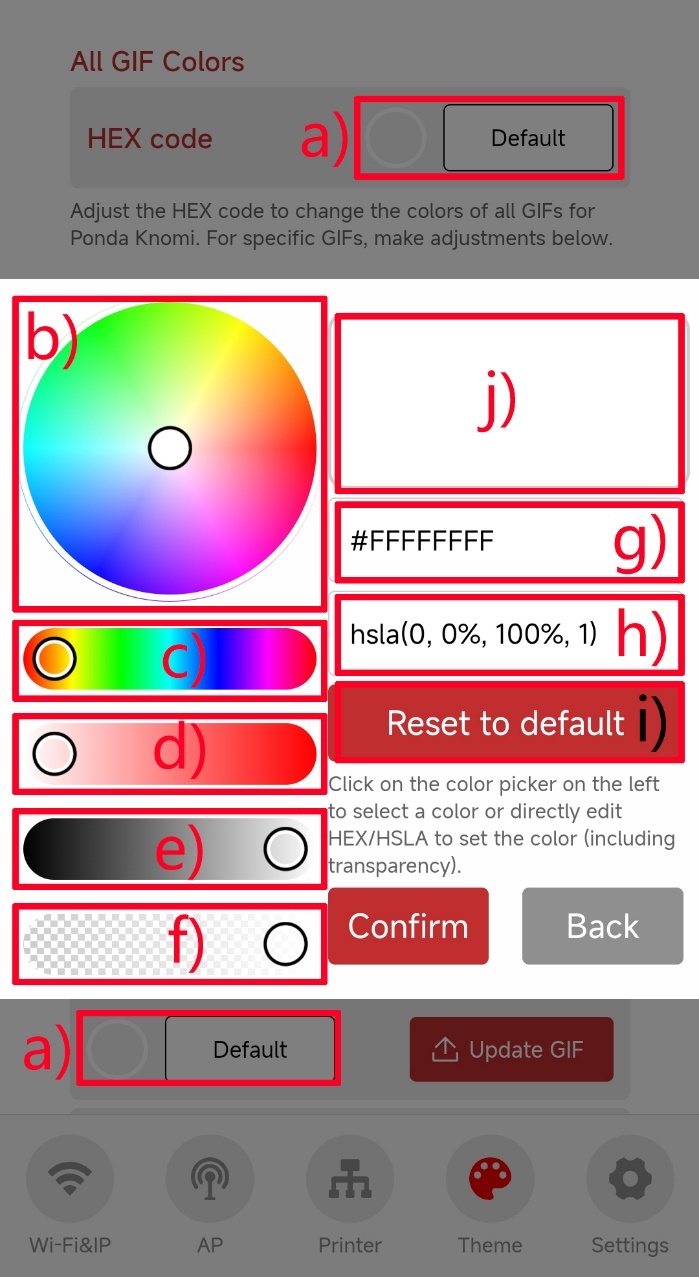
- a) Tap to open the color setting interface for the GIF.
- b) Use the HSL Color Picker.(What is HSL?)
- c) H (Hue) ranges from 0° to 360°.
- d) S (Saturation) ranges from 0% to 100%.
- e) L (Lightness) ranges from 0% to 100%.
- f) A (Alpha/Opacity) ranges from 0.00 to 1.00.
- g) The corresponding RGBA Hexadecimal Value: Each color value ranges from 0 to 255 (0x00 to 0xFF). You can modify these values to get the desired color. For example, #FFFFFFFF means:
- R (Red):0xFF (255/255)
- G (Green):0xFF (255/255)
- B (Blue):0xFF (255/255)
- A (Alpha):0xFF (1.00/1.00)
- h) The corresponding HSLA Values, You can modify these values to get the desired color.
- H (Hue):0°
- S (Saturation):0%
- L (Lightness):100%
- A (Alpha):1.00
- i) Tap to reset to the original GIF color.
- j) Preview the color in the preview area.
- ④ View GIF Storage Usage Due to Panda Knomi’s hardware limitations, the total size of all GIFs cannot exceed 3MB (3072KB). If this limit is exceeded, the Web UI will block the update and display a pop-up reminder.
- ⑤ Set Each GIF Individually (including color and custom GIF images)
TurnPreview Modeon/off to show/hide thePreviewbutton.
TappingPreview this GIFenters preview mode, allowing you to view the custom GIF on the screen. To exit preview mode, turn offPreview Modeor navigate away from theThemeinterface.
Custom GIF Notes:- Panda Knomi uses a
240 x 240pixel screen resolution. GIFs larger than this resolution won’t display fully, so only GIFs of this size or smaller are allowed. Resize larger GIFs:- Tap
Select imagesbutton to select GIF, or Drag and drop the GIF into the browser window. - Make sure that the
Maintain aspect ratiobox is ticked. Avoid changing the aspect ratio to cause inconsistent image effects - Change the larger of the
Width (px):orHeight (px):to 240. If both are the same then you can change either of them. - Tap
Resize IMAGES - Tap
Download resized IMAGESto download the resized GIF.
- Tap
- If using the UI color changing feature, the GIF must have a transparent background (usually black is used for transparency if activated within a GIF). Without transparency, color changes will affect the entire image. Note that almost all GIFs you can find online will not be transparent. BIGTREETECH specifically designed our GIFs to have a transparent background and you can too if you are familiar with how GIFs work.
- Due to the nature of how GIFs update the display between frames, the last frame of a transparent GIF must match the first frame otherwise there will be residual pixels during the loop. This is only relevant if you are crafting your own, custom, transparent GIFs.
- The size of a single GIF cannot exceed 1.5MB (1536KB, 1MB=1024KB), and the total size of all GIFs cannot exceed 3MB (3072KB, 1MB=1024KB).
- The new GIF size must not exceed the sum of the replaced GIF size and remaining capacity. Otherwise, the Web UI will reject the replacement. You can check the available capacity in ④ and the size of each GIF in ⑤.
For example:
to replace “Standby.gif,” if the factory GIF size is 63.61KB and the remaining capacity is 407.75KB, the new GIF size cannot exceed 63.61KB + 407.75KB = 471.36KB.
- Panda Knomi uses a
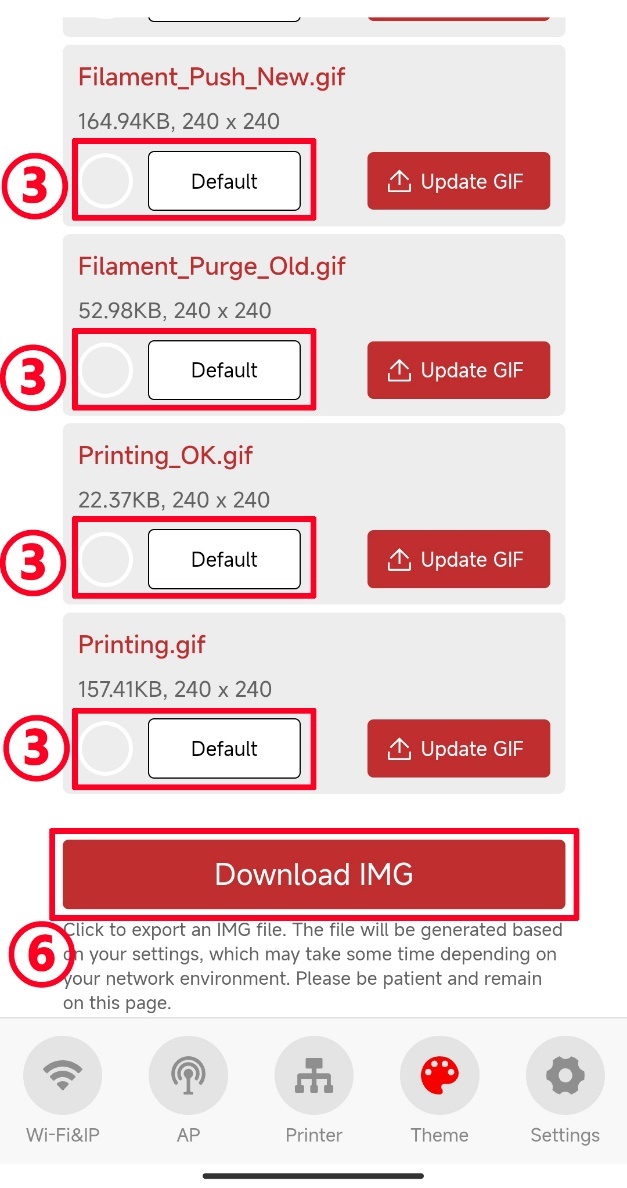
- ⑥ Download and Export Custom GIF as IMG File, Conveniently backup or share your custom GIF designs.
Note: As of firmware V1.0.2 the IMG does not include custom color data information, only GIF image data. Custom color data will be included in V1.0.3.
- ⑦ ⑧ Install Others’ Shared IMG Files to your Panda Knomi.
Optimizing GIF Files
For best results, please optimize your GIFs before uploading using ezgif.com. This helps you store more GIFs on your Panda Knomi. See our Compression Guide for detailed instructions.
Apply IMG to Panda Knomi
Note: As of firmware V1.0.2 the IMG does not include custom color data information, only GIF image data. Custom color data will be included in V1.0.3.
- Download IMG Theme file
- Download Panda Knomi
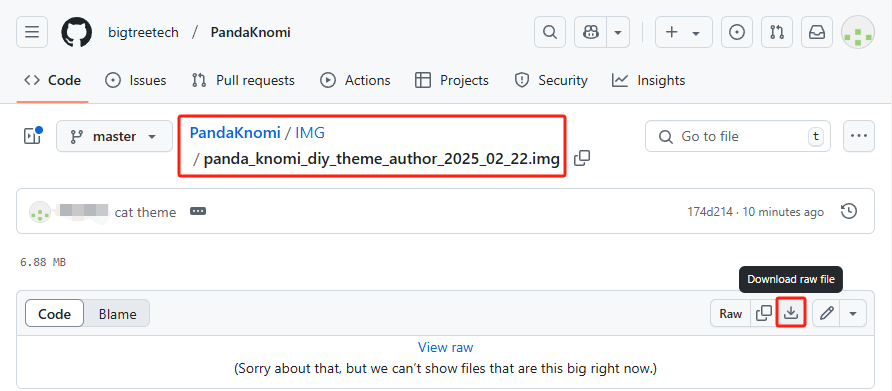
.imgfiles shared by other users in the community. - Download from the Github of Panda Knomi.
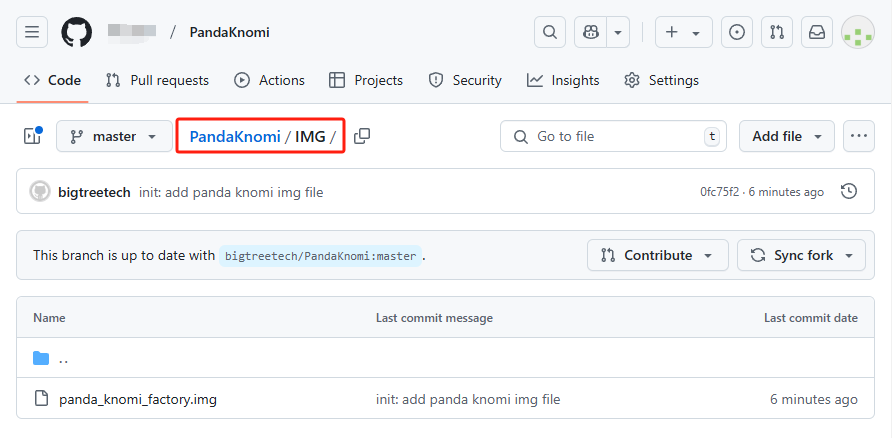
- Visit Panda Knomi’s GitHub repository
- Go to the IMG Folder, select the IMG theme.
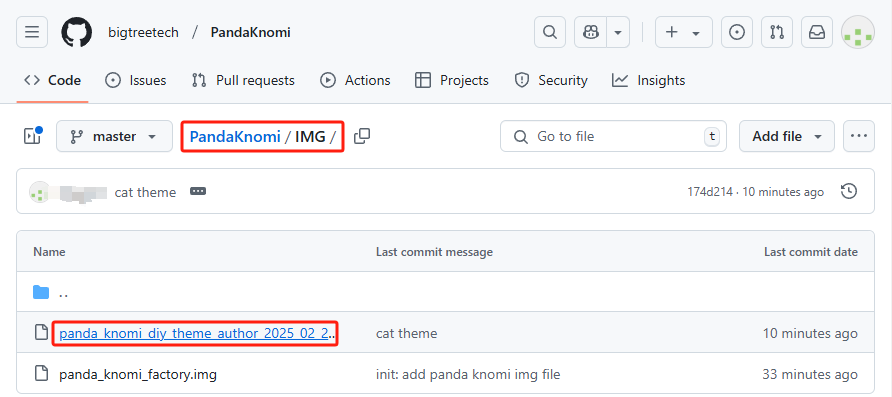
- Click Download to save it locally.
- Download Panda Knomi
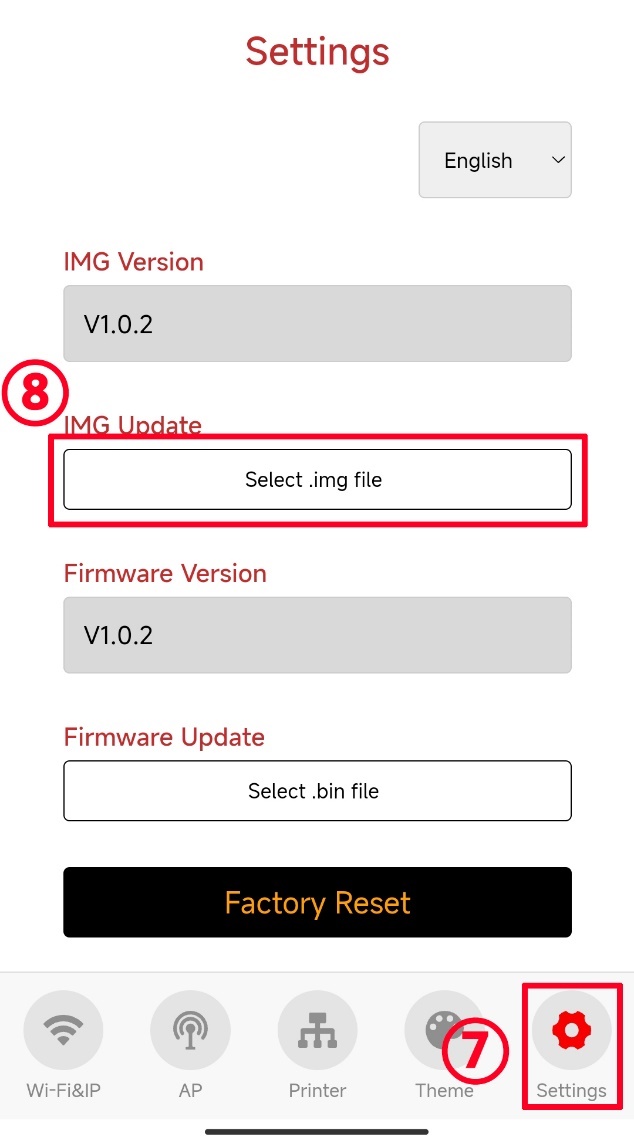
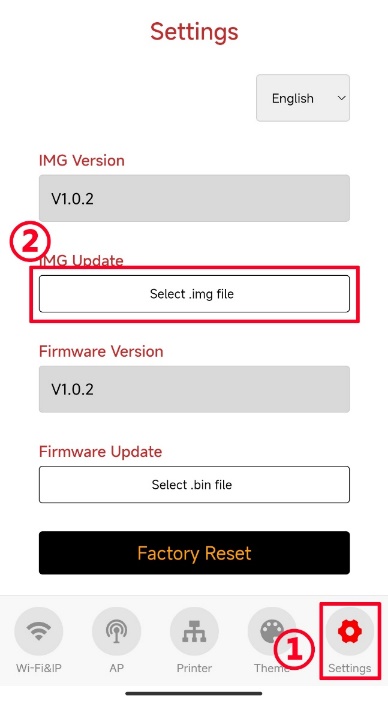
- Then, enter Panda Knomi's Web UI: ① Go to "Settings" → ② Select the .img file you just downloaded.
Once the update is complete, Panda Knomi will automatically apply the new IMG file.
Export IMG from Panda Knomi to Share
Note: As of firmware V1.0.2 the IMG does not include custom color data information, only GIF image data. Custom color data will be included in V1.0.3.
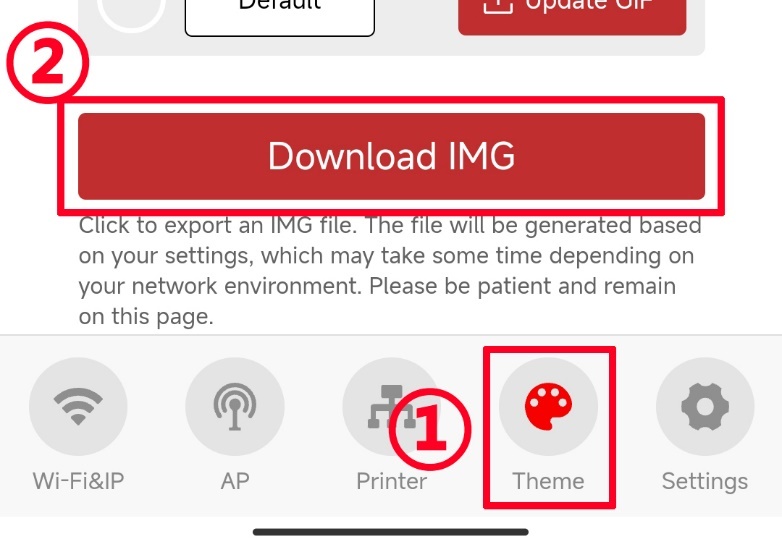
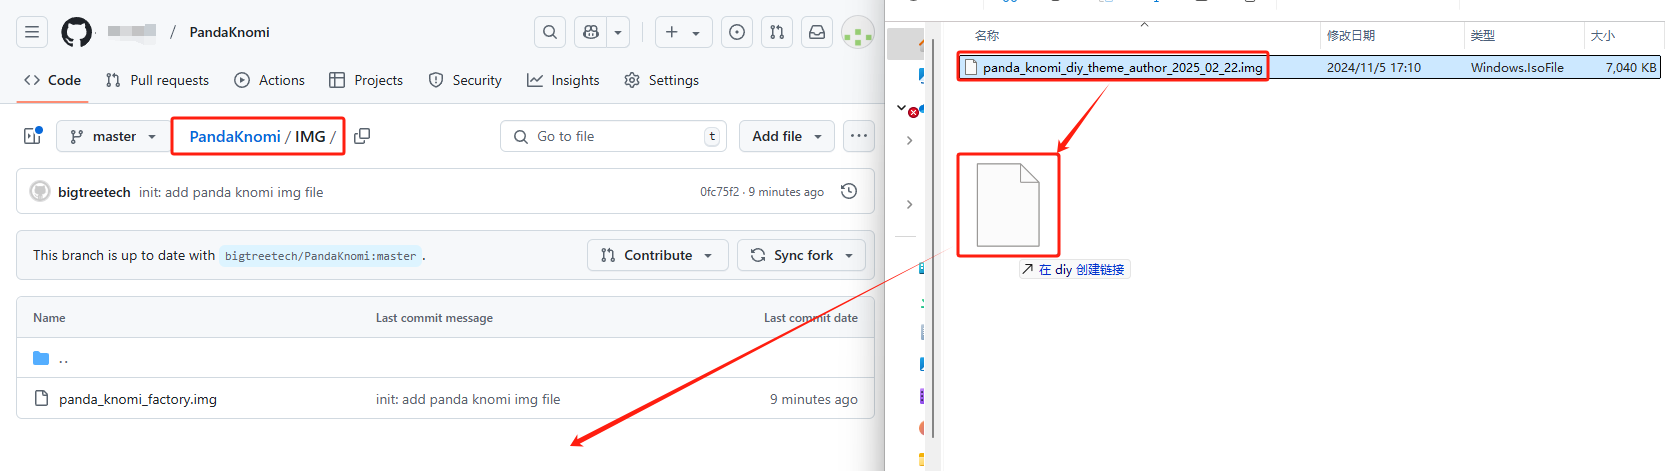
- ① Go to "Theme" → ② Select "Export IMG," and wait for the file to export.
-
Rename it using the following format:
panda_knomi_diy_<theme_name>_<author_name>_YYYY_MM_DD.img<theme_name>: Choose a theme name for the IMG<author_name>: Author’s nickname or nameYYYY_MM_DD: Date of the IMG file (Year_Month_Day)
Example: panda_knomi_diy_theme_author_2025_02_22.img。
-
Share IMG theme to GitHub
- If you don’t have a GitHub account, please create one.
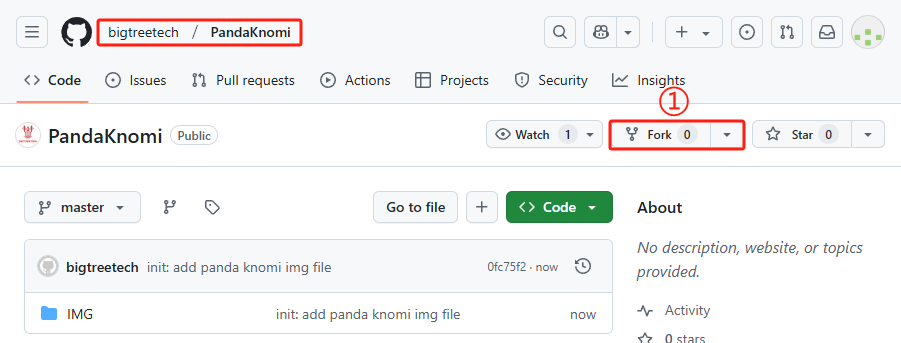
- Visit Panda Knomi’s GitHub repository
- Click ①
Fork
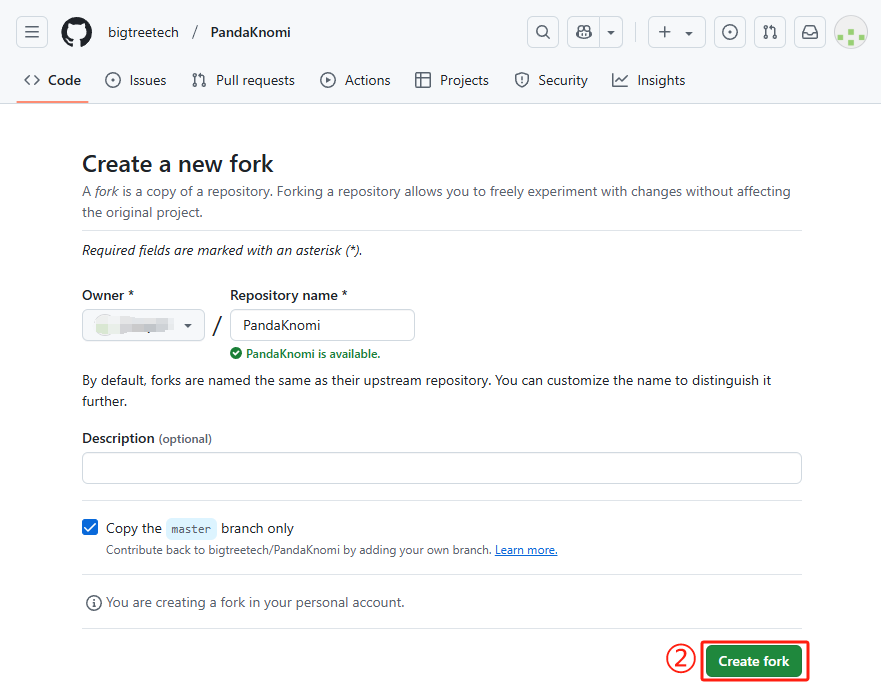
- Click ②
Create fork
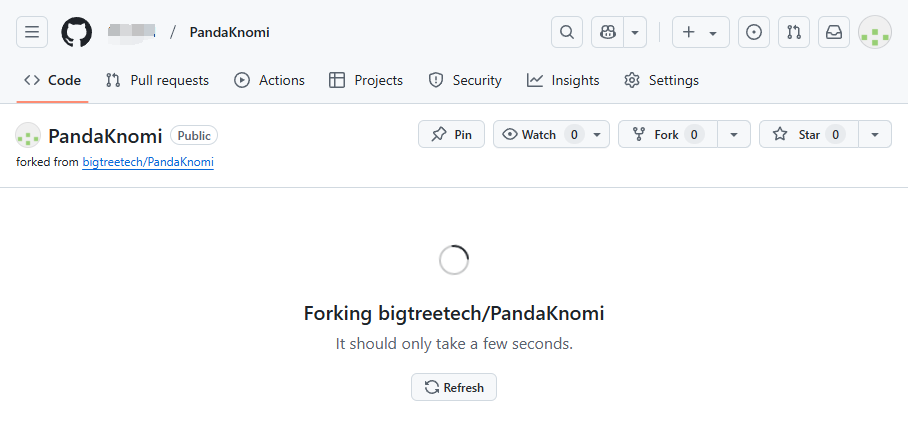
- Wait for the
forkto complete
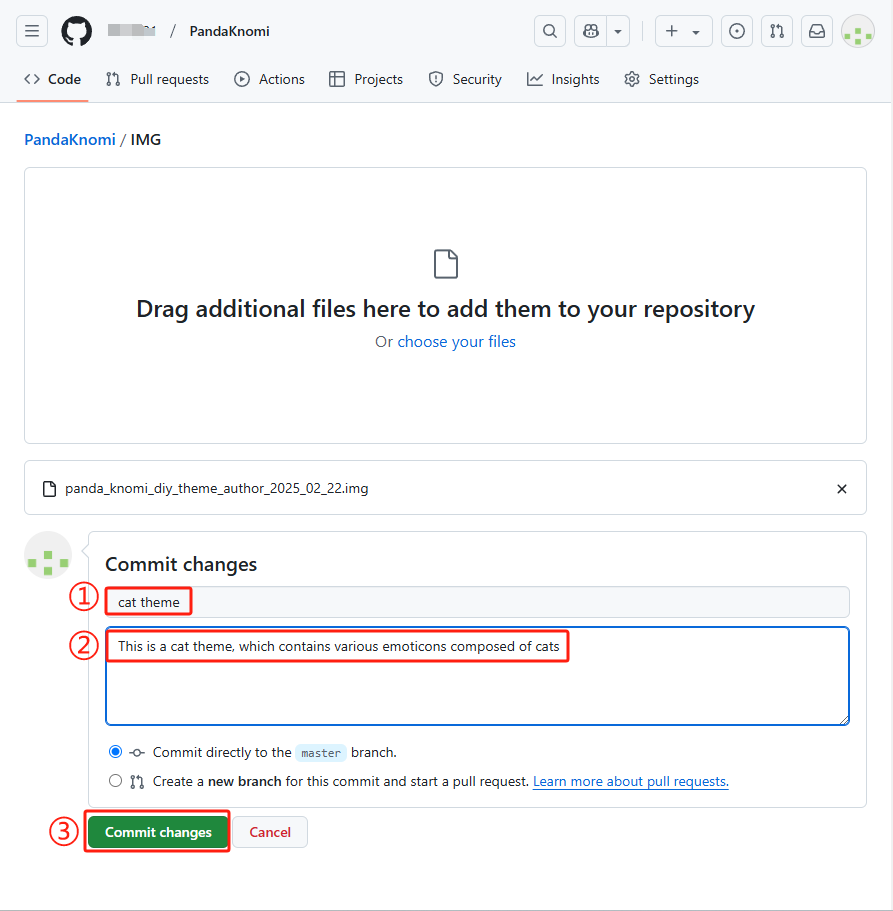
- After forking, go to the IMG Folder
- Drag and drop the IMG file into the browser window. The
Drop to upload your filesinterface will appear.

- Enter the ①
title, ②description, and ③commit changes.
- ①
Contribute-> ②Open pull request
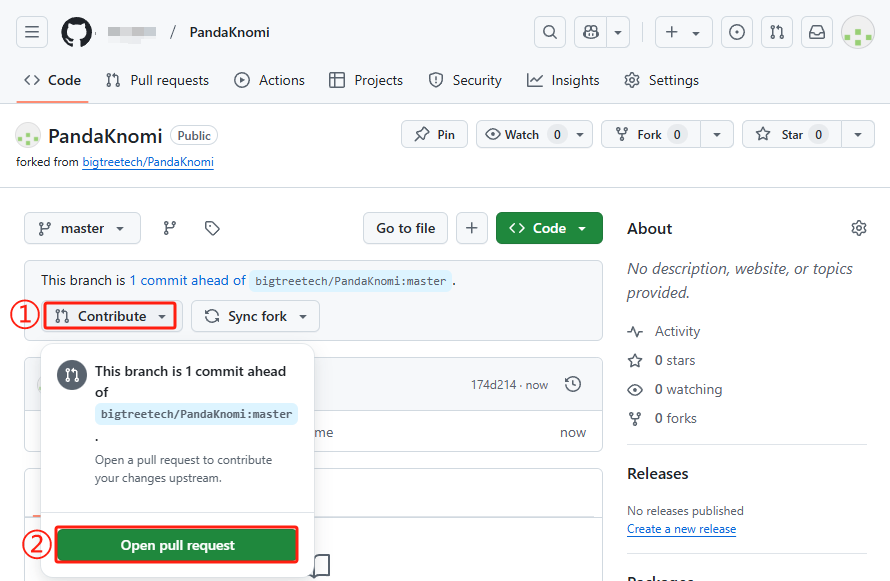
- Write a ①
title, ②description, check ③Allow edits by maintainers, and ④Create pull request

- Congratulations! You’ve shared your theme.
Factory Reset
Restoring the factory settings of Panda Knomi will erase all configurations, including language, Wi-Fi settings, custom hostname, custom AP hotspot name and password, bound printers, print progress display selection, and theme color information. However, custom GIFs cannot be restored to the factory defaults. GIFs can only be modified by uploading new ones or updating the IMG file. The factory IMG file is available for download and can be updated from GitHub
Via Web UI
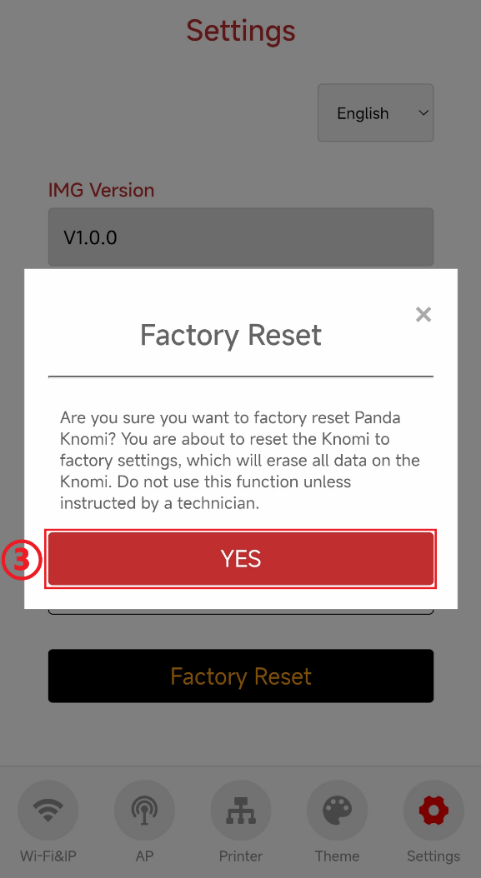
- Go to the ①
Settingsinterface and tap the ②Factory Reset
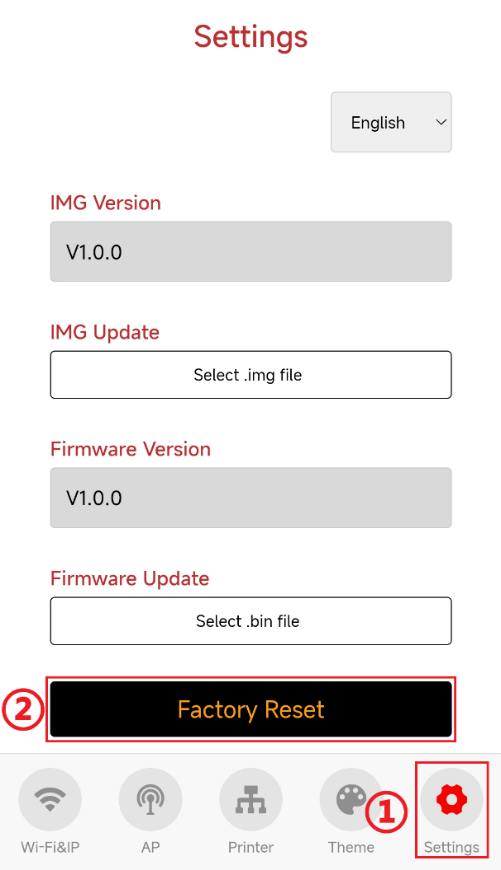
- A confirmation popup will appear, Tap ③
YESto confirm and reset. Panda Knomi will restore the factory settings and restart.
Via Hardware Button
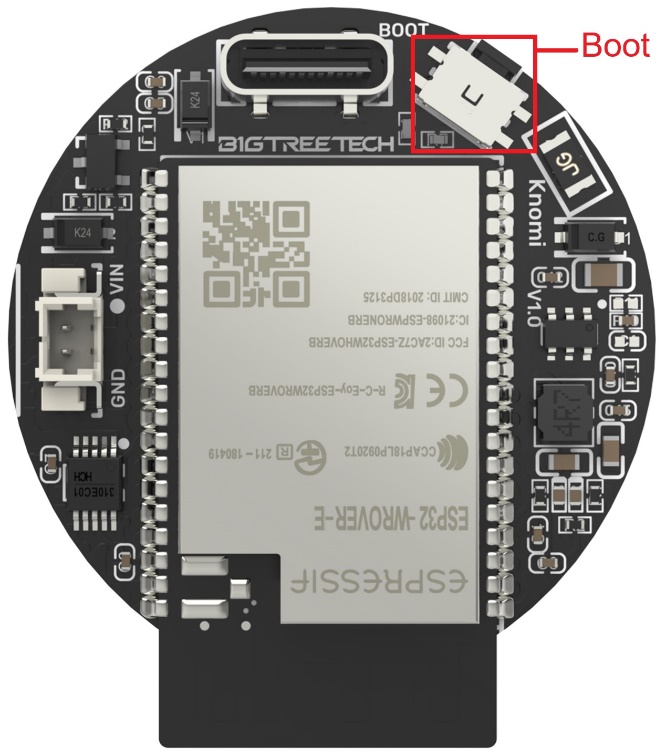
Hold the Boot button on Panda Knomi for 5 seconds to reset the factory settings. The device will restart automatically.
Firmware
Feature requests
If there is something you would like to see in a future release of the Panda Knomi firmware, please let us know by logging a feature request on the official Panda Knomi Github repository.
How to update firmware
OTA
- Access the Web UI
If Panda Knomi is already connected to Wi-Fi, you can connect the device to the same LAN as the Wi-Fi and access the Web UI directly via IP to update the firmware. You can also connect the device to the AP hotspot of Panda Knomi to access the Web UI to update the firmware. You can choose either of these two methods.
- Connect your device to the same local network as Panda Knomi
- Connect your device to the local area network of the Wi-Fi where Panda Knomi is located (Wi-Fi or Ethernet is OK)
- Enter Panda Knomi’s IP or hostname into your browser. The default hostname is http://pandaknomi.local.
- Connect to Panda Knomi's AP hotspot
- Connect your device to Panda Knomi's AP hotspot Using an iPhone as an example:
- On your phone home screen, go to
Settings→WLAN. - Turn on
WLAN. Your device will automatically search for available networks.
- Tap on the network name starting with
Panda_Knomi_and enter the default password:987654321. - After successfully connecting to the Panda Knomi network, you will see a blue checkmark next to the network, and the Wi-Fi icon indicating a connection will appear in the top-right corner of the screen.
- After connecting to the AP, there should be a prompt of
Connected (Login/Authentication required), and click it to enter the Web UI configuration interface. Sometimes due to network reasons, you need to wait for 10~20 seconds. If you still cannot enter the Web UI configuration interface after waiting, you can manually enter 192.168.254.1 for firmware versionsV1.0.4.1and later (and use 192.168.4.1 for previous versions) in the browser to access the Web UI configuration interface.
- Connect your device to the same local network as Panda Knomi
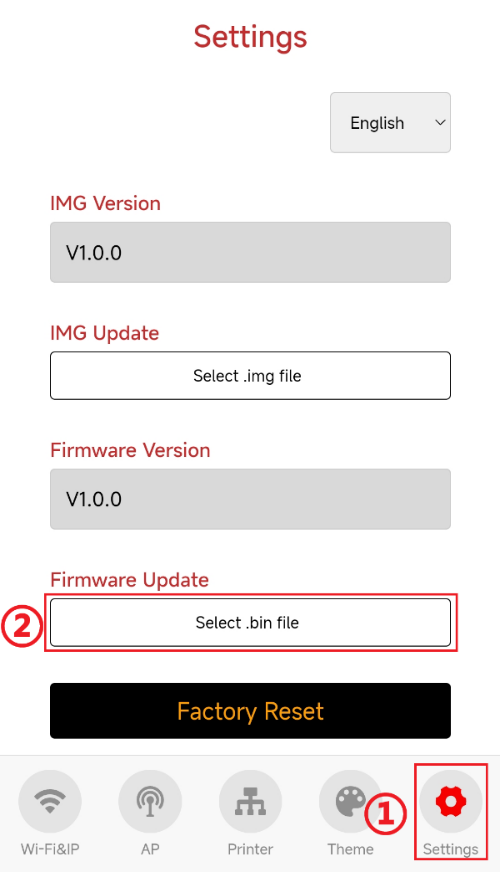
- In the configuration interface, go to ①
Settings, then tap ②Select .bin fileto choose the firmware to update. The device will restart automatically after the update.
flash_download_tool (Type-C)
Note: Panda Knomi firmware updates should be available as a free OTA, This step is only necessary when OTA is is not working on your network as may be the case with some network configurations.
- If your computer does not have the CH340 driver, please download and install CH341SER.EXE
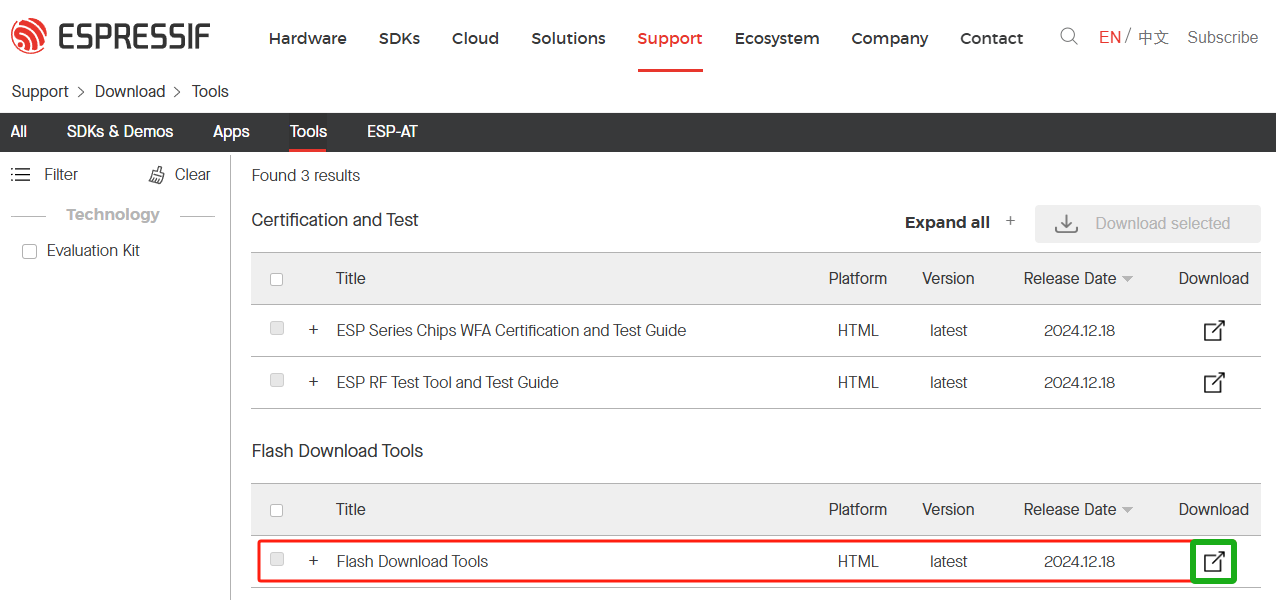
- Download the Flash Download Tools
- Download the Panda Knomi firmware from the releases page.
- Hold the
Bootbutton on Panda Knomi, connect it viaType-Cto your computer, and a new COM port should appear in the device manager.

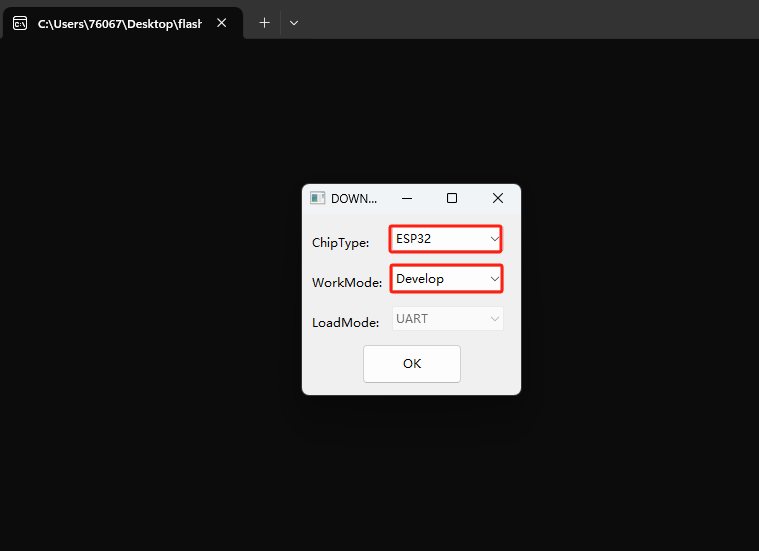
- Open
flash_download_tool_3.9.8_6.exe, and configure as follows:
- As shown in the figure below, configure the flash download tool:
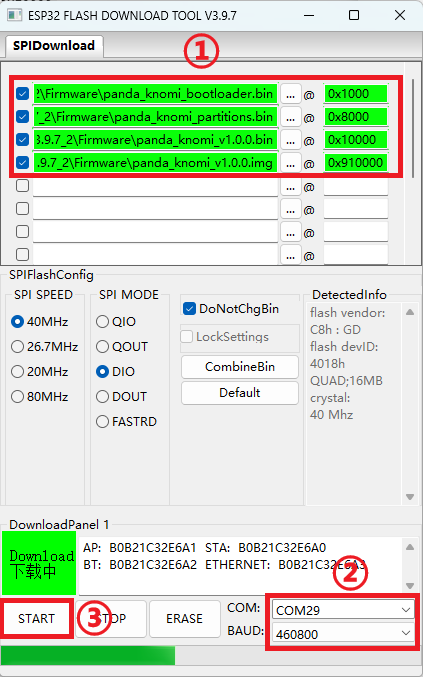
- ① Set the.bin file's writing address, ensuring all checkboxes are ticked:
panda_knomi_bootloader.binto0x1000panda_knomi_partition.binto0x8000panda_knomi_v1.0.0.binto0x10000panda_knomi_v1.0.0.imgto0x910000
- ② Set the COM port to the Panda Knomi port(We can check it in the computer's
Device Manager->Port), and choose a baud rate (recommended: 460800). - ③ Click
STARTto begin writing. Once done, power off and restart Panda Knomi.
- ① Set the.bin file's writing address, ensuring all checkboxes are ticked:
Firmware History 
V1.0.5
- Fixed bad HMS errors and improved web interface stability.
- Added new theme options, progress colors, and screensaver toggle.
- For detailed release information, visit the releases page.
V1.0.4.1
- Optimization: Change the default AP Hotspot IP from
192.168.4.1to192.168.254.1to minimize the possibility of conflicts with the router IP range as much as possible.
V1.0.4
- Fixed: Use MAC address as the
client_idfor MQTT. To avoid the problem of multiple devices using the sameclient_idbeing prohibited from connecting by the printer - Fixed: WebUI adds the ability to set AP Hotspot IP. Panda Knomi defaults to using
192.168.4.1. If your router also uses this IP range, Panda Knomi will not be able to connect to the printer and needs to be set to a different IP range from the router, such as192.168.5.1. After the setup is completed, the device needs to be restarted for it to take effect. - Fixed: Panda Knomi keeps displaying homing GIF when power loss recovery.
- Fixed: Filter non UTF-8 encoded WiFi SSID(name) because non UTF-8 characters cannot be transmitted through WebSocket TEXT.
- Fixed: Unable to display and connect properly when WiFi SSID(name) starts with a space or has multiple consecutive spaces.
- Optimization: WebUI STA and AP add the function of hiding WiFi passwords.
-
Optimization: WiFi connection failure, add a 5-second interval when reconnecting in the background, optimize uninterrupted reconnection to WiFi may cause unstable AP and slow WebUI response issues.
-
TODO (known issue): Unable to display and connect WiFi with the
"character in the SSID(name), will be resolved in the next version.
V1.0.3.1
- Optimization: WebUI custom GIFs with "resolution exceeding 240x240", "single GIF size exceeding 1.5MB" and "sum of all GIF sizes exceeding 3MB" dialog boxes, with added redirect links to wiki instructions for users to adjust GIFs to be compatible with PandaKonmi.
V1.0.3
- Fixed: Implement dedicated memory management logic for custom GIF, fixed the issue of insufficient memory caused by memory fragmentation when replacing GIFs.
- Fixed: MQTT publish failed retry logic.
- Fixed: MQTT receive buffer size has increased from 14KB to 80KB, because X1C connected to 4 AMS may have a single frame data size of up to 26KB, H2D may up to 50KB.
- Fixed: Disable netbiosns to avoid the problem of devices failing to start when the hostname exceeds 15 characters.
- Optimization: The background color of the QR code is fixed to black, and optimizing the contrast is not clear enough, which sometimes causes the phone to fail to scan successfully.
- Optimization recolor GIF:
- Colors are directly stored in GIFs, so that color schemes can be moved along with GIF/IMG files, making it convenient for users to share color schemes.
- Convert the colored RGB to CMYK and merge it with the original color, preserving the anti-aliasing effect of GIF.
- Delete the configuration of useless alpha transparent channels in WebUI.
- Add a GIF loading interface to inform users of the current real-time status of Panda Knomi
- Optimization: The 'Invalid IMG' interface only appears when the GIF to be displayed is invalid. The previous logic was that as long as any GIF was invalid, it would appear when any of the GIFs needed to be displayed.
- Optimization: Add error codes to the message of WebUI wifi connection failure to help us locate the cause of the problem.
V1.0.2
- Fixed: Solve the problem that the TCP connection is occupied and the Web UI cannot be accessed. Now the old connection will be forcibly disconnected and the latest Web UI request will be answered.
- Fixed: MQTT memory leak. Fixed the issue where Panda Knomi may remain in the state of
binding printerafter disconnecting and rebinding the printer more than 100 times. - Fixed: After unbinding a printer in Web UI, if you immediately click
Bindthe printer, Panda Knomi may not bind the printer. - Fix: After printing is completed,
gif_printing_ok.gifis occasionally not displayed. - Optimization: Add the total size limit of GIF, Web UI (pop-up window) + background (refuse to allocate memory) are limited to no more than 3MB, to avoid GIF running out of RAM and causing system abnormalities.
- Optimization: Web UI adds display of GIF storage usage information.
- Optimization: Web UI add the display of the size and resolution of each GIF file.
[V1.0.1]
- Fixed: When accessing the Web UI, the pop-up window that appears immediately is always in English.
- Fixed: Screen saver function causes the
WiFi scan completedandPrinter scan completedinterfaces not to be displayed. - Fixed: Unable to connect to WiFi hotspots with encryption method
WPA-PSK. - Fixed: The WiFi password error was reported incorrectly. A 3-time retry mechanism was added. An exception will be thrown only after the password error is reported 3 times, and the background will still try to reconnect.
- Optimization: It takes about 25 seconds for the A1 mini printer to complete the deployment of MQTT after it is powered on. Panda Knomi will try to reconnect within 30 seconds after the connection is started, and will throw an
Invalid IPexception after 30 seconds, to avoid the situation where Panda Knomi reports an error when MQTT deployment is not completed when the printer is just turned on。 - Optimization: When an
Invalid IPexception occurs, Panda Knomi background automatically listens to UDP and rescans the printer. If a printer with the same SN code is scanned, the new IP will be re-applied to establish a connection.
[V1.0.0]
- First released factory firmware.
Technical Support
Did this page help you? If you have any further questions about product usage or encounter other issues, please feel free to contact our after-sales email at support01@bigtree-tech.com.