SKR V1.4
Product Profile
BIGTREETECH SKR V1.4 motherboard is a 32-bit 3D printer motherboard optimized and upgraded by the 3D printing team of Shenzhen BIQU Innovation Technology Co., Ltd. for the deficiencies of V1.3 version, especially suitable for small and medium-sized printers.
Product Link: https://biqu.equipment/products/bigtreetech-skr-v1-4-skr-v1-4-turbo-control-board-tmc2209-tmc2208-eeprom-v1-0-exp-mot-v1-0-3d-printer-parts-for-ender-3
Features Highlights
- Using 32-bit main frequency 100MHz ARM level Cortex-M3 series LPC1768 main control chip, the performance has been greatly improved;
- Equipped with highly modular and open source firmware Marlin2.0, which is convenient for users to DIY and secondary development;
- Using dedicated power chip M6130, support 12-24V power input;
- Support 2.4, 2.8, 3.5 inch color touch screen, support LCD2004 screen, LCD12864 screen;
- Upgrade and configure the firmware through SD card, which is simple, convenient and efficient;
- The SPI and UART working mode driven by the TMC driver, also having the DIAG pin, which eliminates complex wiring process and can be used by simple unplugging jumper cap;
- Support Resume Printing While Power Off, Filament Break Detection,Automatic Shutdown After Printing and so on;
- High performance MOSFET tube, better heat dissipation effect;
- Using removable fuse makes the replacement process easier;
- Reserved extended port SERVOS and Probe to support BL Touch;
- Support RGB light bar;
- Use the power selection design to separate the USB power supply from the switch power supply, effectively avoiding the situation that the USB port of the computer is burnt out due to short circuit;
- The special function interface uses the row needle with conspicuous color, which greatly reduces the error rate of wiring;
- I2C, SPI and WIFI interfaces are reserved for convenience of DIY;
- Closed-loop drive interface is reserved to reduce the trouble of plug-in switching module;
- Double z-axis interface, eliminating the trouble of external drive expansion module;
- The thermistor interface is protected by a bile capacitor pressurized resistor to enhance the resistance of the interface;
- More fan interfaces: 1 way CNC fan, 3 way normally open fan;
- Plug-in external DC5V power supply module to supply power to TFT screen, BLtouch and Neopixel.
Specifications
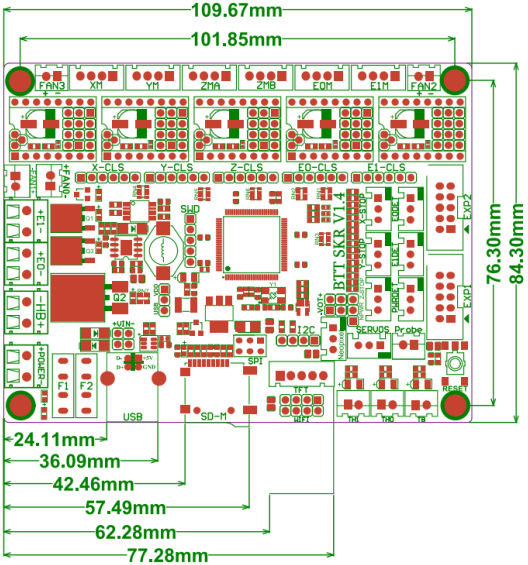
| Appearance size | 110*85mm |
|---|---|
| Mounting size | 102*76mm |
| Microprocessor | ARM Cortex-M3 CPU |
| Input voltage | DC12V-DC24V 5A-15A |
| Logic voltage | DC 3.3V |
| WIFI module | ESP-01S |
| Motor driver | Support TMC5161、TMC5160、TMC2209、TMC2225、TMC2208、TMC2130、ST820、LV8729、DRV8825、A4988 etc., independent external motor drive. |
| Driver working mode support | SPI、UART、STEP/DIR |
| Motor driver interface | X、Y、Z、E0、E1,5 way(Each has a closed loop drive interface) up to 256 subdivisions |
| Temperature sensor interface | TH0, TH1, TB, 3 channel 100K NTC Temperature sensor interface: TH0, TH1, TB, 3 channel 100K NTC (thermal resistance) |
| Display | 2.4、2.8、3.5 inch TFT(Support dual mode screen)、LCD2004、LCD12864 |
| PC communication interface | Square USB, easy to plug, communication baud rate of 115200 |
| Expand the interface function support | Resume Printing While Power Off,Filament Break Detection, Automatic Shutdown After Printing, Automatic leveling, BL Touch |
| Support file format | G-code |
| Supported machine architecture | XYZ、delta、kossel、Ultimaker、corexy |
| Recommended software | Cura、Simplify3D、pronterface、Repetier-host、Makerware |
Dimensions
Peripheral Interface
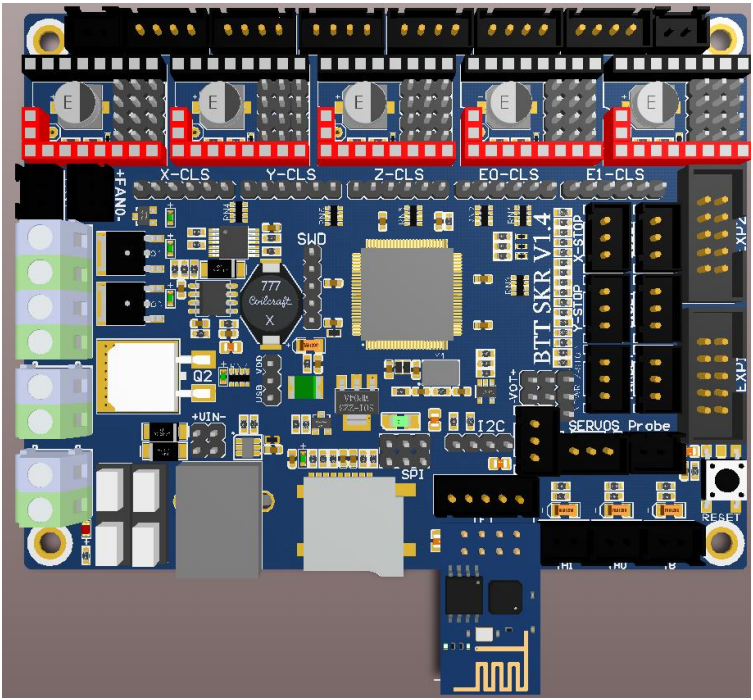
Interface Diagram
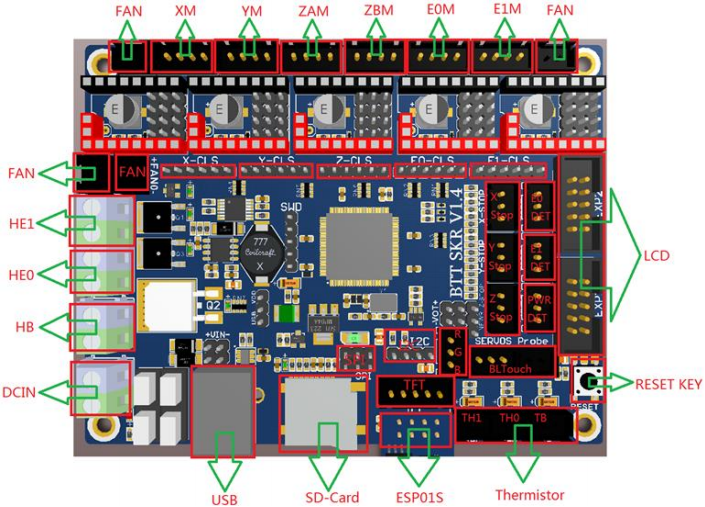
Interface Introduction
USB Power Supply
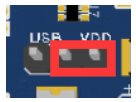
After the SKR mainboard is powered up, the D5 red light in the lower left corner will go on, indicating normal power supply. The 5V SEL in the middle of the board is the power selection terminal;
1、When using USB to power the motherboard:
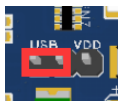
2、When using 12v-24v power supply:
Connection
SKR motherboard communicates with the computer through the [USB] interface. The computer needs to install the driver program first and then insert the motherboard into the computer to identify the port for data transmission. Without installing the driver, it is easy for the computer to fail to recognize the USB port.Using the Marlin2.0 firmware, follow the tutorial for installation:
tutorial:https://www.dropbox.com/s/ppjfflhf3j5yzh2/MarlinV2.0%20SKRV1.1%20instruction.docx?dl=0
driver:https://www.dropbox.com/s/a0k5idjmf4fn82f/lpc176x_usb_driver.inf?dl=0

Drive Mode and Selection Method
1、Common STEP/DIR mode: (for example: A4988, DRV8825, LV8729, ST820, etc.) select the short circuit cap to connect MS0-MS2 according to the driver subdivision table.
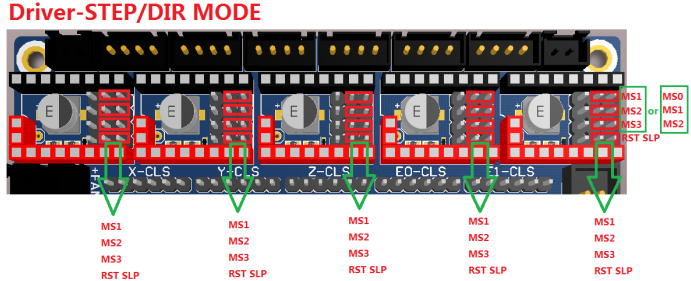
Note: if you are using A4988 or DRV8825 driver, you must connect RST and SLP with jumper cap.
For details, please click: https://bigtreetech.github.io/docs/Tutorials.html
2、TMC Driver-UART Mode: (eg: TMC2208, TMC2209, TMC2225, etc.) Each axis uses a shorting cap to connect the red frame in the figure. The subdivision and drive current are set by firmware.

Note: When using the TMC2209, if you don’t use the stallguard function, you need to cut off the DIAG pin on the driver so that the mechanical switch can work normally. The operation method is as shown below:

Note: This function pin needs to be trimmed only when the blocking detection function is not used.
3、TMC Driver-SPI Mode: (such as: TMC2130, TMC5160, TMC5161, etc.) Each axis uses four shorting caps to connect the red frame position in the figure. The subdivision and drive current are set by firmware.

BLTouch
The connection of SKR V1.4 and BL touch:

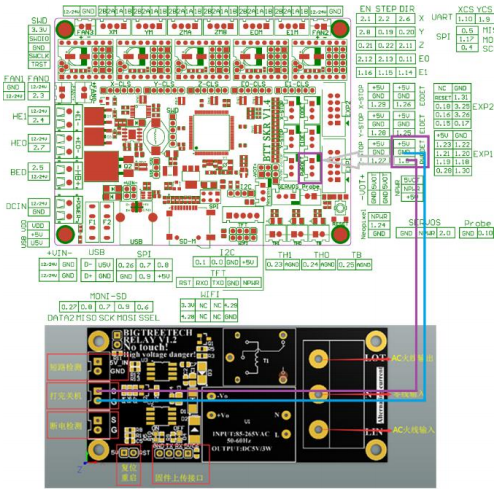
Relay V1.2
The connection of SKR V1.4 and Automatic Shutdown After Printing Module(Relay V1.2):
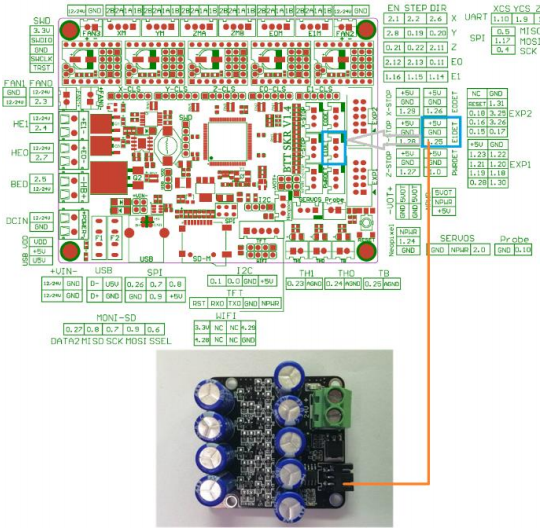
UPS
The connection of SKR V1.4 and Resume Printing While Power Off Module(UPS 24V V1.0):
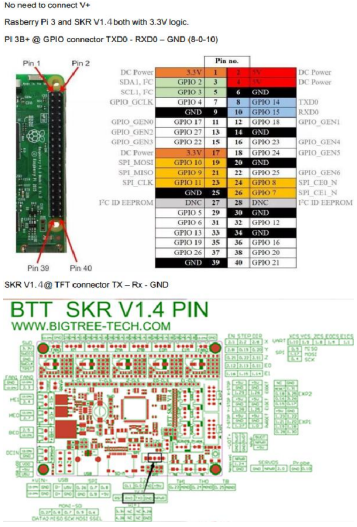
Raspberry Pi
The connection of SKR V1.4 and Raspberry Pi:
Closed loop driver
The connection of SKR V1.4 and closed loop driver:

Marlin
The firmware description of SKR motherboard
The factory motherboard is installed equipped with firmware for testing (model I3), which can be used directly or changed according to your own needs.
1、The Firmware Acquisition Method of SKR Motherboard:
Obtain by Ask customer service or technical personnel;
Download at our Company Open source website: https://github.com/bigtreetech
2、Marlin2.0 Firmware update method
After downloading our open source Marlin2.0 firmware, use Visual Studio Code to open the project to compile, then find the firmware.bin file, copy it to the SD card, and then reset the motherboard. For detailed steps, please refer to the tutorial:
https://www.dropbox.com/s/ppjfflhf3j5yzh2/MarlinV2.0%20SKRV1.1%20instruction.docx?dl=0
Precausions
- The motherboard 5V SEL must connect VDD and +5V two pins before printing (that is, 12v-24v power supply must be provided to the motherboard for printing);
- The power of the hot bed connected to the motherboard must be less than or equal to 144W (that is, the thermal bed resistance is greater than 1Ω). If you want to use a high-power hot bed, you must connect an external hot-bed power expansion board;
- Firmware file names in SD card cannot be changed (including letter case);
- The wiring process and plug-in drive process must be carried out under the premise of power failure. The power can be put on after checking the correct connection of the line and the correct insertion of the drive, so as to prevent the wrong connection line from burning the motherboard and driver and causing unnecessary losses;
- To replace the configuration file, please backup the factory configuration file to record the pin number of each part of the chip, and then change the new configuration file!