A1/Mini
Product Link: https://biqu.equipment/products/biqu-panda-claw-extruder-gear-set-gold-nano-coated-steel-aluminum-cnc-support-for-x1-p1-a1-mini?variant=41425356750946
Wiki: https://bttwiki.com/Panda%20A1Mini.html
Introduction
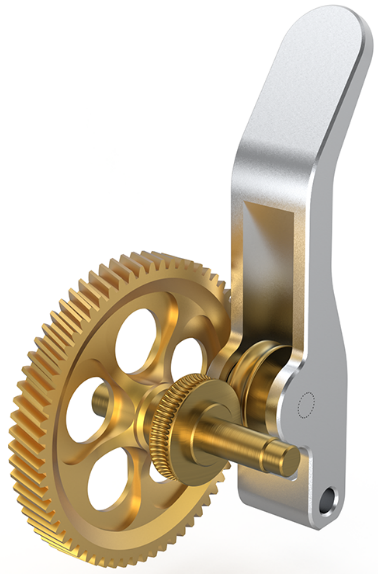
The BIQU Panda Claw is an extruder gear set, designed with golden RNC nano-coated hardened steel gears and aluminum CNC idler arm. It is tailored to improve the performance and durability of extrusion systems in the X1, P1, and A1 series printers, offering an upgrade that enhances filament flow and printing precision.
Feature Highlights
- Abrasive-Resistant: Made from hardened steel with RNC nano-coating, the Panda Claw is highly resistant to wear-and-tear from abrasive filament.
- Enhanced Stability and Durability: The lightweight, high-strength, ultra-tight tolerance idler arm eliminates unwanted movement, ensuring stable feeding, while the brass spur gear provides self-lubricating properties for a longer lifespan.
- Precision: The five-spoke lightweight design minimizes moving mass, ensuring exceptional accuracy for perfect prints.
- Compatibility: The Panda Claw is compatible with Bambu Lab X1/P1/A1 series printers.
Packaging List
| Item | Qty |
|---|---|
| Panda Claw | 1 |
| Bearings | 2 |
| MoS2 Grease | 1 |
Replacement Guide
In this guide, you will learn how to replace the stock extruder gear with our Panda Claw on the A1.
Step 1: Remove the Stock Extrusion Gear
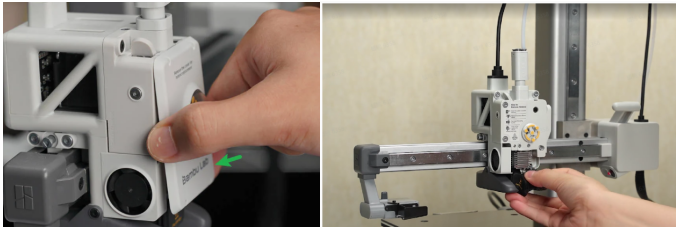
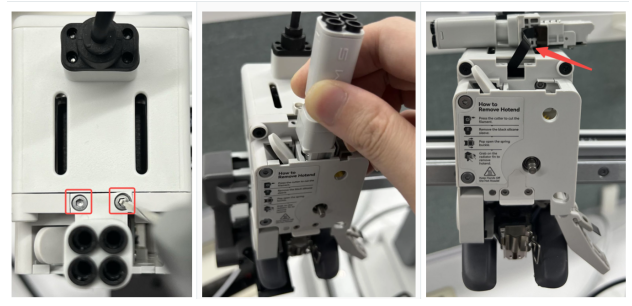
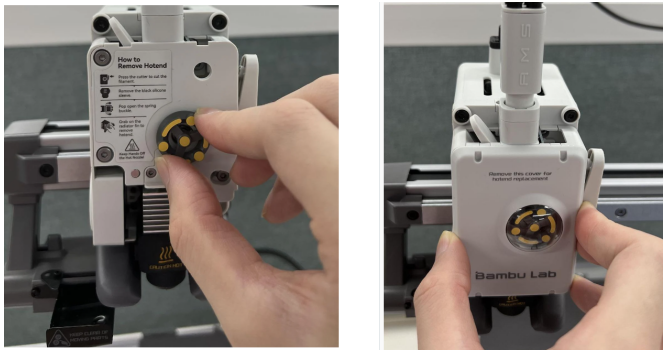
1.Remove the Hotend Assembly
Cut the Filament (if necessary): If the filament is in the loading state, use a filament cutter to cut it off first.
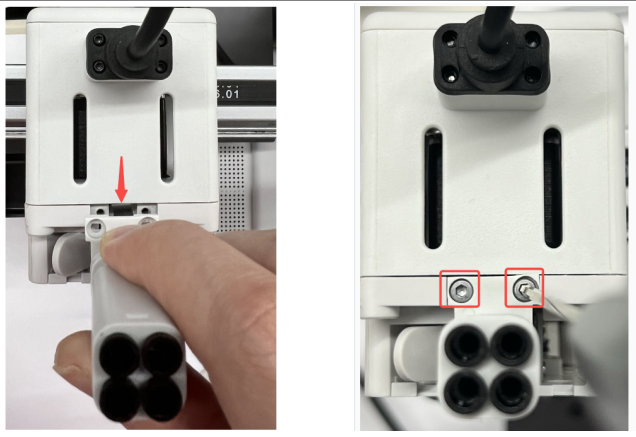
Press the Toolhead Cover from both sides to unlock and remove it.
Pull the protrusion on the side of the Hotend Silicone Sock by hand and remove the Sock.
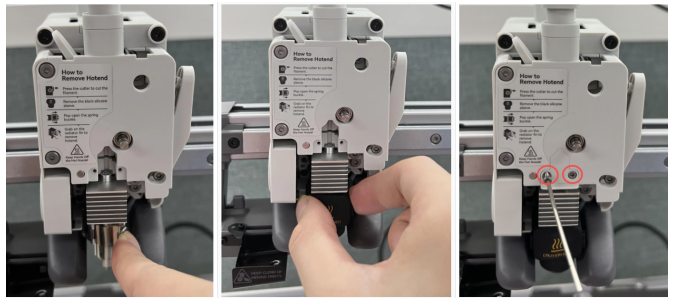
Remove the rotating wheel.
Use an H1.5 hex key to remove the two screws.
Take off pressure block.
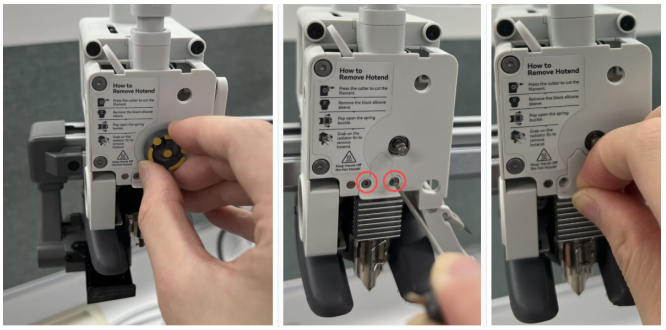
Release the hotend latch, then hold the heat sink with your hands and carefully remove the hotend.

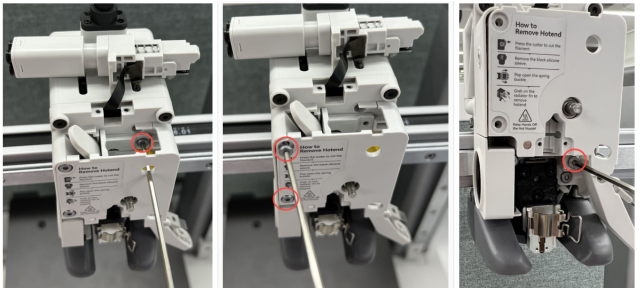
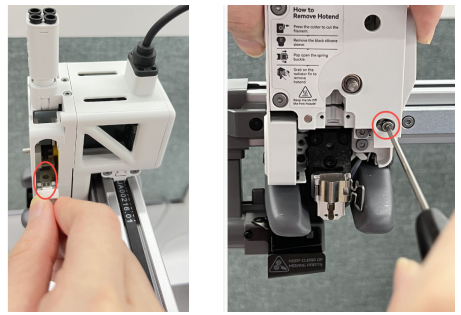
2.Loosen the Filament Cutter
Use an H2.0 hex key to remove the screw and release the filament cutter.

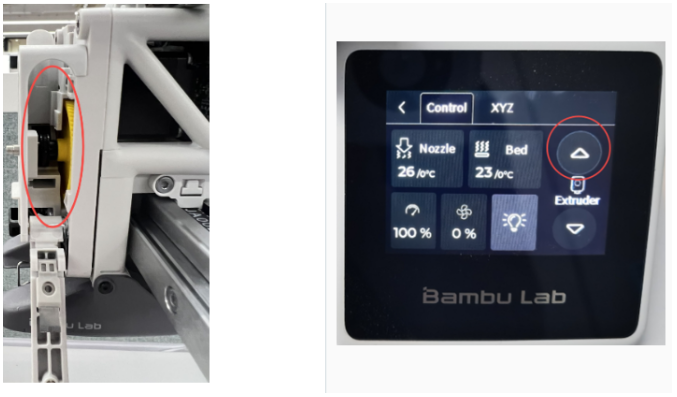
Clean the Internal Filament Debris: Use tweezers and a blower to clean out any filament debris and residue.
Manually rotate the yellow gear clockwise for cleaning while the power is off, or alternatively press the "retract" button on the screen while the power is on to rotate the extruder wheel to the specified angle for cleaning.
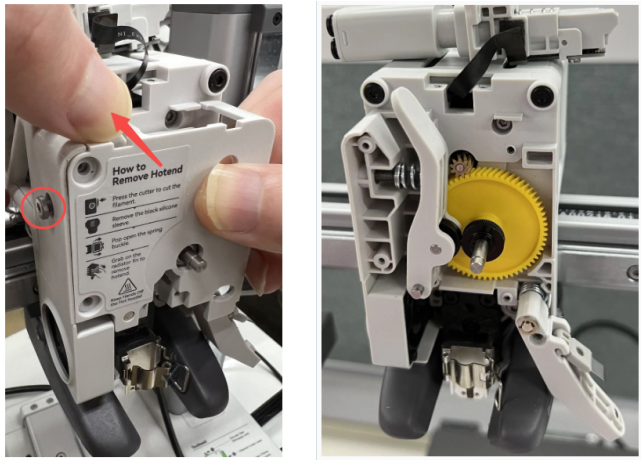
3.Remove the Extrusion Gear
1)Remove the Filament Hub Assembly: Use an H2.0 hex key to unscrew the two screws and then carefully remove the filament hub.
Be careful not to damage the black FPC cable. After removing the filament hub, you can place it on top of the tool head as shown in the picture below.
2)Remove the Extruder Front Cover: Use an H2.0 hex key to unscrew the four screws on the front cover of the extruder.
When removing the front cover, first, slightly loosen the screw on the side, hold the top of the bracket, and remove the front cover while holding the other side.
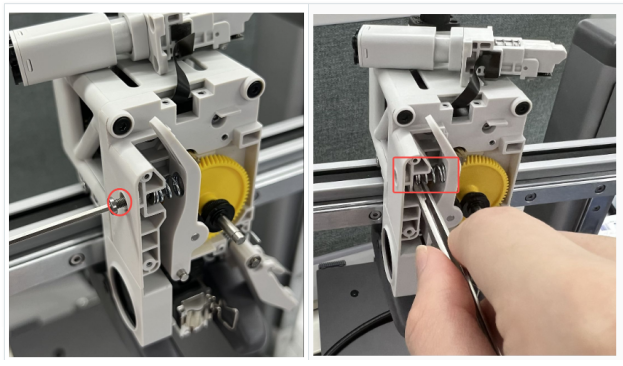
3)Remove the Driven Wheel Bracket: Use an H2.0 hex key to unscrew the side screw and carefully remove the bracket.
Be cautious as the internal spring and end cap can easily fall off. Use tweezers to carefully remove them to prevent loss.
4)Remove the Extrusion Gear: Remove the extruder gear assembly directly.

Now that you've removed the stock extruder gear, we can start installing the Panda Claw.
Step 2. Panda Claw Assembly Instructions
1.Install the Extrusion Gear
Lubricate the gear (highlighted in green in the image below) before installing the extrusion gear.
Notes: Make sure you don’t get any grease on the filament gear teeth(highlighted in blue in the image below). If you do, just wiping it off won’t help. You’ll need to wash the gear with soap to remove the grease and then apply new grease after that.

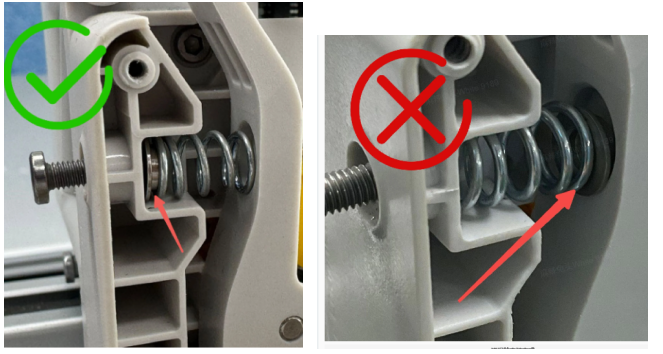
2.Install the Driven Wheel Bracket
Install the driven wheel bracket to the corresponding shaft. Assemble the spring and end cap in the correct orientation and placement, referring to the provided images for guidance below. Utilize tweezers to carefully position them within the driven wheel bracket. The side screw should remain untightened temporarily.
Important:
Ensure that the spring and end cap are installed properly. Incorrect installation may result in the gear failing to grip the filament, leading to print failure.


3.Install the Extruder Front Cover
Tighten the four screws located on the front cover of the extruder.

4.Tighten the Screw on the Side of the Extruder

5.Install the Filament Hub Assembly
Install the filament hub assembly, ensuring that the black FPC cable is not folded and is smoothly positioned in the designated vacant space. Then, tighten the two screws to secure the filament hub in place.
6.Install the Filament Cutter
Lift the lever and slide the cutter into position along the blade groove. Secure the lever by tightening the screw.
7.Install the Hotend Assembly
Hold the nozzle heat sink and align it with the mounting position. Mount the nozzle in place and engage the quick-release device. Install the Hotend Silicone Sock, then tighten the two screws to secure the pressure block in place.
Install the rotating wheel and attach the tool head front cover.
Congratulations! You've successfully upgraded to the Panda Claw. Enjoy enhanced performance and precision in your printing.
Product Purchase Link
https://biqu.equipment/products/biqu-panda-claw-extruder-gear-set-gold-nano-coated-steel-aluminum-cnc-support-for-x1-p1-a1-mini?variant=41425356750946
If you have any issues with the product, please submit a support ticket.
https://biqu3d.com/pages/submit-a-ticket
Navigation:
BIQU Official Website: http://biqu3d.com
BIGTREETECH Official Website: http://bigtree-tech.com
Online Store: https://biqu.equipment
Community: https://community.biqu3d.com