M8P V2.0
Product Profile
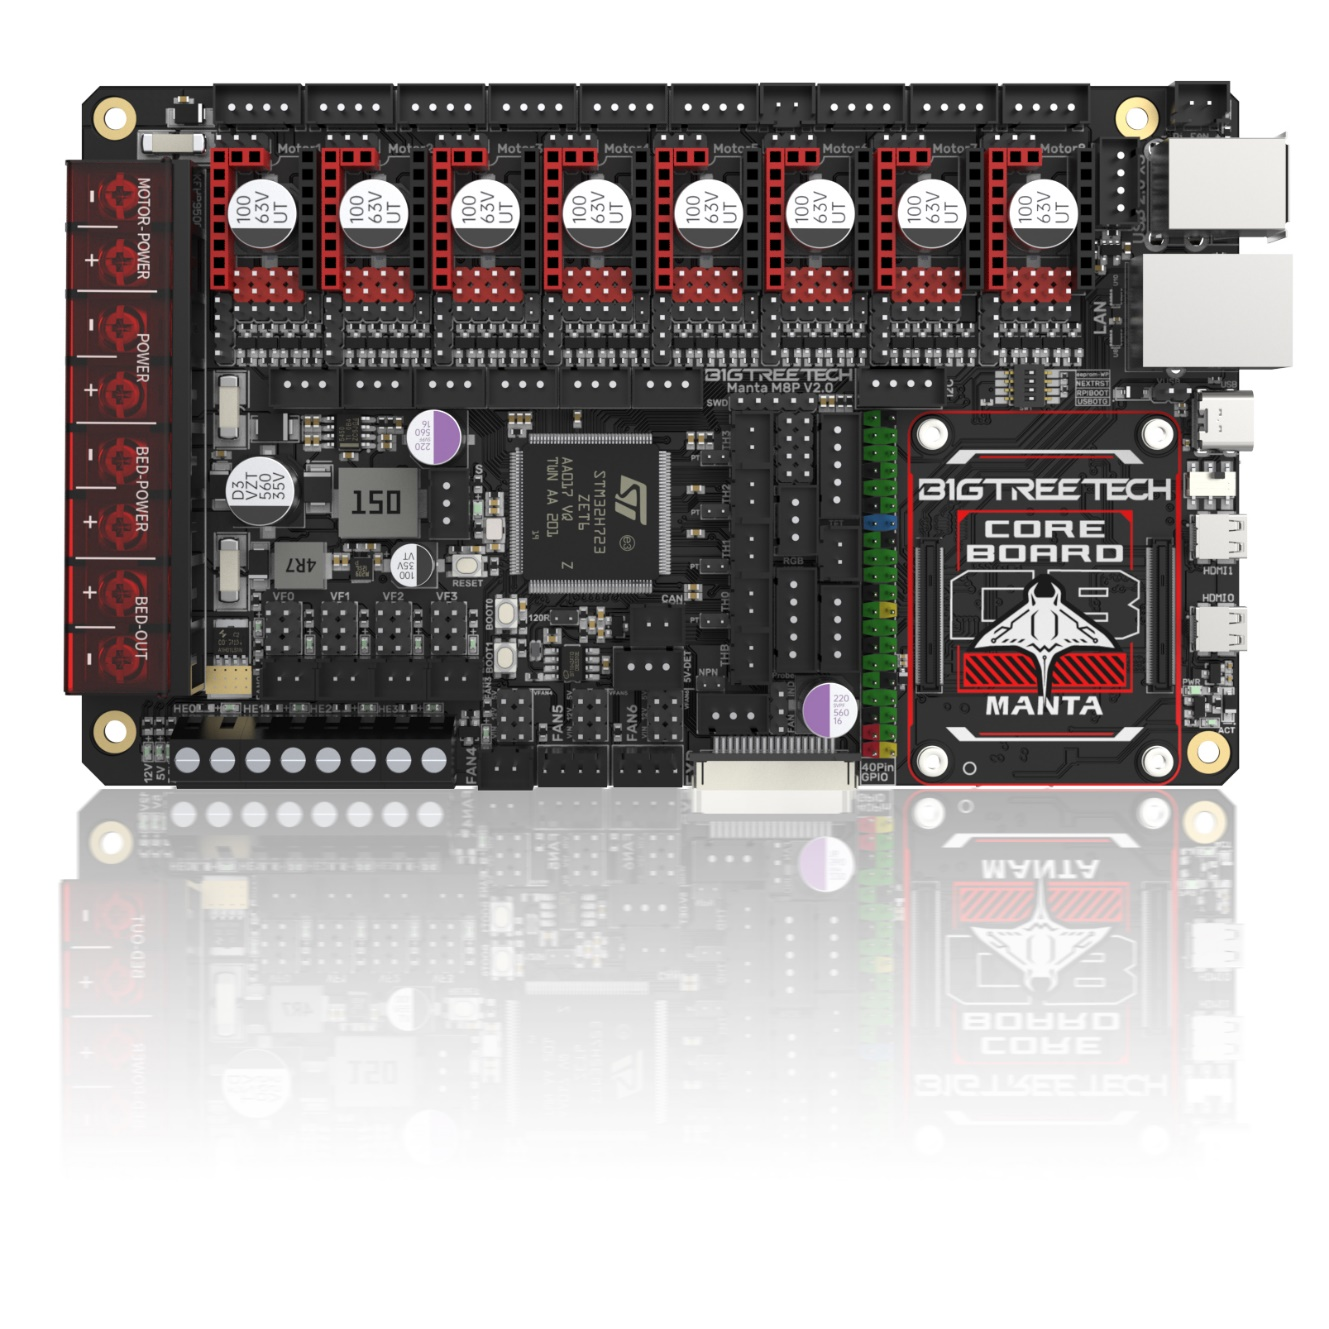
BIGTREETECH Manta M8P V2.0 is a 32-bit 3D printer control board designed for use with Klipper firmware. It allows direct installation of a core board to run Klipper, greatly simplifying connections to a Raspberry Pi and saving space in the electronics enclosure. The board has a BTB socket for use with a CM4, CB1, or other solutions, providing flexibility beyond the expensive CM4.
Features Highlights
- Uses a 32-bit STM32H723ZET6 ARM Cortex-M7 MCU running at 550MHz.
- The TPS5450-5A power chip supports 12/24V DC input and delivers up to 5A/6A peak for powering a Raspberry Pi.
- A BOOT button is provided for DFU firmware updates.
- The thermistor circuit is protected to prevent MCU damage from shorted heated bed and heater cartridge connections.
- PWM fans support 24/12/5V voltage selection without external transformer module, reducing failure points.
- The thermistor resistor can select the pull-up resistor value through a jumper to support PT1000 without an external module, which is convenient for customers to use for DIY purposes.
- The MCU firmware can be upgraded through an SD card or through the "make flash" command in Klipper to update the MCU firmware via DFU.
- The BTB connector allows use of CM4, CB1, or other core boards.
- The onboard TMC driver works in SPI and UART modes, and the onboard DIAG function pin can be used by simply plugging in a jumper.
- Connectors for filament sensor, auto power-off, BLTouch, RGB, I2C, servo, 5V power detection, etc.
- High efficiency MOSFET for less heat generation;
- High performance MOSFETs reduce heating.
- Replaceable fuses for easy service.
- 3x 4-pin fan headers usable for water cooling.
- Proximity switch header supports NPN and PNP (24/12/5V).
- SPI expansion for accelerometer-based resonance compensation.
Specifications
| Overall Dimensions | 170 x 102.7mm. |
|---|---|
| Installation Dimensions | Please refer to BIGTREETECH MANTA M8P V2.0-SIZE-top.pdf |
| Microprocessor | ARM Cortex-M7 STM32H723ZET6 550MHz |
| Driver Input Voltage | 24V, HV (24-60V) Selectable |
| Board Input Voltage | VIN=DC12V or DC24V |
| Heated Bed Input Voltage | BED IN=DC12V or DC24V |
| Heating Interfaces | Heated Bed (HB), Heater Cartridge (HE0, HE1, HE2, HE3) |
| Max Heated Bed Output Current | 10A, peak 10.5A |
| Max Heater Cartridge Output Current | 5.5A, peak 6A |
| Fan Interfaces | 5x 2-pin PWM fans (FAN0, FAN1, FAN2, FAN3, FAN4),1x 2-pin Pi FAN, 2x 4-pin PWM fans (FAN5, FAN6), 1x always on fan, FAN0, FAN1, FAN2, FAN3, FAN4, FAN5, FAN6 are available with 5/12/24V selections. |
| Max Fan Output Current | 1A, peak 1.1A |
| Total Current for Heater Cartridge + Driver + Fans | Less than 12A |
| Expansion Interfaces | BLTouch (Servos, Probe), Servo, Filament Sensor, 5V Power Loss Detection, PS-ON, I2C, RGB, SPI, TFT, EXP, CAN etc. |
| Motor Driver | Supports TMC5160, TMC2209, TMC2225, TMC2226, TMC2208, TMC2130, ST820, LV8729, DRV8825, A4988 etc. |
| Driver Modes | SPI, UART, STEP/DIR |
| Motor Drive Interface | Motor1, Motor2, Motor3 (dual), Motor4, Motor5, Motor6, Motor7, Motor8 (8 total) |
| Temperature Sensor Interfaces | 5x 100K NTC, 4x support NTC and PT1000 |
| Display Interfaces | SPI touchscreen, LCD display |
| PC Communication | Type-C for easy plug/unplug |
| Function Interfaces | USB 2.0*3, LAN, DSI, CSI, SPI, 40-pin GPIO, HDMI0/HDMI1, SOC-Card, MCU-Card |
| Supported Machine Types | Cartesian, Delta, Kossel, Ultimaker, CoreXY |
| Recommended Software | Cura, Simplify3D, Pronterface, Repetier-host, Makerware |
Dimensions

Peripheral Interfaces
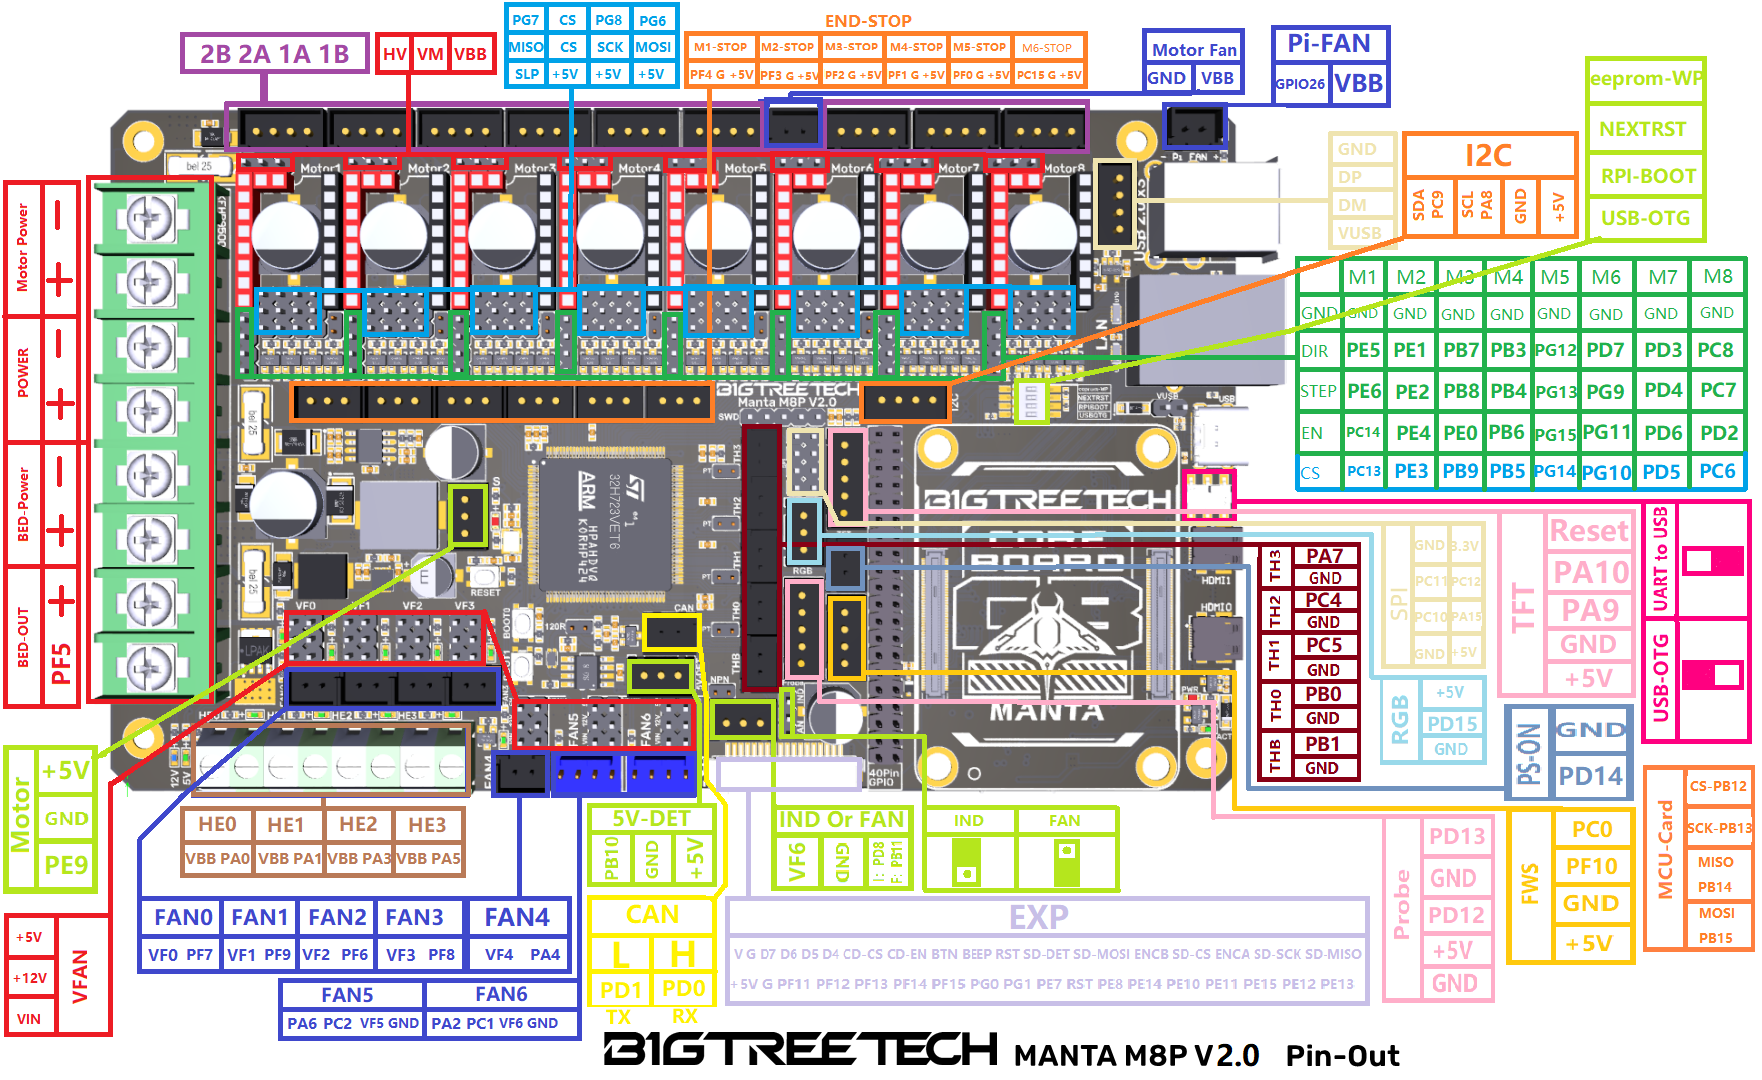
Interface Diagram

Pin Description
Interface Introduction
USB Power Supply
After powering on the M8P, the LED on the bottom left corner will light up to indicate normal power supply. The VUSB jumper in the center is for selecting power - it should only be shorted when powering the board via USB or supplying power out via USB.

Stepper Motor Drivers
Standard STEP/DIR (STANDALONE) Mode
For drivers like A4988, DRV8825, LV8729, ST820, etc, use a jumper to short MS0-MS2 based on the microstepping table.

Note: A4988 and DRV8825 require RST and SLP jumpered for proper operation.
For details, please click: https://bigtreetech.github.io/docs/Tutorials.html
TMC Drivers - UART Mode
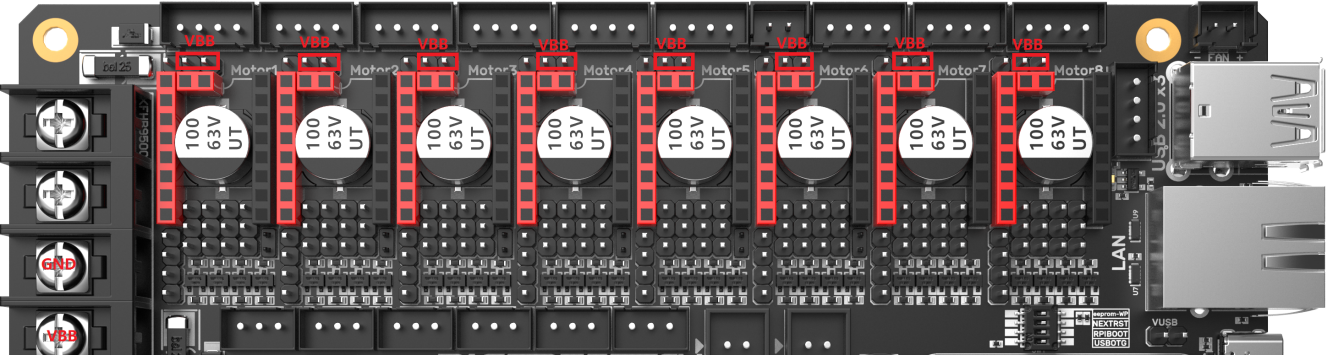
For TMC2208, TMC2209, TMC2225, etc, short the jumper for each as shown in the red box. Microsteps and current are configured in firmware.
TMC Drivers - SPI Mode
For example, TMC2130, TMC5160, TMC5161, etc. Each uses four jumpers to short the red box positions in the diagram. Micro-stepping and drive current are set through the firmware.

TMC Drivers - DIAG (Sensorless Homing)
For sensorless homing, insert the jumper as shown. Remove when not in use - no need to cut the DIAG pin of the driver.

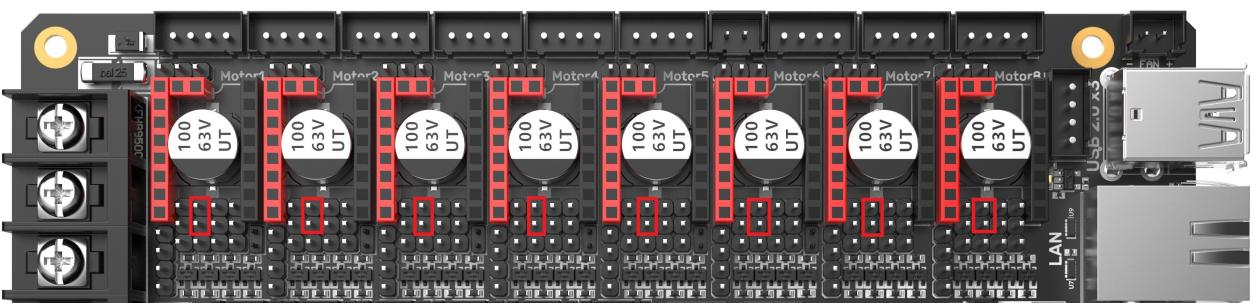
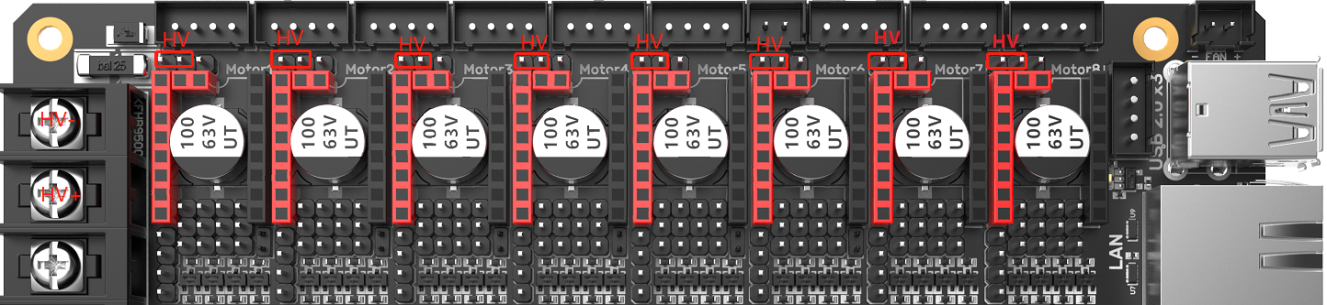
Driver Voltage Selection
Installing a Core Board on the BTB Connector
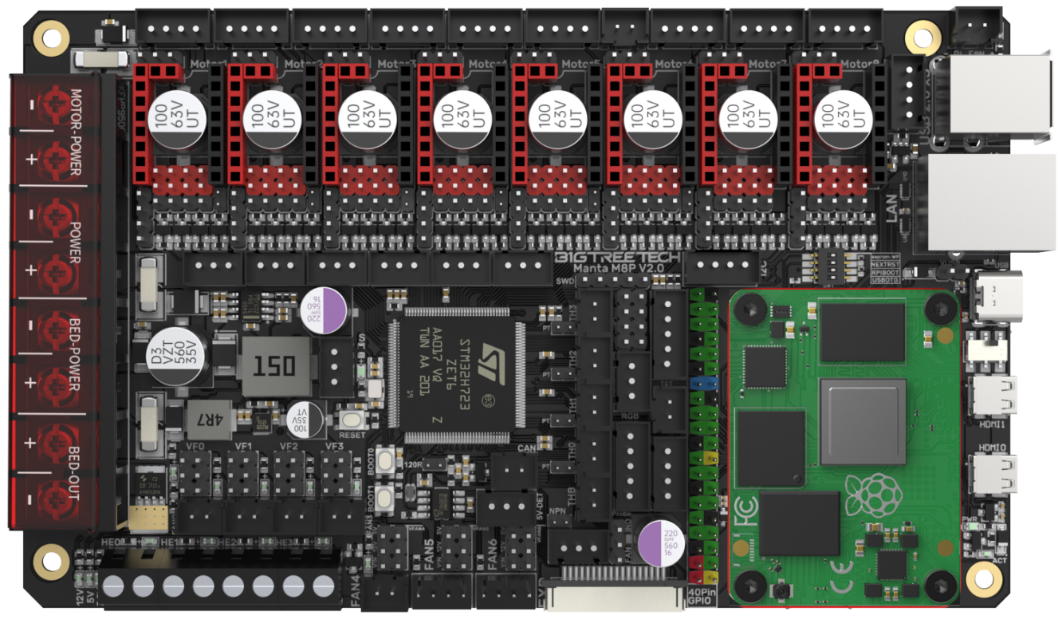
M8P+CM4: Note orientation as shown below.
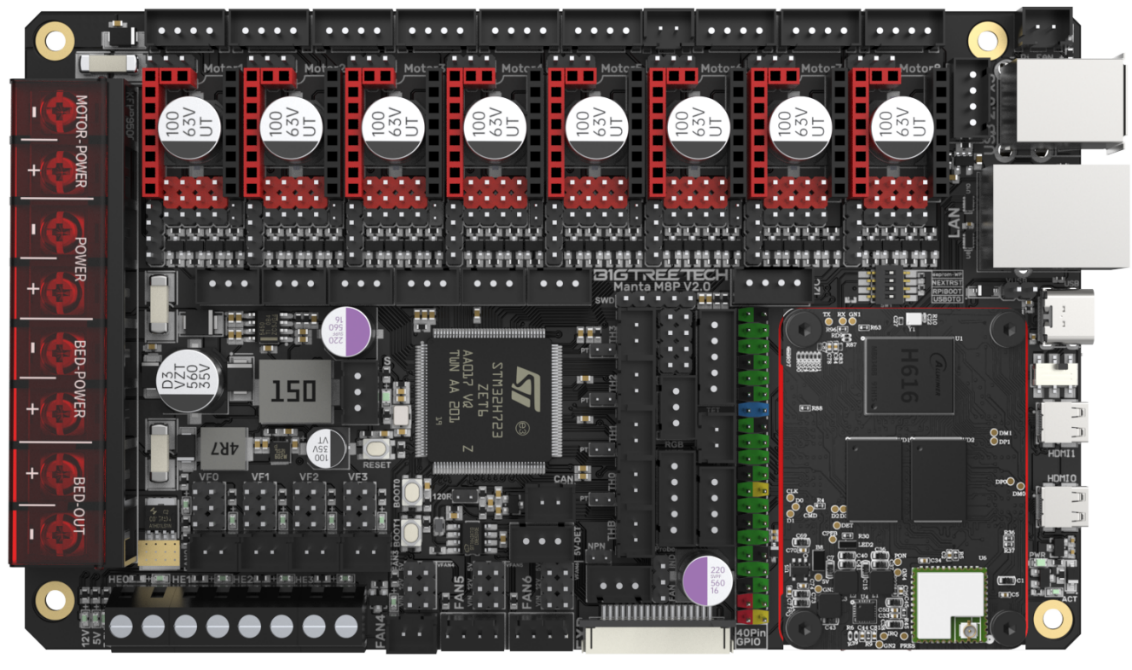
M8P+CB1: Note orientation as shown below.
CNC Fan Voltage Selection
Set the output voltage to 5V, 12V, or 24V using jumpers.
Note: Before selecting the voltage, please make sure to confirm the supported voltage of the fan. Our company is not responsible for fan damage caused by incorrect voltage selection.

100K NTC or PT1000 Settings
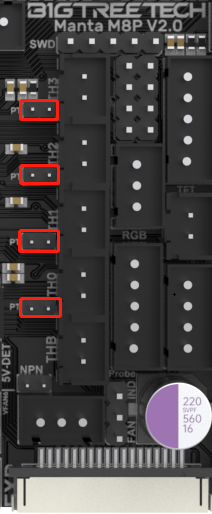
For 100K NTC thermistors, no jumper is needed. At this time, the pull-up resistor of TH0-TH3 is 4.7K 0.1%. For PT1000, short the pins in the red box to add 4.12K 0.1% in parallel, at this time, the pull-up resistor of TH0-TH1 is 2.2K.
Note: The temperature accuracy read using this method will be lower than MAX31865.
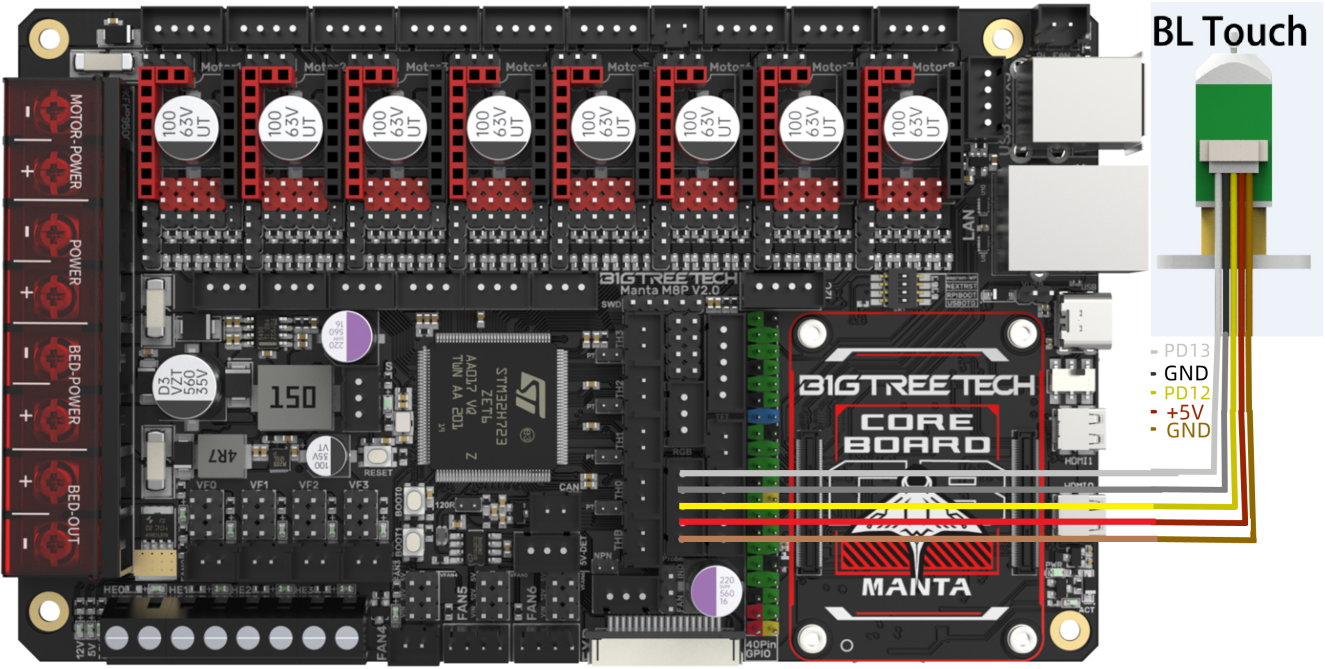
BLTouch Wiring
Auto Power Off (Relay V1.2) Wiring

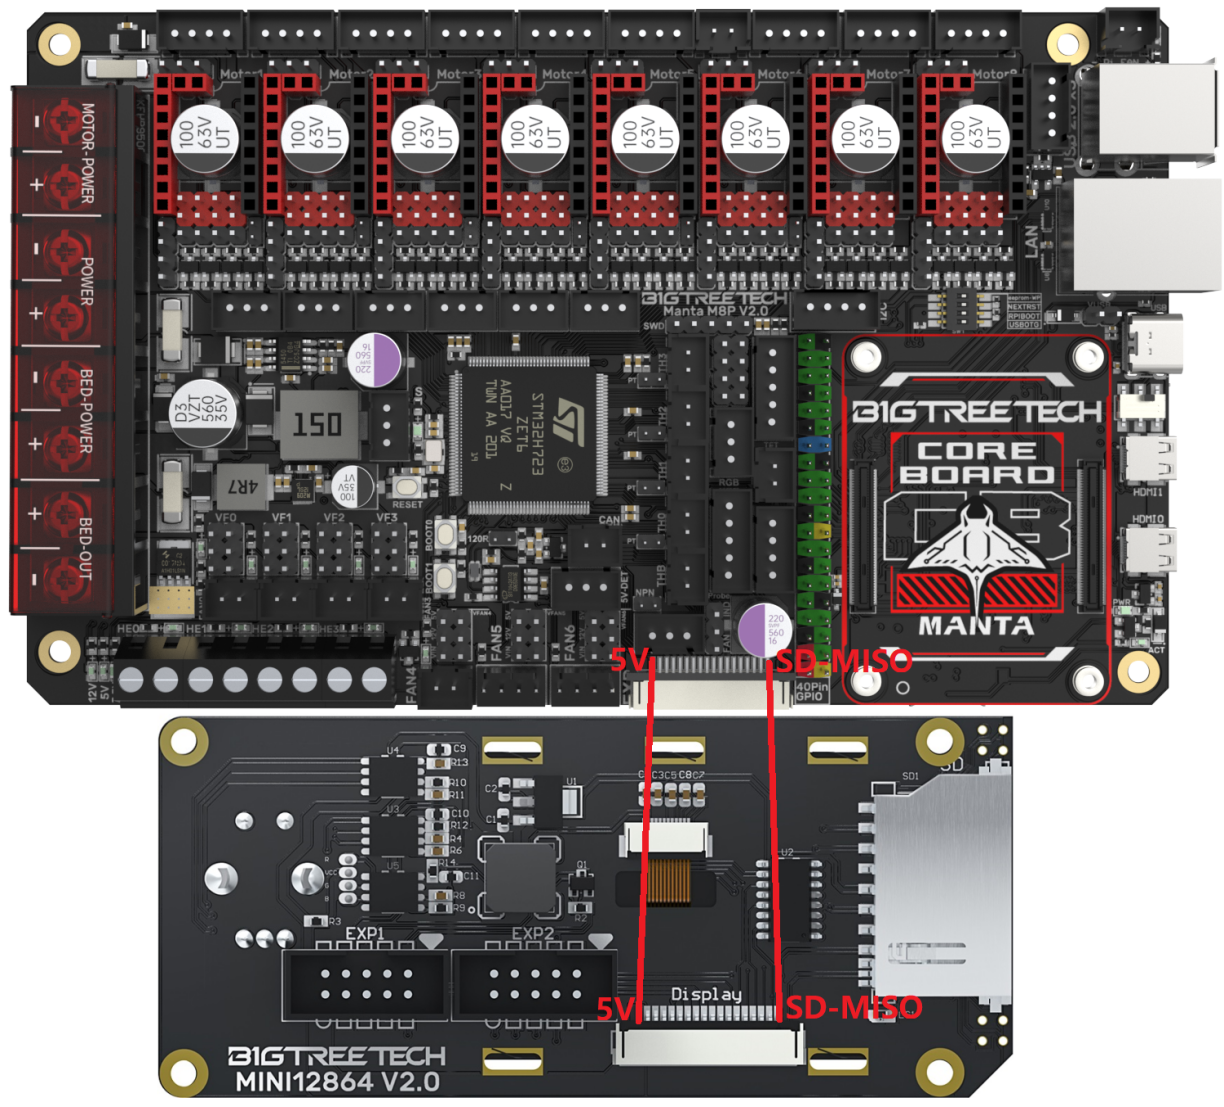
MINI12864 V2.0 Wiring
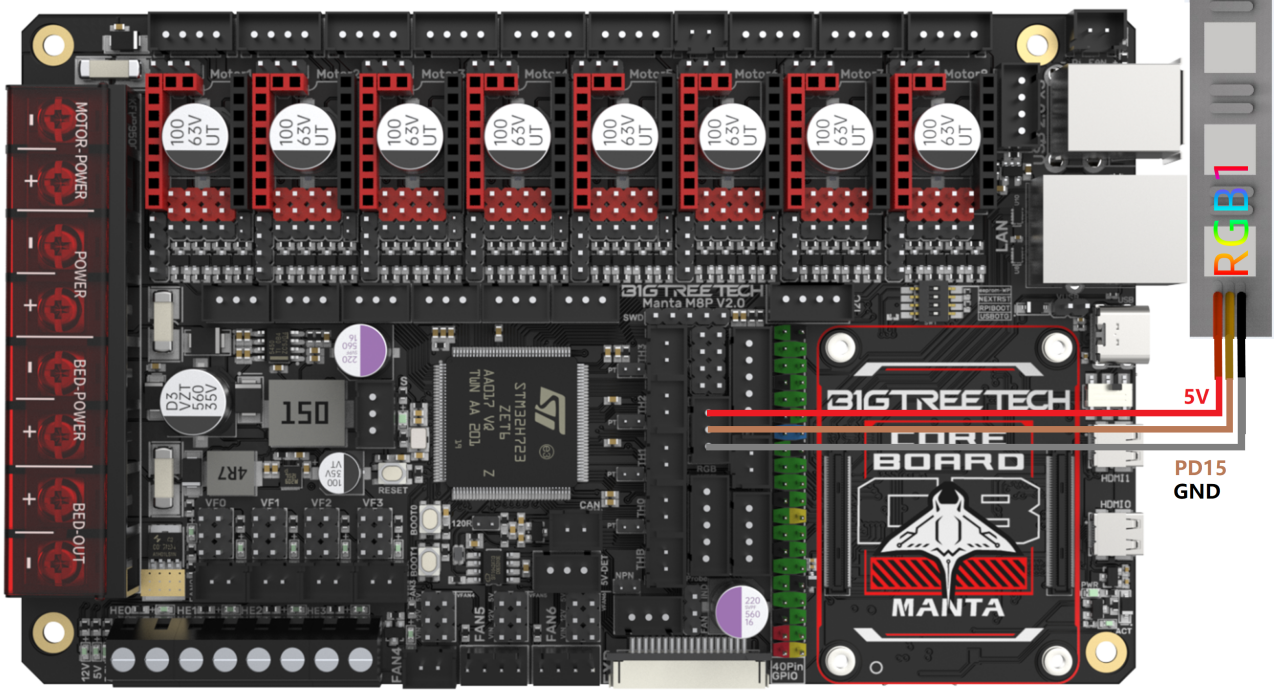
RGB Wiring
Servo Wiring

I2C Wiring (Temperature and Humidity Sensor)

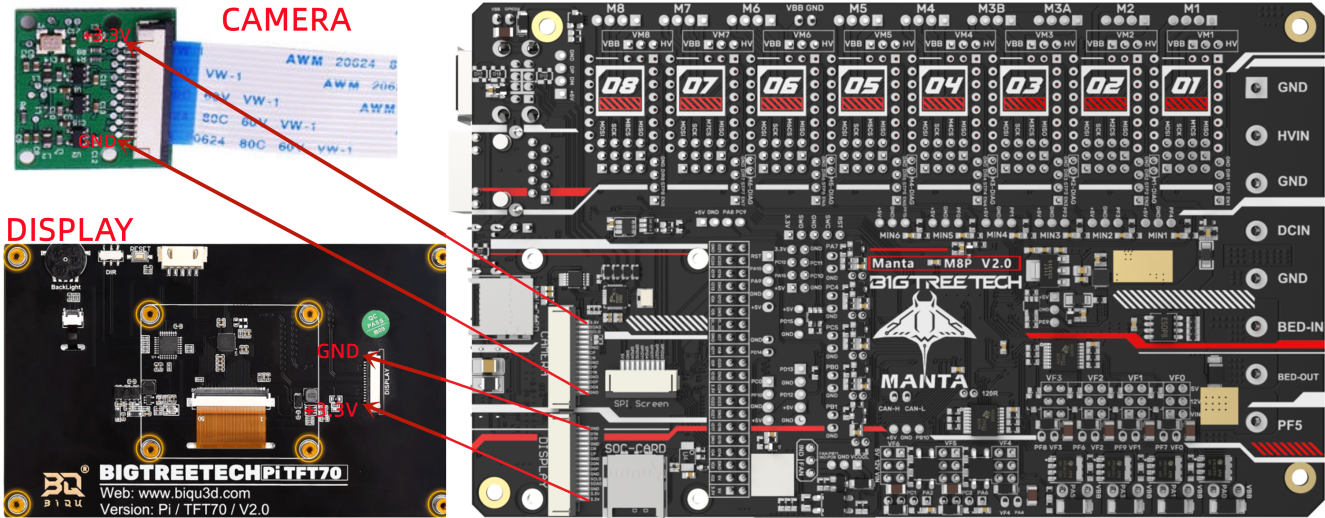
DSI and CSI Connections
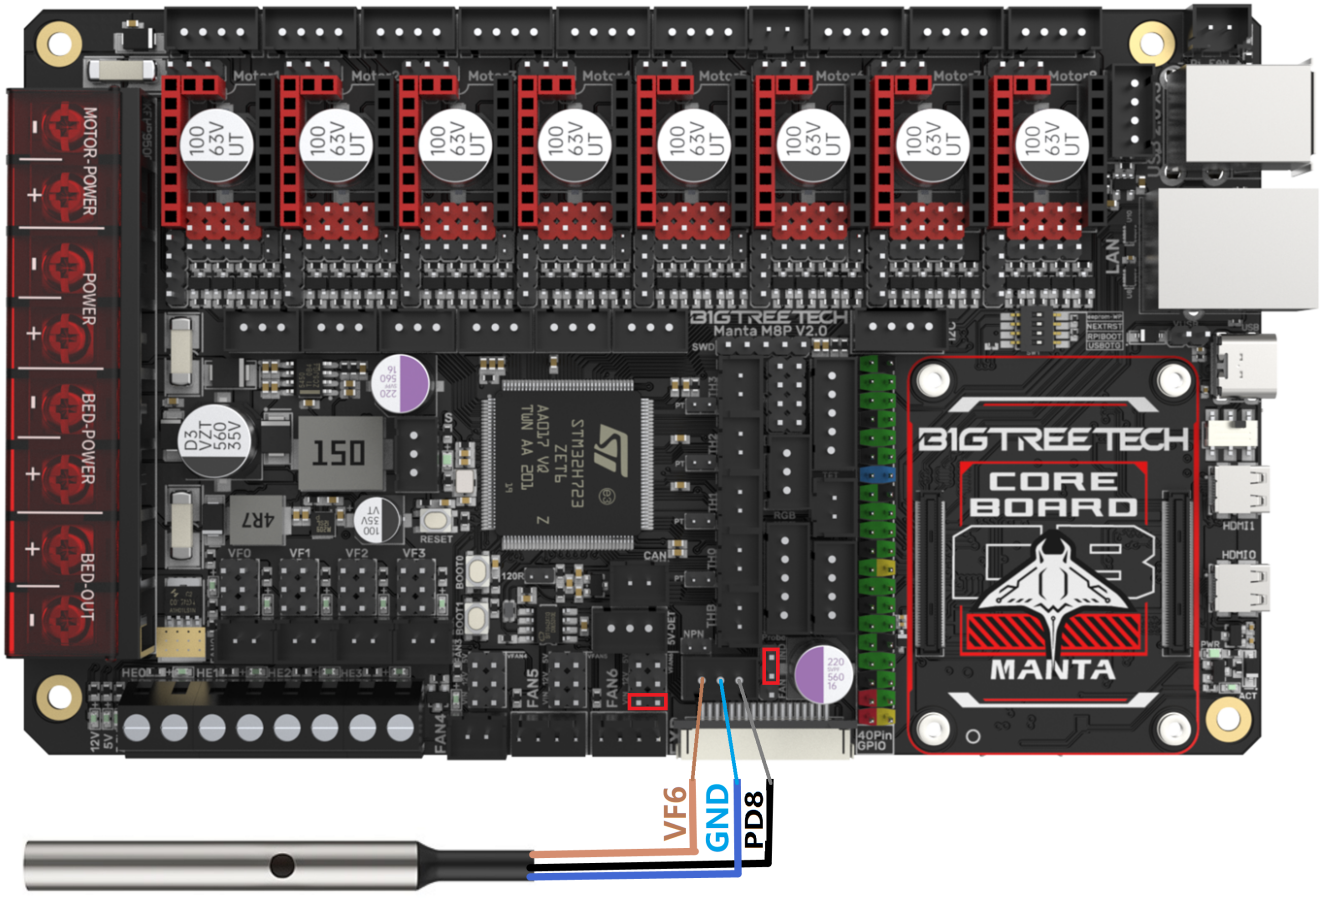
Proximity Switch Wiring
Normally open (NPN), no jumper needed, e.g. 24V:
Normally closed (PNP), short jumper, e.g. 24V:

CNC fan function, short jumper, e.g. 24V:

4-Pin Fan / Water Cooling Connection
(24V example below)

Using the Raspberry Pi CM4
Download OS Image
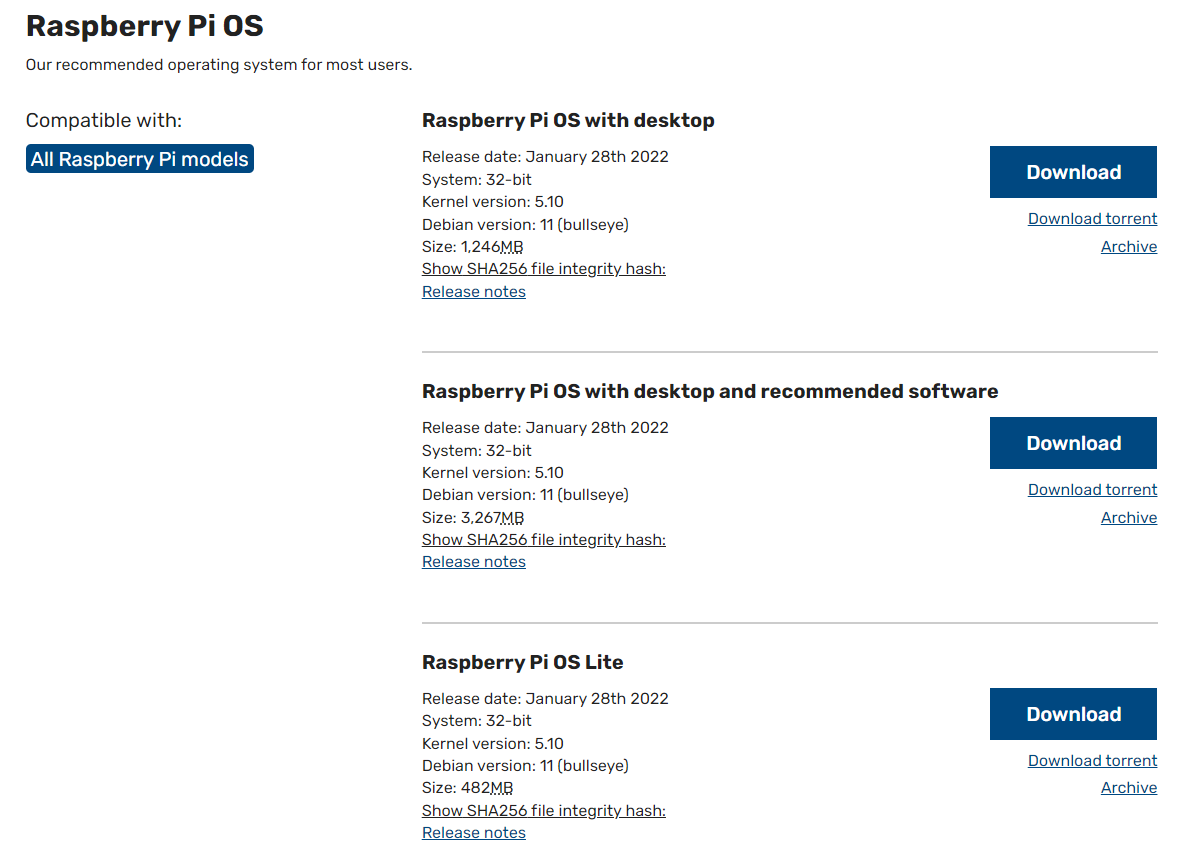
When using CM4, download the image of Fluidd, Mainsail directly, also, you can download a pure OS image from the Raspberry Pi official website and and install it yourself. Fluidd: https://github.com/fluidd-core/FluiddPI/releases Mainsail: https://github.com/mainsail-crew/MainsailOS/releases Official Raspberry Pi OS Image: https://www.raspberrypi.com/software/operating-systems (Note: CM4 has some differences from Pi 3B/4B, refer to the system configuration section to enable USB, DSI etc.)
Download and install Raspberry Pi Imager
Download and install the official Raspberry Pi burning software: https://www.raspberrypi.com/software/
Write OS
CM4 LITE Version (MicroSD Card)
1、Insert MicroSD into your computer via a card reader.
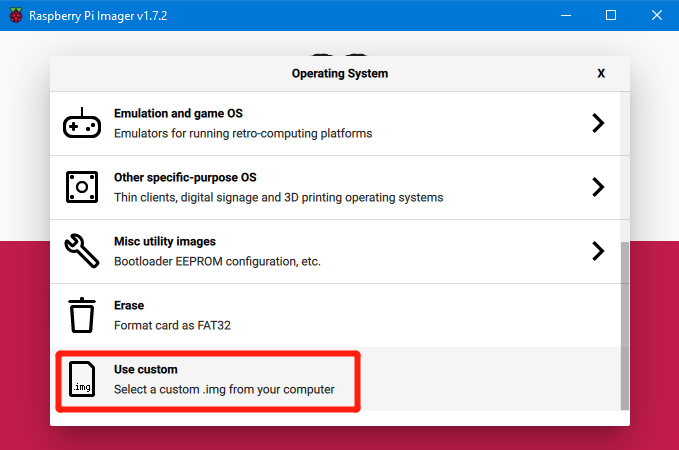
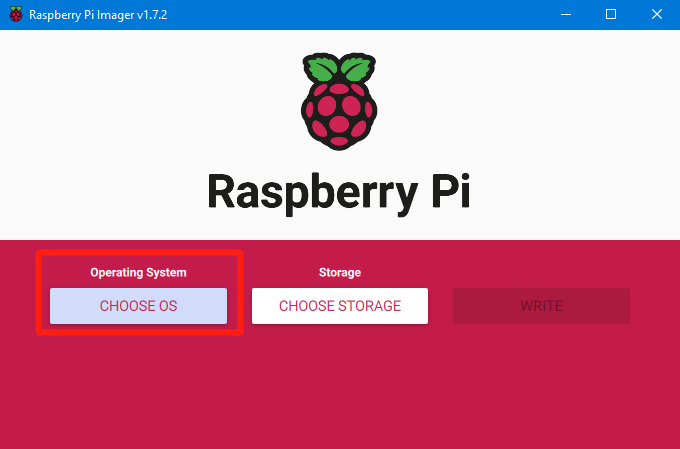
2、Choose OS.

3、Select "Use custom", then select the image that you downloaded.
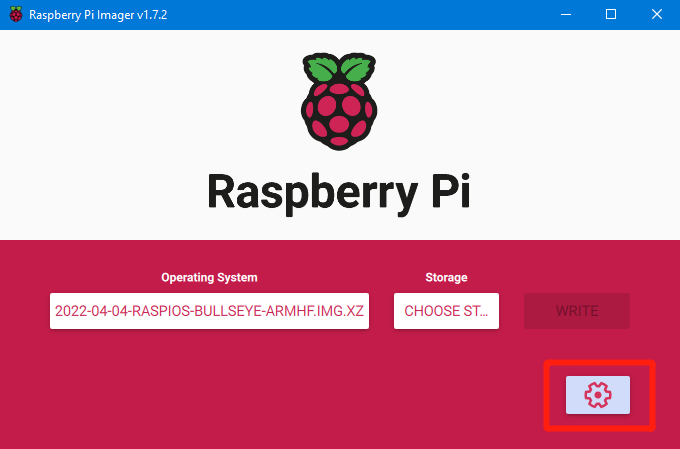
4、Click the settings icon in the lower right corner.
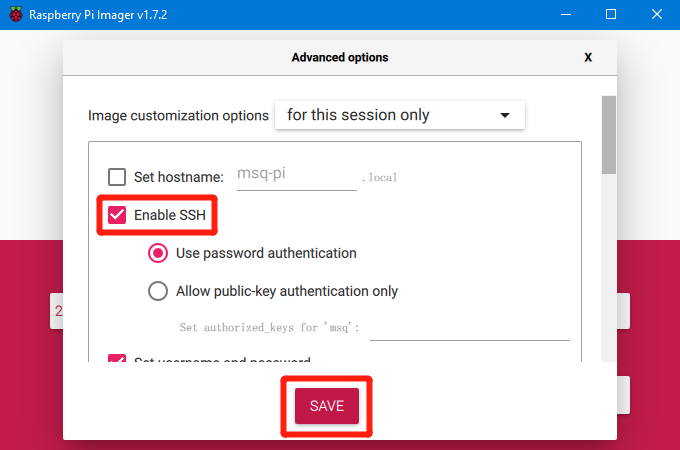
5、"Enable SSH" and then click "Save", there are other functions that can be set in this interface, please modify them according to your needs. Details are as follows: Set hostname: raspberrypi.local // custom hostname, default is raspberrypi.local Enable SSH Set username and password // custom username and password, default username: pi, password: raspberry Configure wireless LAN // custom WiFi name and password
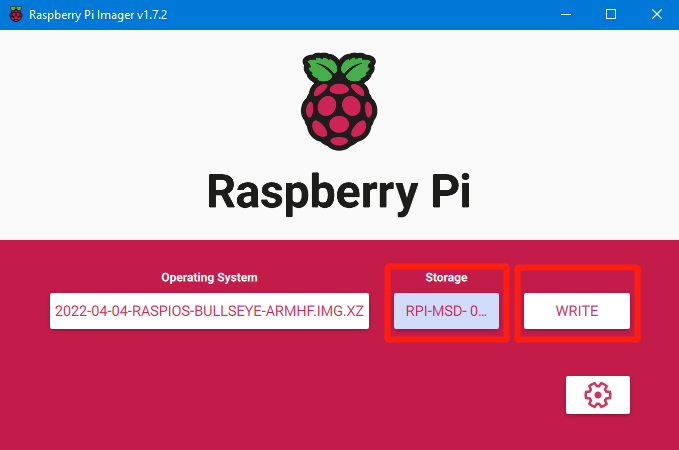
6、Select the MicroSD card and click "WRITE" (WRITE the image will format the MicroSD card. Be careful not to select the wrong storage device, otherwise the data will be formatted).
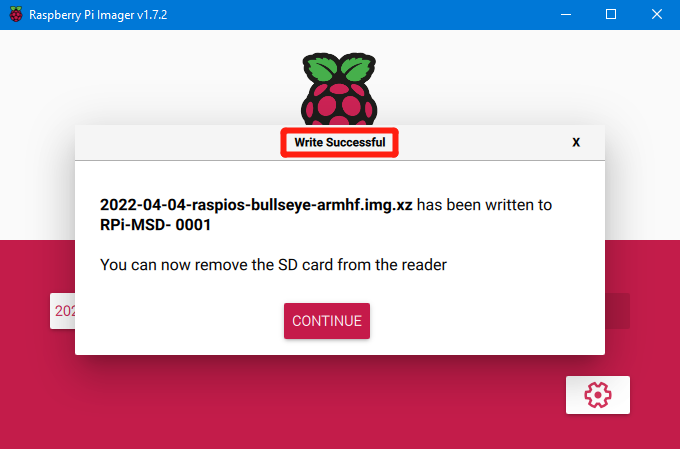
7、Wait for the process to complete.

CM4 eMMC Version
Note: eMMC version will not run the system in the Micro SD card.
1、Install rpiboot
For Windows: http://github.com/raspberrypi/usbboot/raw/master/win32/rpiboot_setup.exe For Mac and Linux: https://github.com/raspberrypi/usbboot#building
2、Toggle switches 4 (USBOTG) and 3 (RPIBOOT) to ON to enter BOOT mode.

3、Connect the Type-C to the computer's USB port (to avoid problems caused by insufficient computer USB power supply, it is recommended to use an external 24V power supply for the motherboard), run sudo ./rpiboot(Mac/Linux) or rpiboot.exe on Windows, and then the CM4 eMMC will be recognized as a large-capacity storage device by the computer (if rpiboot reports an error at this time, you can try unplugging and re-plugging the USB).
4、Use the Raspberry Pi Imager software to write the OS image. The steps are exactly the same as the LITE version.
5、After the writing is completed, power off and toggle switches 4 (USBOTG) and 3 (RPIBOOT) back to OFF. After powering on again, it will enter the normal working mode.
System Settings (CM4)
USB 2.0 Hub Port
MANTA M8P has a USB 2.0 Hub. To save power, the USB port of the CM4 is disabled by default. To enable it, add the following content to the config.txt file: dtoverlay=dwc2,dr_mode=host
DSI1 Display
The default display interface is HDMI. The DSI interface of the MANTA M8P is DSI1. To use it, download the DSI1 driver by entering the following command (Note: For systems released on or after 2023-10-10, the path is /boot/firmware/dt-blob.bin, and for systems released before that, the path is /boot/dt-blob.bin):
sudo wget https://datasheets.raspberrypi.com/cmio/dt-blob-disp1-cam1.bin -O /boot/firmware/dt-blob.bin
After downloading this driver and restarting, the screen on the DSI interface can be displayed normally. If you want to use the HDMI interface, delete the downloaded /boot/firmware/dt-blob.bin driver and restart, then HDMI can output normally.
CSI1 Camera
The DSI1 driver downloaded in DSI1 Display also includes the CSI1 driver. If you don't want to install the DSI1 driver and only want to install the CSI1 driver, find the driver you want to use at https://datasheets.raspberrypi.com/licence.html download it to the CM4's /boot/firmware/ (Note: For systems released on or after 2023-10-10, the path is /boot/firmware/, and for systems released before that, the path is /boot/) folder, and rename it to dt-blob.bin, then refer to the settings here for use:
https://projects.raspberrypi.org/en/projects/getting-started-with-picamera/
Using the BIGTREETECH CB1
Download OS Image
When using CB1, use the provided image: https://github.com/bigtreetech/CB1/releases
Download and install Raspberry Pi Imager
Download and install the official Raspberry Pi writing software: https://www.raspberrypi.com/software/ The CB1 OS image can also be written using this software.
Write OS
1、Insert MicroSD into your computer via a card reader.
2、Choose OS.
3、Select "Use custom", then select the image that you downloaded.

4、Select the MicroSD card and click "WRITE" (WRITE the image will format the MicroSD card. Be careful not to select the wrong storage device, otherwise the data will be formatted).

Set up WiFi
Note: If you are using an Ethernet connection, please skip this step.
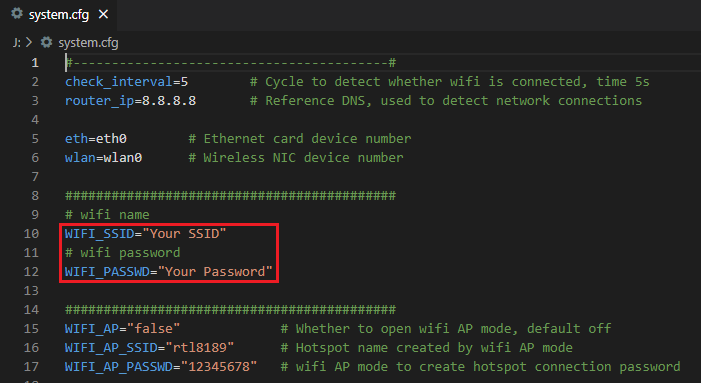
CB1 cannot directly use the Raspberry Pi Imager software to set up Wi-Fi name and password like CM4. After the OS image is burned, there will be a FAT32 partition recognized by the computer on the MicroSD card. In this partition, there is a configuration file named "system.cfg".
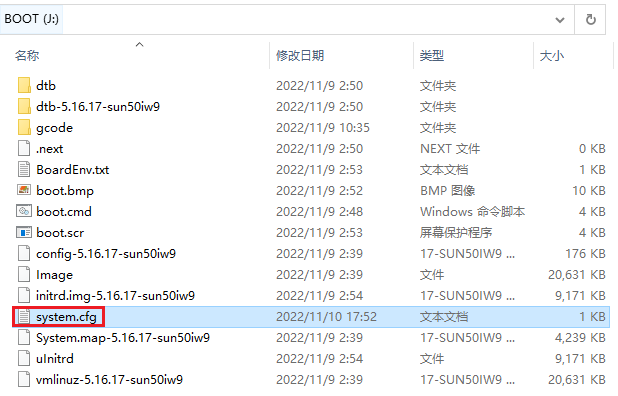
Edit in Notepad and set WIFI-SSID and PASSWORD.
Configure the Motherboard
Connect to the Device Using SSH Software
1、Install the SSH software Mobaxterm:
https://mobaxterm.mobatek.net/download-home-edition.html
2、Insert the MicroSD card into the MANTA M8P and power it on. Wait for the system to start, which takes about 1-2 minutes.
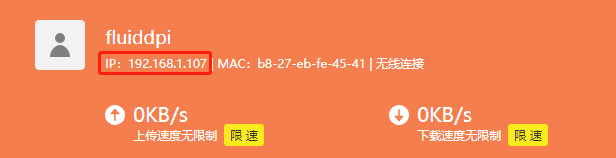
3、After the device is connected to Wi-Fi or an Ethernet cable, it will be automatically assigned an IP address.
4、Enter the router management interface to find the device's IP address.
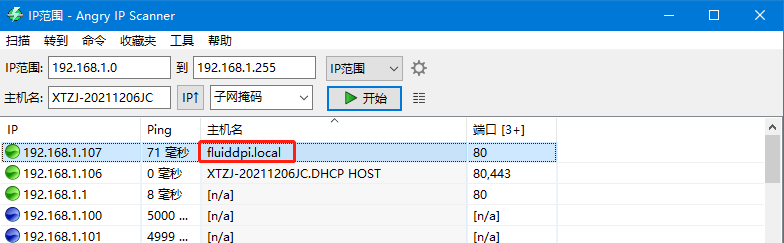
5、Alternatively, use the tool https://angryip.org/ to scan all IP addresses in the current local area network and reorder them by hostname. Find the device with the hostname Fluidd, Mainsail, or BTT-CB1, as shown in the image below.
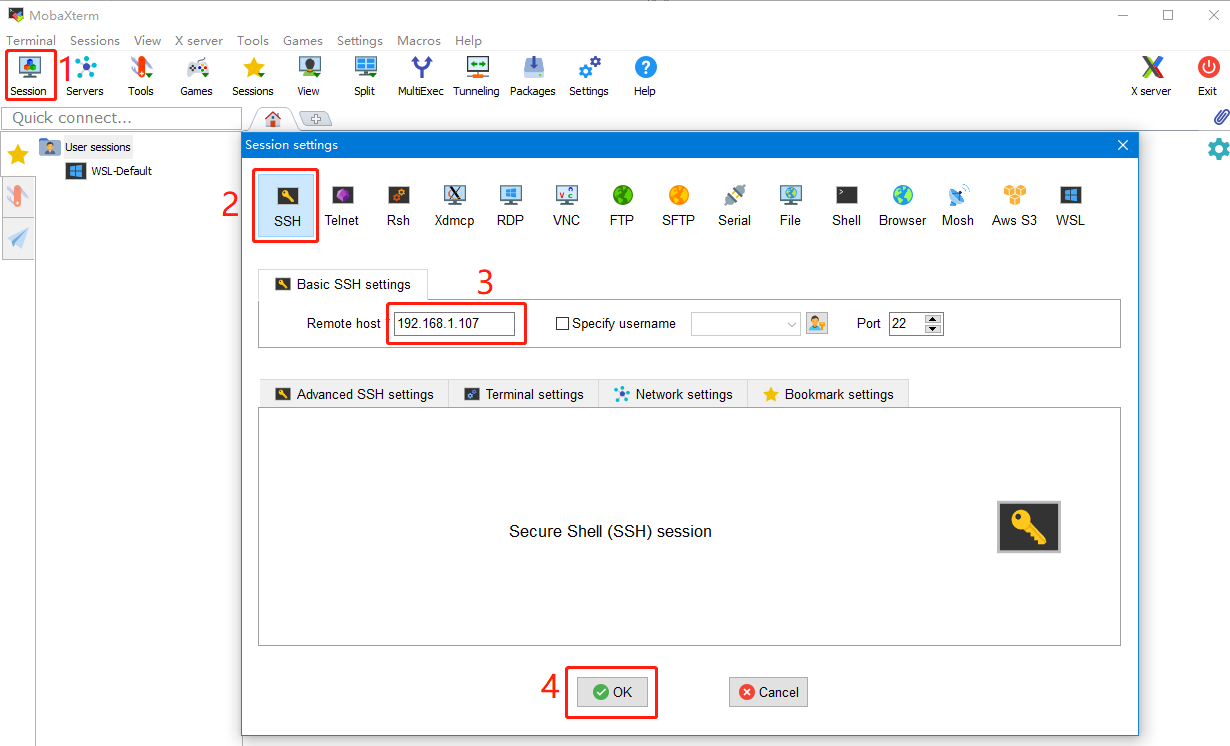
6、Open the installed Mobaxterm software, click "Session", click "SSH" in the pop-up window, enter the device's IP address in the "Remote host" input box, and click "OK" (Note: The computer and the device must be on the same local area network).
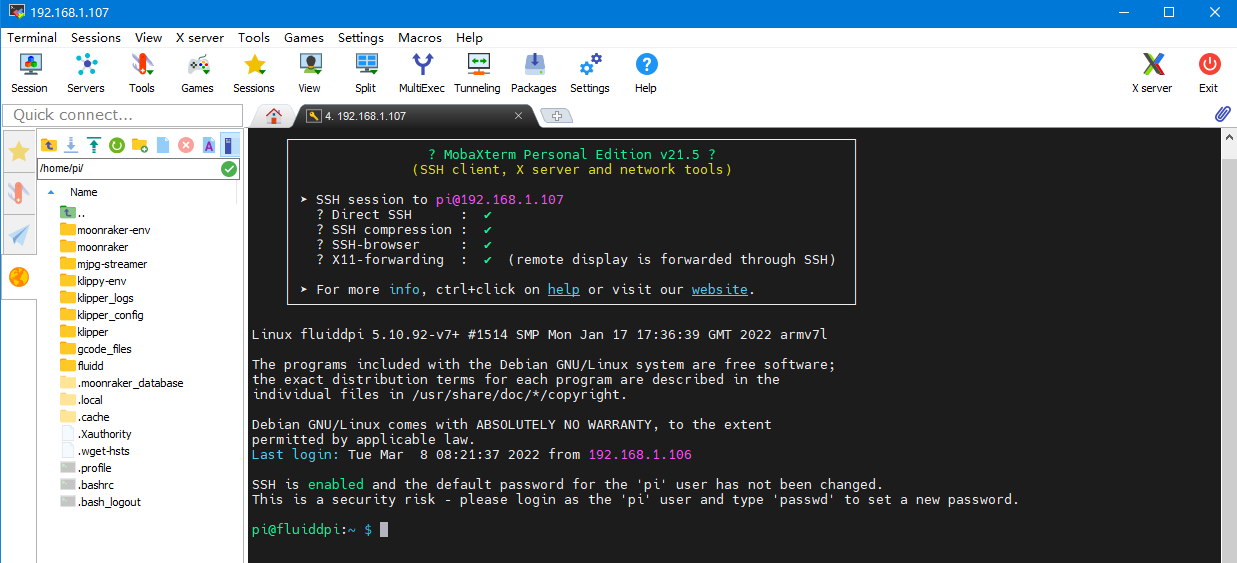
7、Enter the login name and password to access the SSH terminal interface. CM4: Login name: pi Password: raspberry CB1: Login name: biqu Password: biqu
Compile MCU Firmware
1、After connecting to the device via SSH, enter the following command in the command line:
Use the following configuration to compile the firmware (if the options below are not available, please update the Klipper firmware source code to the latest version): * [*] Enable extra low-level configuration options * Micro-controller Architecture (STMicroelectronics STM32) ---> * Processor model (STM32H723) ---> * Bootloader offset (128KiB bootloader (SKR SE BX v2.0)) ---> * Clock Reference (25 MHz crystal) ---> * Communication interface (USB (on PA11/PA12)) --->
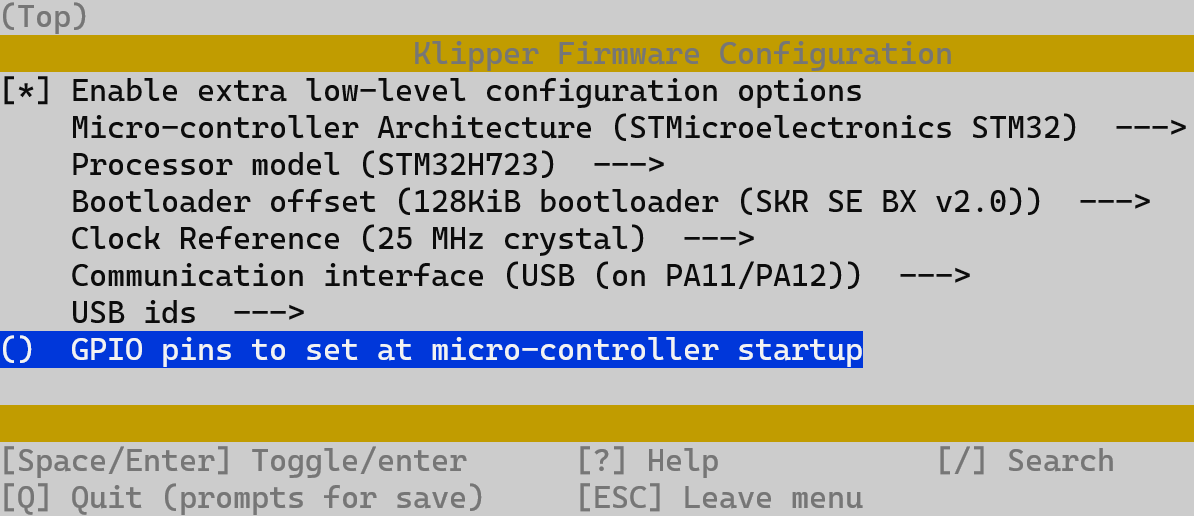
2、After completing the configuration selection, enter q to exit the configuration interface. When asked if you want to save the configuration, select "Yes".
3、Enter make to compile the firmware. After the make command is executed, the klipper.bin firmware we need will be generated in the device's home/pi/klipper/out folder. You can download it directly to your computer using the SSH software.

Update Firmware
SD Card Update
1、Rename klipper.bin to "firmware.bin", copy it to the root directory of the SD card, insert the SD card into the MANTA M8P SD card slot, press the reset button or power on again, and the firmware will be automatically updated. After the update is complete, the "firmware.bin" in the SD card will be renamed to "FIRMWARE.CUR".
2、Enter
in the command line to query the mainboard's ID and confirm whether the firmware has been successfully burned. If the burning is successful, a Klipper device ID will be returned, as shown in the image below.

Copy and save this ID, as it needs to be set in the configuration file.
DFU Update
If you can find the MCU's Klipper device ID using ls /dev/serial/by-id/, you can directly enter
to burn the firmware (Note: Replace /dev/serial/by-id/xxx with the actual ID found in the previous step).
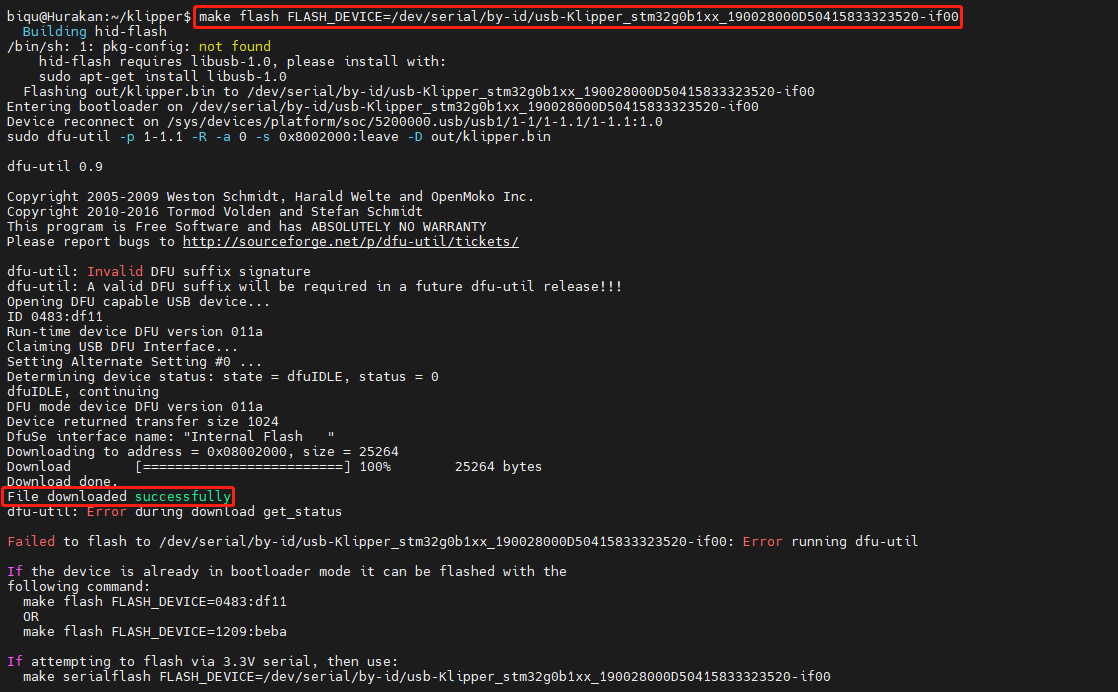
After the burning is completed, there will be a dfu-util: Error during download get_status error message, which can be ignored.
Configure Klipper
1、Enter the Raspberry Pi's IP address in the computer's browser to access it. Download the reference configuration named generic-bigtreetech-manta-m8p-V2_0.cfg in the path shown in the image below. If you cannot find this file, please update the Klipper firmware source code to the latest version or download it from GitHub:
https://github.com/bigtreetech/Manta-M8P

2、Upload the mainboard configuration file to Configuration Files.

3、Add the mainboard configuration in the "printer.cfg" file:
[include generic-bigtreetech-manta-m8p-V2_0.cfg]
4、Modify the ID number in the configuration file to the actual ID of the mainboard.
5、Follow the instructions in the link below to configure the specific functions of the mainboard:
https://www.klipper3d.org/Overview.html
V2.0 Upgrade Notes
- Upgraded MCU to ARM Cortex-M7 STM32H723ZET6 550MHz.
- Added interfaces: servo, I2C, 5V detection, TFT expansion ports.
- Changed EXP1+EXP2 to FPC connectors.
- Increased USB output current.
- Added large-capacity energy storage capacitors to the 5V circuit, especially at the core board 5V input port, to prevent the 5V supply from breaking due to excessive current during CM4 startup.
- Upgraded 12V power supply for increased capacity and resistance.
Precautions
- Power off before connecting/disconnecting anything except USB, HDMI and Ethernet. Includes enabling eMMC flashing.
- Pay attention to the heat dissipation issues of CM4 and CB1. If the running application consumes excessive system resources, it can lead to significant heating.