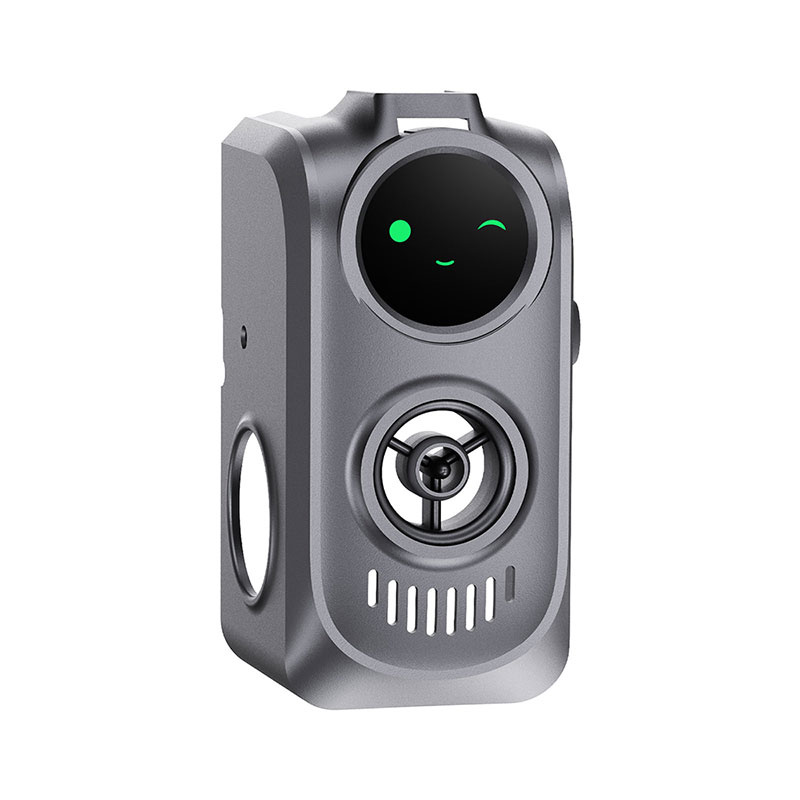
Creator Knomi Hi
Important Notes
- Latest firmware: Click here
- Creator Knomi Hi only supports 2.4GHz Wi-Fi networks.
- After connecting to the Creator Knomi Hi’s AP hotspot from the settings screen, your device should redirect to the Web UI. However, on some smartphones, permissions may block the ability to upload GIFs, IMG files, or firmware here. If this happens, open a browser manually and go to the Web UI to complete uploads.
- For any issues or suggestions, please visit our GitHub and submit an issue
Technical Specifications
| Processor | Xtensa Dual-Core 32-bit LX6 ESP32, up to 240MHz |
|---|---|
| Memory | PSRAM 8MB (4MB RAM + 4MB Himem), Flash 16MB |
| Logic Voltage | 3.3V |
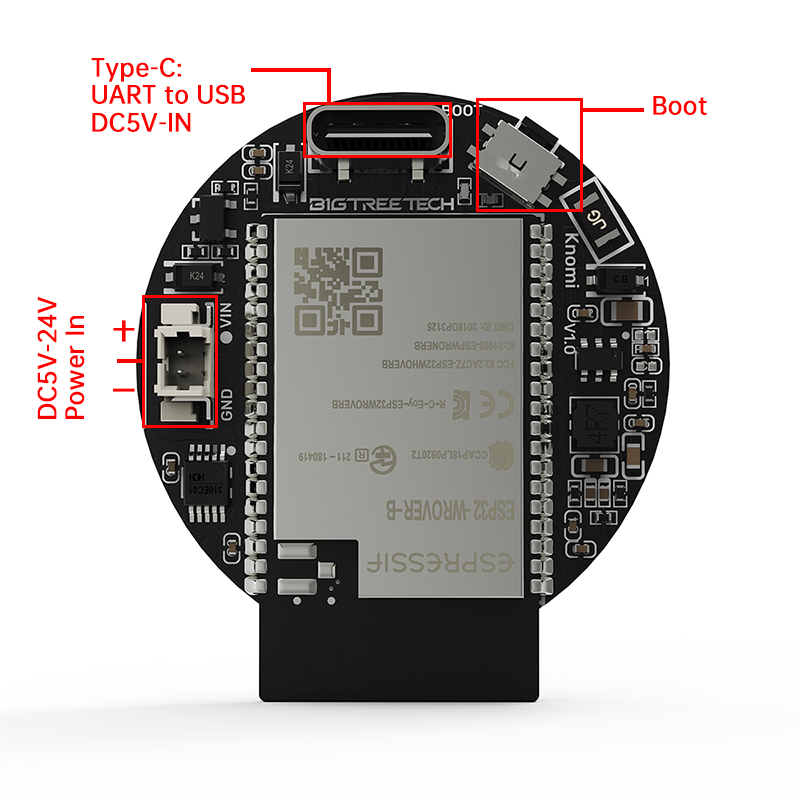
| Input Voltage | 5V-24V |
| Rated Power | 0.65W |
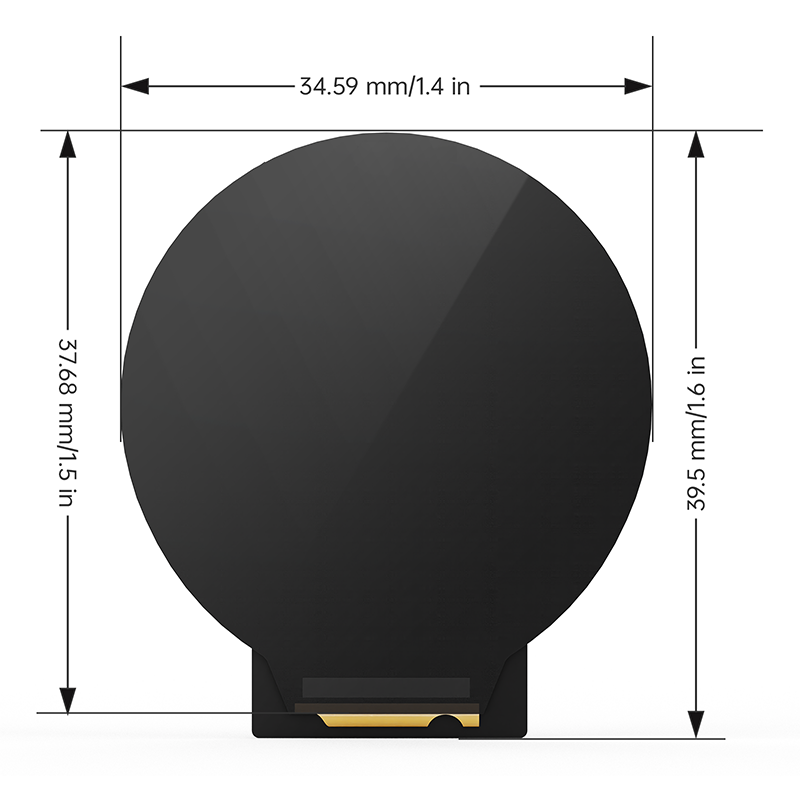
| Display Dimensions | 34.6mm x 37.9mm x 3.5mm |
| Display Size | 1.28” |
| Resolution | 240 x 240 |
| Active Display Area | 32.4(H)mm x 32.4(V)mm |
| Display Driver Chip | GC9A01 |
| Viewing Angle | All View |
| Backlight Brightness | 400 Cd/m² |
| Connection | 2.4GHz Wi-Fi (IEEE 802.11 b/g/n) |
| Operating Temperature | Creator Knomi Hi: -20°C to +70°C Creator Knomi Hi Shell: -30°C to +130°C |
| Storage Temperature | -30°C to +80°C |
| Backlight Lifespan | > 20,000 hours |
Dimensions & Interfaces
Installation Guide
This section covers how to install the Creator Knomi Hi into the Creality Hi printer toolhead using the Creator Knomi Hi Shell .
-
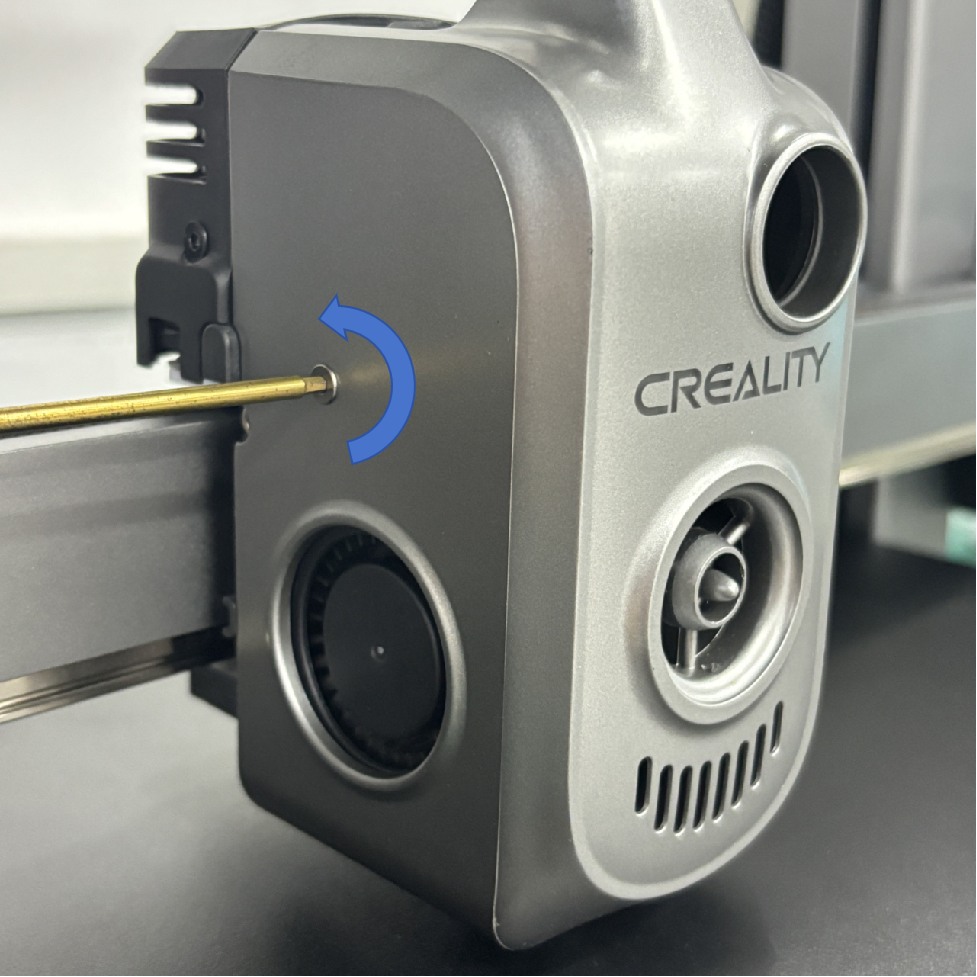
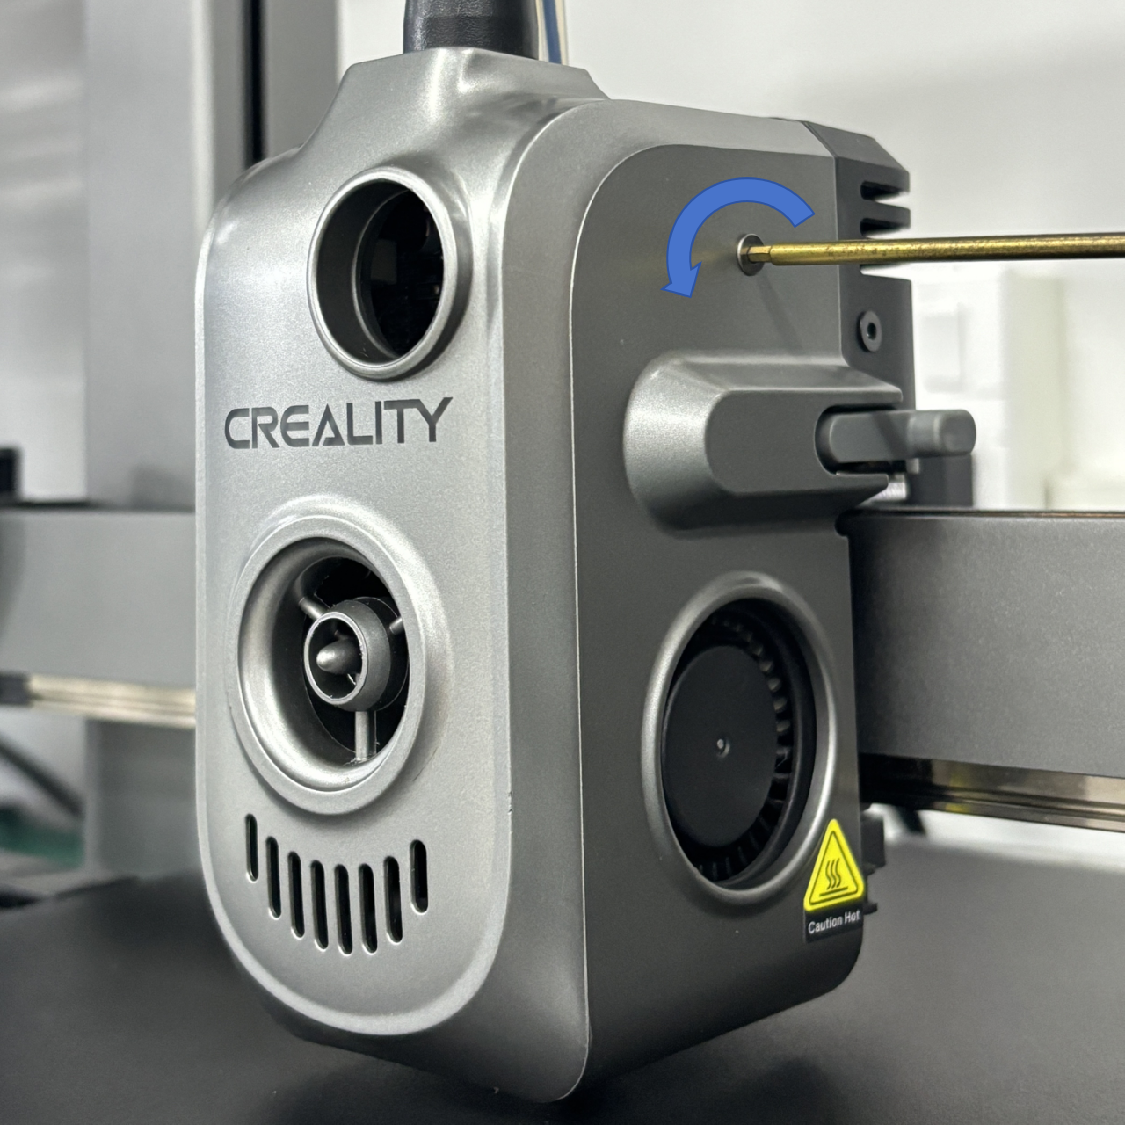
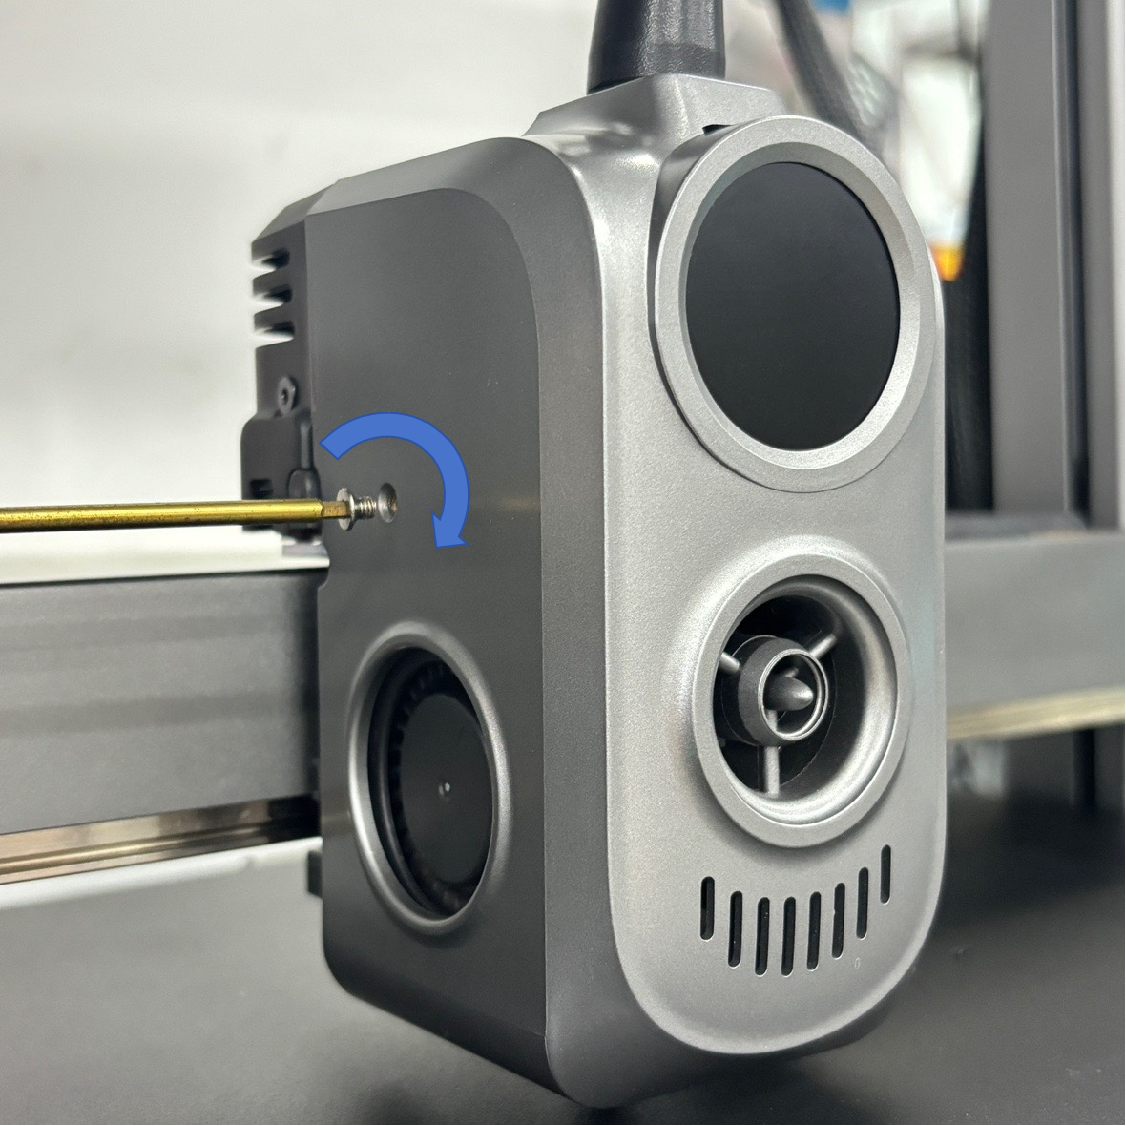
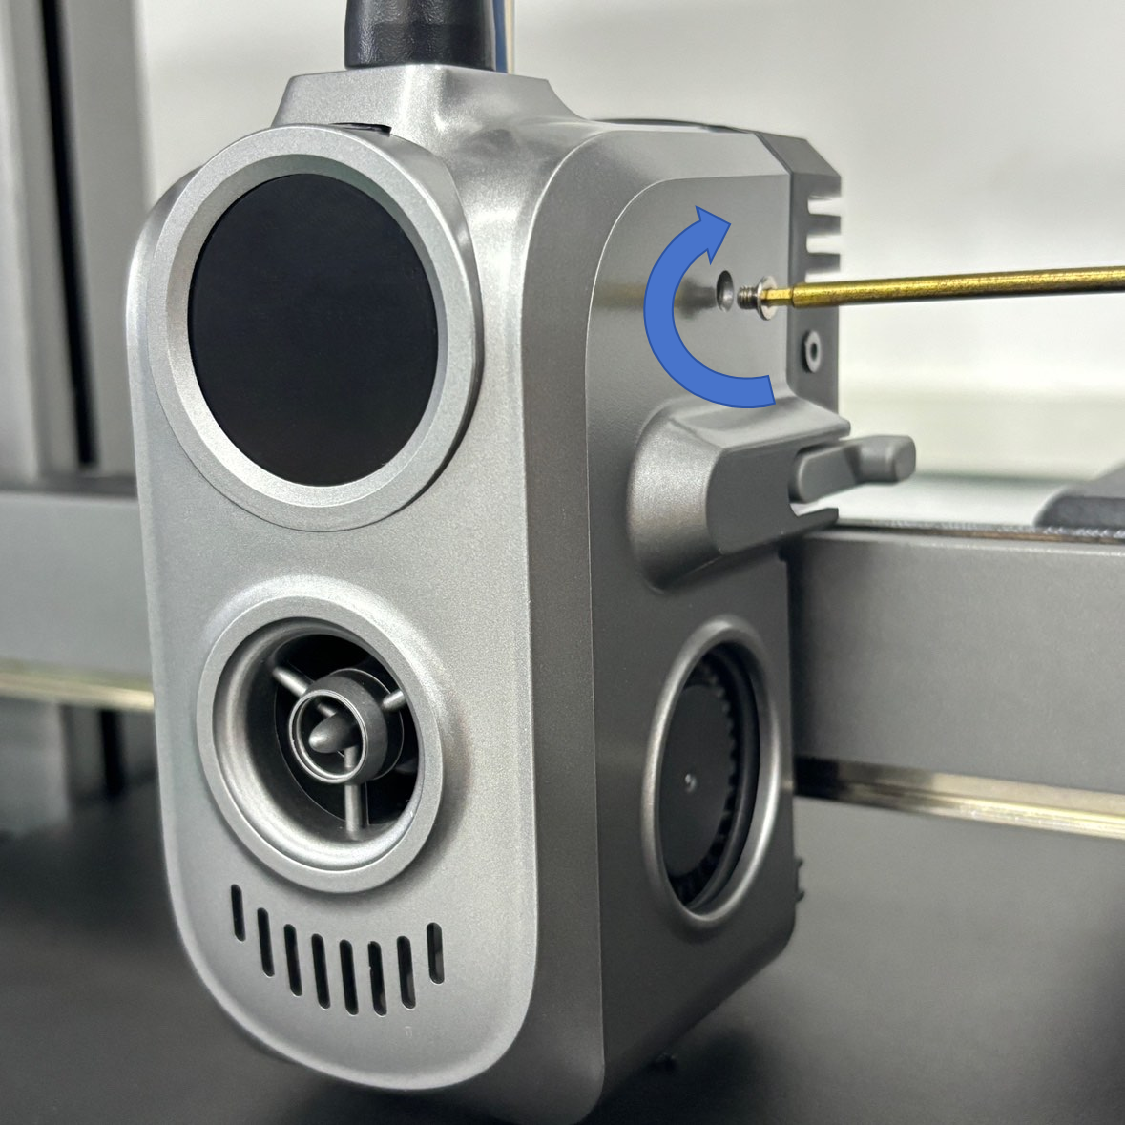
Step 1: Remove the Stock Front Cover
Use a 2.0mm screwdriver to remove the screws on both sides of the front cover.
Note: these screws will be used later to secure the Creator Knomi Hi shell.
-
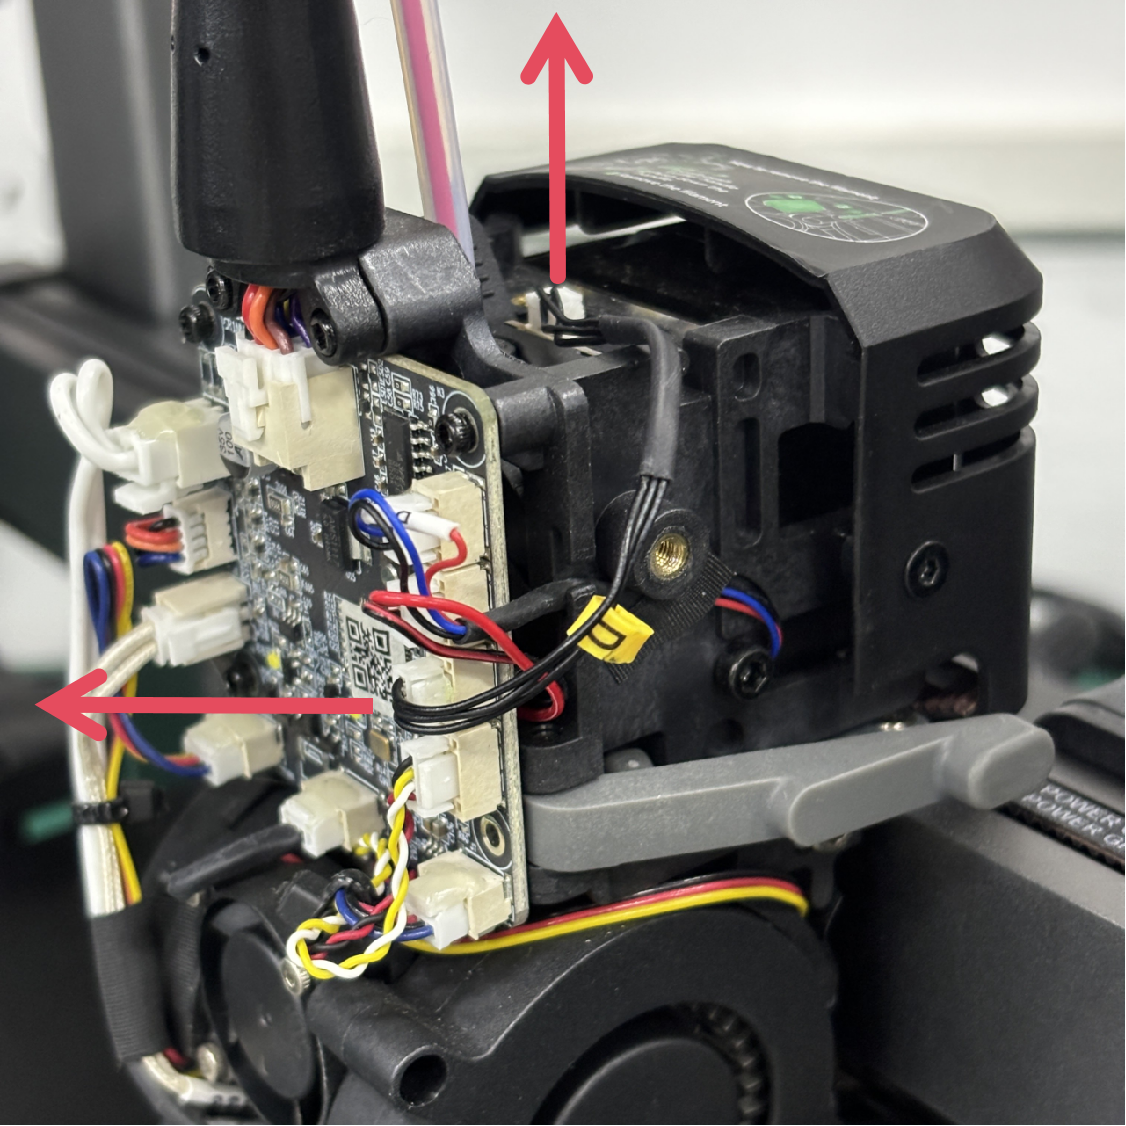
Step 2: Remove the Wiring Harness
Unplug the two connectors shown by the arrows to remove the wiring harness.
-
Step 3: Cable Connection
Plug connector A into the display socket d (as shown in the image).
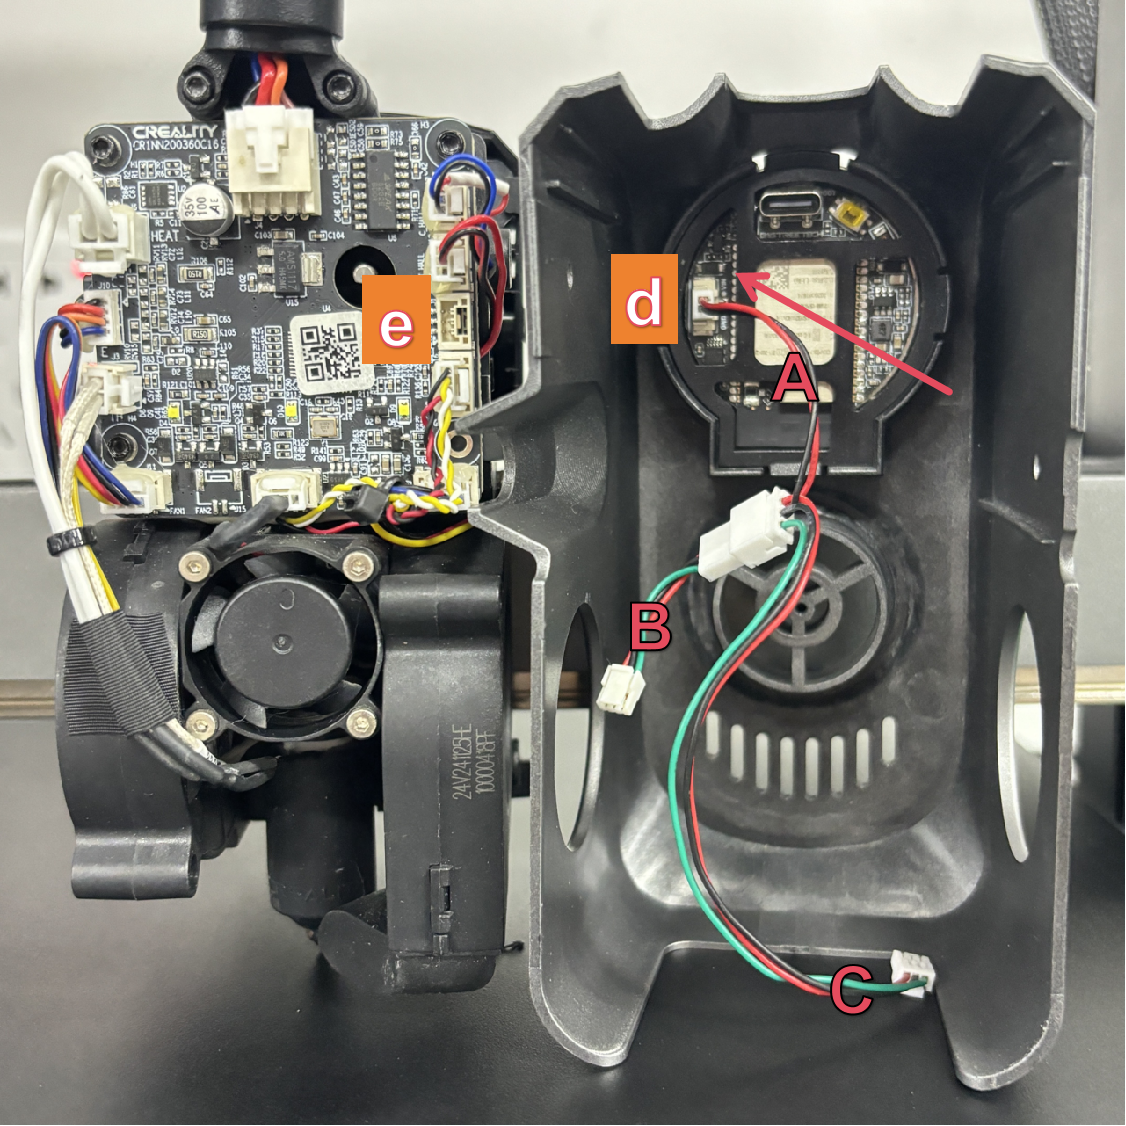
Plug connector B to the e port on the Creality Hi print head controller board.
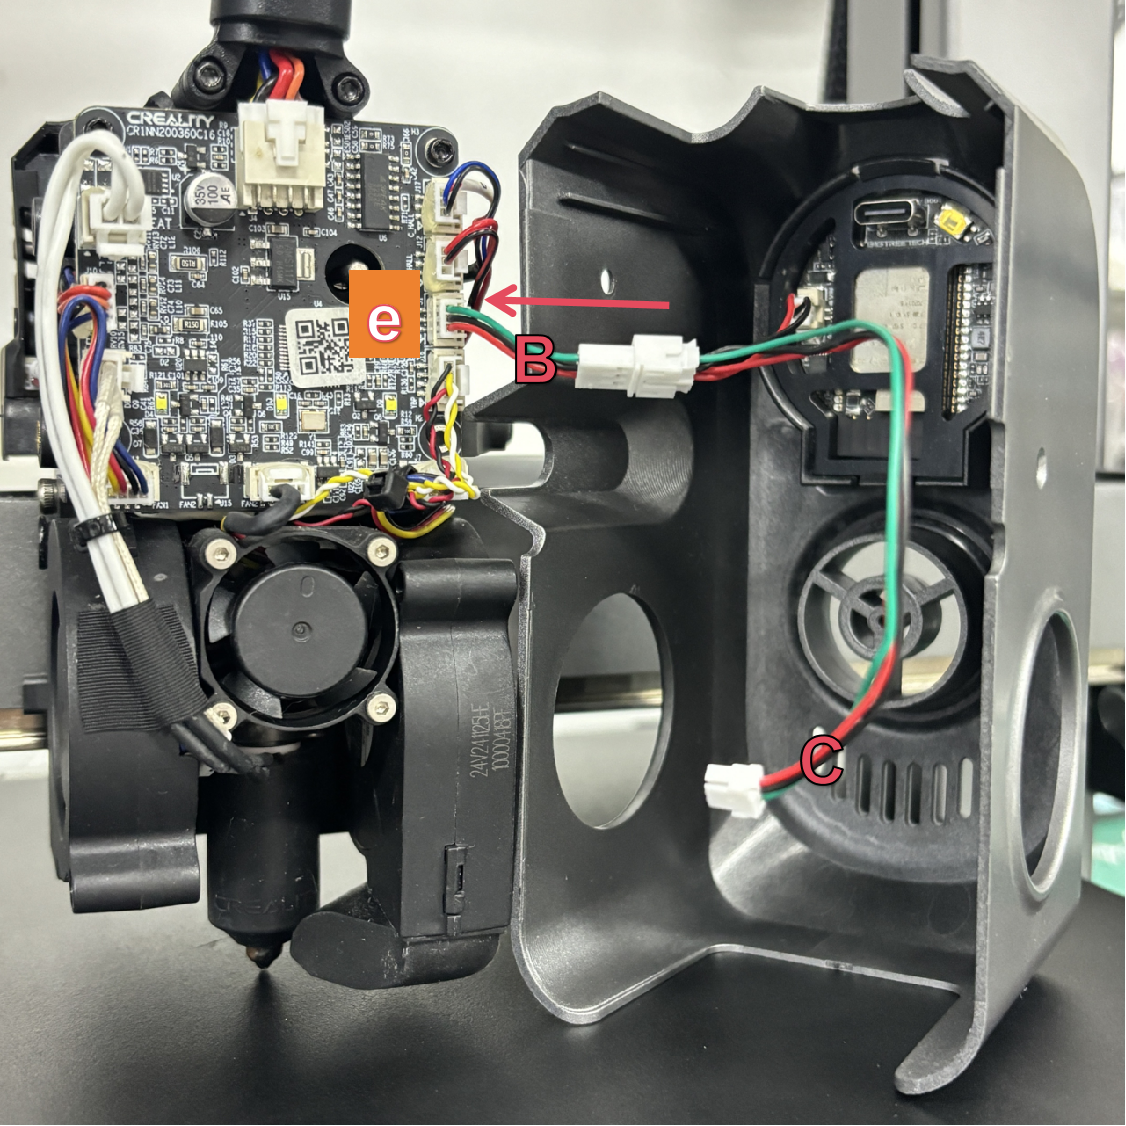
Plug connector C to the f port on the print head, then route the cable through position g.
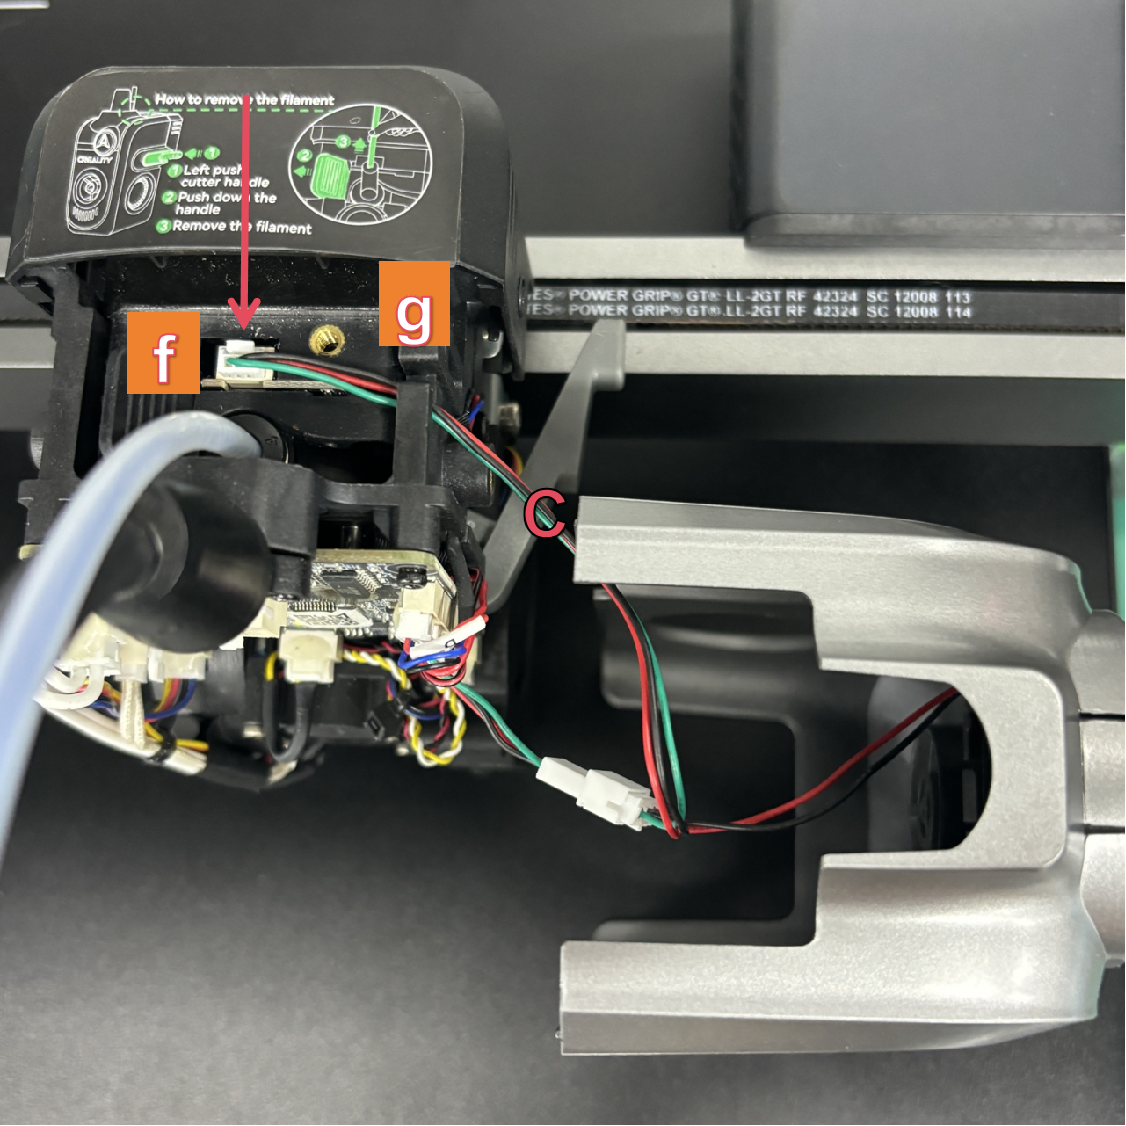
Ensure all connections are fully seated and secure. Route cables neatly to prevent pinching or mechanical interference during operation. -
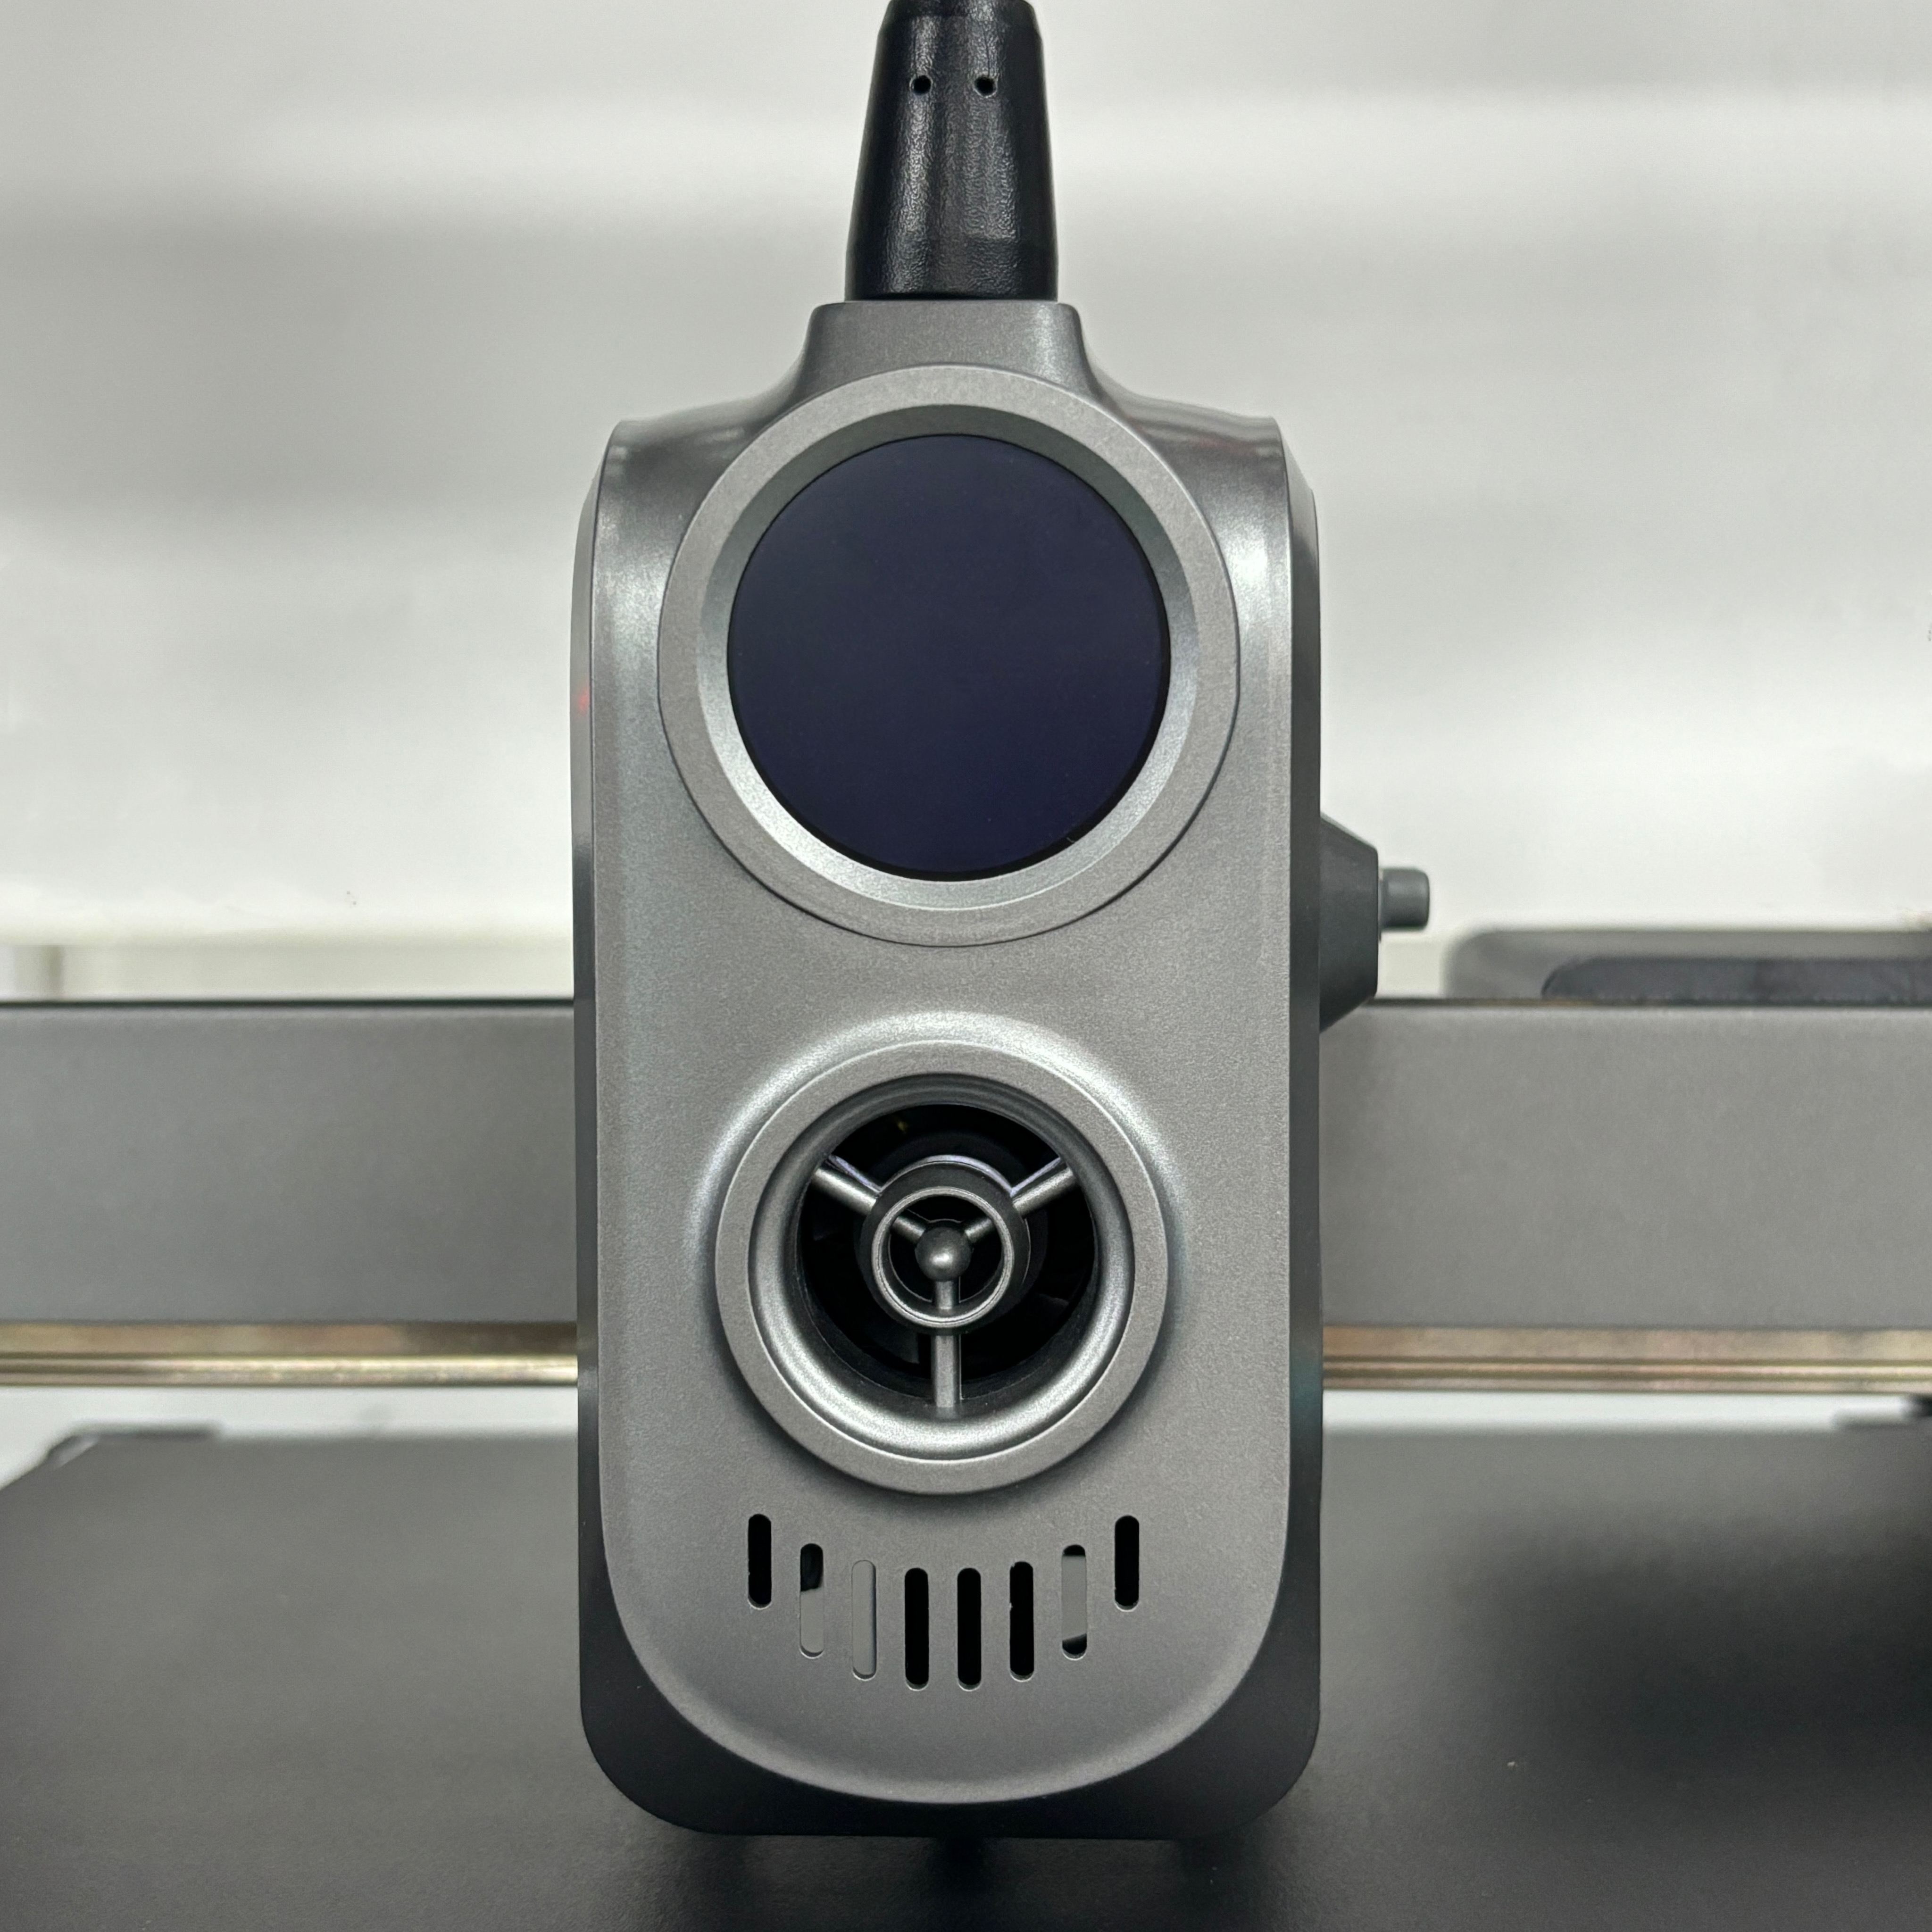
Step 4: Attach and Secure the Creator Knomi Hi Shell
Align the Creator Knomi Hi shell in place. Secure it using the screws you removed earlier.
-
Installation Complete!
Printer Configuration
- Find your printer's IP address
- ① Tap
Settings
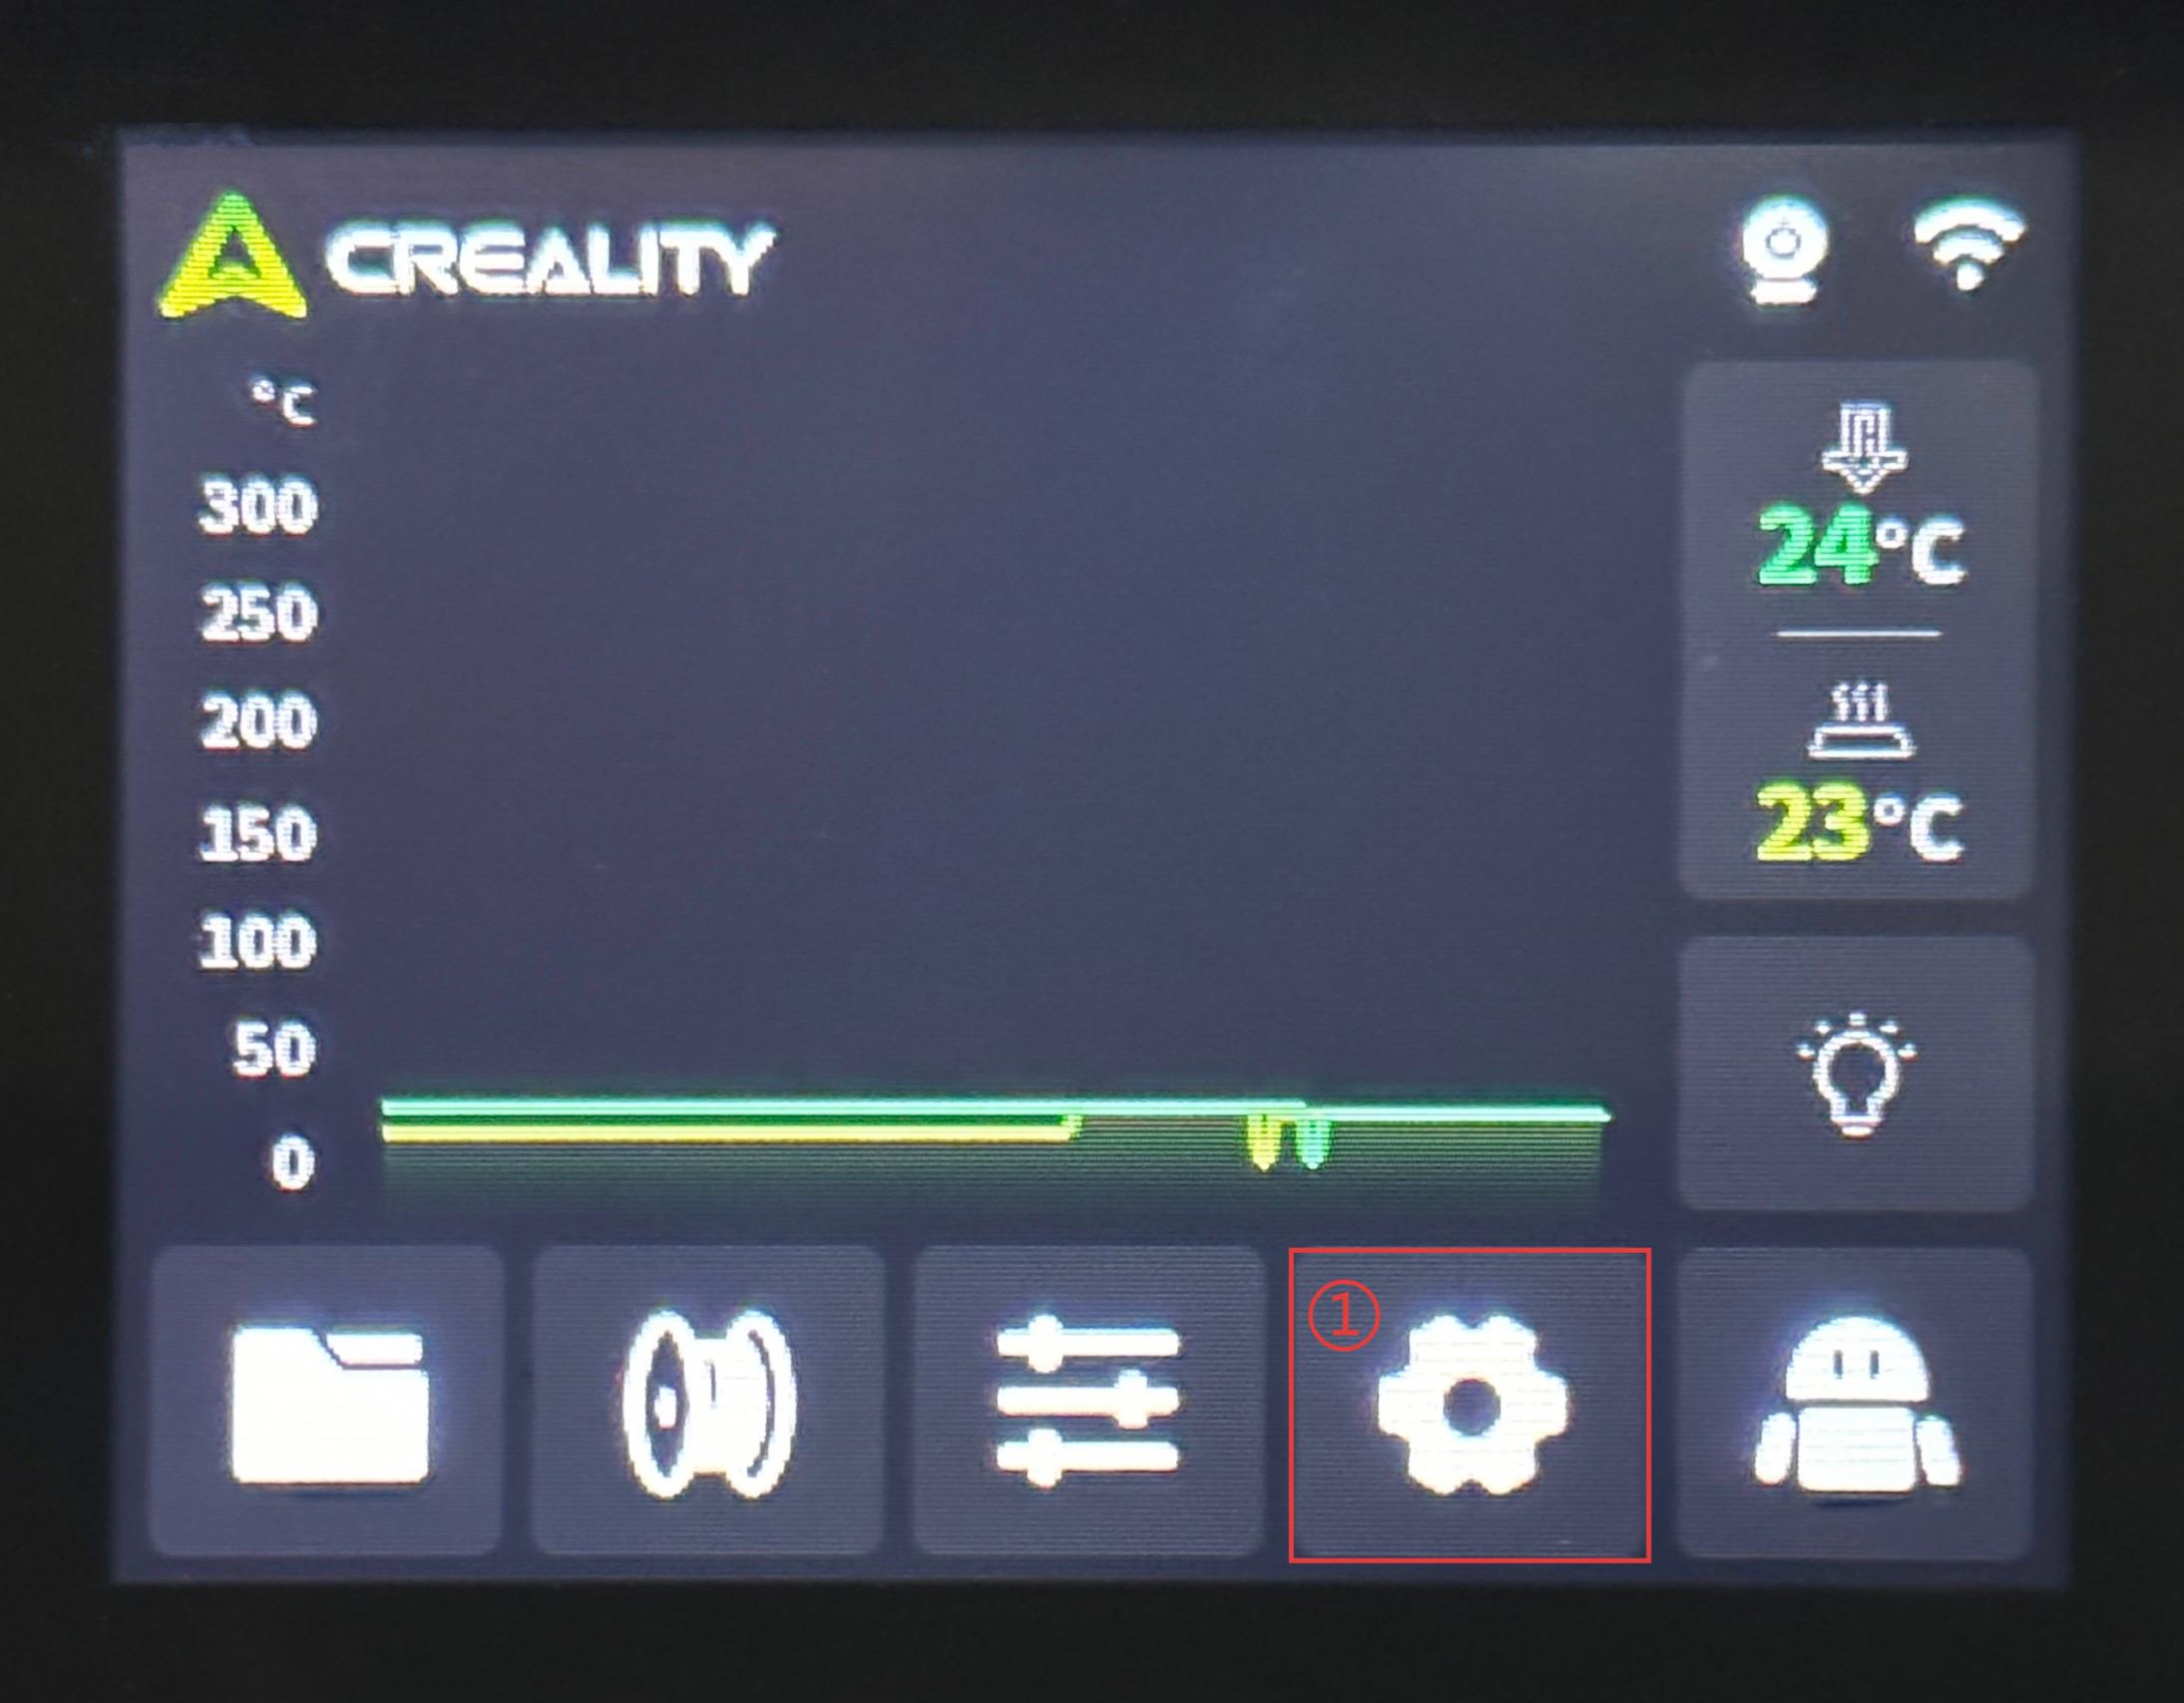
-
② Tap
Network-> ③IP
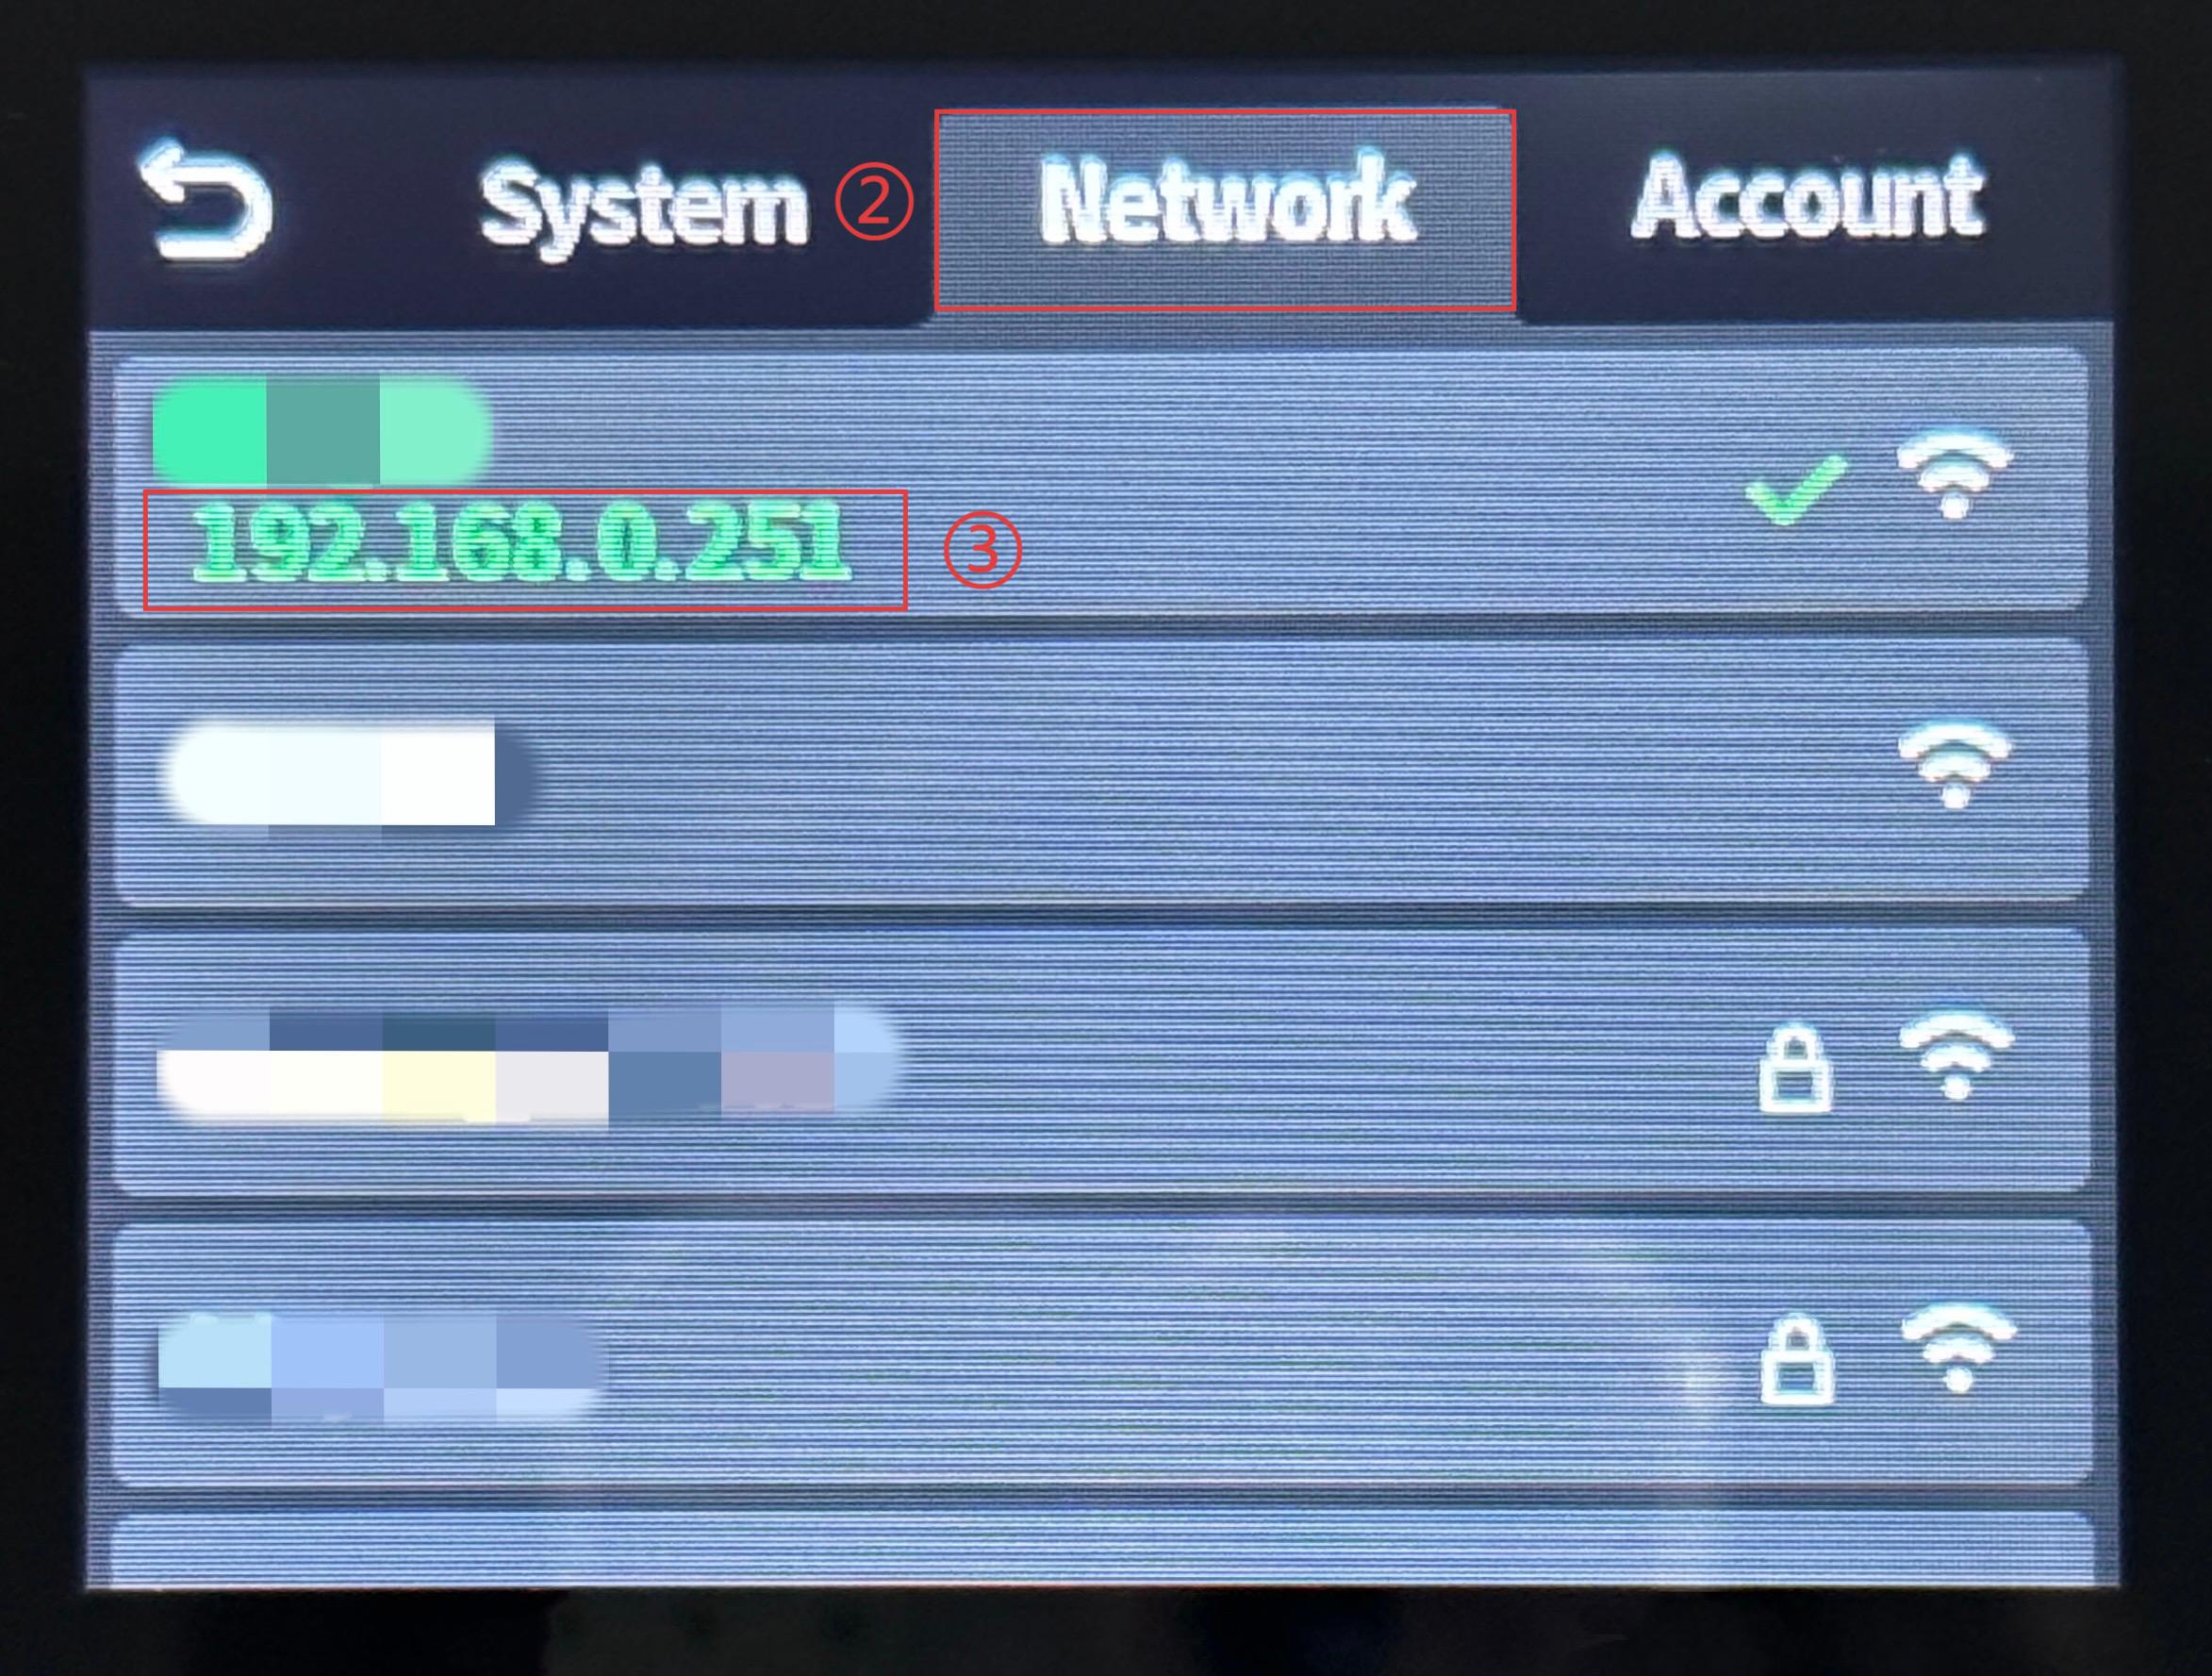
-
Ensure your computer is connected to the same local network as the printer. Open a web browser and enter the printer's IP address followed by
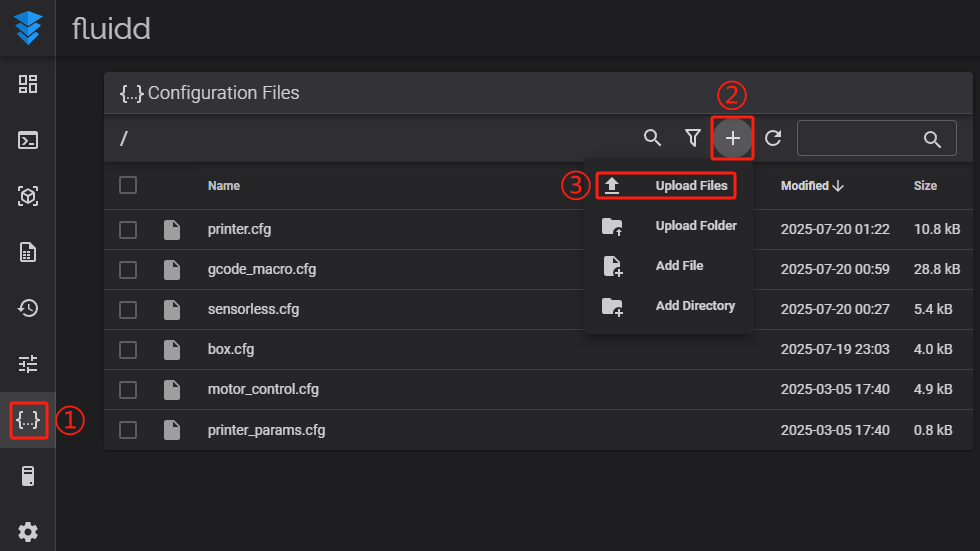
4408(the default port). Example: If your printer's IP is192.168.3.81, enter192.168.3.81:4408in your browser. - Upload Configuration File: In the interface: ① -> ② -> ③ Tap
Upload Filesand selectCreator_Knomi_Hi_01.00.00.00.cfgto upload.
- Edit
printer.cfgand add this line: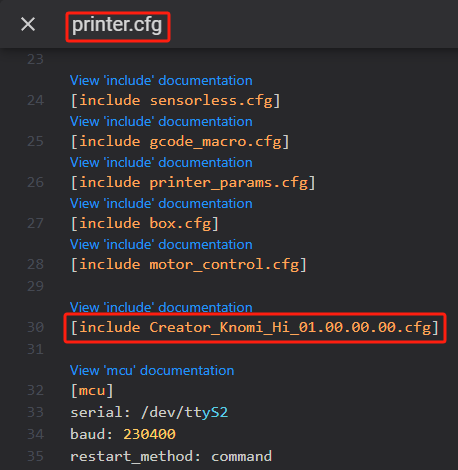
- Edit
sensorless.cfg
At the beginning of each of the following macros:_HOME_X,_HOME_Y, and_HOME_Z, add the this line: At the end of each macro, add: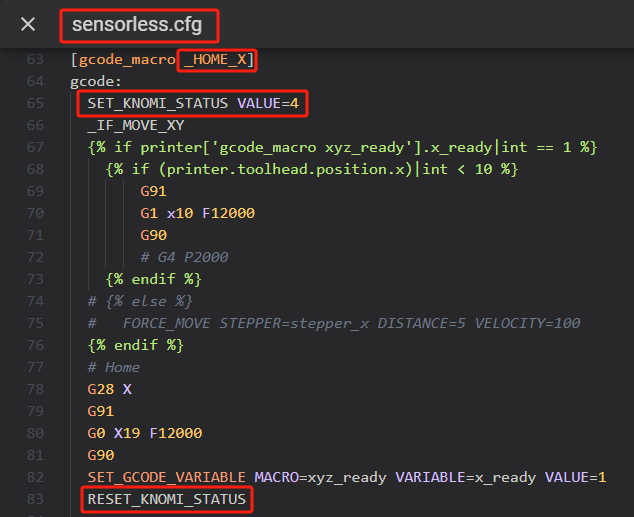
Note: The screenshot only shows “_HOME_X” but “_HOME_Y” and “_HOME_Z” should be updated the same way.
-
Edit
andgcode_macro.cfg: In theQUIT_MATERIALmacro, add the following in the shown location: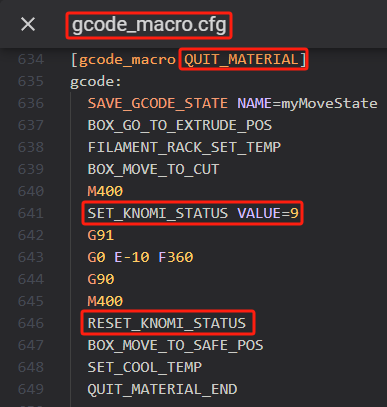
-
After making all changes, click
SAVE & RESTARTto apply your configuration.
User Interface Overview
First-Time Setup Guide
Accessing the Web UI Configuration Page
-
Connect to the Creator Knomi Hi AP hotspot After powering on for the first time or performing a
Factory Reset, you’ll see this interface:
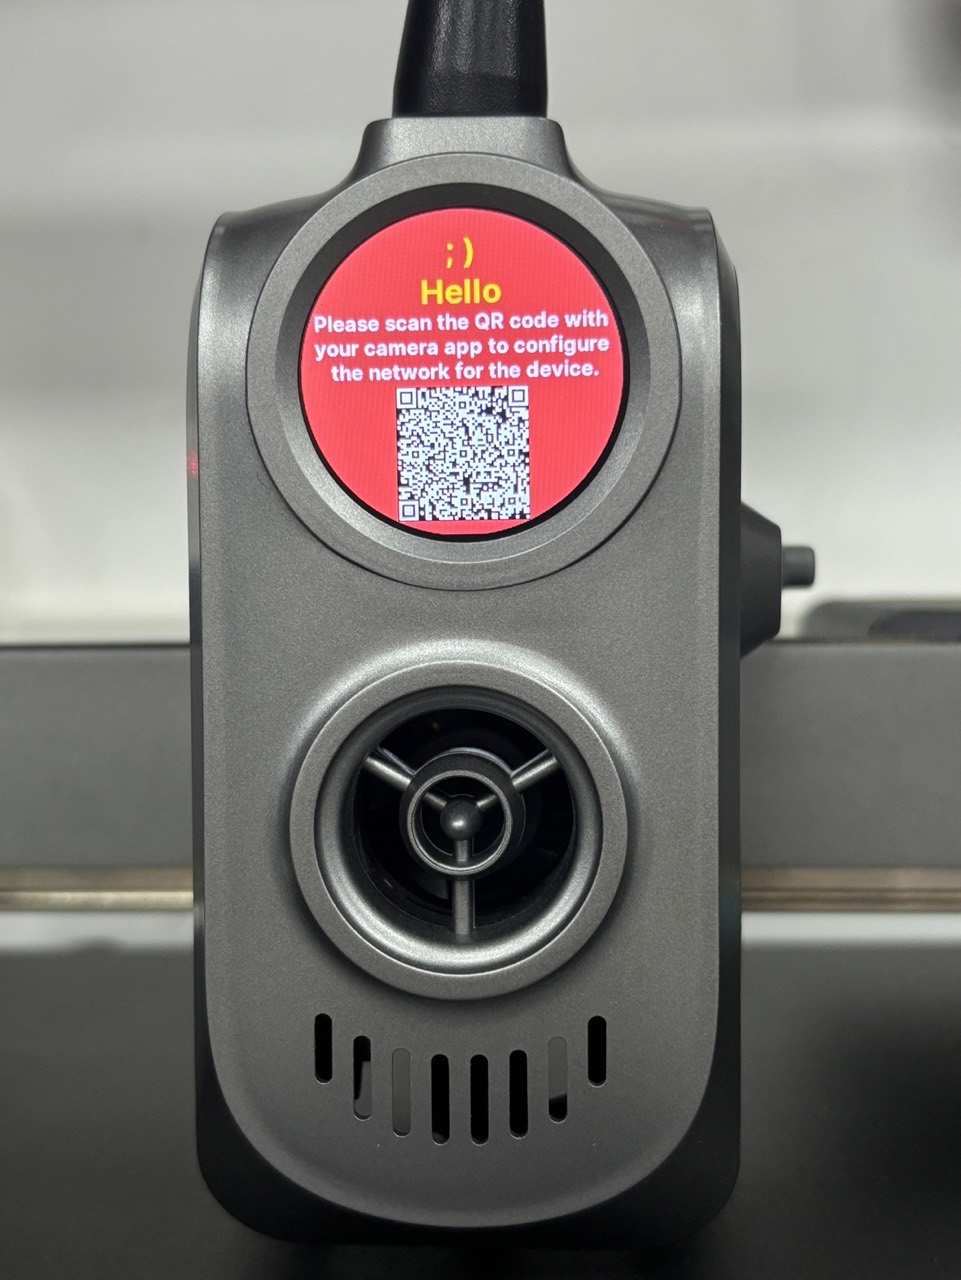
- Scan the QR code on the Creator Knomi Hi to get the AP name and password.
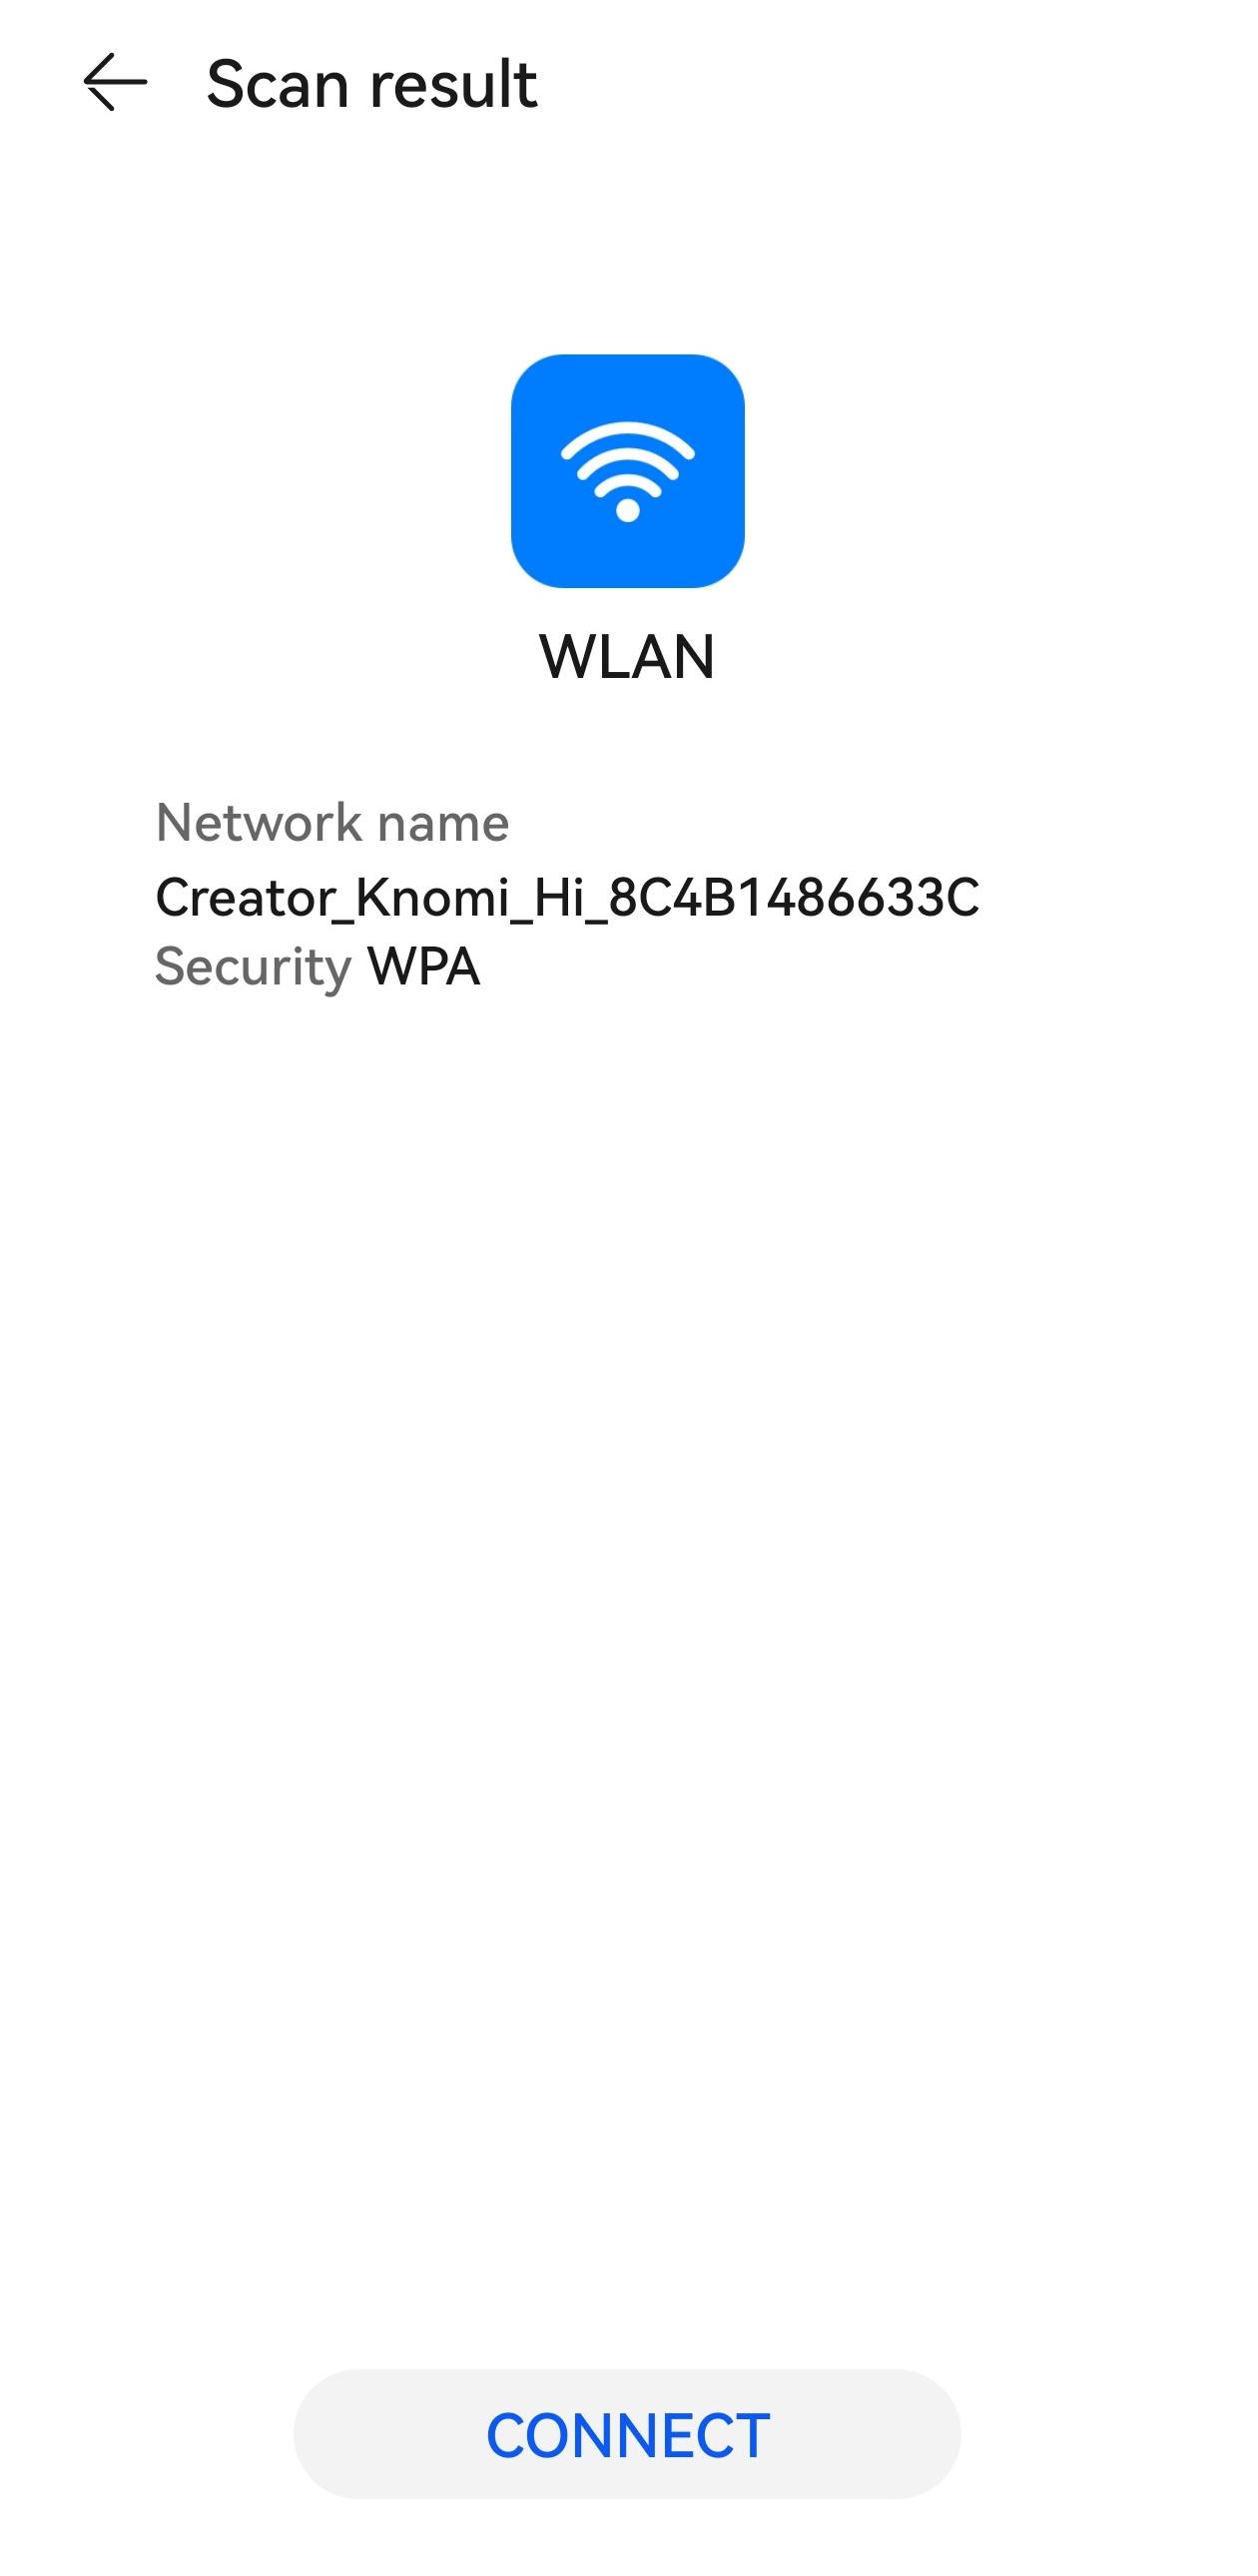
Connect to the AP with the default credentials:
Wi-Fi Name:Creator_Knomi_Hi_xxxxxxxxxxxx
Wi-Fi Password:987654321Note: Most modern smartphones are equipped to scan QR codes directly through their camera app. This feature is typically available on devices running iOS 11 or later, and Android 9.0 or later. To ensure optimal QR code scanning performance, please verify that both your device’s operating system and camera app are updated to their latest versions. If your smartphone does not have this capability, alternative options include using third-party applications from the application store, like Google Lens. Alternatively, you can manually connect to the Creator Knomi Hi’s hotspot using the default password
987654321to access the Web UI. - If scanning the QR code doesn't work, you can go to the
settingsmenu on the device to connect to the hotspot manually.
Using an iPhone as an example:- On your phone home screen, go to
Settings→WLAN. - Turn on
WLAN. Your device will automatically search for available networks.
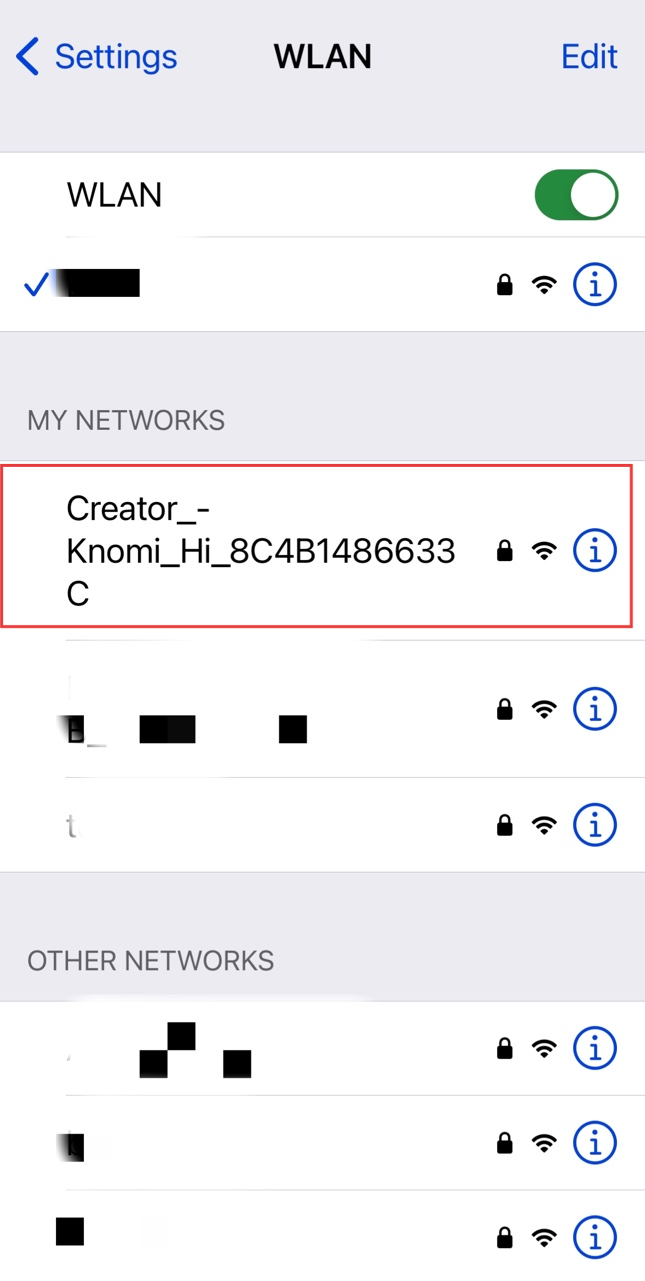
- Tap on the network name starting with
Creator_Knomi_Hiand enter the default password:987654321. - After successfully connecting to the Creator_Knomi_Hi network, you will see a blue checkmark next to the network, and the Wi-Fi icon indicating a connection will appear in the top-right corner of the screen.
- On your phone home screen, go to
- Scan the QR code on the Creator Knomi Hi to get the AP name and password.
-
Once connected, a
Login Requiredmessage may appear. Tap it to launch the Web UI. If that doesn’t happen, wait 10–20 seconds. If it still doesn’t load, open your browser manually and go to: 192.168.254.1.
Connecting to the Same Wi-Fi as the Printer
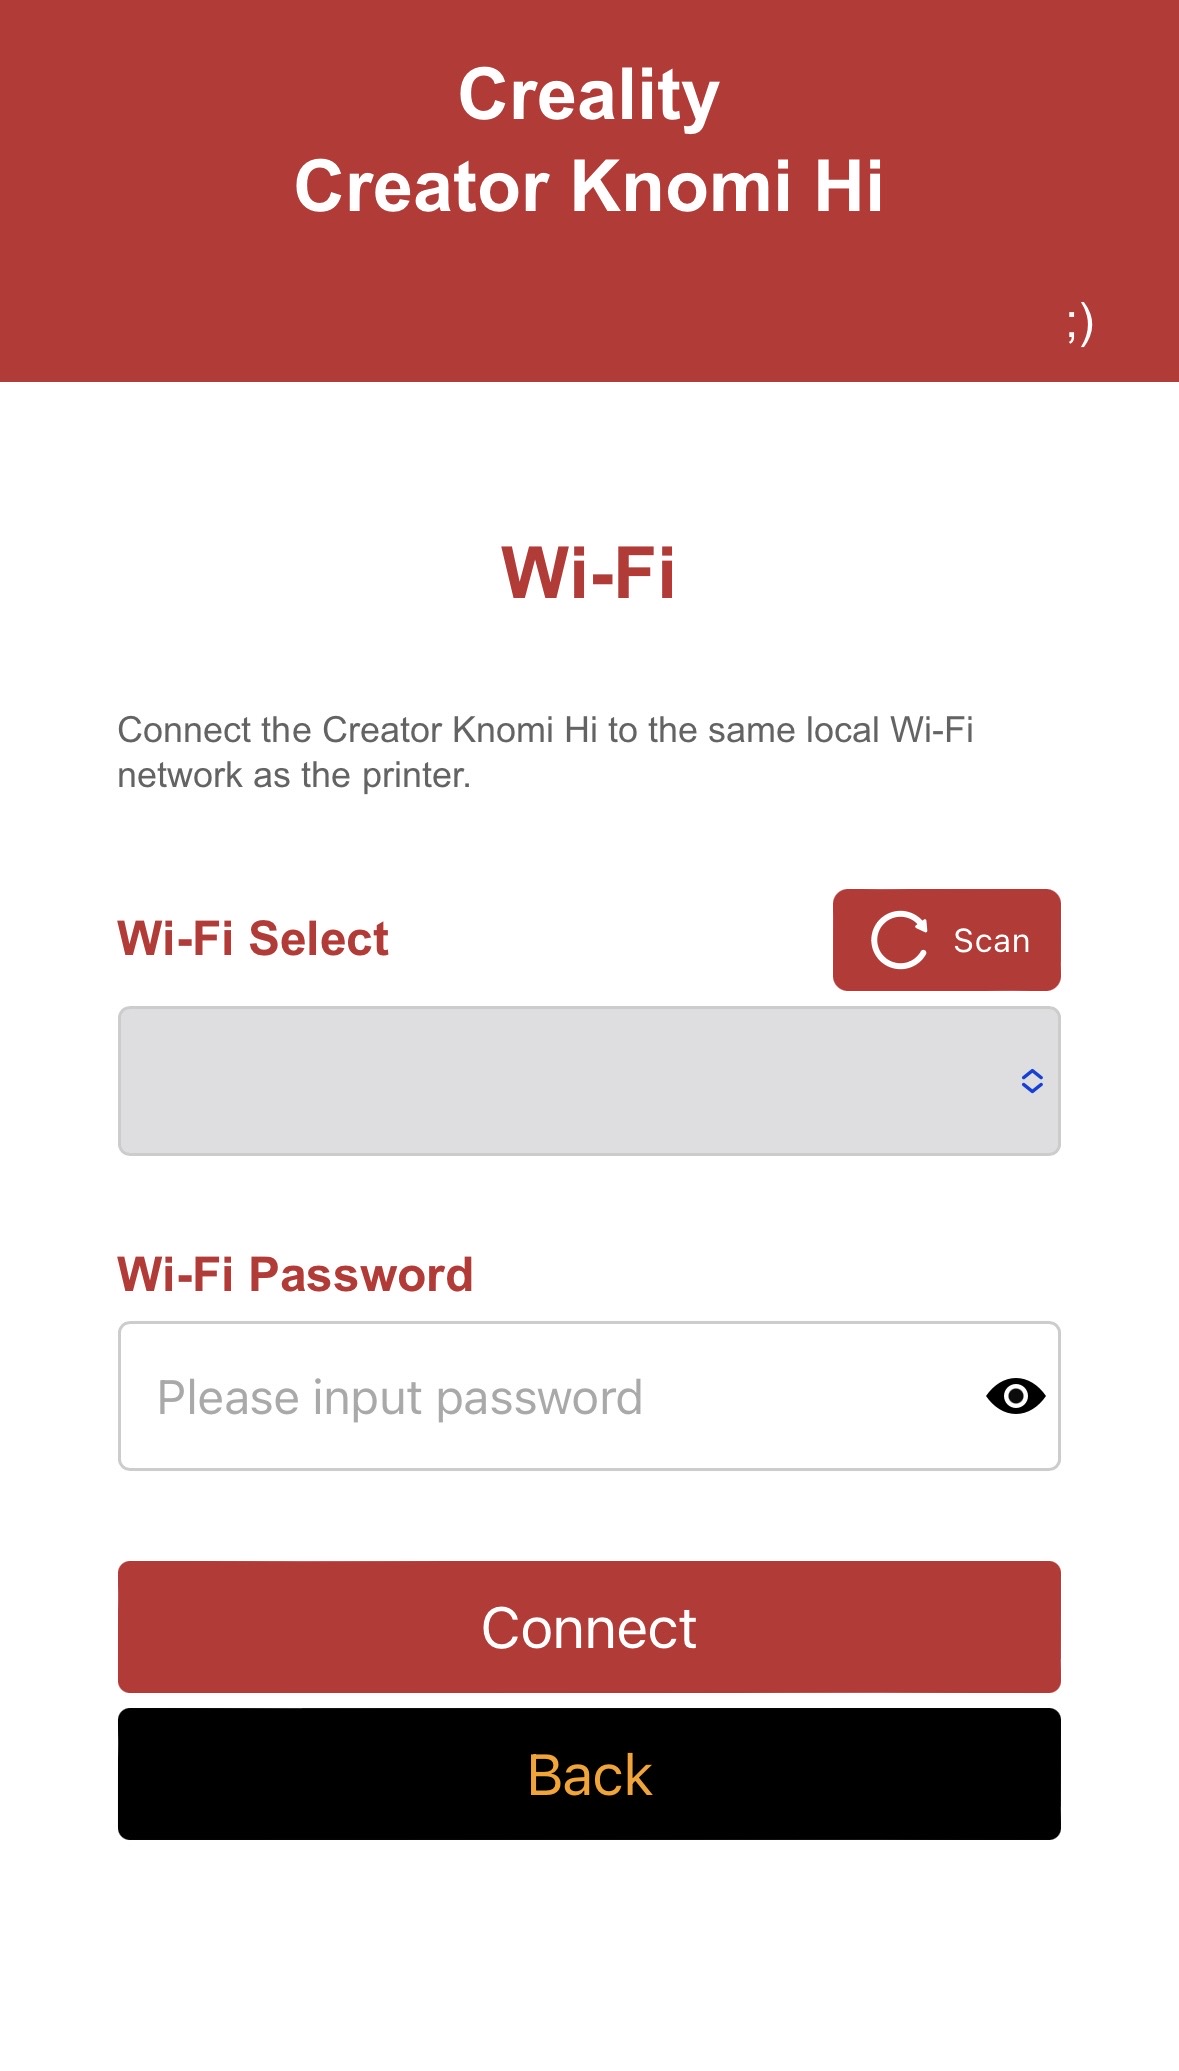
- Initially, you will be prompted to select a language. After setting the language, tap
Nextto proceed to the Wi-Fi connection interface.

- The Creator Knomi Hi will automatically search for available Wi-Fi networks in the vicinity. If your desired Wi-Fi network does not appear, you can tap the
Scanbutton to initiate a new search for networks.
Select the printer’s connected Wi-Fi network, enter the password, and tapConnect.
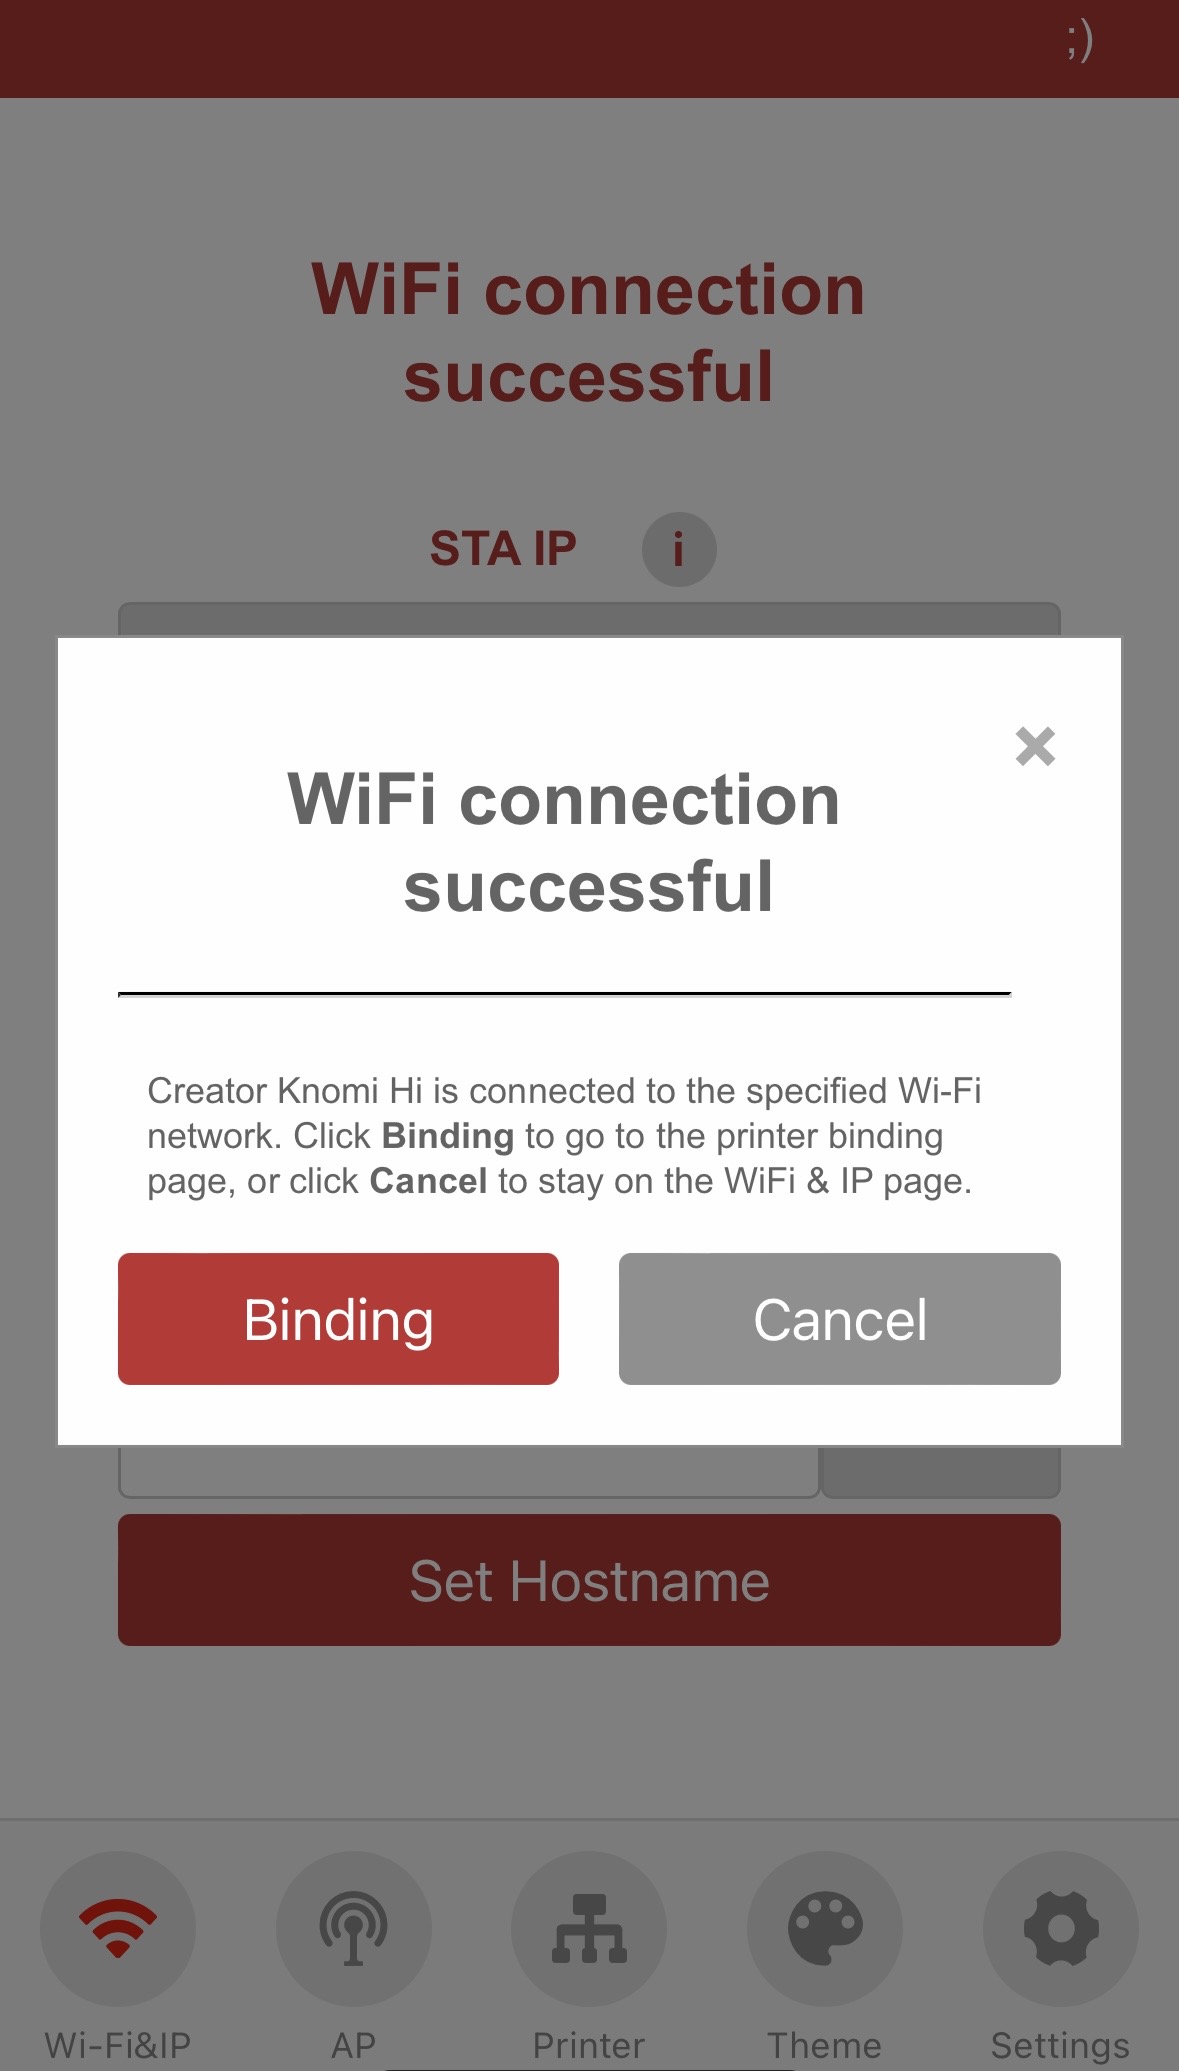
- Once the connection is established, tap
Bindingto proceed to thePrinterinterface where you will bind the printer.
Printer Binding
Auto Scan
- In the Web UI, go to the
Printerpage, set the scan port (default for Creality Hi is7125) and tapScan.
Scanning may take 50–300 seconds depending on how many devices are on your network. If the desired printer isn’t found after scanning, you can tapScanagain to retry, or manual enter the printer information directly.
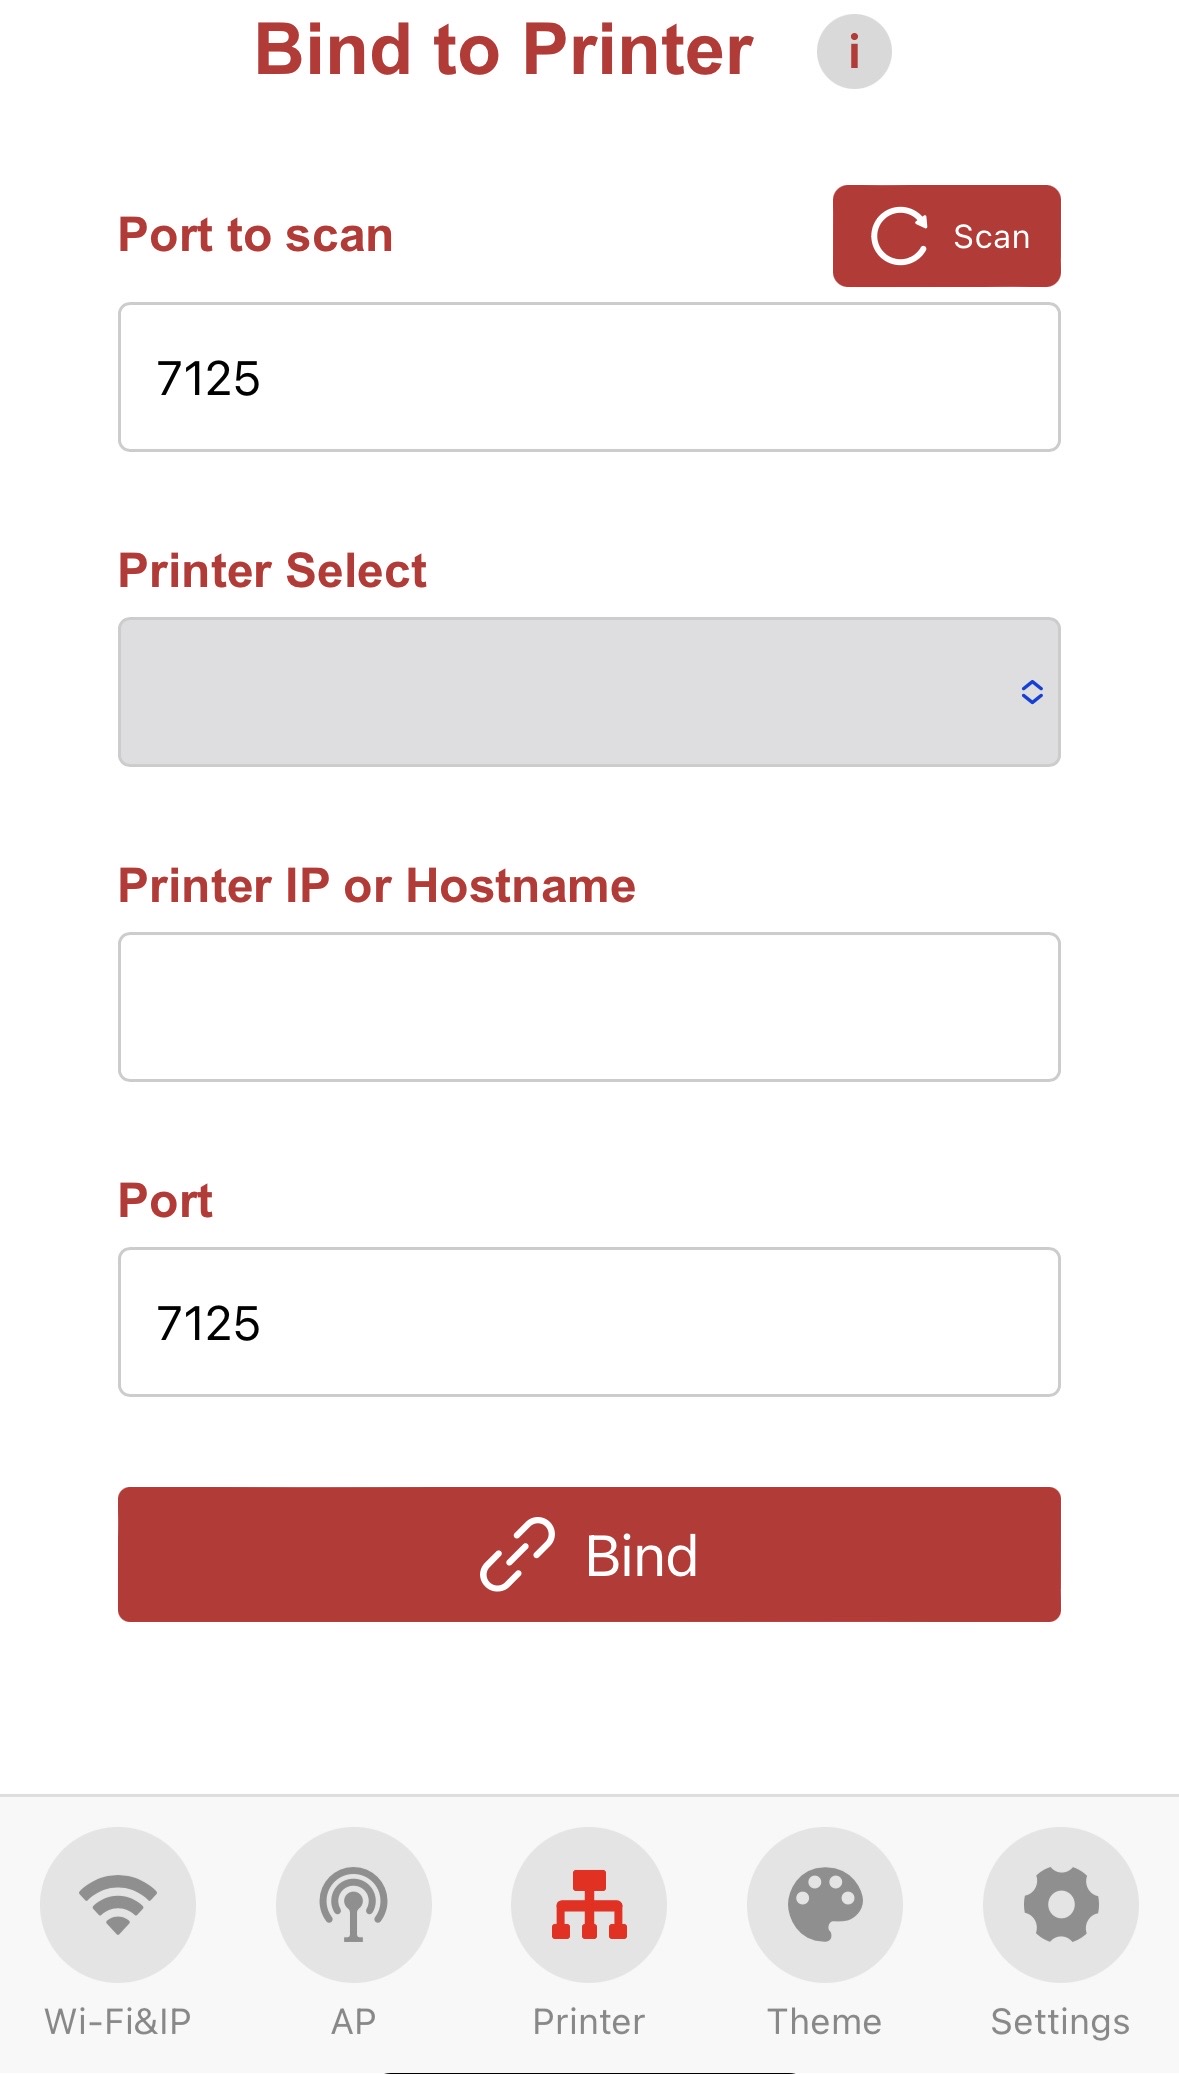
- After scanning, select your printer. The IP/Device Name and port will fill in automatically
- Tap
Bind. ABinding successfulpopup will confirm that the Creator Knomi Hi has connected to the printer.

- You’re all set—Creator Knomi Hi is now connected to your printer!
Manual Entry
- The scan works by pinging all IPs in the LAN and sending HTTP GET requests to each on the selected port. If valid printer data is returned, it is listed. However, not all printers may be detected. In such cases, manual entry is recommended.
- If your LAN has few printers but still fails to detect them, try manual binding. If connection fails, your router may be blocking inter-device LAN traffic. Contact support at support01@bigtree-tech.com for help.
- Find the printer’s IP and enter it in the Web UI:
- ①
Settings
- ②
Network-> ③IP
- The default port is
7125
- ①
- Tap
Bind. A "Binding successful" popup will confirm that the Creator Knomi Hi has connected to the printer.
- Congratulations! Your Creator Knomi Hi is now set up and ready to use. Enjoy exploring its features!
GIF Status Explanation
- Due to hardware limitations, Creator Knomi Hi requires that the size of a single GIF not exceed 1.5MB (1536KB, 1MB = 1024KB), and the total size of all GIFs must not exceed 3MB (3072KB, 1MB = 1024KB).
- In the factory state, the total size of all GIFs is 1374.06KB (slightly different from the sum of all sizes in the table above due to rounding each GIF's size to two decimal places), leaving 1697.94KB of available space.
| File Name in Web UI | GIF Effect | Conditions for Display (Printer must be bound) | Factory GIF Size | Factory GIF Resolution (Width x Height) | |
|---|---|---|---|---|---|
| 1 | standby.gif |  |
The printer is idle. | 242.21KB | 240 x 240 |
| 2 | nozzle_heating.gif |  |
Nozzle is heating up. | 146.11KB | 240 x 240 |
| 3 | bed_heating.gif |  |
Bed is heating up. | 72.74KB | 240 x 240 |
| 4 | bed_leveling.gif |  |
Auto-leveling. | 133.82KB | 240 x 240 |
| 5 | homing.gif |  |
Homing. | 149.86KB | 240 x 240 |
| 6 | z_tilting.gif |  |
Z-axis leveling. | 172.79KB | 240 x 240 |
| 7 | nozzle_cleaning.gif |  |
Nozzle is being cleaned. | 82.4KB | 240 x 240 |
| 8 | xy_input_shaper.gif |  |
Calibrating input shaping. | 59.44KB | 240 x 240 |
| 9 | filament_cut.gif |  |
Cutting filament. | 12.56KB | 240 x 240 |
| 10 | Filament_pull_back_cur.gif |  |
Retracting filament. | 108.79KB | 240 x 240 |
| 11 | filament_purge_old.gif |  |
Purging old filament. | 17.51KB | 240 x 240 |
| 12 | printing_ok.gif |  |
Printing complete. | 18.4KB | 240 x 240 |
| 13 | printing.gif |  |
Printing in progress. | 157.43KB | 240 x 240 |
Screen Saver
To prevent screen burn-in from long exposure to static images, Creator Knomi Hi includes a built-in screen saver. Every 15 seconds, a screen saver GIF (non-customizable) will appear for 2 seconds.
- The screen saver GIF is as follows:

- The screen saver is active on the following interfaces:
- Invalid IMG Interface
- Hello Screen at Factory Settings
- Wi-Fi Scan Completion
- Wi-Fi Connection Failure
- Wi-Fi Password Error
- Binding Printer Interface
- Printer Scan Completion
- Printer Unready
Wi-Fi & IP Settings
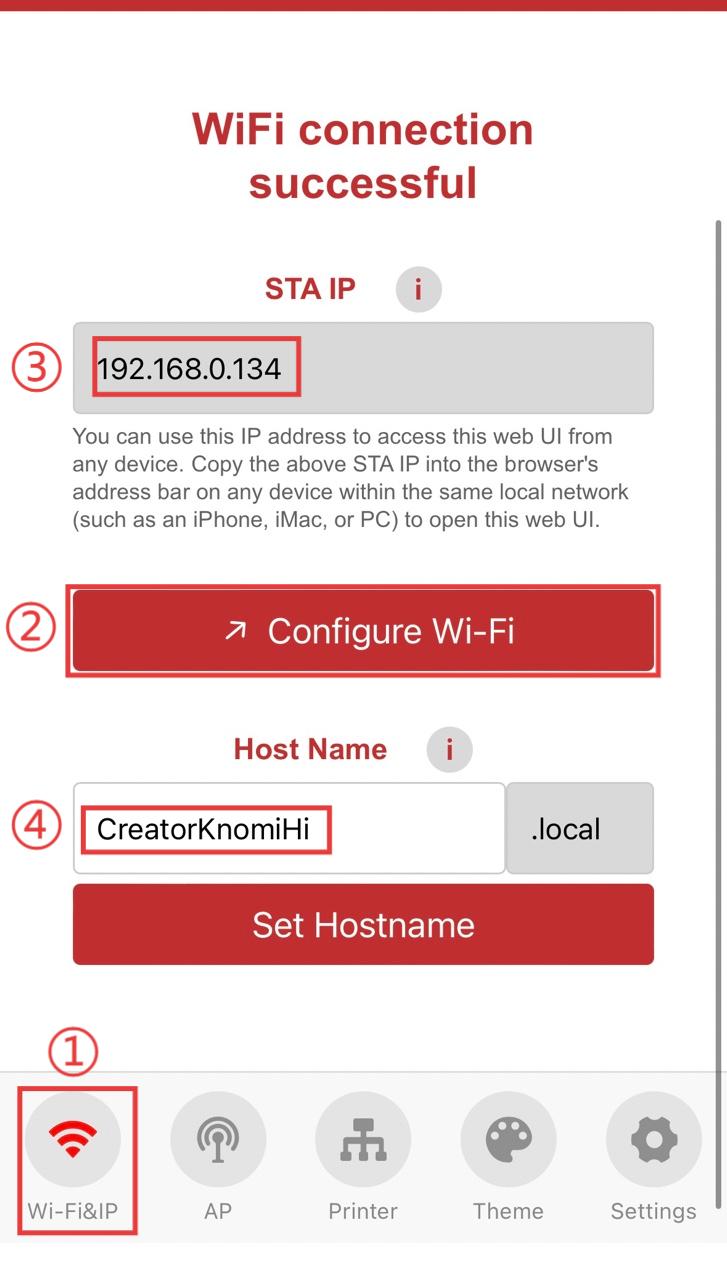
- ① Tap the
Wi-Fi & IPoption. - ② To change the Wi-Fi network that Creator Knomi Hi connects to, tap
Configure Wi-Fi, this will take you back to the Wi-Fi configuration interface.Note: When the Creator Knomi Hi switches to a different Wi-Fi network, it will connect to a new local network and IP address. If your device is connected to the same Wi-Fi network as Creator Knomi Hi at the time of this change, you will lose the ability to communicate with it. To reconnect, you'll need to join the new Wi-Fi network to which Creator Knomi Hi has connected.
However, to avoid losing connection during this transition, it is recommended to connect your device to the Creator Knomi Hi's AP hotspot before initiating any changes to the Wi-Fi settings. This way, you can manage the network settings without disrupting your connection to the device. - ③ After configuring the network, ensure that your devices (phone, computer, etc.) are connected to the same local network as Creator Knomi Hi.
Access the Web UI by entering the IP address into your browser’s address bar. To avoid forgetting the IP address, consider bookmarking it on your phone’s home screen. -
④ Alternatively, if your devices are on the same network as Creator Knomi Hi, you can access the Web UI using the hostname, which by default is
Creator_Knomi_Hi(accessible via http://CreatorKnomiHi.local , hostname is not case-sensitive).
Note that if a VPN is active on your device, you may need to use the IP address directly, as accessing by hostname might fail.
Setting the Hostname:- The hostname must consist only of letters (a-z, A-Z), numbers (0-9), and hyphens (-), and must start with a letter.
- The hostname must be at least 8 characters long and no more than 32 characters. (If firmware is
v1.0.2or earlier, max is 15 characters to avoid boot failure. To support longer names, update to firmware version V1.0.3 or later.)
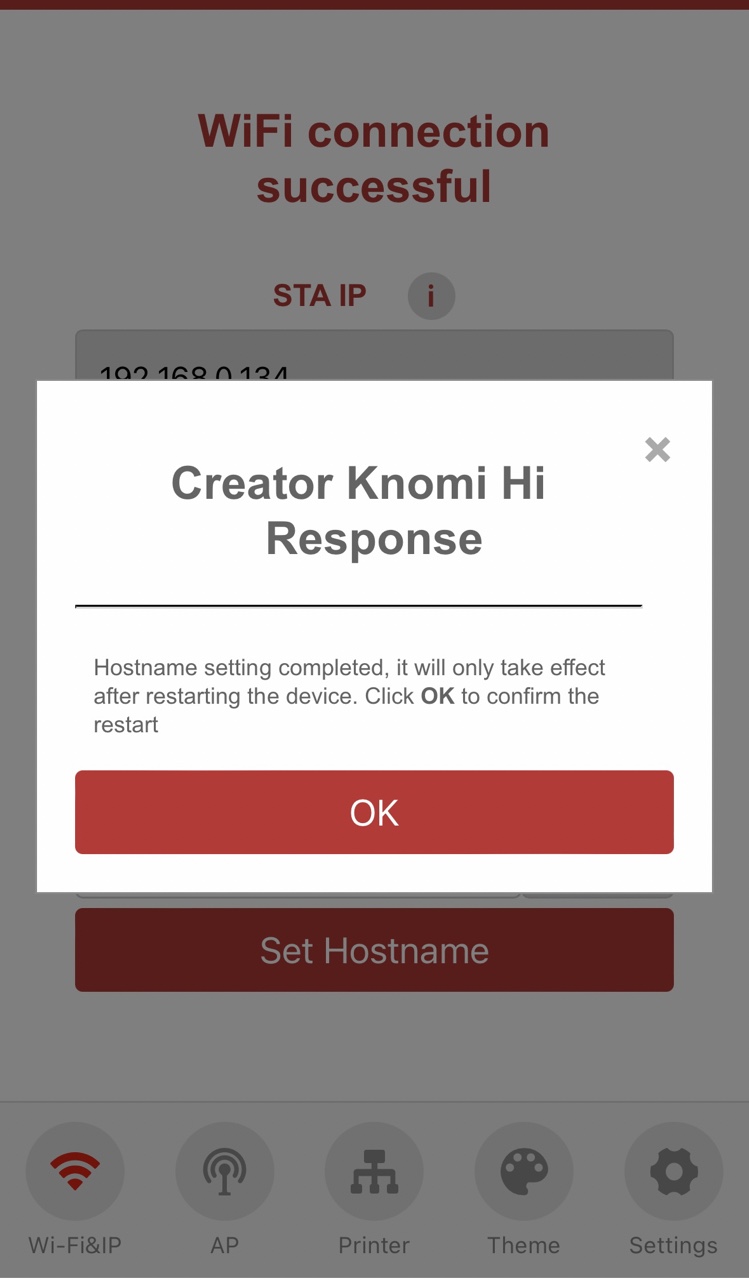
After choosing a new hostname, tap
Set Hostnameto update Creator Knomi Hi. A popup will confirm the successful change. The device must be restarted for the hostname change to take effect. This can be initiated by tappingOKin the confirmation popup, or postponed by closing the popup with thexbutton.
AP Interface
If your device is connected to the Creator Knomi Hi AP hotspot to access the Web UI, any changes or shutdown of the Creator Knomi Hi AP settings will disconnect the device. To prevent this, it is recommended to connect your device to the same local network as Creator Knomi Hi before making changes.
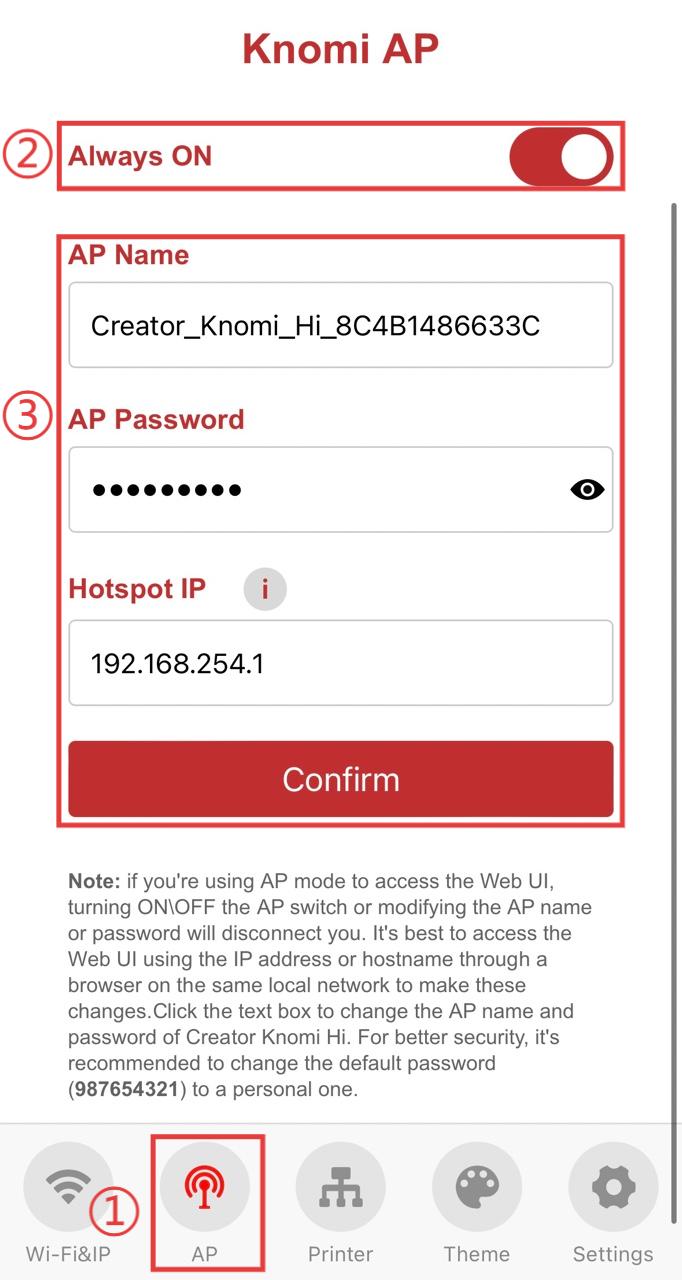
- ① Access the
APinterface. - ② Toggle the Creator Knomi Hi AP hotspot on or off. When the AP hotspot is off, the device will no longer connect to Creator Knomi Hi’s hotspot for Web UI access. Before disabling it, ensure you record Creator Knomi Hi’s IP address on the current Wi-Fi network. Devices on the same Wi-Fi can still access the Web UI via this IP.
- ③ Modify the Creator Knomi Hi AP hotspot settings. The default configuration is:
Wi-Fi Name:Creator_Knomi_Hi_xxxxxxxxxxxx
Wi-Fi Password:987654321
IP Address:192.168.254.1Note:
Changing only the name/password takes effect immediately.
Changing the IP address requires a reboot.
Theme Settings & Sharing IMG Files
Theme Settings 
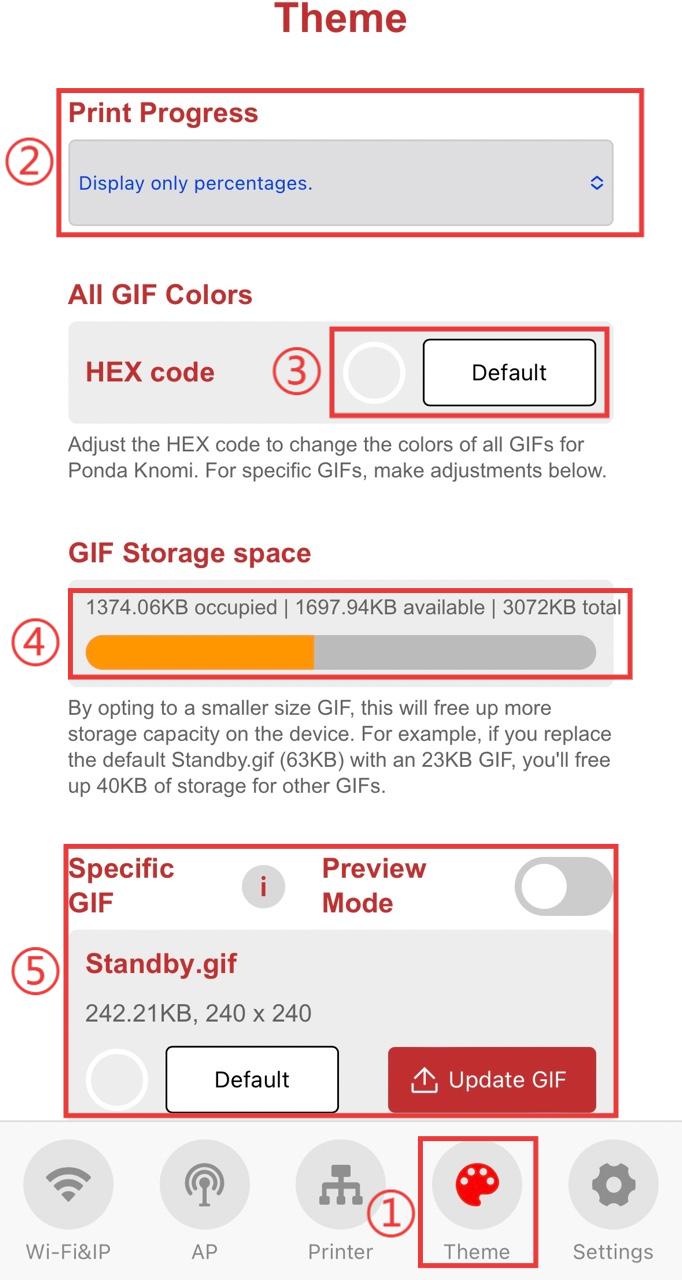
- ① Go to the
Themeinterface. - ② Choose how to display printing progress:
Only percentage: Displays real-time printing progress as a percentageOnly GIF: Displays a GIF representing the printing process.Alternating percentage and GIF: Alternates between showing the percentage and GIF every 10 seconds.
- ③ Set GIF Colors
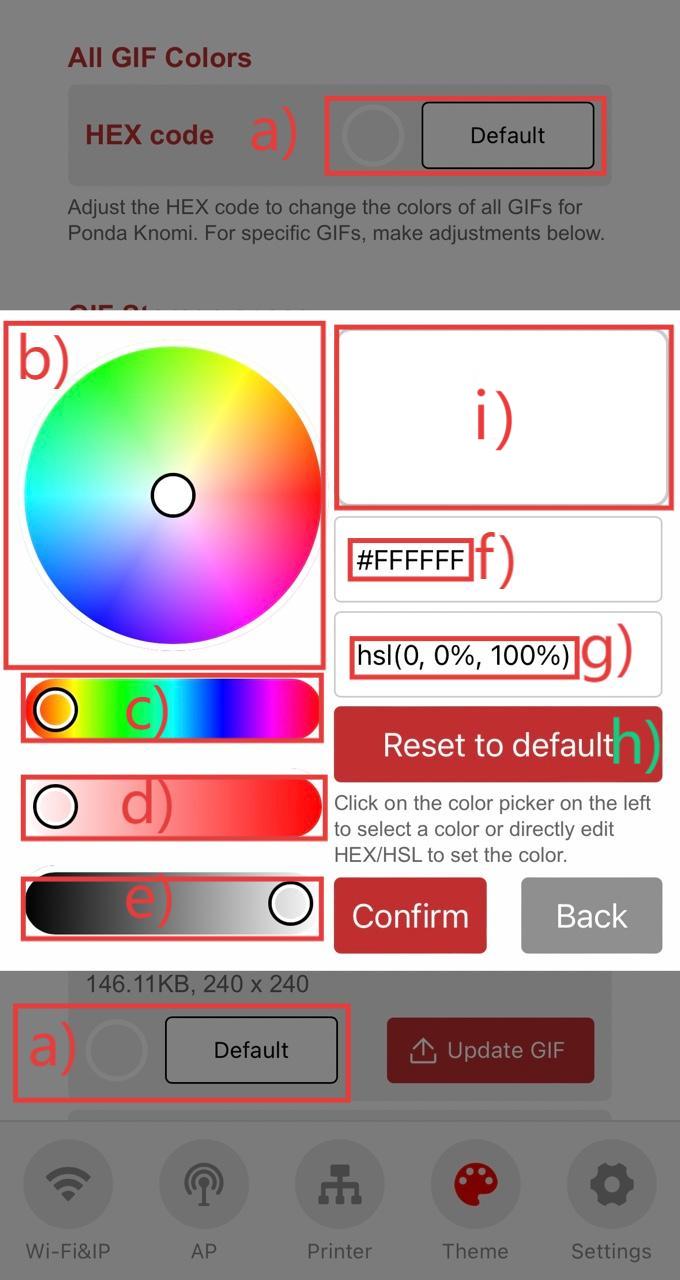
- a) Tap to open the color setting interface for the GIF.
- b) Use the HSL Color Wheel. ( What is HSL?)
- c) H (Hue) ranges from 0° to 360°.
- d) S (Saturation) ranges from 0% to 100%.
- e) L (Lightness) ranges from 0% to 100%.
- f) The hex RGB value — each value ranges from 0 to 255 (0x00 to 0xFF). You can directly modify this value to get your desired color. For example, the value #CCFF4D shown in the image means:
- R (Red): 0xCC (204/255)
- G (Green): 0xFF (255/255)
- B (Blue): 0x4D (77/255)
- g) The HSLA Values — Hue (H) ranges from 0–360°, Saturation (S) from 0–100%, and Lightness (L) from 0–100%. You can directly edit these values to achieve your desired color.
For example, the value hsla(77, 100%, 65%) shown in the image means:
- H (Hue): 77°
- S (Saturation): 100%
- L (Lightness): 65%
- h) Tap to reset to the original GIF color.
- i) Preview the color in the preview area.
- ④ View GIF Storage Usage:Due to Creator Knomi Hi’s hardware limitations, the total size of all GIFs cannot exceed 3MB (3072KB). If this limit is exceeded, the Web UI will block the update and display a pop-up reminder.
- ⑤ Set Each GIF Individually, including color and custom GIF images:
TurnPreview Modeon/off to show/hide thePreviewbutton. TappingPreview this GIFenters preview mode, allowing you to view the custom GIF on the screen. To exit preview mode, turn offPreview Modeor navigate away from theThemeinterface.
Custom GIF Notes:- The screen resolution of the Creator Knomi Hi is
240 × 240 pixels(width × height). GIFs larger than this will not display correctly. Only GIFs that are240 × 240 pixelsor smaller are supported. If your GIF exceeds this size, we recommend resizing it using an online tool like https://www.iloveimg.com/resize-image/resize-gif- Click
Select imagesor drag your GIF into the upload area. - Ensure
Maintain aspect ratiois checked to prevent distortion. - Set the larger value—either
Width (px)orHeight (px)—to 240 or less. If both are equal, you can adjust either. - Click
Resize IMAGES. - After processing, click
Download resized IMAGESto save your optimized GIF.
- Click
- Each individual GIF must be no larger than 1.5MB (1536KB). The total size of all GIFs must not exceed 3MB (3072KB).
- When replacing a built-in GIF, the new GIF's size must not exceed the sum of the original GIF size and the remaining available space. You can check the available space in
④and each GIF’s size in⑤.
Example:
To replacestandby.gif(242.21KB) with 1697.94KB of remaining space, the new GIF must be ≤ 1940.15KB(242.21KB + 1697.94KB).
- The screen resolution of the Creator Knomi Hi is
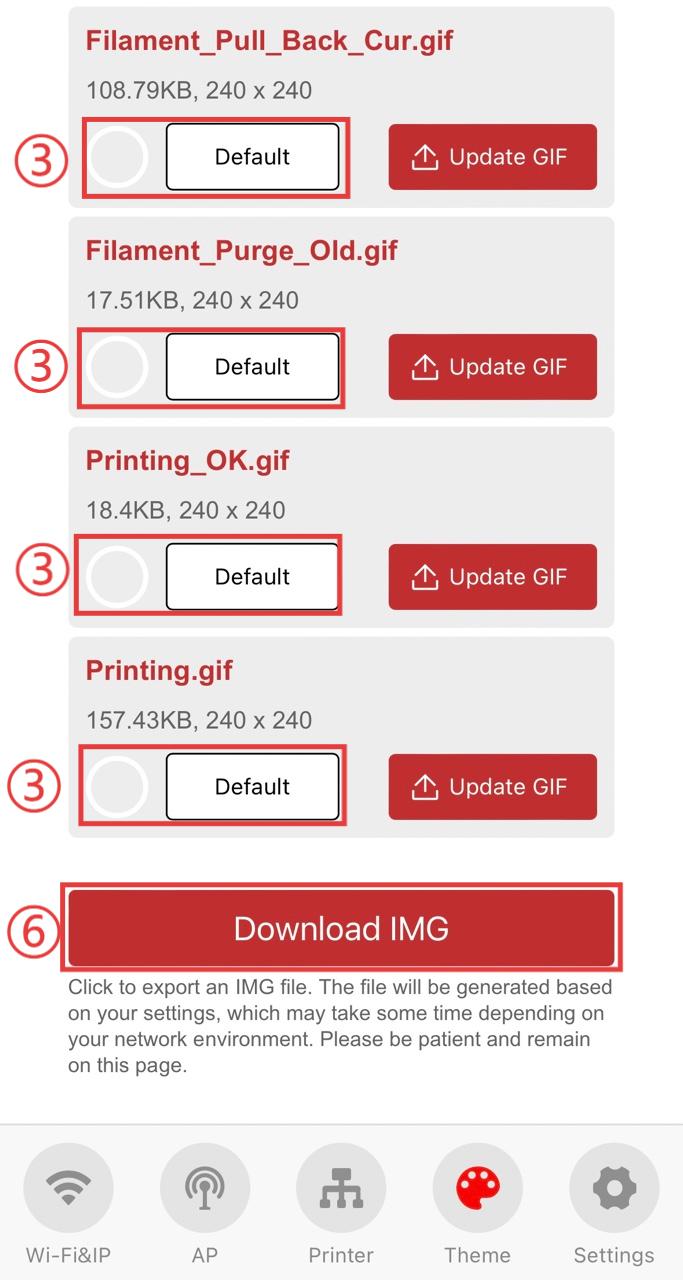
- ⑥ Export your custom GIFs as an
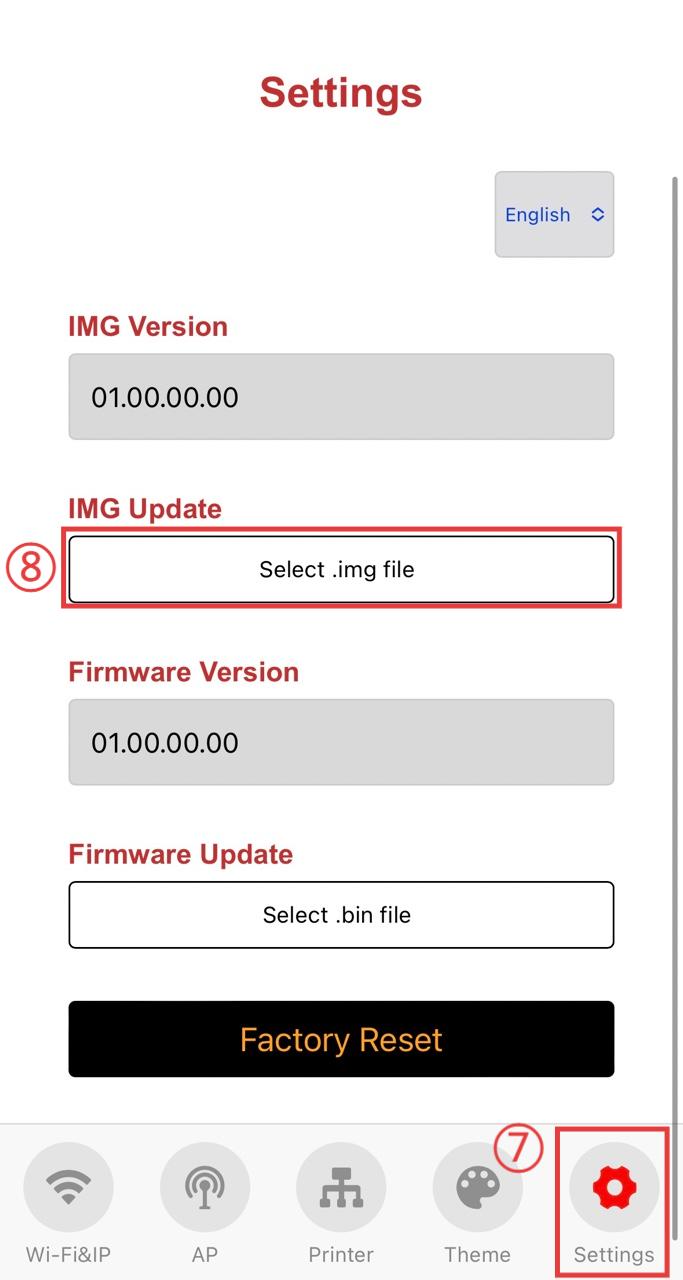
.imgfile for easy backup or sharing. - ⑦ ⑧ Import a shared
.imgfile into Creator Knomi Hi to apply the custom theme.
Download IMG Theme and Apply to Creator Knomi Hi
- Download IMG Theme File
- Download a
.imgtheme file from the community
- Download a
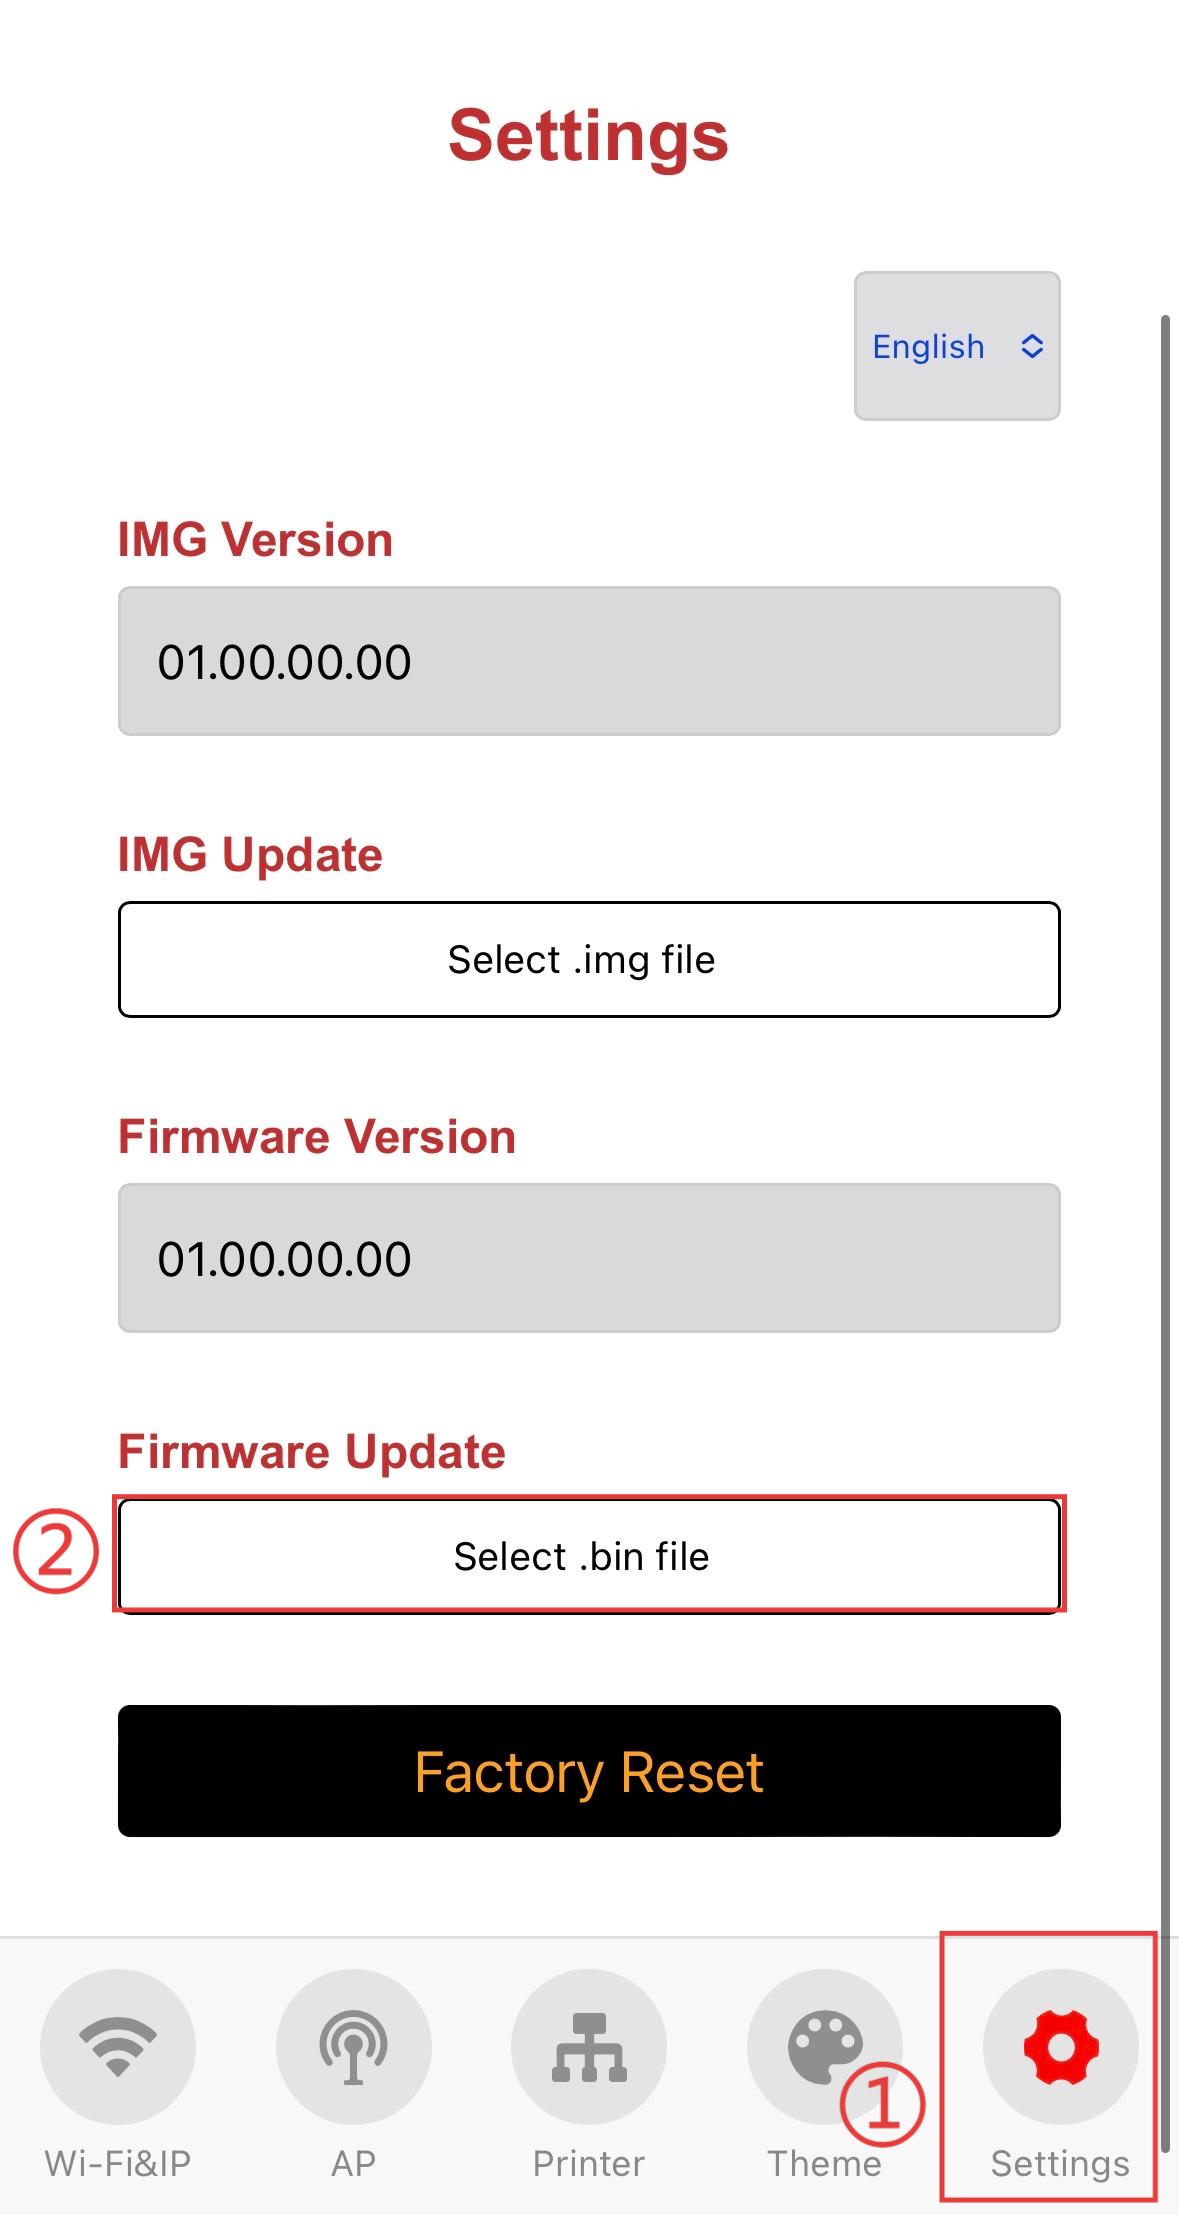
- Open Creator Knomi Hi’s Web UI: ①
Settings-> ②Select .img file,select the .img file you just downloaded. Once the update is complete, Creator Knomi Hi will automatically apply the new IMG file.
Export IMG File from Creator Knomi Hi
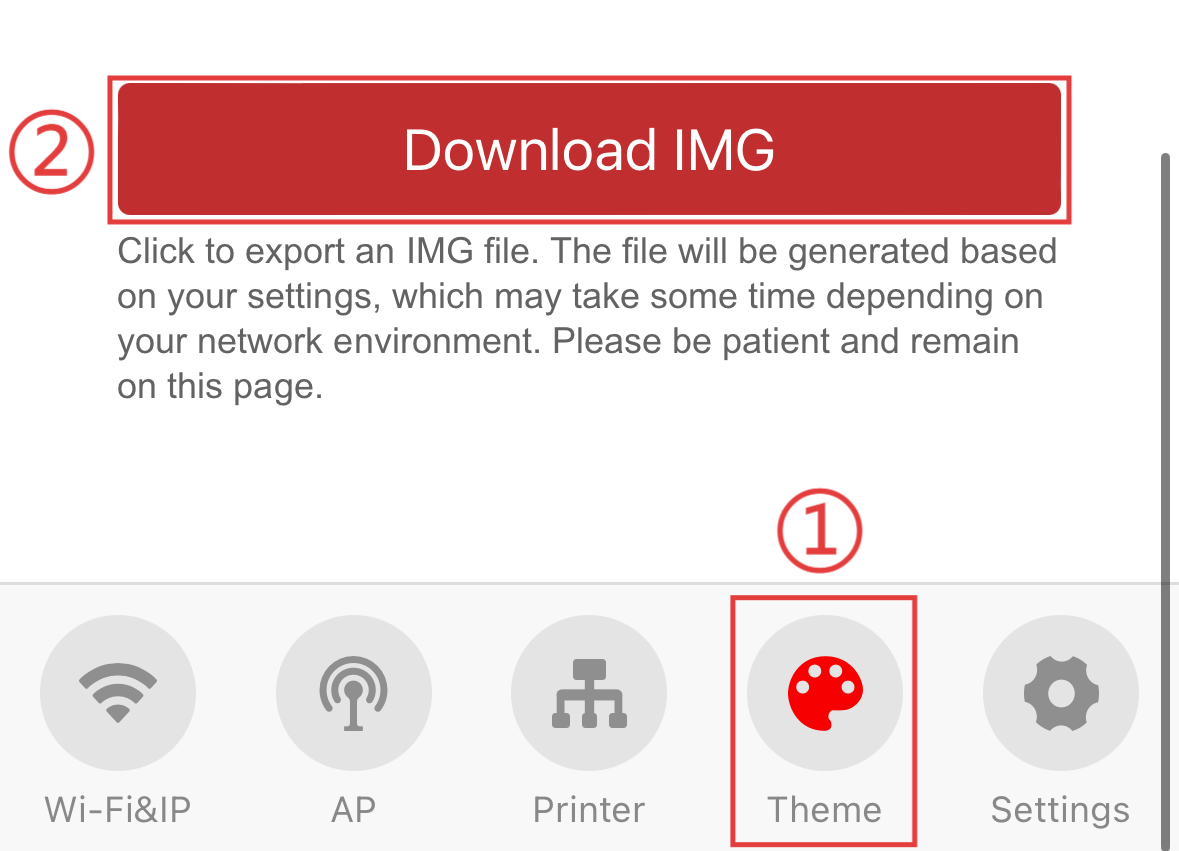
- In Web UI: Go to ①
Theme-> ② Export IMG, and wait for the file to export.
Factory Reset
Restoring the factory settings of Creator Knomi Hi will erase all configurations, including language, Wi-Fi settings, custom hostname, custom AP hotspot name and password, bound printers, print progress display selection. However, custom GIFs cannot be restored to the factory defaults. GIFs can only be modified by uploading new ones or updating the IMG file.
Via Web UI
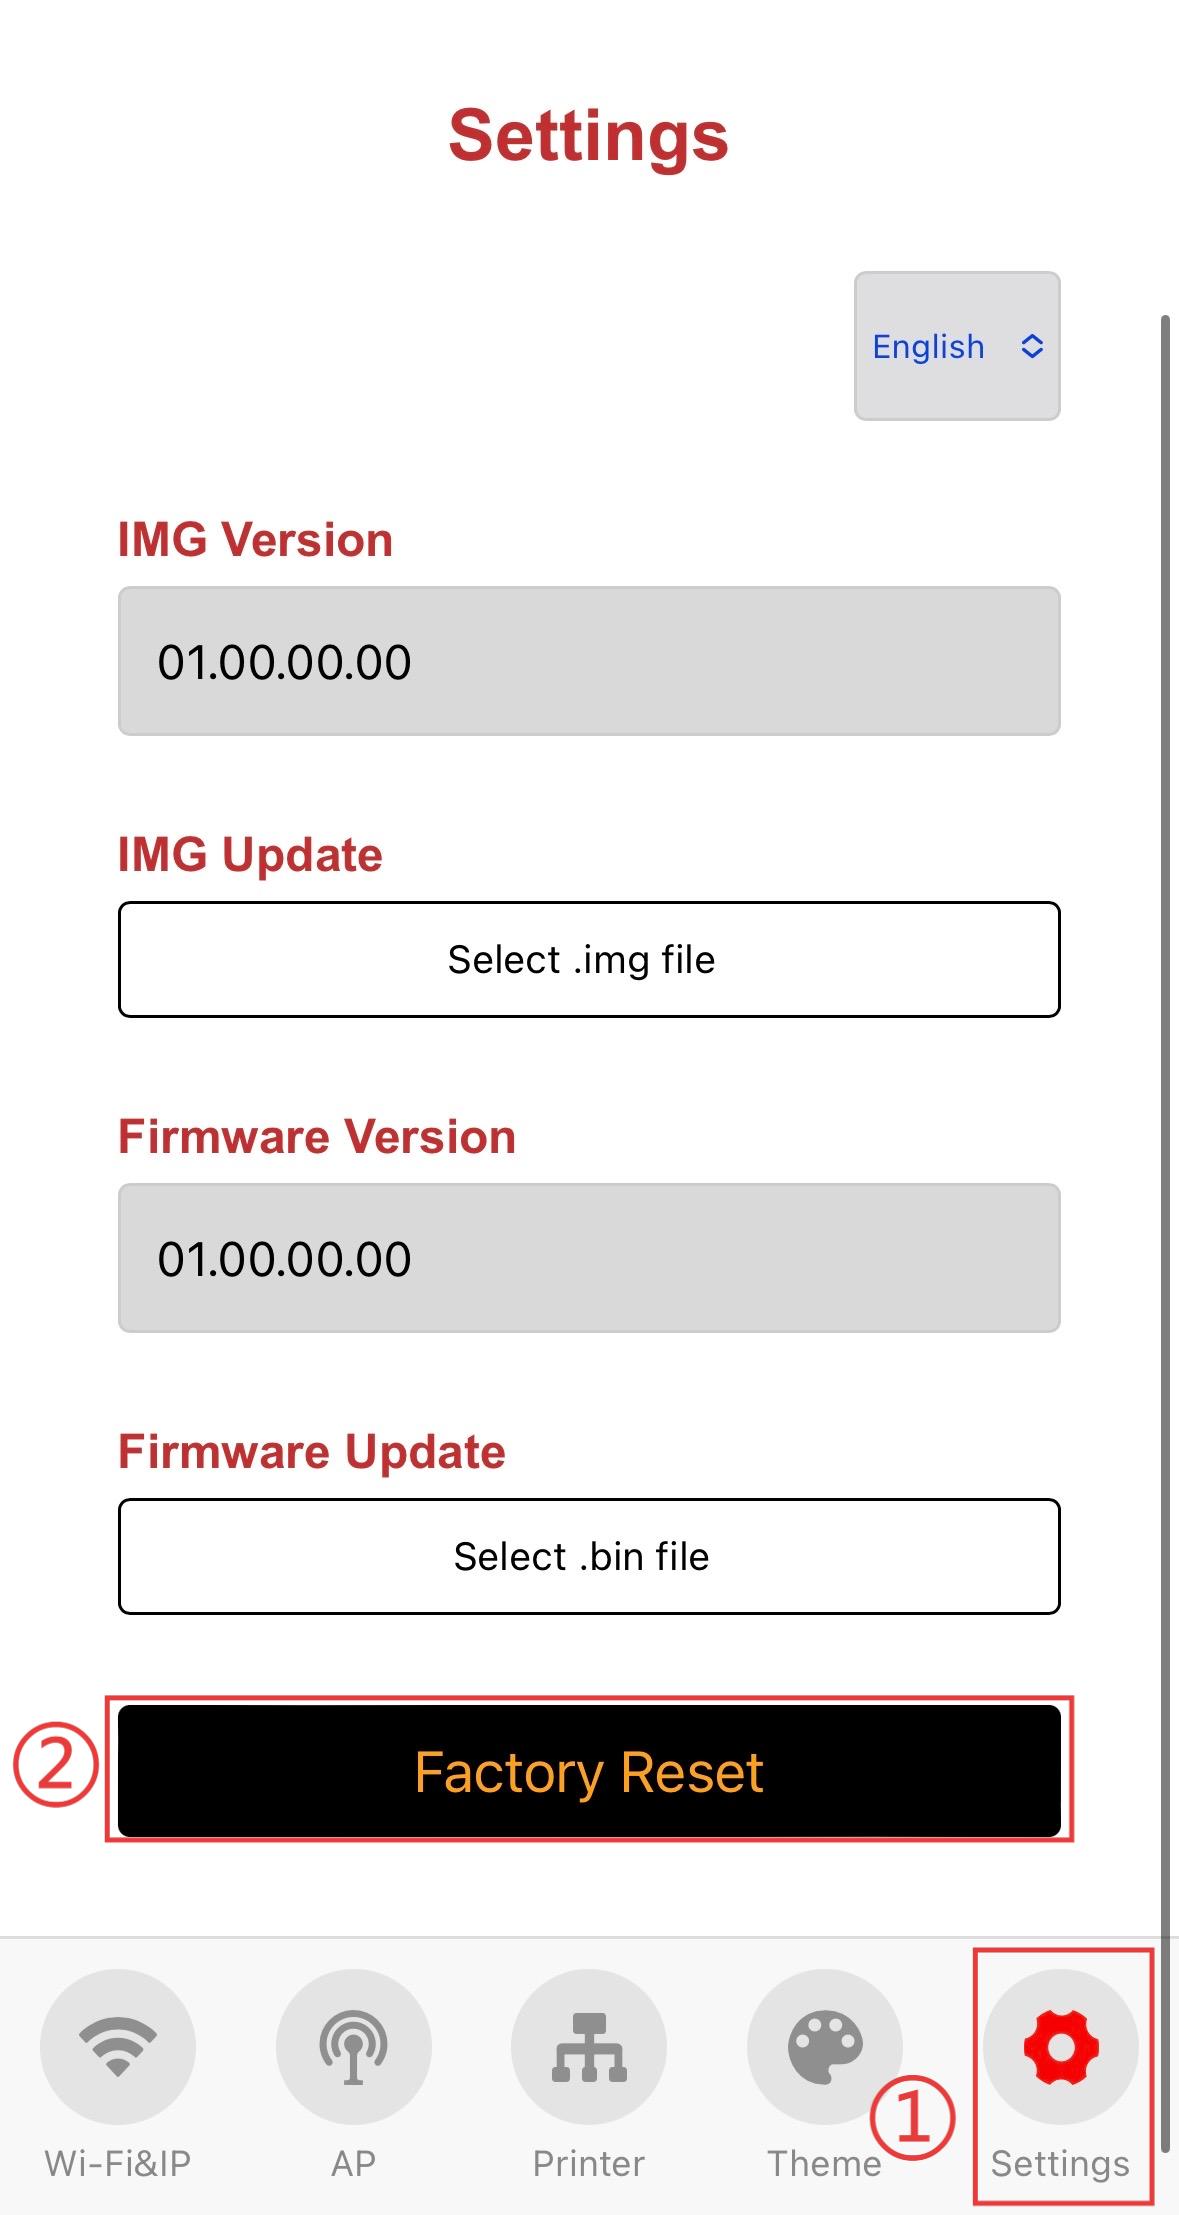
- Go to the ①
Settingsinterface and tap the ②Factory Reset
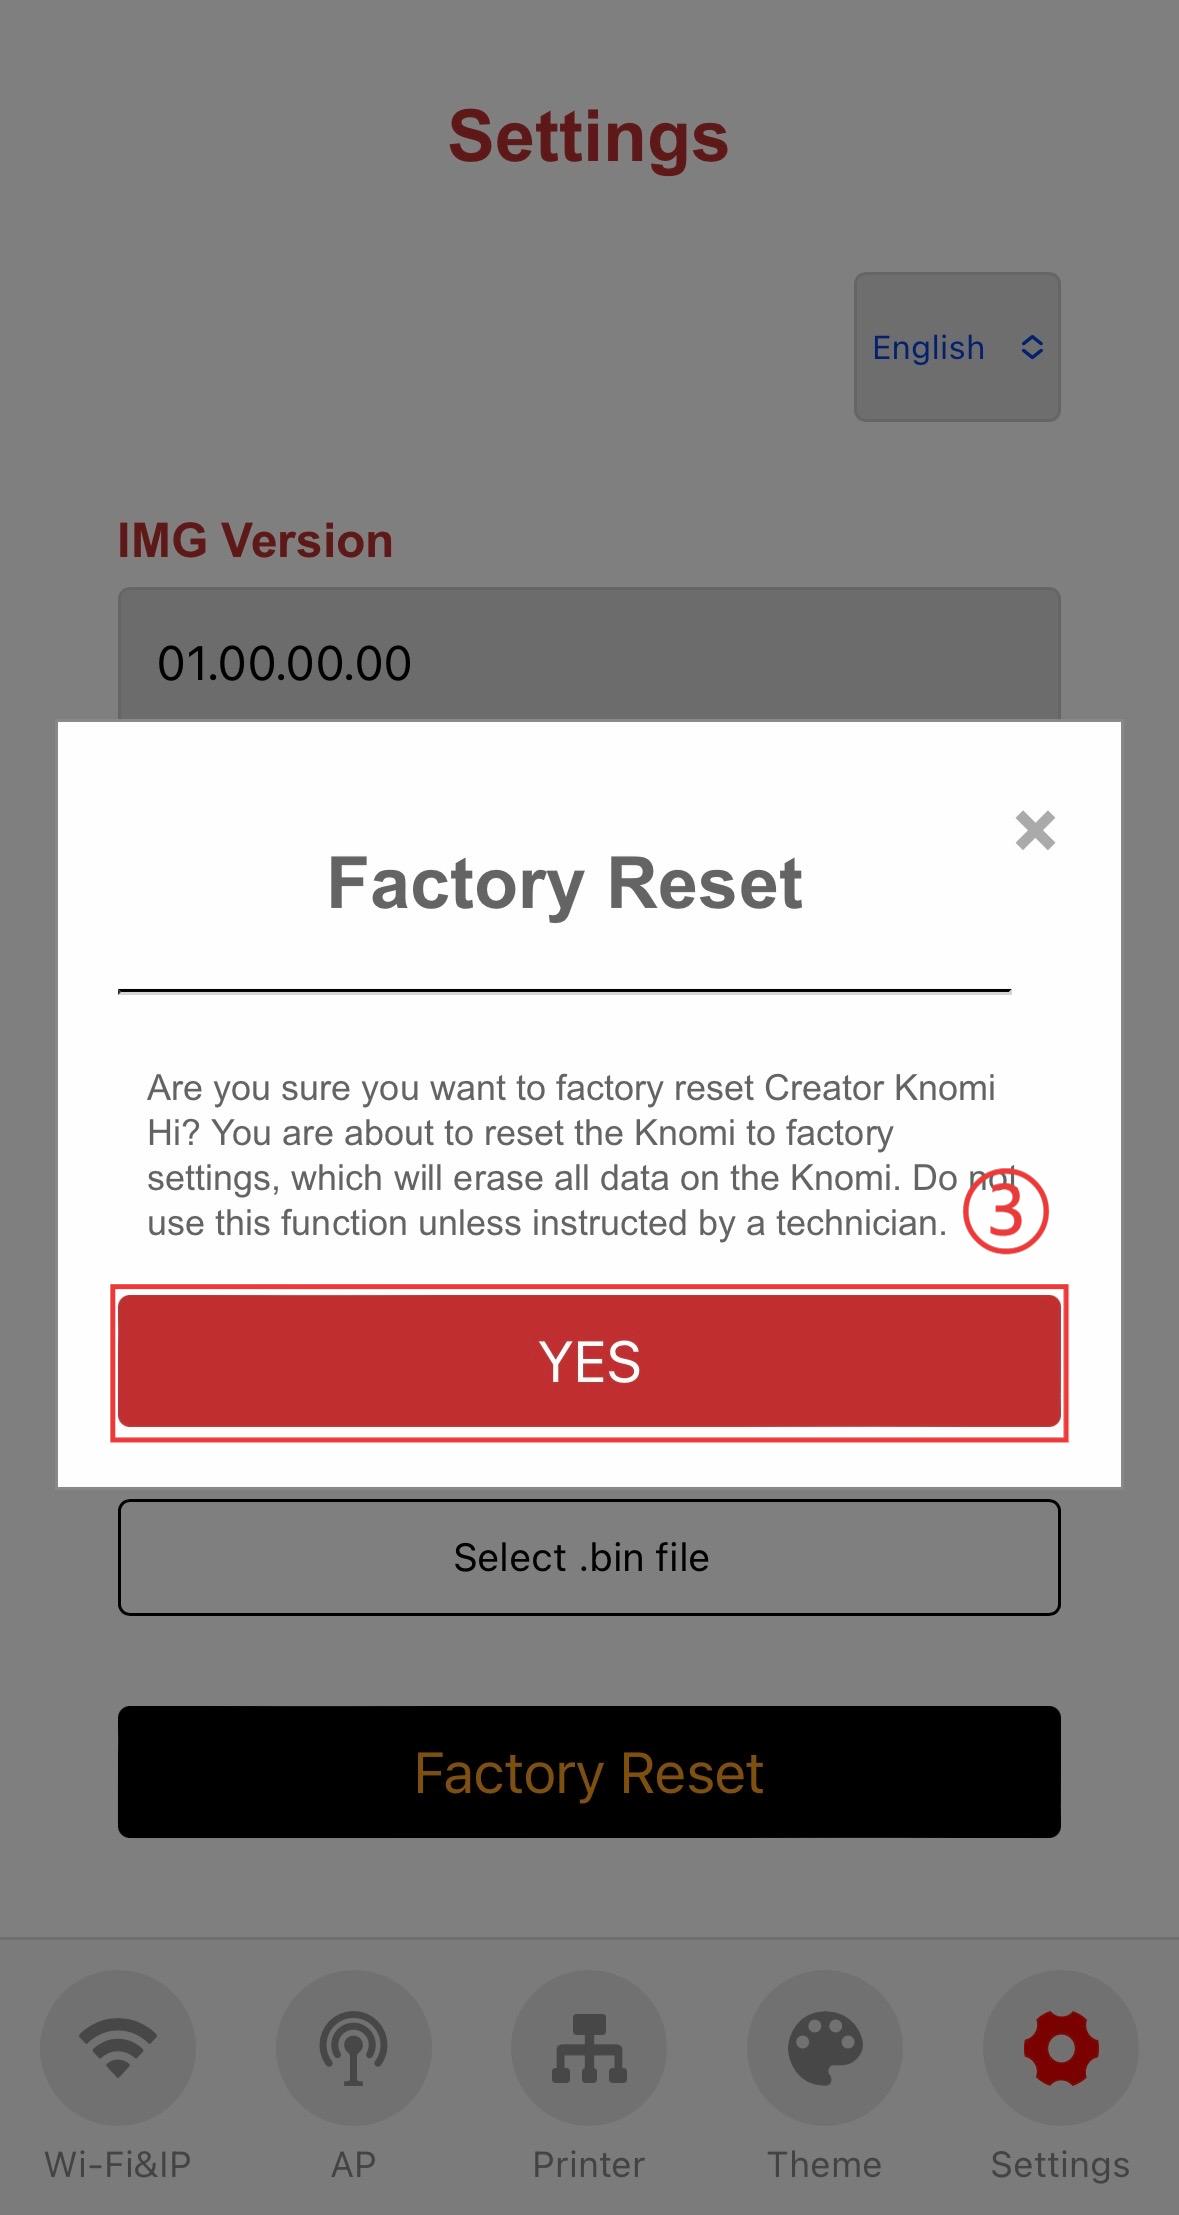
- A confirmation popup will appear, tap ③
YESto confirm and reset. Creator Knomi Hi will restore the factory settings and restart.
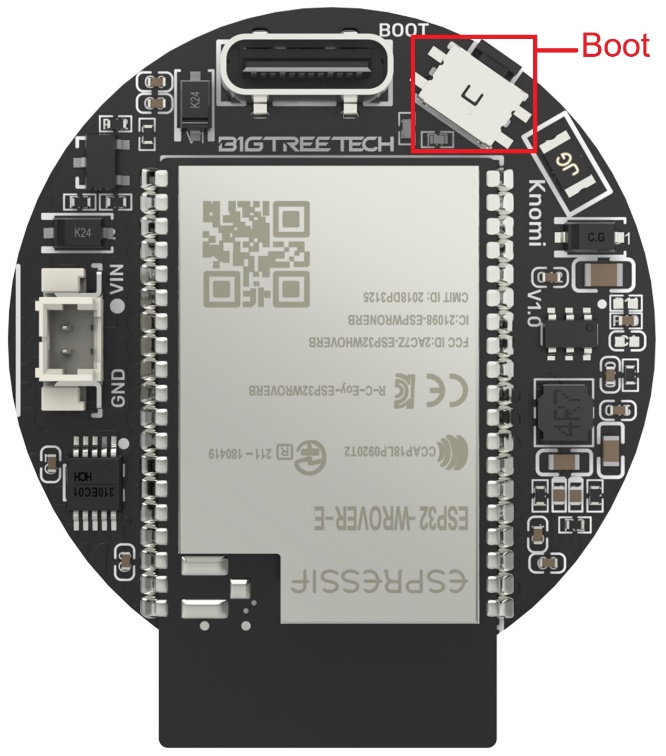
Via Hardware Button
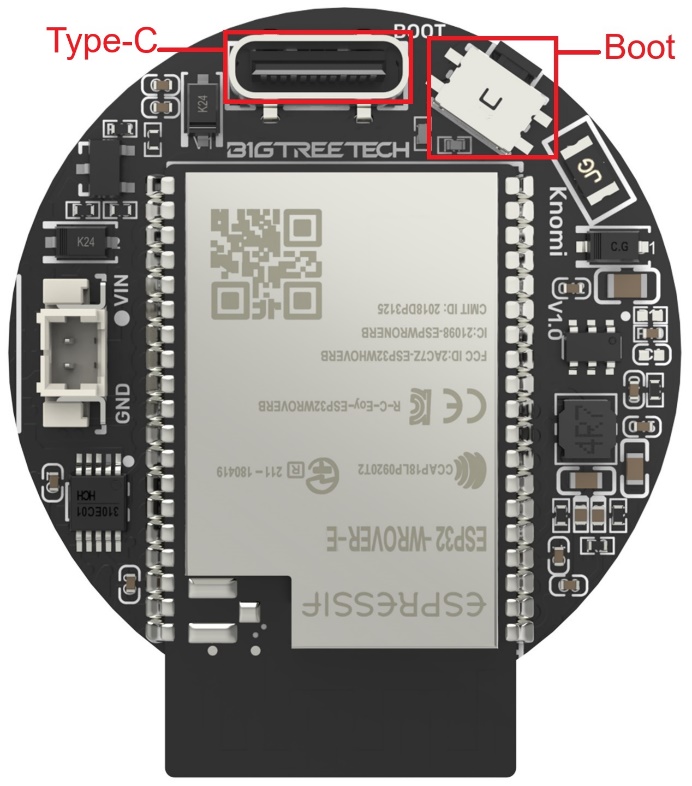
Hold the Boot button on Creator Knomi Hi for 5 seconds to reset the factory settings. It will restart automatically.
Firmware
Feature Requests
Want a new feature added in the next firmware release? Submit a request on Creator Knomi Hi github repo:
How to Update Firmware
OTA
- Open the Web UI
You can access it by connecting your device to the same Wi-Fi as Creator Knomi Hi or by connecting to Creator Knomi Hi’s AP hotspot.
- Option A: Connect via local network:
- Ensure your device (phone/computer) is connected to the same Wi-Fi network as your Creator Knomi Hi.
- Open a browser and go to Creator Knomi Hi’s IP or hostname (e.g.,
http://CreatorKnomiHi.local). If VPN is active, use the IP address instead.
- Option B: Connect via AP hotspot:
- Connect to Creator Knomi Hi’s hotspot on your phone (iPhone Example):
- Go to
Settings->WLAN. - Enable
WLAN, your phone will automatically scan for available networks.
- Tap the network name that starts with
Creator_Knomi_Hi_then enter the default password:987654321. - Once connected: A blue checkmark will appear next to the network name. The Wi-Fi icon will be visible in the top-right corner of your phone screen.
- Go to
- After connecting, you should see a message such as
Connected (Login Required). Tap this message to launch the Web UI configuration page.
If the page doesn't open automatically, wait about 10–20 seconds.
If it still doesn’t appear, open Safari and manually enter: 192.168.254.1
- Connect to Creator Knomi Hi’s hotspot on your phone (iPhone Example):
- Option A: Connect via local network:
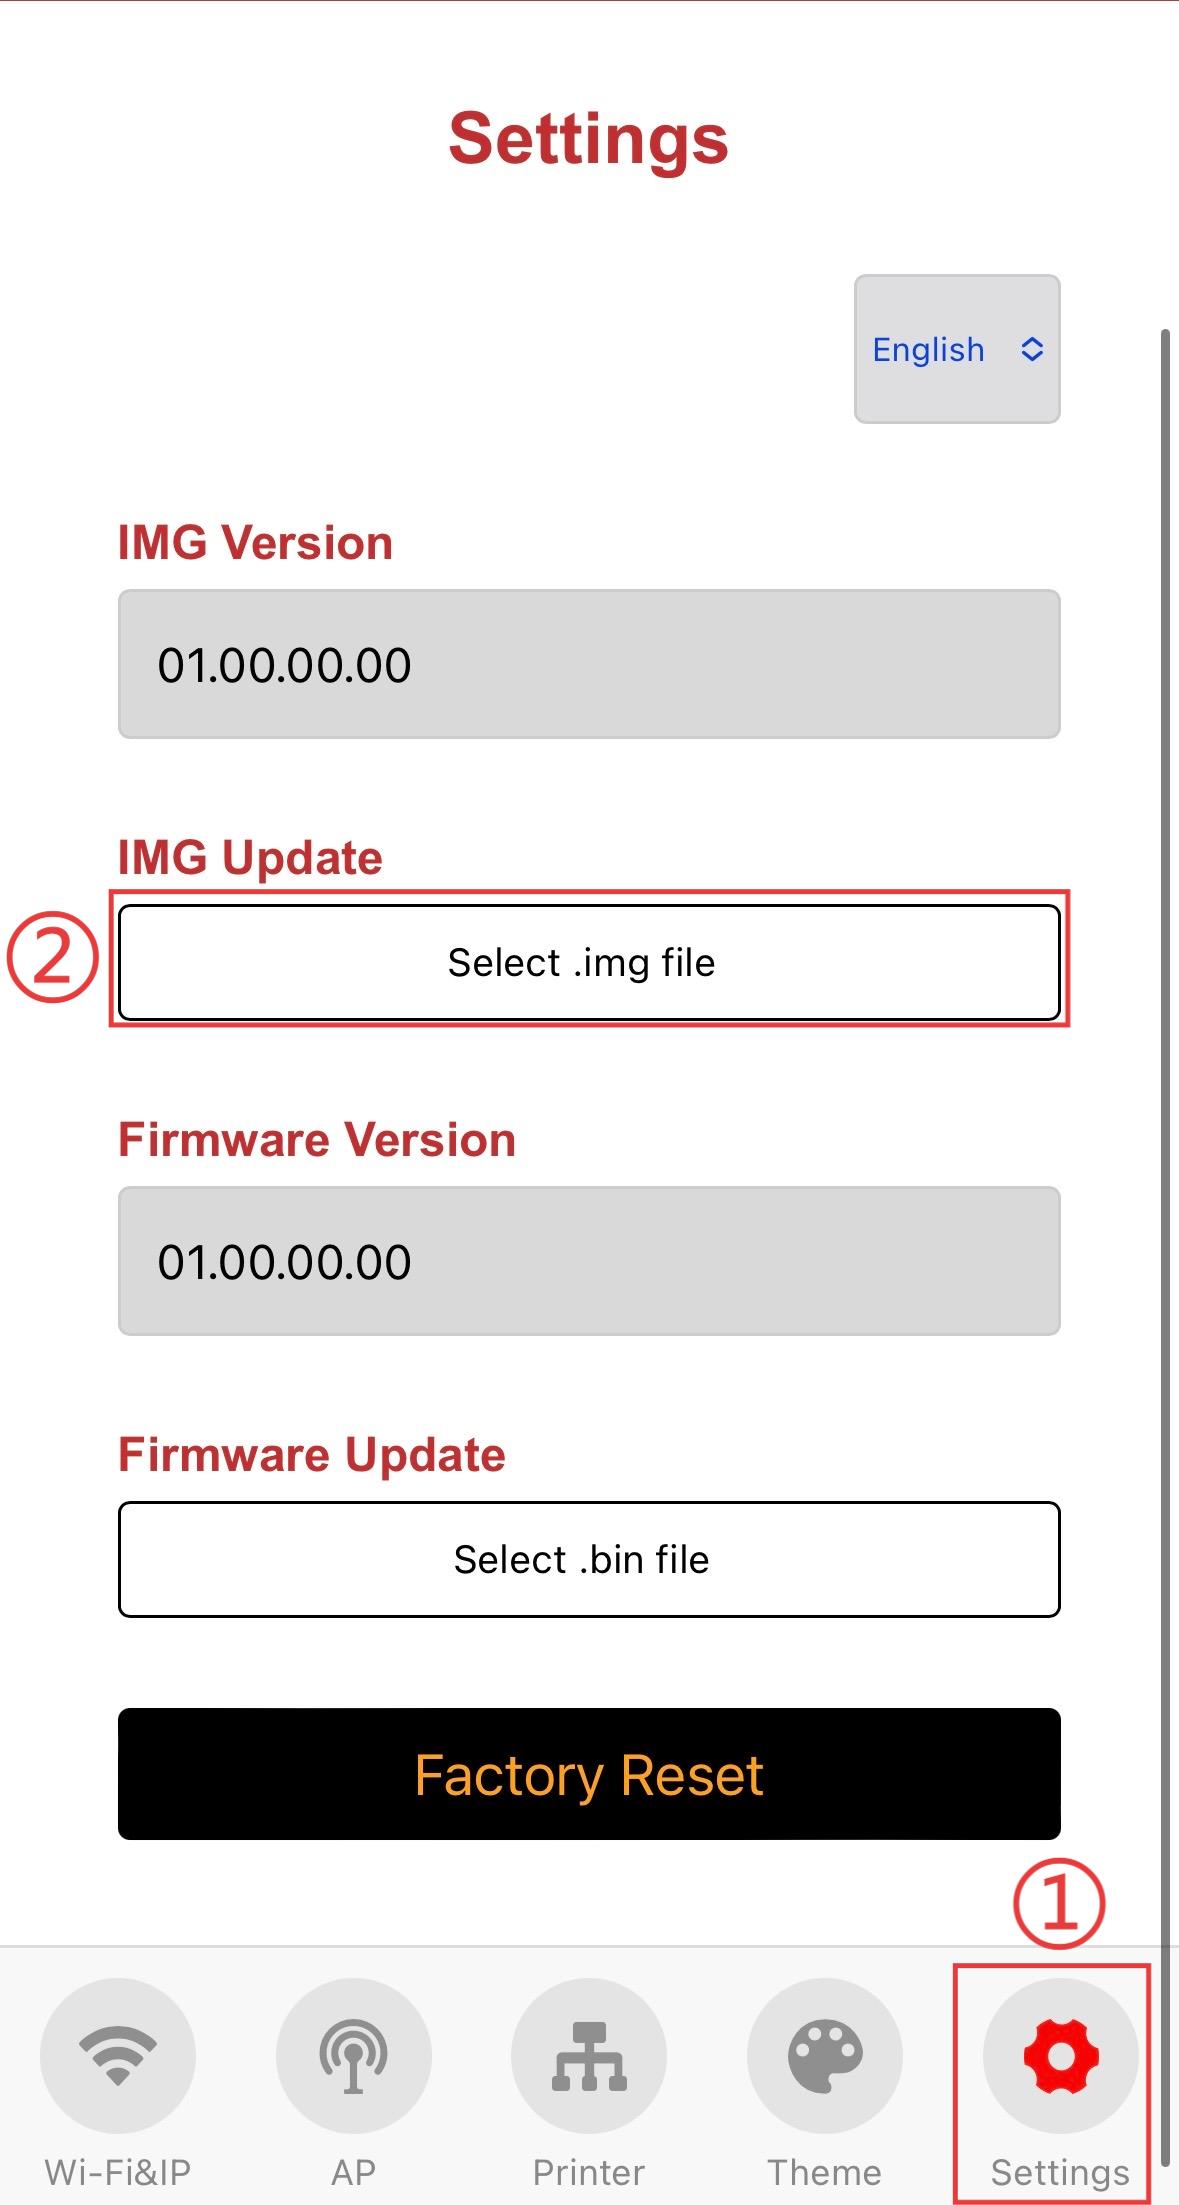
- In Web UI: Go to ①
Settings-> ② TapSelect .bin file, then select the firmware file, after uploading, Creator Knomi Hi will reboot automatically.
Flash via flash_download_tool (USB Type-C)
Note: Creator Knomi Hi should be able to perform OTA updates automatically. This step is only necessary when OTA is unavailable.
- If your computer does not have the CH340 driver, please download and install CH341SER.EXE
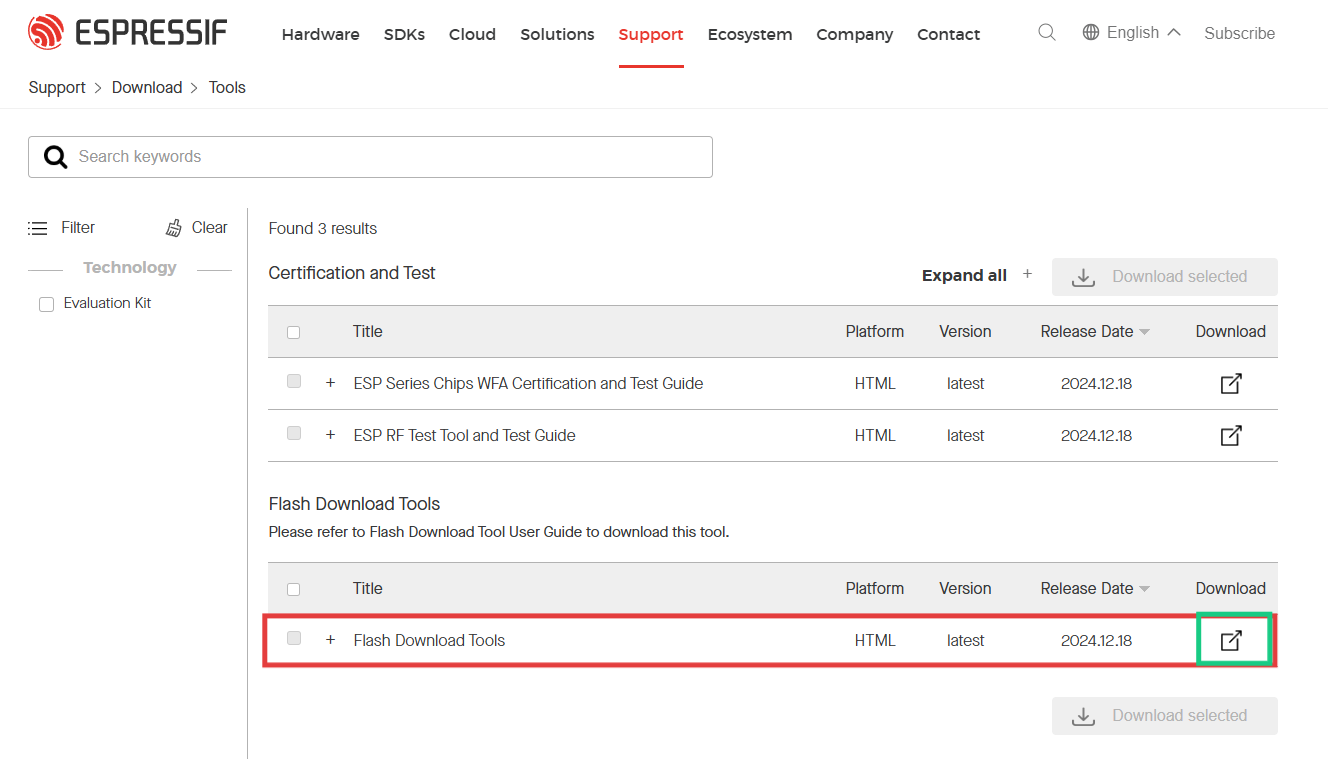
- Download Flash Download Tools
- Download the Creator Knomi Hi Firmware
- Hold the Boot button on Creator Knomi Hi, connect it via Type-C to your computer, and a new COM port should appear in the device manager.
- Open
flash_download_tool_3.9.8_6.exeand configure as follows:
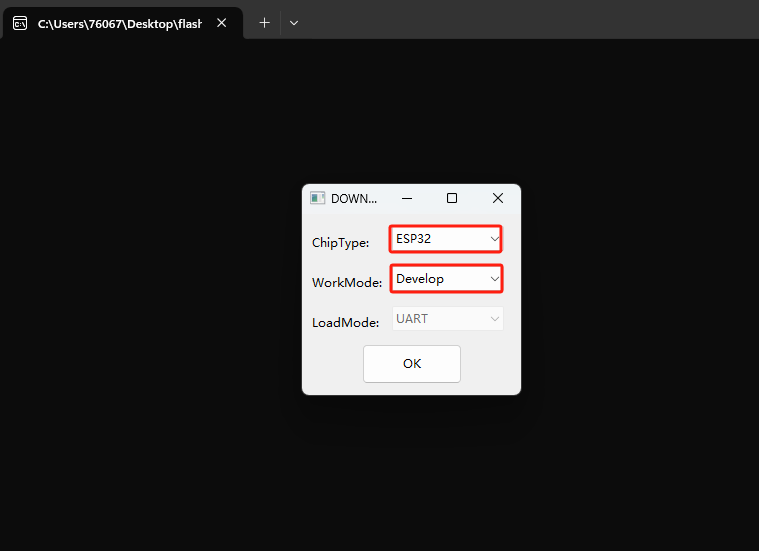
- As shown in the figure below, configure the burning software:
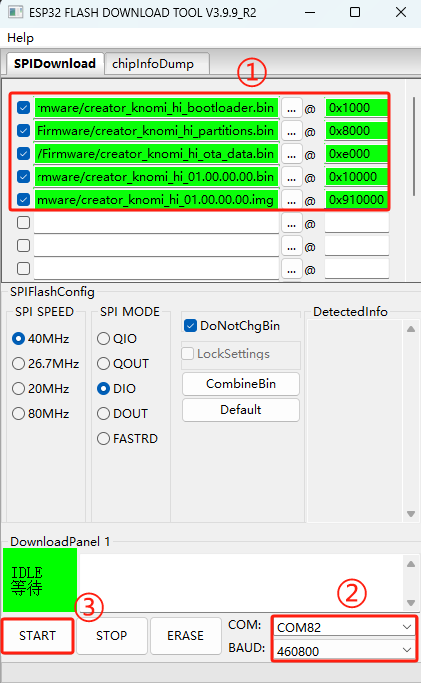
- ① Set the.bin file's burning address, ensuring all checkboxes are ticked:
creator_knomi_hi_bootloader.binto0x1000creator_knomi_hi_partitions.binto0x8000creator_knomi_hi_ota_data.binto0xe000creator_knomi_hi_01.00.00.00.binto0x10000creator_knomi_hi_01.00.00.00.imgto0x910000
- ② Set the COM port to the Creator Knomi Hi port (check in Device Manager) and choose a baud rate (recommended:
460800) - ③ Click
STARTto begin burning. Once done, power off and restart Creator Knomi Hi.
- ① Set the.bin file's burning address, ensuring all checkboxes are ticked:
Firmware Version History 
01.00.00.00
- Initial factory firmware release.
Technical Support
Was this page helpful?
For any questions or issues, please email:support01@bigtree-tech.com