EBB SB2209 CAN RP2040
/EBB_SB2240_2209(RP2040)_title.png)
Note
For information about EBB SB2209 CAN V1.0 (RP2040) structure, please click EBB SB2209 CAN V1.0 (RP2040).PDF
Product Profile
Highlighted in red are other accessories of the Voron StealthBurner, which are not included in this EBB SB2209 CAN V1.0(RP2040) and will need to be purchased by yourself.
Product Link: BIGTREETECH Official Website
Features Highlights
-
Highlighted in blue are included in this EBB SB2209 CAN V1.0 (RP2040).
-
Highlighted in red are other accessories of the Voron StealthBurner, which are not included in this EBB SB2209 CAN V1.0(RP2040) and will need to be purchased by yourself.
Software Configuration
Flashing Katapult
Katapult / CanBoot
Katapult is the New Name for CanBoot
Please note that Katapult is designed for the purpose of directly updating the MCU firmware via the CAN bus interface. If you prefer the DFU update method, you may skip this step
“Flashing Katapult on a CB1/Raspberry Pi”
Refer to the instructions here to download the Katapult project
-
to enter the home directory, then run command below to download Katapult project.
-
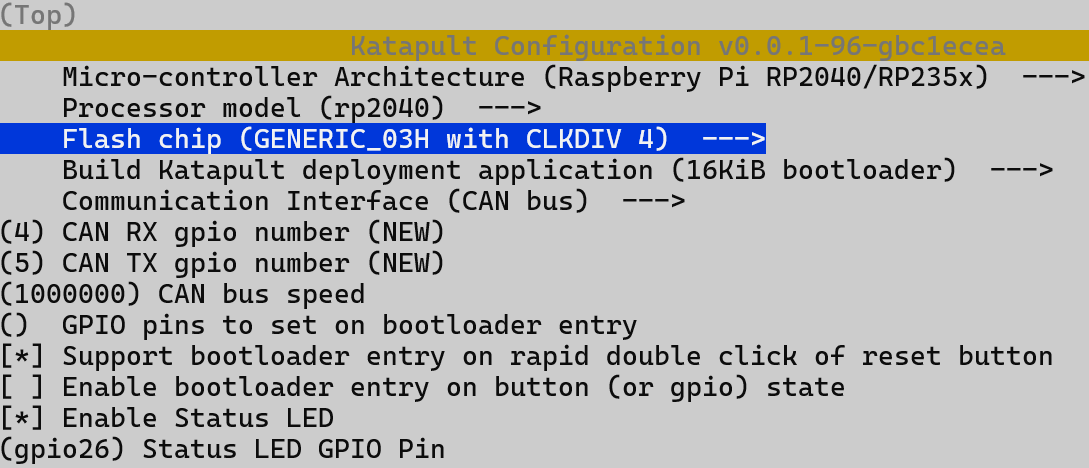
Config Katapult
and configure according to the following figure
-
Build Katapult
-
Flash Katapult using DFU
-
Please use a Type-C cable to connect the EBB SB2209 CAN V1.0(RP2040)to the Raspberry Pi/CB1, and ensure that the USB_5V jumper is connected, in order to supply power to the EBB SB2209 CAN V1.0 (RP2040) via Type-C.
/EBB_SB2240_2209(RP2040)_software3.png)
-
Press and hold the Boot button, and then click the Reset button to enter the DFU mode.
/EBB_SB2240_2209(RP2040)_software4.png)
-
Enter in the SSH terminal command line
Query DFU device ID
/EBB_SB2240_2209(RP2040)_software5.png)
-
Please enter the following command to flash Katapult::
-
Compile Klipper
-
After SSH is successfully connected to Raspberry Pi, run
Compile the firmware with the following configuration (if the options below are not available, please update your Klipper source code to the newest version).
Note
If using Katapult set Bootloader offset to
16KiB bootloader -
Press
qto exit, andywhen asked to save the configuration. -
Run make to compile firmware,"klipper. bin" file will be generated in home/pi/klipper/out folder when make is finished, download it onto your computer using the SSH application.
/EBB_SB2240_2209(RP2040)_software6.png)
Firmware Update(via Katapult)
-
To use the CAN bus, you need to connect the CAN bus cable and insert a jumper at the position of the 120R termination resistor.
-
Run the following command to find CAN uuid
to query the canbus ID (connect the CAN cable and power it on in advance), as shown in the figure below, the UUID of the device has been found
/EBB_SB2240_2209(RP2040)_software7.png)
-
Use command following to flash Klipper via Katapult
Note
The
be69315a613cis replaced with the actual UUID.klipper.bin needs to be made in advance, and the application start offset of Katapult is 16KiB offset, so Klipper's menuconfig Bootloader offset should also be 16KiB bootloader, as shown in the following figure.
/EBB_SB2240_2209(RP2040)_software8.png)
-
Use command below to check application running in EBB CAN.
/EBB_SB2240_2209(RP2040)_software9.png)
Firmware Update(via DFU)
Raspberry Pi or CB1 update via DFU.
-
Please use a Type-C cable to connect the EBB SB2209 CAN V1.0 (RP2040) to the Raspberry Pi/CB1, and ensure that the USB_5V jumper is connected, in order to supply power to the EBB SB2209 CAN V1.0 (RP2040) via Type-C.
/EBB_SB2240_2209(RP2040)_software10.png)
-
Press and hold the Boot button, and then click the Reset button to enter the DFU mode.
/EBB_SB2240_2209(RP2040)_software11.png)
-
use
lsusbcommand to confirm that the device is inDFUmode./EBB_SB2240_2209(RP2040)_software12.png)
-
run following command to enter to the klipper directory, then write the firmware:
-
Connect CAN cable then find CANBUS uuid by using command following.
-
If EBB not connect to klipper, the above command will report the device's
canbus_uuid.
Klipper Configure
-
Enter Raspberry Pi IP address into your browser, and find the reference config for the motherboard in the directory shown below, if there is no such config available, update your Klipper source code to the newest version or download it from GitHub repo bigtreetech/EBB
/EBB_SB2240_2209(RP2040)_software14.png)
-
Upload the configuration file of the motherboard to Configuration Files.
/EBB_SB2240_2209(RP2040)_software15.png)
-
Add the configuration of this motherboard in the
printer.cfgfile:/EBB_SB2240_2209(RP2040)_software16.png)
-
replace
canbus_uuidwith the one found in the previous steps/EBB_SB2240_2209(RP2040)_software17.png)
-
Configure the module's specific functions according to Klipper Config_Reference