M8P

Product Profile
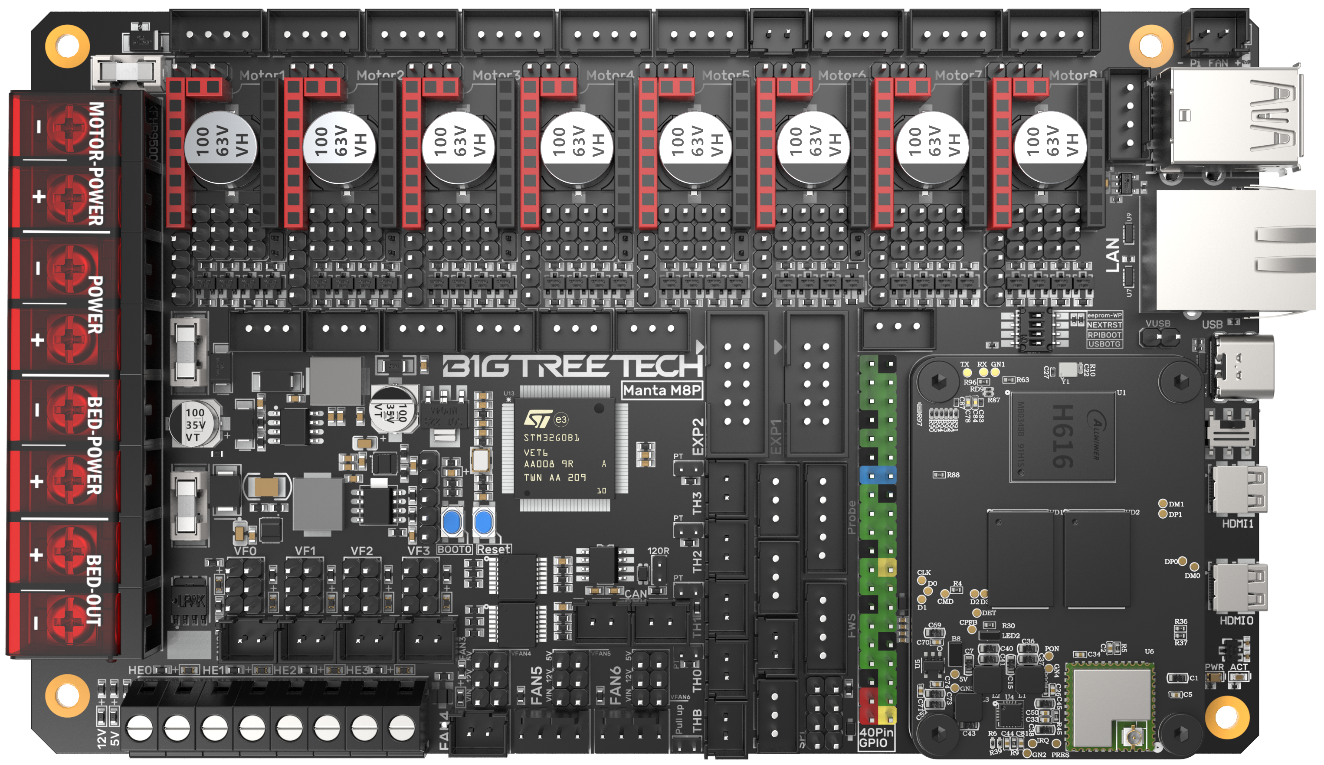
BIGTREETECH MANTA M8P is a 32-bit printer motherboard developed by the 3D printing team of Shenzhen BIQU Innovation Technology Co., Ltd. for Klipper firmware. You can simply plug in the core board to run the Klipper firmware, which greatly simplifies the connection between the motherboard and the Raspberry Pi, and saves a lot of space. Moreover, the BTB connector is designed to install CM4 or other solutions to solve the current expensive problem of CM4.
Product Link: BIGTREETECH Official Website
Features Highlights
- Adopt 32-bit 64MHz ARM Cortex-M0+ series STM32G0B1VET6 as the main control chip;
- The power chip, TPS5450-5A, supports DC12/24V power input. The output current of the chip is up to 5A, and the peak value can reach 6A, which perfectly supports the power supply of Raspberry Pi;
- There is a BOOT button reserved on the motherboard, users can update the bootloader through DFU;
- The thermistor part includes a protection circuit that protects the main control chip from the possibility of burning caused by leakage of the heated bed or heater cartridge;
- 24V, 12V, and 5V voltages are available for CNC fans, eliminating the need for an external transformer module, thereby reducing the chance of damage to the motherboard due to improper operation;
- The thermistor can select the pull-up resistor value through the jumper, in this way, it supports PT1000 without an external module, which is convenient for customers to DIY;
- The MCU firmware can be updated via an SD card, or through Klipper's make flash command using DFU;
- The motherboard and the core board use the BTB connection to allow using other solutions other than CM4;
- On-board TMC-driver SPI and UART working modes, on-board DIAG function pins, can be used by simply plugging and unplugging the jumper cap;
- Support filament runout detection, auto shutdown, BLTouch, RGB lights...
- High efficiency MOSFET for less heat generation;
- Adopt replaceable fuse for easy replacement;
- Three-way four-wire fan interface is reserved, and can be used to connect the water cooling device;
- The proximity switch interface is reserved, supports NPN and PNP types, (24V, 12V, 5V) voltage selection is available, common voltage selection with VFAN6;
- Provide the SPI expansion interface to allow Klipper firmware users to connect an external acceleration sensor for acceleration compensation.
Specifications
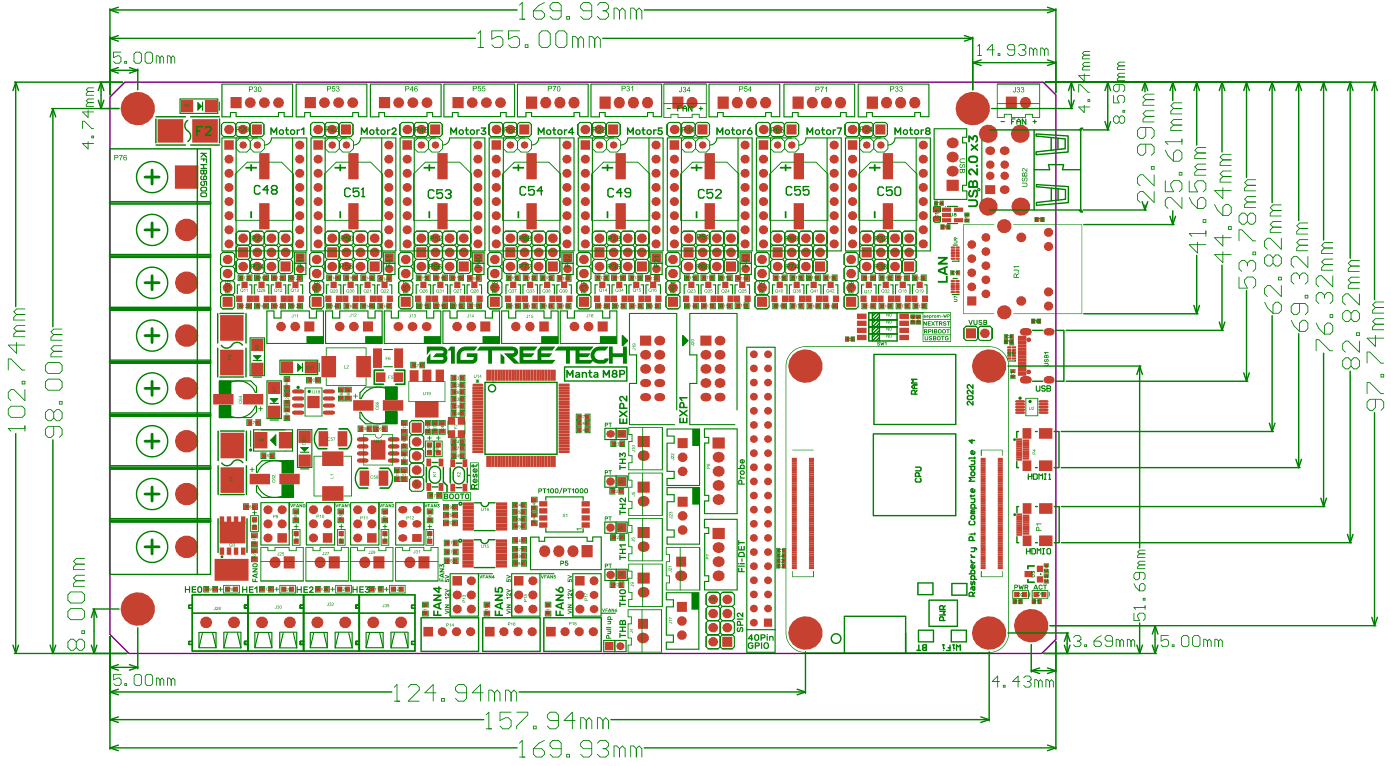
| Product Size | 170 x 102.7mm. For further details please read: Dimensions |
|---|---|
| Microprocessor | ARM Cortex-M0+ STM32G0B1VET6 64MHz |
| Drive Input Voltage | VIN(12V/24V) Or HV(≤56V) |
| Motherboard Input Voltage | VIN=DC12V or DC24V |
| Heated Bed Input Voltage | BED IN=DC12V or DC24V |
| Logic Voltage | DC3.3V |
| Heating Port | Heated Bed(HB), Heater Cartridge(HE0, HE1, HE2, HE3) |
| The maximum output current of the heated bed port | 10A, Peak Value: 12A |
| The maximum output current of the heater cartridge port | 5.5A, Peak Value: 6A |
| Fan Port | Two-wire CNC Fan (FAN0, FAN1, FAN2, FAN3), four-wire CNC Fan fan (FAN4, FAN5, FAN6), Always-on Fan (24V FAN x 2), among which the CNC Fan voltages are 5V, 12V, 24V optional |
| The maximum output current of the fan port | 1A, Peak Value: 1.5A |
| Total current for heater cartridge + driver + fan | <12A |
| Extended Interface | BLTouch(Servos, Probe), PS-ON, Fil-DET, RGBx2, SPI |
| Motor Driver | Support TMC5160, TMC2209, TMC2225, TMC2226, TMC2208, TMC2130, ST820, LV8729, DRV8825, A4988... |
| Driver Working Mode Support | SPI, UART, STEP/DIR |
| Motor Drive Interface | Motor1, Motor2, Motor3(dual motor interface), Motor4, Motor5, Motor6, Motor7, Motor8, a total of Eight |
| Temperature Sensor Interface | 5-way 100K NTC, of which 4-way 100K NTC and PT1000 are optional |
| Support Screen | SPI Touch Screen, LCD Screen |
| PC Communication Interface | Type-C |
| Functional Interface | USB 2.0 x 3, LAN, DSI, CSI, SPI, 40Pin-GPIO, HDMI0 and HDMI1, SOC-Card, MCU-Card |
| Support Machine Structure | Cartesian, Delta, Kossel, Ultimaker, CoreXY |
| Recommended Software | Cura, Simplify3D, Pronterface, Repetier-host, Makerware |
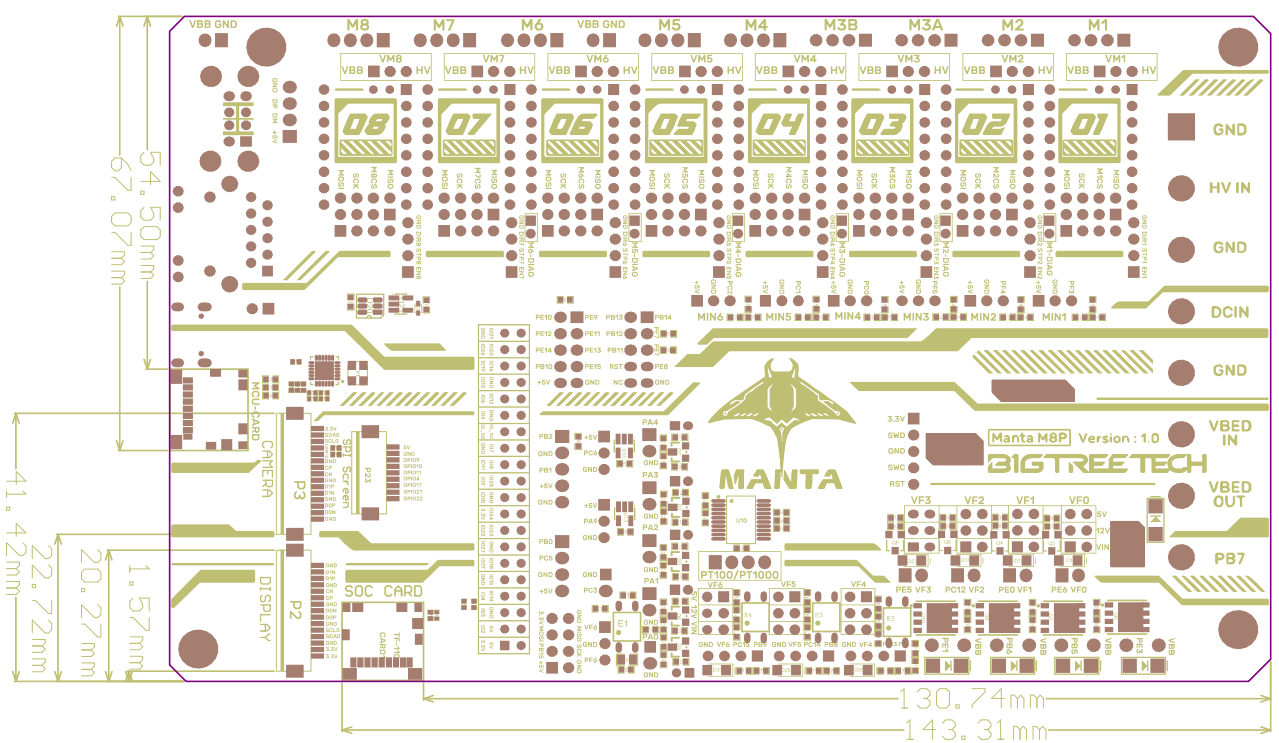
Dimensions
Pinout

Differences between V1.0 and V1.1
Changes in V1.1 include:M6,M7,M8,SPI,MCU-Card,RGB1&RGB2,FAN4,CAN,Pi-FAN
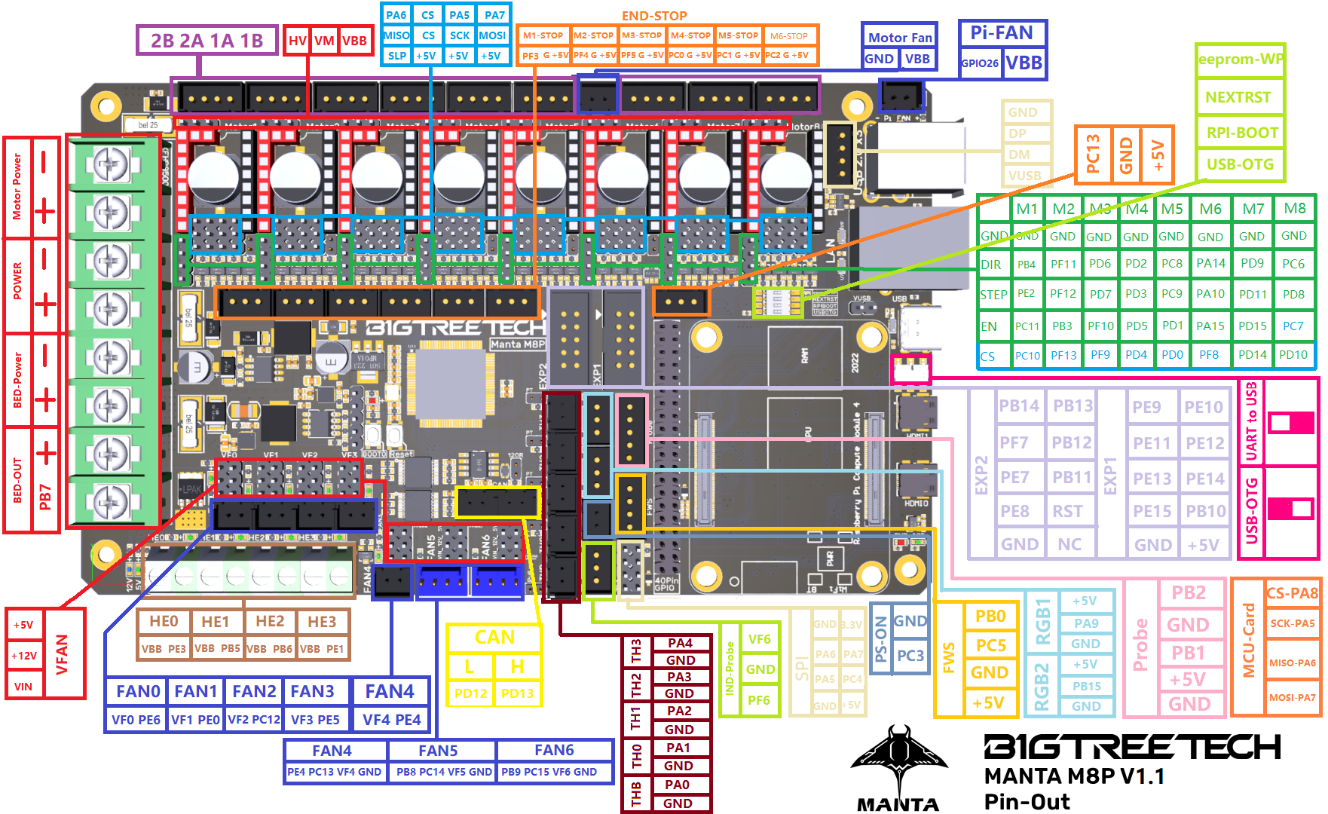
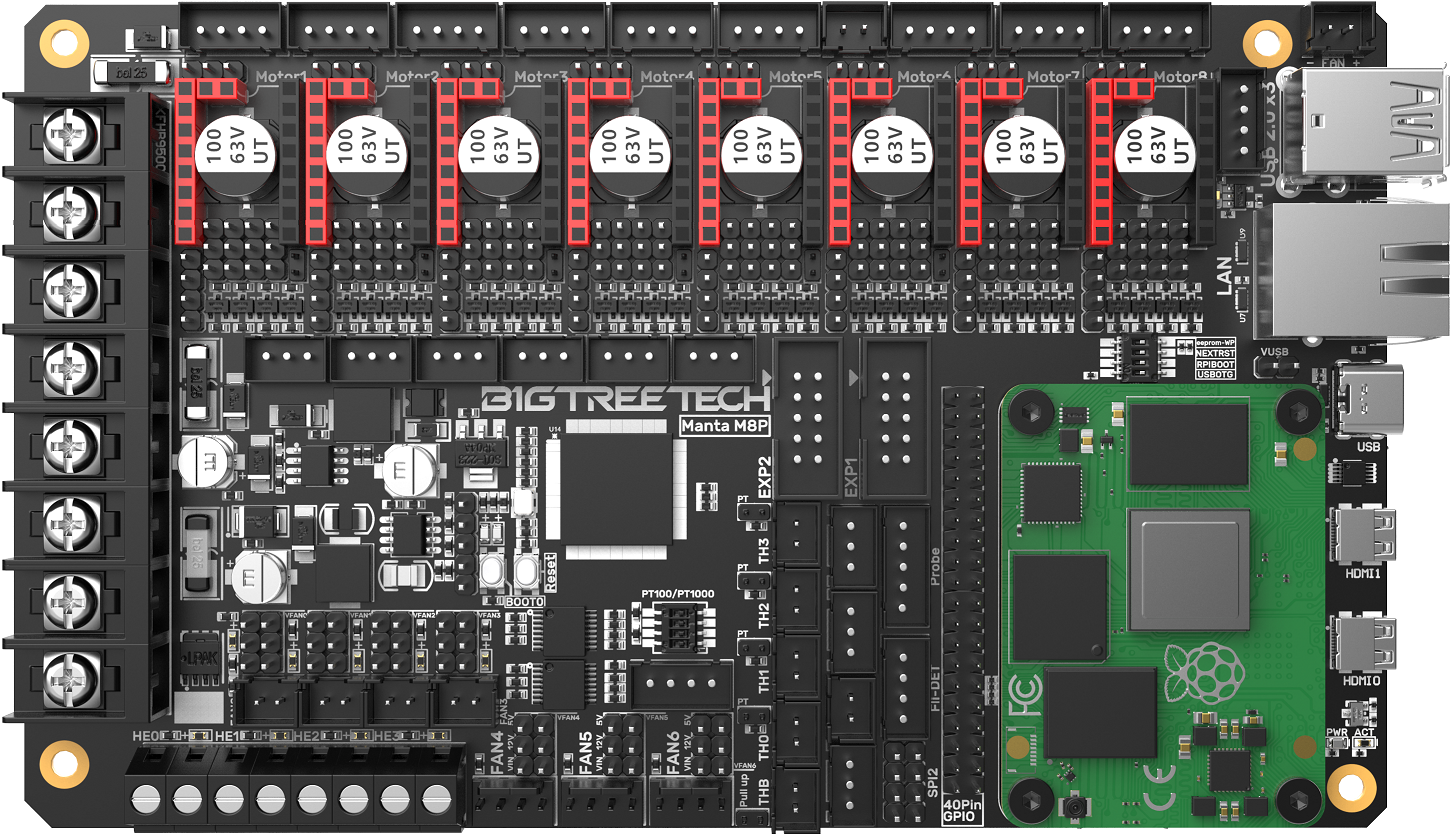
Interface Diagram

V1.1 added functions
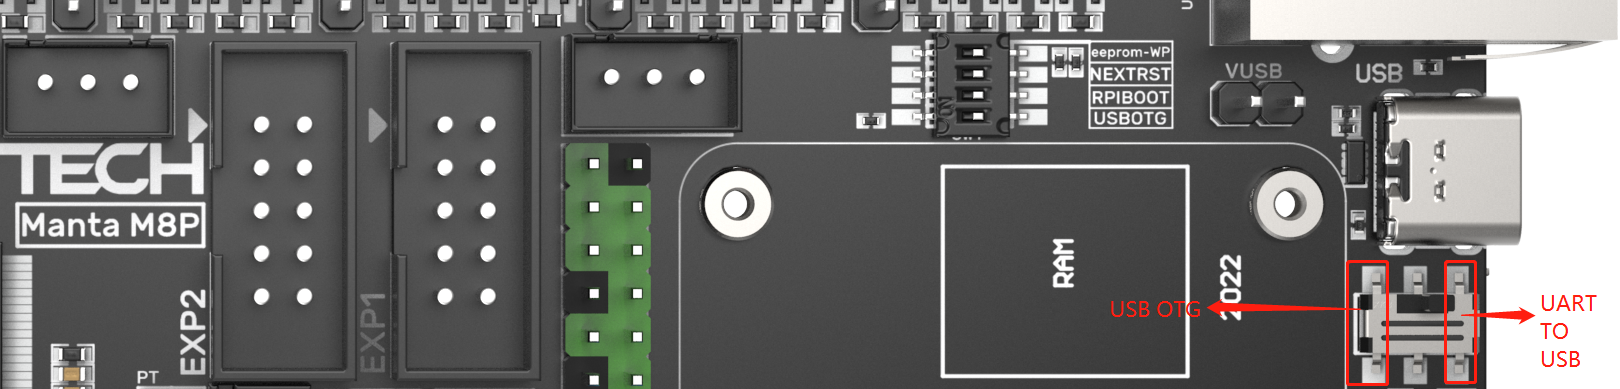
CAN interface(2Pin*2 XH2.54),USB port function selection(UART to USB,USB OTG),Pi-FAN(Controlled by GPIO26),FAN4 becomes a 2-wire CNC fan.
The 5V and 12V power output ports are added with E-FUSE protection, which has short reaction time, strong protection and realizes over-current protection, short circuit protection and spark protection.
M8P V1.1+CB1:
M8P V1.1-Bot:

Hardware Configuration
USB Power Supply
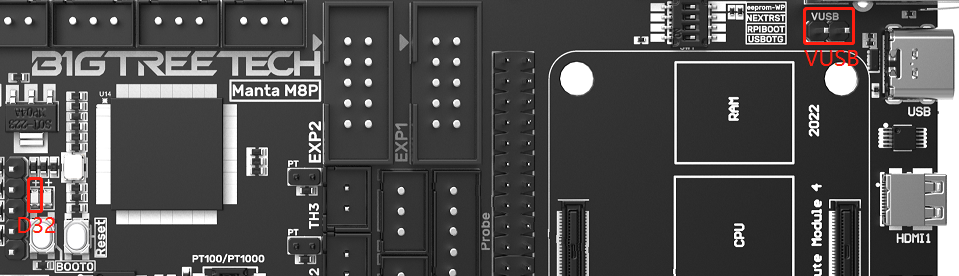
After the M8P motherboard is powered on, the D32 red light on the left side of the MCU will light up, indicating that the power supply is normal. The VUSB in the middle of the board is the power selection terminal. Only when using USB to supply power to the motherboard or need to supply power through USB, do you need to use the jumper to short it.
Hardware Installation
Stepper Driver
STEP/DIR (STANDALONE) Mode
For example, A4988, DRV8825, LV8729, ST820...use the jumper cap to short MS0-MS2 according to the driver subdivision table.
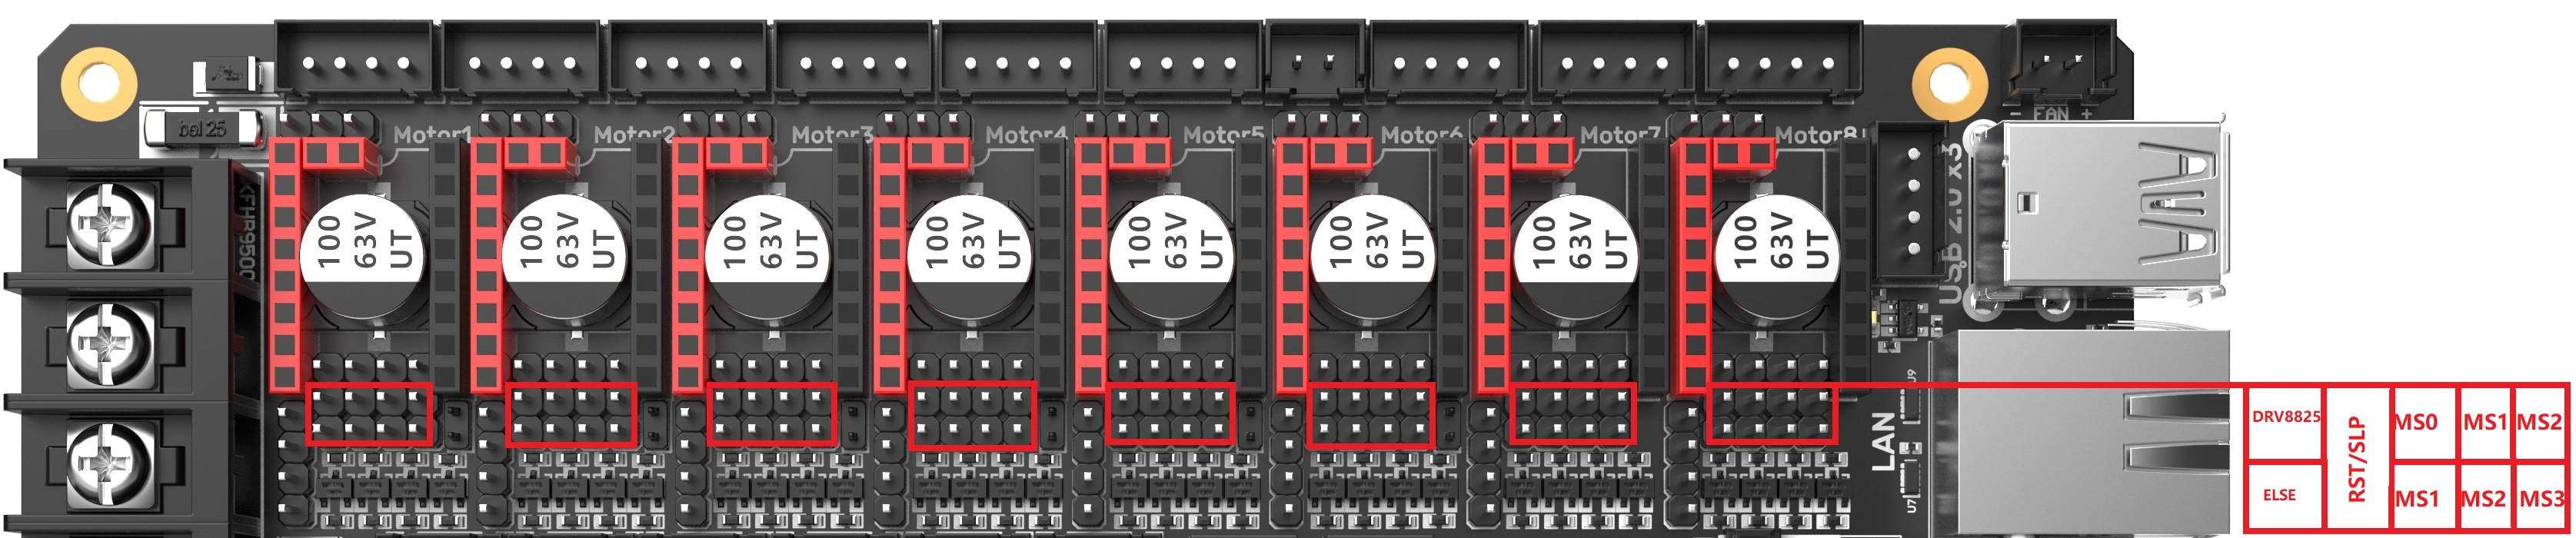
Note: If using A4988or DRV8825, RST and SLP must be shorted with jumper caps for normal operation.
For details, please click: https://bigtreetech.github.io/docs/Tutorials.html
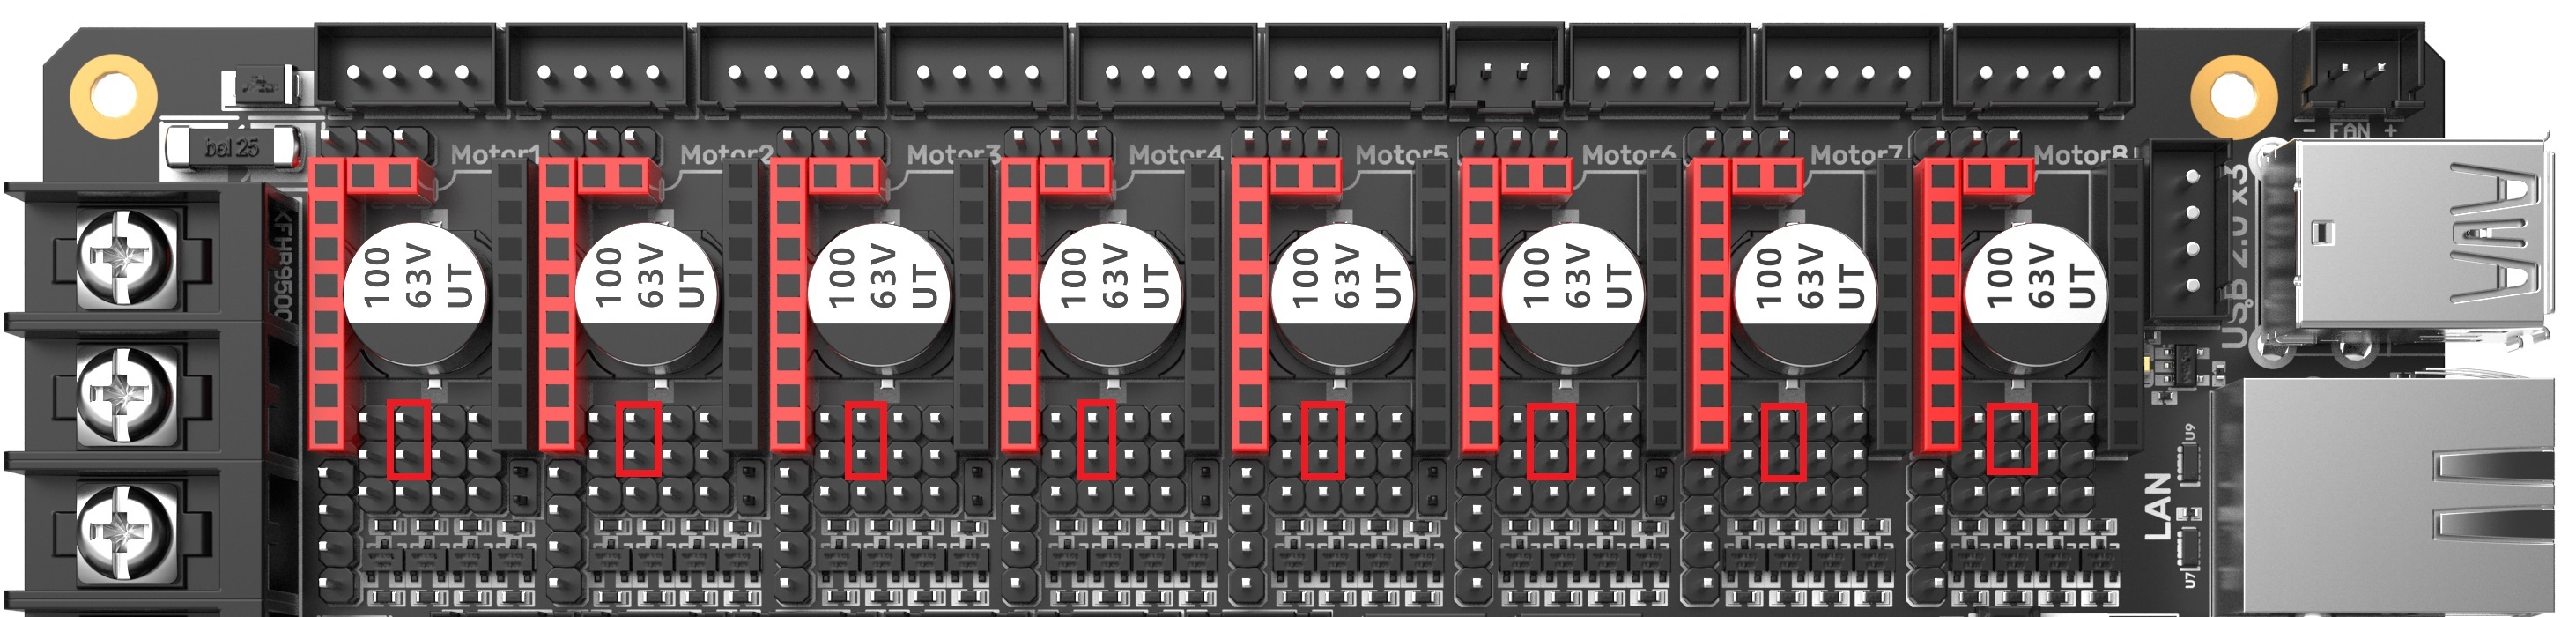
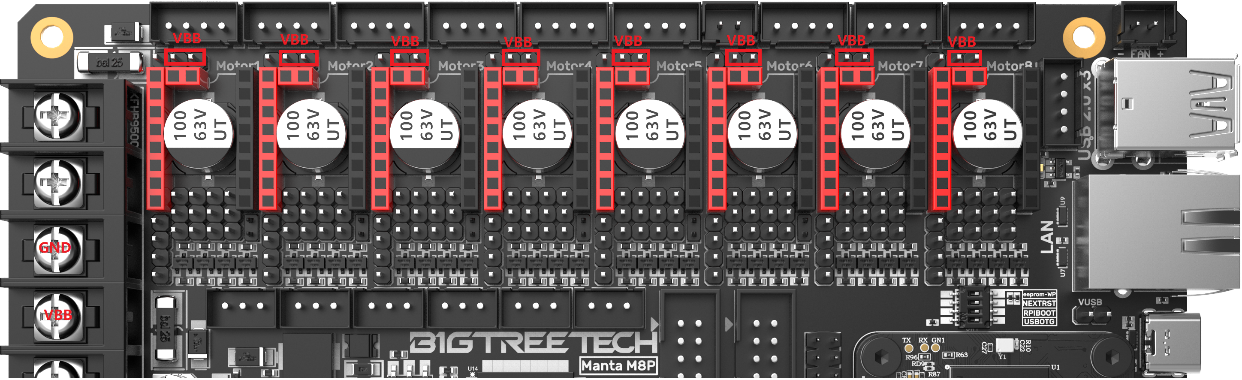
For example, TMC2208, TMC2209, TMC2225... Use a jumper cap for each to connect the position of the red box in the figure, and the subdivision and driver current is set by firmware.
SPI Mode of TMC Driver
For example, TMC2130, TMC5160, TMC5161... Use 4 jumper caps for each to connect the position of the red box in the figure, and the subdivision and driver current is set by firmware.

DIAG(Sensorless Homing) of TMC Driver
As shown in the figure, plug the jumper cap when using the Sensorless Homing function, and leave it unplugged when it is not used.

Driver Voltage Selection

Install the Core Board via BTB Connection
M8P+CM4: Pay attention to the direction, as shown below.
M8P+CB1: Pay attention to the direction, as shown below.

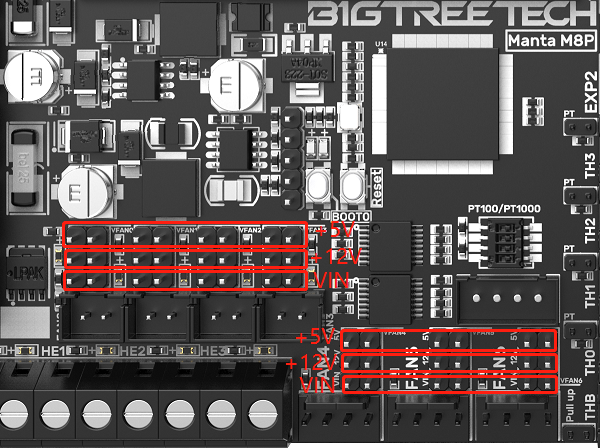
Voltage Selection for CNC Fans
Set the output voltage to 5V, 12V, or 24V with a jumper cap. Note: Please confirm the fan's operating voltage before choosing a voltage. Our company is not responsible for fan burnout caused by wrong selection.
100K NTC or PT1000 Setting
When using a 100K NTC thermistor, there is no need to insert the jumper cap, and the pull-up resistance of TH0-TH3 is 4.7K 0.1%. When using PT1000, you need to use a jumper cap to connect the two pins in the red box in the figure below and connect a 4.12K 0.1% resistor in parallel. At this time, the pull-up resistor of TH0-TH1 is 2.2K (Note: The temperature accuracy read out in this way will be far less accurate than that read out by MAX31865).

BLTouch Wiring

Auto Shutdown Module(Relay V1.2) Wiring

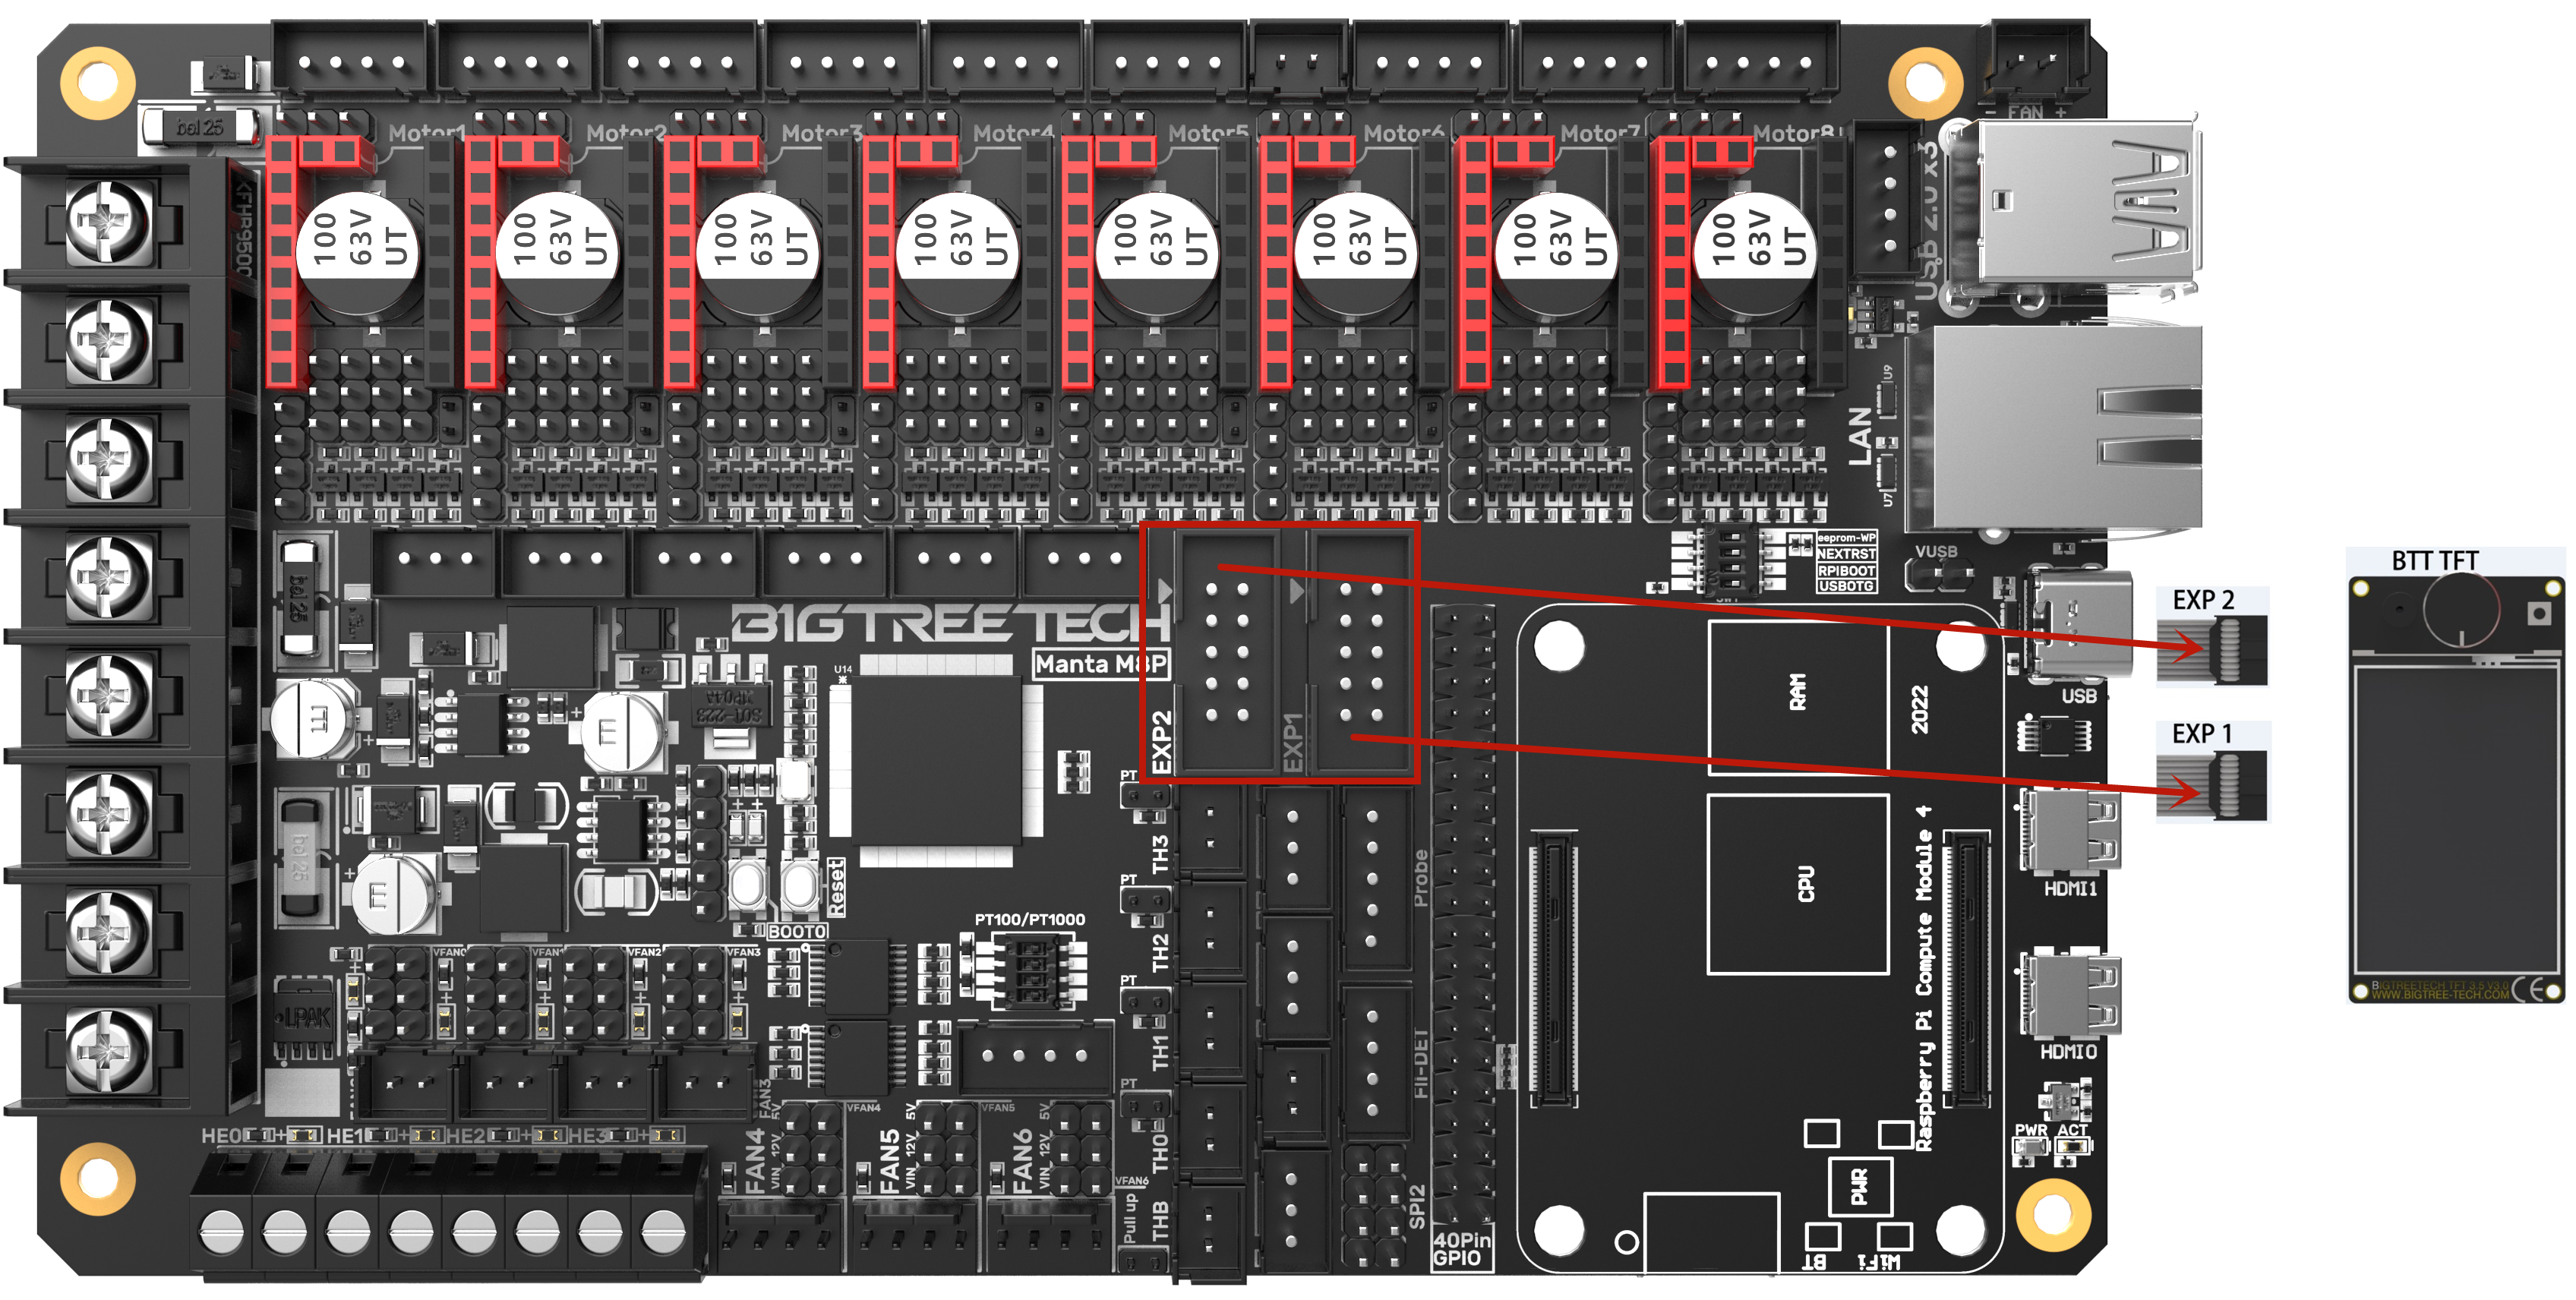
Wiring between LCD Screen and EXP1+EXP2
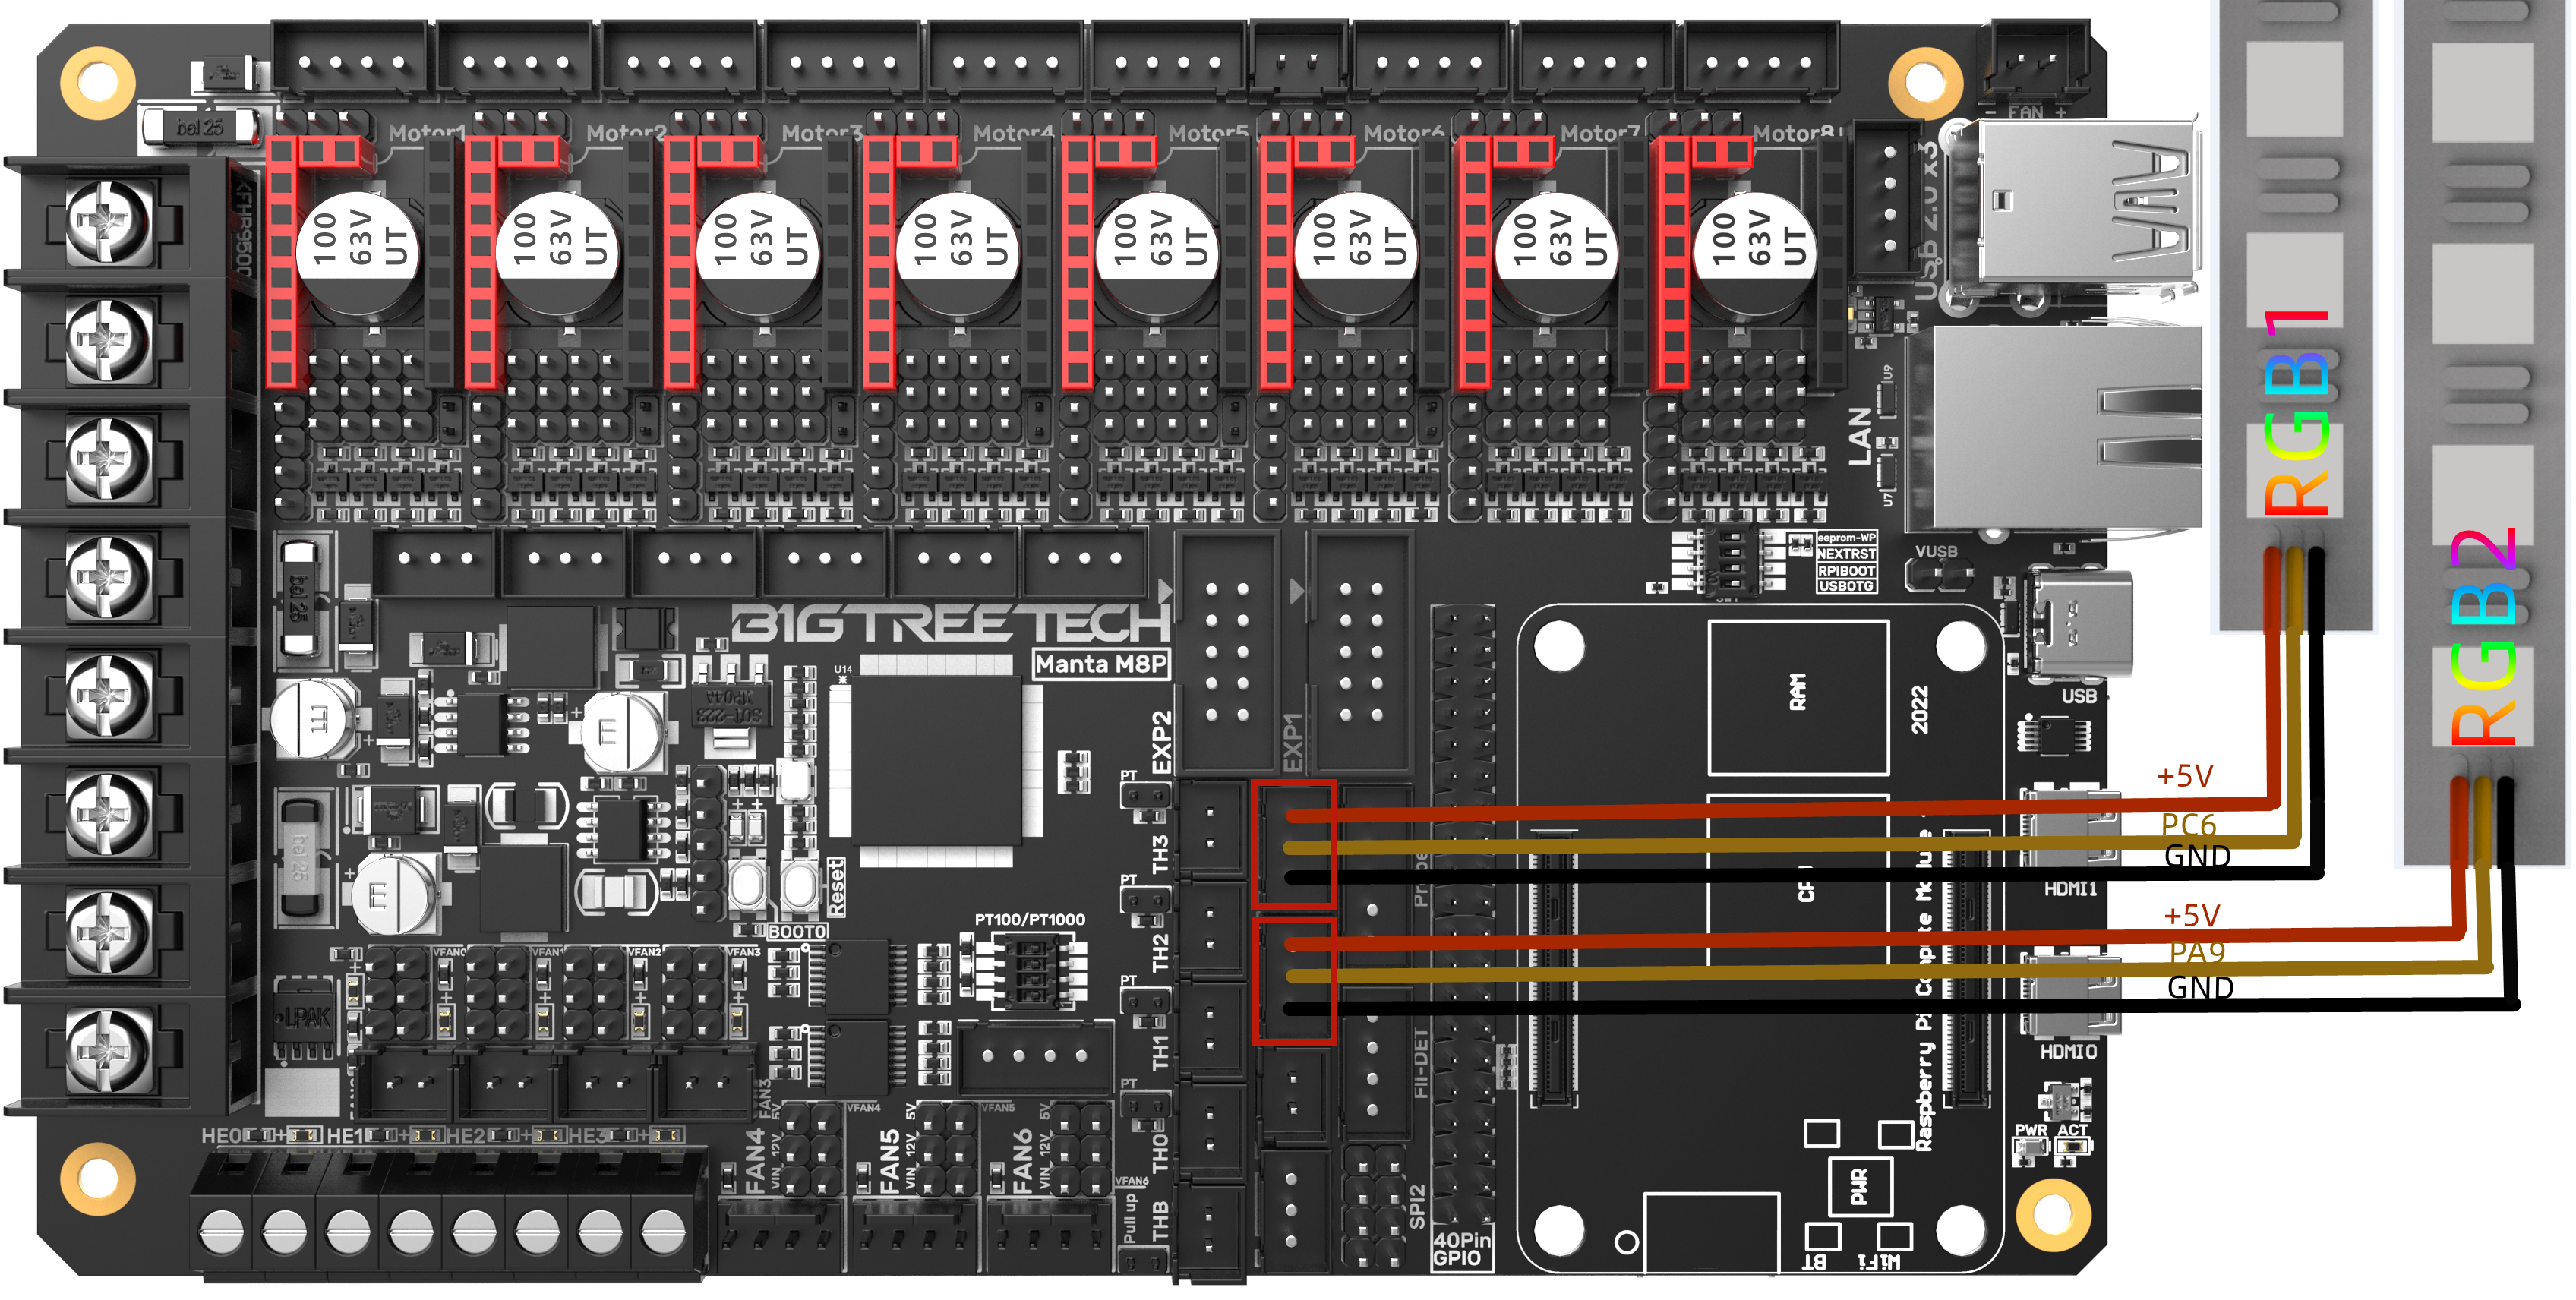
RGB Wiring
Filament Sensor Wiring

40 Pins GPIO

DSI/CSI Wiring

Proximity Switch Wiring
Always on (NPN type), no need to short-circuit via a jumper cap, 24V as an example, as shown in the following figure:

Always off (PNP type), need to short-circuit via a jumper cap, 24V as an example, as shown in the following figure:

Wiring of the 4-wire CNC Fan

ADXL345 Accelerometer
Refer to here: https://www.klipper3d.org/Measuring_Resonances.html, We can refer to the following wiring and configuration when connecting to the M8P motherboard
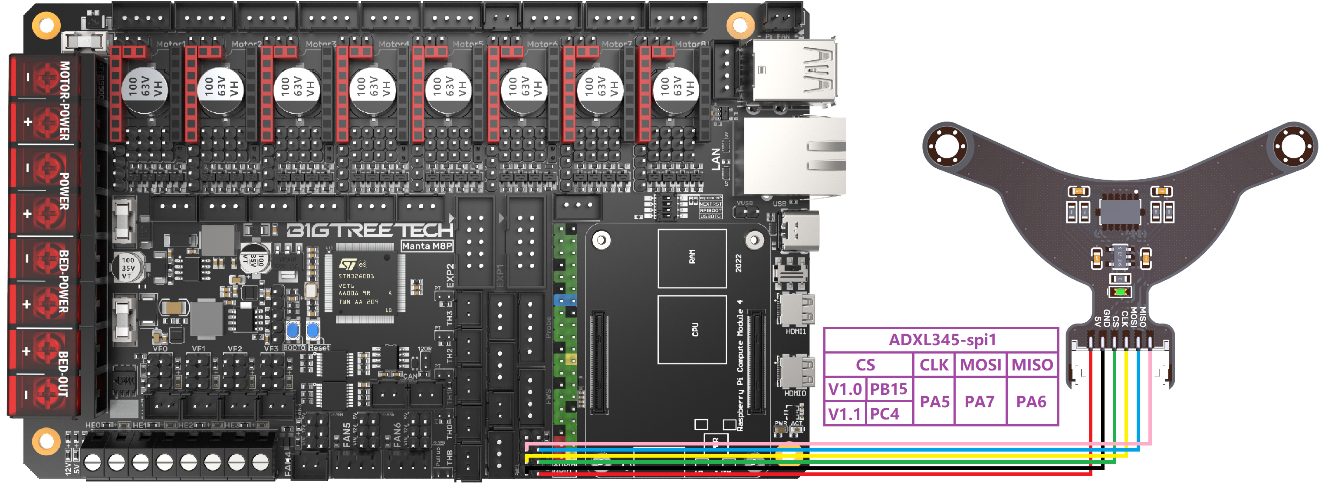
[adxl345]
cs_pin: PC4 # PB15 for V1.0
spi_bus: spi1
#spi_software_sclk_pin: PA5
#spi_software_mosi_pin: PA7
#spi_software_miso_pin: PA6
Software Configuration
For details, please click:
https://bigtreetech.github.io/docs/Software%20Configuration.html
Software Installation
For details, please click:
https://bigtreetech.github.io/docs/Software%20Installation.html
FAQs
- All unplugging and plugging operations should be performed under the condition of power off, including enabling the eMMC writing.
- Pay attention to the heat dissipation of CM4 and CB1. The CM4/CB1 may become quite hot if the running application consumes too many system resources.
- M8P V1.1 Notice: If you have an M8P V1.1 and are only able to move stepper motor number 6 in one direction then please contact "bttuniversity" on discord and he will assist you to get the issue resolved. Note that only a limited number of V1.1 boards were affected by this issue and none of the V1.0 boards were affected.
Product Purchase Link
Purchase Link:
https://biqu.equipment/products/manta-m4p-m8p?variant=39859521716322
If you have any issues with the product, please submit a support ticket.
https://biqu3d.com/pages/submit-a-ticket
M8P Guide Videos
Unboxing/Wiring/Firmware Installation of CB1&M8P(Voron 2.4 as an example)
Navigation:
BIQU Official Website: http://biqu3d.com
BIGTREETECH Official Website: http://bigtree-tech.com
Online Store: https://biqu.equipment
Community: https://community.biqu3d.com