M4P

Product Profile
BIGTREETECH CB1 is an alternative to Raspberry Pi CM4, which is currently out of stock.
BIGTREETECH M4P is a 4-axis motherboard using a CM4 BTB header, which can work with CB1 or CM4 perfectly.
Product Link: BIGTREETECH Official Website
Features Highlights
-
DSI1, CSI1 interface (for CM4)
-
Gigabit Ethernet interface (1000M for CM4, 100M for CB1)
-
3 USB 2.0 ports
-
Equipping the ESD protection chip on the USB and Ethernet ports to prevent being
broken down by the static electricity
- When working with Raspberry Pi CM4, its 40pin pin header has the same function
as that of Raspberry Pi(Custom IO for CB1)
- Using a BTB board-to-board connection, which can be further reinforced with
screws, perfectly compatible with CB1 or Raspberry Pi CM4
-
The MCU adopts STM32G0B0RE 32-bit ARM Cortex-M0+ @64MHz chip
-
The power chip adopts TPS5450-5A, which supports DC12/24V power input, the
output current of the chip is up to 5A, and the peak value can reach 6A, which
perfectly supports the power supply of the core board
- The protection circuit of the thermistor part prevents the main control chip from
burning due to leakage of the heated bed or heater cartridge
- In CNC fan ports: FAN0, FAN1, and FAN2, a 24V (DCIN) or 5V power supply can
be selected with a jumper cap (Note: the voltage of the three CNC fans should be
the same, and cannot be set to different voltages individually)
- MCU firmware can be upgraded through SD card, or through DFU with Klipper's
make flash command
- On-board TMC-driven SPI and UART working modes, on-board DIAG function
pins, can be used by simply plugging and unplugging the jumper cap
-
Support filament runout detection, BLTouch, RGB lights...
-
Adopt replaceable fuse for easy replacement
Specifications
| Product Size | 160 x 95mm |
|---|---|
| Installation Size | 146 x 84.2mm; 97 x 84.2mm |
| Core Board Installation Size | 33 x 48mm |
| The maximum output current of the heated bed port | 10A |
| The maximum output current of the heater cartridge port | 6A |
| Fan Port | Three for CNC Fan(24V/5V Voltage Selectable), One SoC Fan(Voltage not Selectable) |
| The maximum output current of the fan port | 1A |
| Total current for heater cartridge + driver + fan | <20A |
| Extended Interface | BLTouch(Servos, Probe), Fil-DET, 2 * RGB |
| Motor Driver | Support TMC5160, TMC2209, TMC2225, TMC2226, TMC2208, TMC2130, ST820, LV8729, DRV8825, A4988... |
| Driver Working Mode Support | SPI, UART, STEP/DIR |
| Motor Drive Interface | X, Y, Z(Dual Z-axis), E0, a total of four |
| Temperature Sensor Interface | 2-way 100K NTC |
| Display Screen | RepRapDiscount EXP-1 + EXP-2 |
Dimensions

Interface Diagram

Pinout

Hardware Configuration
TYPE-C
After the M4P is powered on, the red LED1 on the lower right side of the motherboard will light up, indicating that the power supply is normal. The J8 on the middle of the board is the power selection terminal, it needs to be short circuited only when the type-C USB is used to supply power to the
motherboard or the USB is used to supply power externally. The signal of type-C is connected to the SoC, Only used when writing OS image for CM4 eMMC version.

Hardware Installation
Stepper Driver
Normal STEP/DIR(STANDALONE) Mode
For example, A4988, DRV8825, LV8729, ST820...use the jumper cap to short MS0-MS2 according to the driver subdivision table.
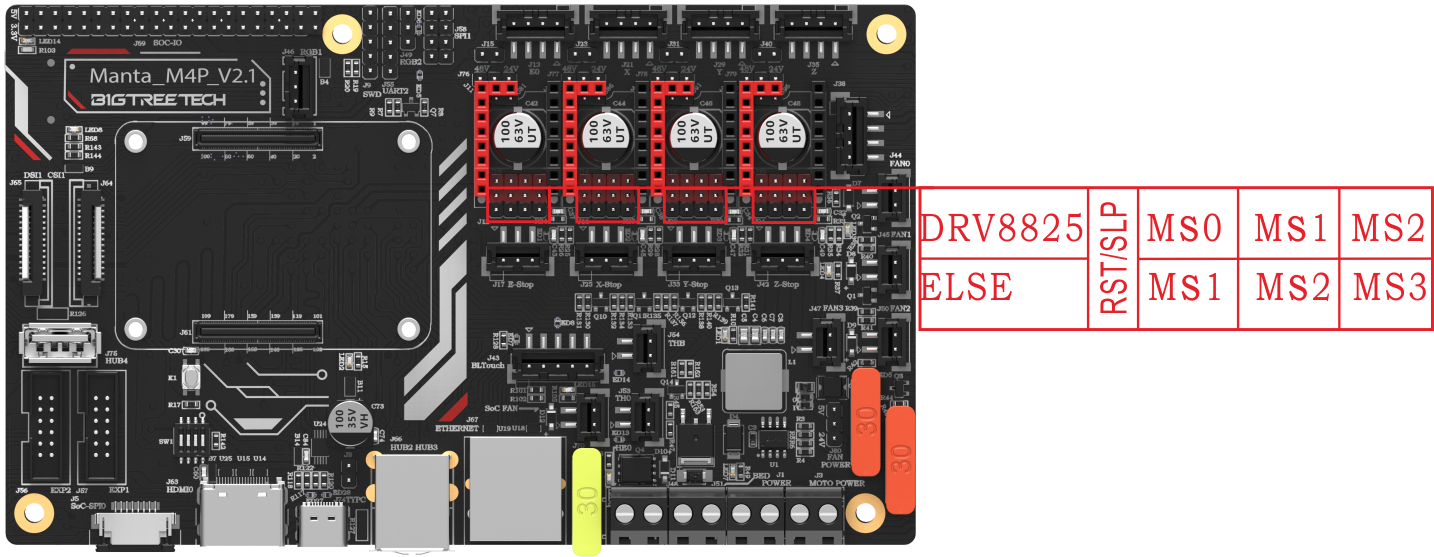
Note: If using A4988or DRV8825, RST and SLP must be shorted with jumper caps for normal operation.
For details, please click: https://bigtreetech.github.io/docs/Tutorials.html
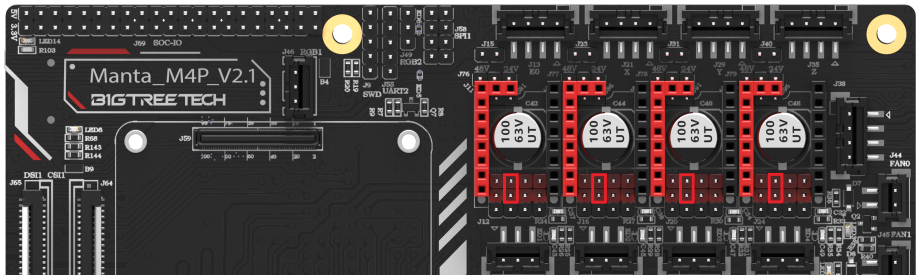
UART Mode of TMC Driver
For example, TMC2208, TMC2209, TMC2225... Use a jumper cap for each to connect the position of the red box in the figure, and the subdivision and driver current is set by firmware.
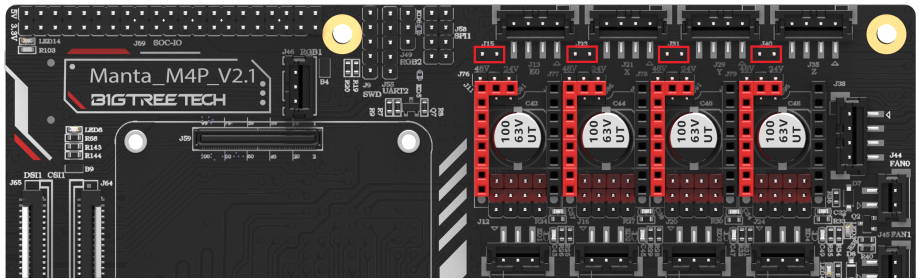
SPI Mode of TMC Driver
For example, TMC2130, TMC5160, TMC5161... Use 4 jumper caps for each to connect the position of the red box in the figure, and the subdivision and driver current is set by firmware.

DIAG(Sensorless Homing) of TMC Driver
As shown in the figure, plug the jumper cap when using the Sensorless Homing function, and leave it unplugged when it is not used. There is no need to cut the DIAG pin of the driver.
Driver Voltage Selection
The power supply of each driver can be set by the jumper. When the jumper is inserted into the left side, the independent MOTOR POWER port is used for driver power, and the supported voltage up to 56V. When the jumper is inserted into the right side, the main POWER port is used for driver power, and the 12/24v voltage is supported.
Driver independent power supply
The jumper is inserted into the left side and powered by the MOTOR POWER port. the supported voltage up to 56V.

Main power supply
The jumper is inserted into the right side and powered by the main POWER port. the 12/24v voltage is supported.

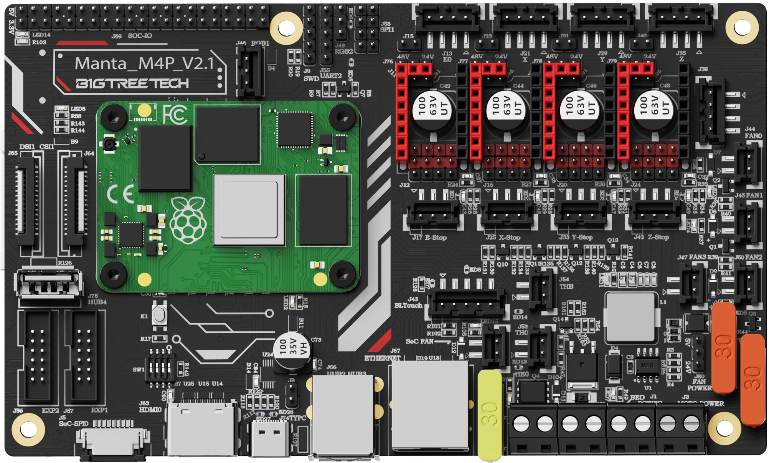
Install the Core Board via BTB Connection
M4P+CM4:Pay attention to the direction, as shown below.
M4P+CB1:Pay attention to the direction, as shown below.

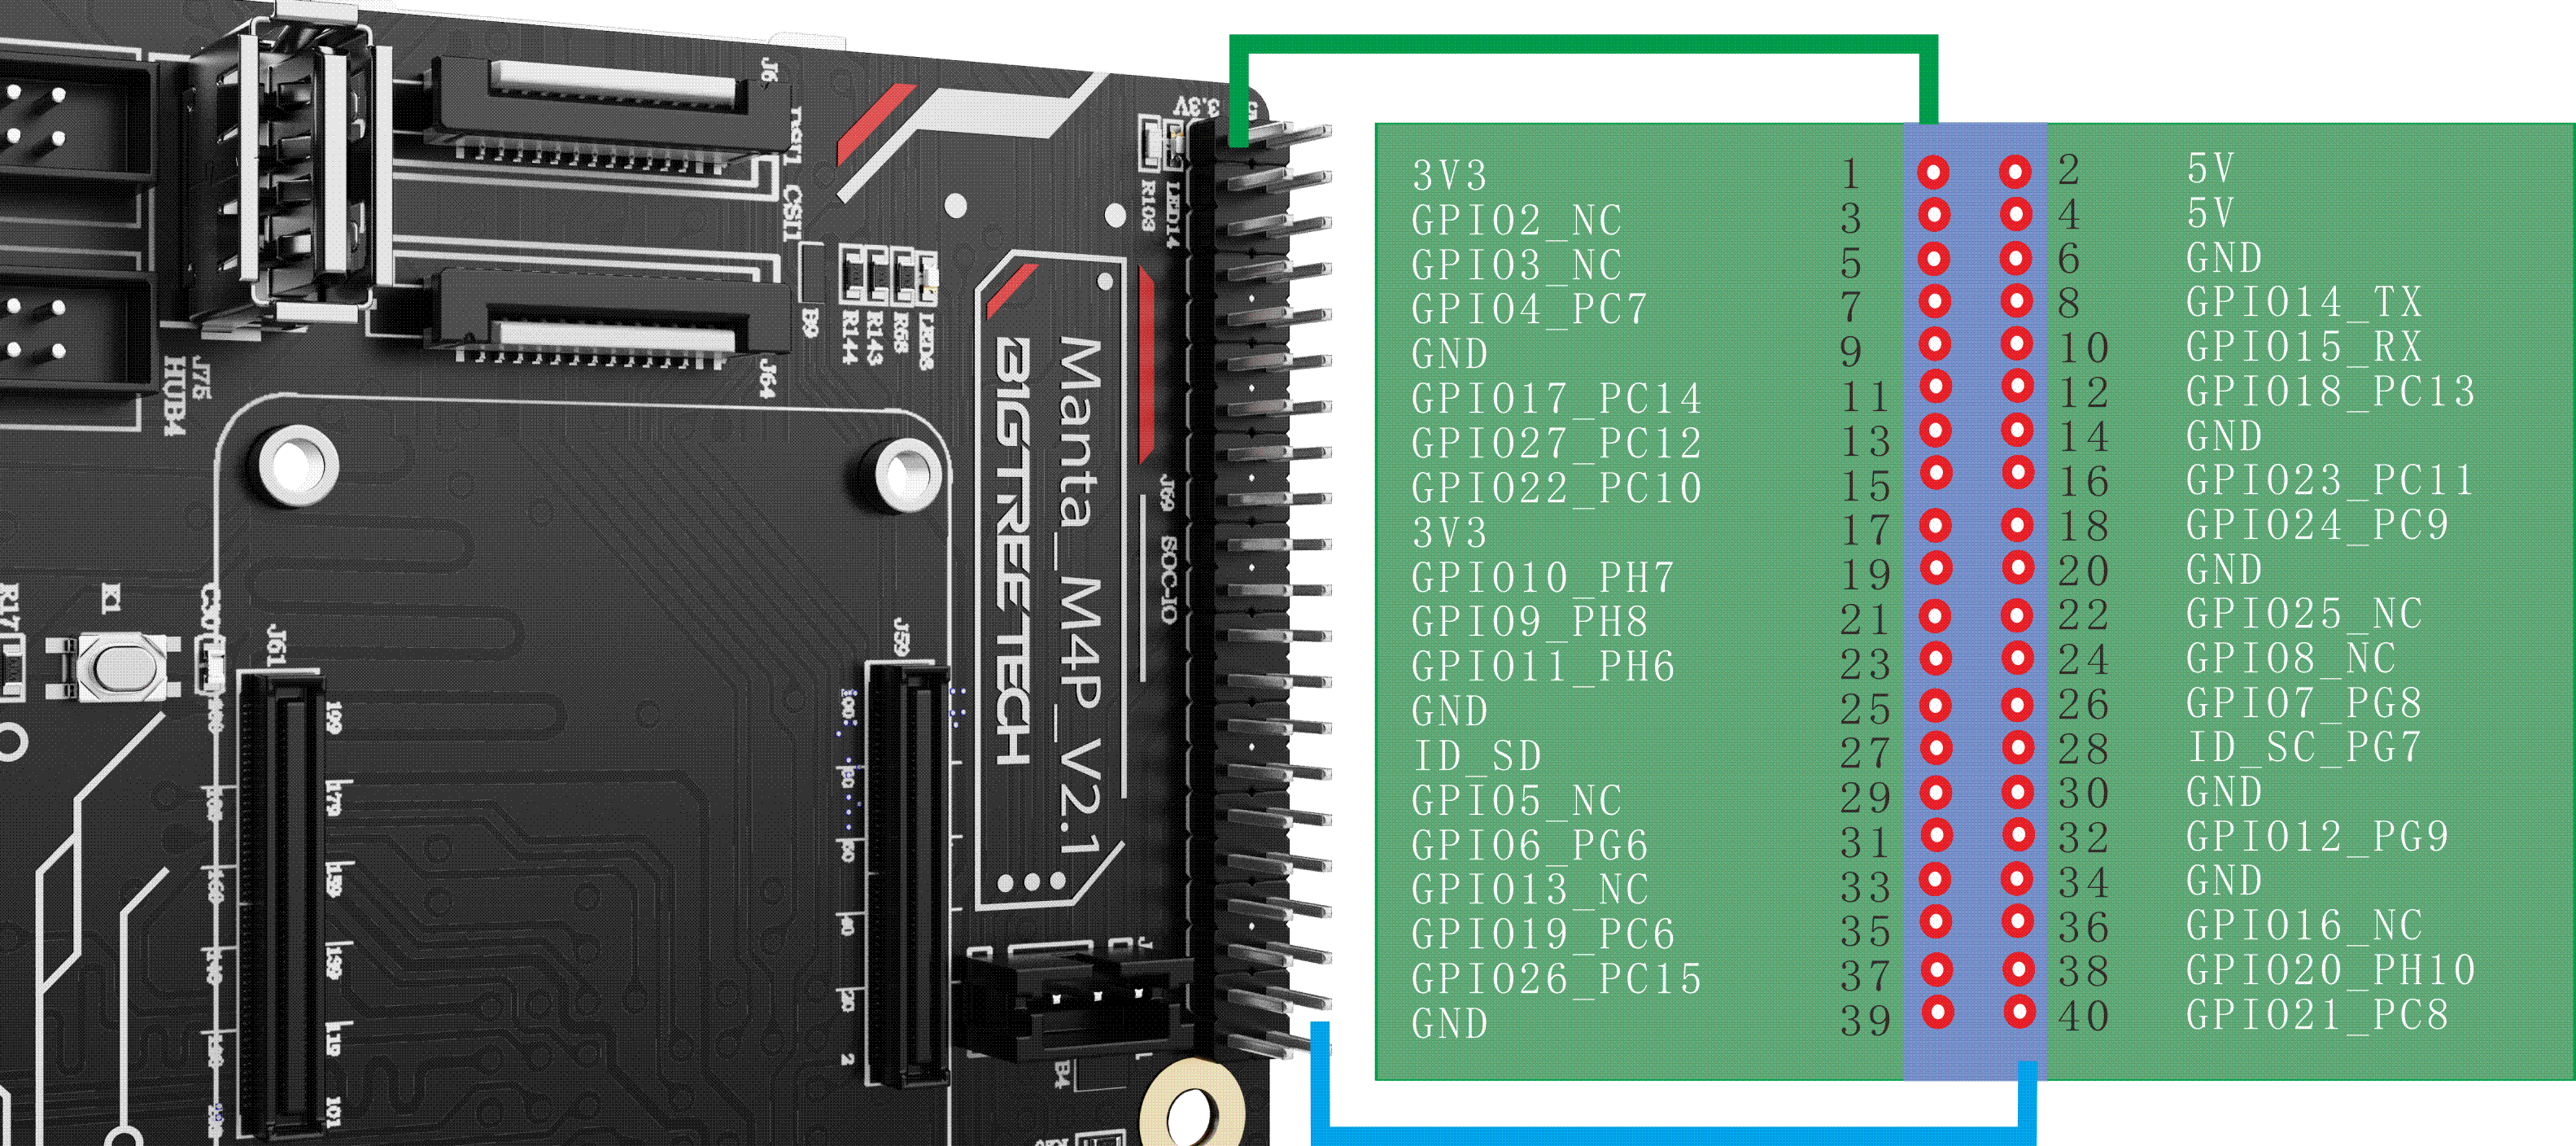
40 pin GPIO
When working with CM4, the pin arrangement of 40 Pin GPIO is exactly the same as that of Raspberry Pi. When working with CB1, it is a custom IO arrangement, as shown in the figure below, the 'GPIO4' in front of '_' is the IO of CM4, and the latter 'PC7' is the IO of CB1.
BLTouch Wiring
M4P_BLTouch_Wiring

EXP1+EXP2 and LCD Screen Wiring
M4P_E1_E2_LCD

RGB Wiring

DSI/CSI Wiring

SPI Display Wiring

ADXL345 Accelerometer
Refer to here: https://www.klipper3d.org/Measuring_Resonances.html, We can refer to the following wiring and configuration when connecting to the M4P motherboard
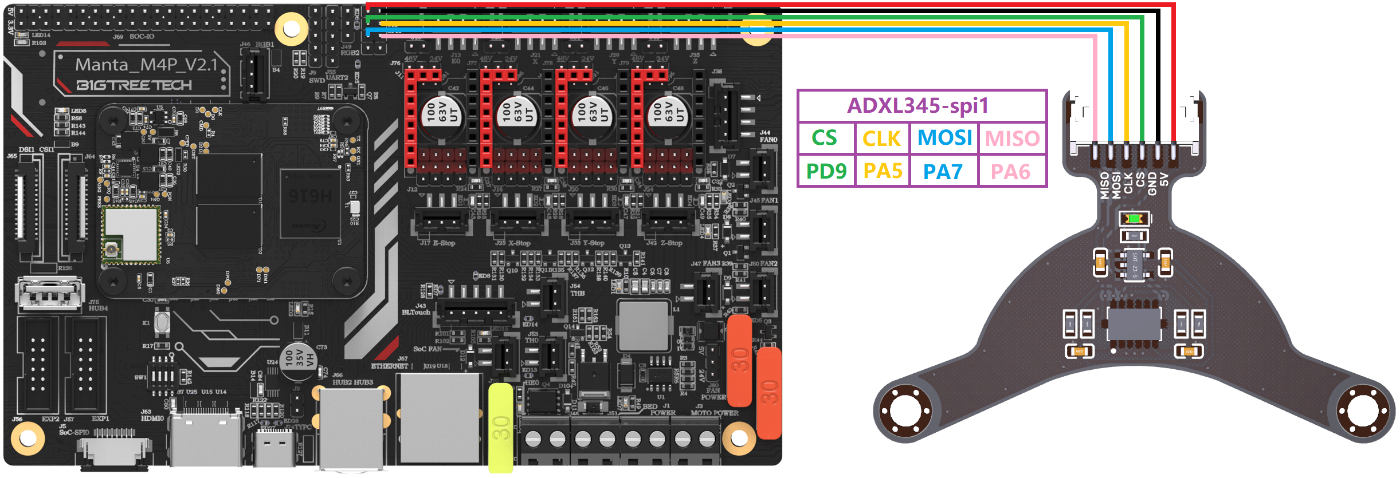
[adxl345]
```
cs_pin: PD9
spi_bus: spi1
#spi_software_sclk_pin: PA5
#spi_software_mosi_pin: PA7
#spi_software_miso_pin: PA6
```
Software Configuration
For details, please click:
https://bigtreetech.github.io/docs/Software%20Configuration.html
Software Installation
For details, please click:
https://bigtreetech.github.io/docs/Software%20Installation.html
FAQs
- All unplugging and plugging operations should be performed under the condition of power off, including enabling the eMMC writing.
- Pay attention to the heat dissipation of CM4 and CB1. If the running application consumes too many system resources, the CM4/CB1 will get hot quite seriously.
Product Purchase Link
Purchase Link:
https://biqu.equipment/products/manta-m4p-m8p
If you have any issues with the product, please submit a support ticket.
https://biqu3d.com/pages/submit-a-ticket
M4P Guide Videos
Unboxing/Wiring/Firmware Installation of CB1&M4P(Voron V0 as an example)
Navigation:
BIQU Official Website: http://biqu3d.com
BIGTREETECH Official Website: http://bigtree-tech.com
Online Store: https://biqu.equipment
BIGTREETECH Official Group: https://www.facebook.com/groups/bigtreetech
Discord: https://discord.gg/hhZsV7zk
Reddit: https://www.reddit.com/r/BIGTREETECH/