Universal Turbo Kit

Product Link:
https://biqu.equipment/products/universal-turbo-kit
GitHub repository:
https://github.com/bigtreetech/Universal-Turbo-Kit
Introduction
The BIQU Universal Turbo Kit consists of high-quality, high-performance components supplied by Wonsmart Motor (a supplier of medical equipment), along with our self-developed controller adapter board and custom cables, to make your CPAP blower installation experience as easy as connecting a regular DC fan. Plug & Play is our game!
Feature Highlights
- Specially designed adapter board and cable for Plug & Play universal compatibility.
- High-quality, high-performance WS7040 blower and driver from Wonsmart Motor (a supplier of medical equipment).
- 45,000 maximum RPM.
- 6.6 Kpa maximum static pressure.
- 14.7 CFM maximum flow rate.
- Comes with an air filter to prolong turbo lifespan and reduce noise while filtering large filament particles.
- Voron 2.4 exhaust hood mod installation hardware included.
- Voron 2.4 exhaust hood mod model provided.
- Reference 3D model available to aid in designing your own components around the kit.
- Printed noise reduction shroud 3D model available.
Packaging List
| Item | Qty |
|---|---|
| WS7040-24-V200 Blower | 1 |
| WS2403DY01V04 Brushless Driver | 1 |
| Air Intake Filter | 1 |
| Controller Adaptor Board | 1 |
| Power Cable 20AWG x 1m w/ Spade Terminal | 1 |
| Control Signal Cable 20AWG x 1m w/ XH2.54 | 1 |
| BLS Driver Power Cable | 1 |
| BLS Driver Signal Cable | 1 |
| Potentiometer Knob | 1 |
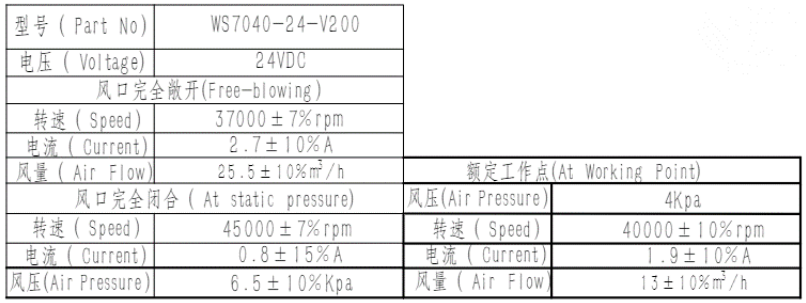
Motor Specification

Driver Specification

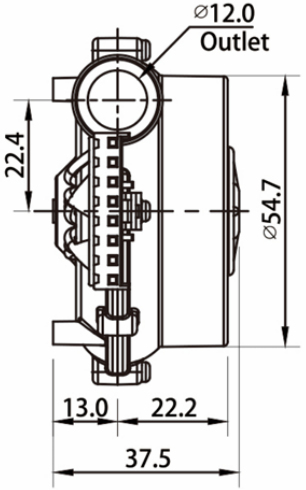
Dimensions


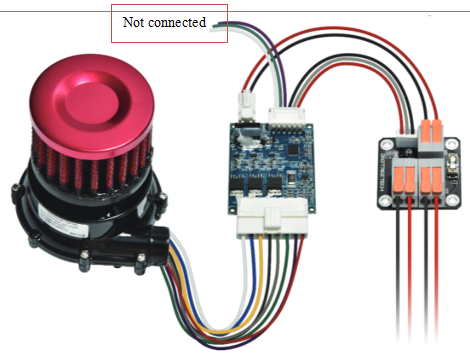
Wiring Instruction
To use the potentiometer knob for manual speed control:
1、Connect the power to 24V.
2、Plug the 3-pin XH2.54 connector into the potentiometer.
To use a mainboard or Pi SBC for firmware speed control, follow the diagram below:
- Insert the BLDC driver power cable into the adapter board.
- Plug the 3-pin XH2.54 connector into the adapter board.
- Cut the included power and signal cable to your preferred length.
- Insert the power and signal cable into the adapter board.
- Connect the power to 24V DC.
- Connect the signal cable to any fan port (3.3-24V full range compatibility).

Firmware Setup
Klipper
Insert your fan port pin into the pin section below and copy it to your “printer.cfg” file:
[fan]

pin: # Output pin controlling the fan. This parameter must be provided.

max_power: 0.8

# This should be set to 0.8 on most motherboards to give full range of control to your slicer.

# Anything above 80% duty cycle will be full power on this particular brushless driver.

# To fine-tune the max_power parameter for your particular motherboard, set max_power to 1.0, go into the Klipper dashboard, and increase fan speed 1% at a time until the actual fan speed stops increasing as you increase the fan speed. Divide the fan speed at this point by 100 and enter it into the max_power parameter.

# This parameter defines the maximum power (expressed as a value from 0.0 to 1.0) that the pin may be set to.

# The value 1.0 allows the pin to be set fully enabled for extended periods, while a value of 0.5 would allow the pin to be enabled for no more than half the time.

# This setting may be used to limit the total power output (over extended periods) to the fan.

# If this value is less than 1.0, then fan speed requests will be scaled between zero and max_power (for example, if max_power is 0.9 and a fan speed of 80% is requested, then the fan power will be set to 72%).

shutdown_speed: 0

# The desired fan speed (expressed as a value from 0.0 to 1.0) if

# The microcontroller software enters an error state.

# The default is 0.

cycle_time: 0.005

# The amount of time (in seconds) for each PWM power cycle to the fan.

# It is recommended this be 10 milliseconds or greater when using software-based PWM.

# The default is 0.010 seconds.

hardware_pwm: False

# Enable this to use hardware PWM instead of software PWM.

# Most fans do not work well with hardware PWM, so it is not recommended to enable this unless there is an electrical requirement to switch at very high speeds.

# When using hardware PWM, the actual cycle time is constrained by the implementation and may be significantly different than the requested cycle_time.

# The default is False.

kick_start_time: 0.100

# Time (in seconds) to run the fan at full speed when either first enabling or increasing it by more than 50% (helps get the fan spinning).

# The default is 0.100 seconds.

off_below: 0.1

# The blower will not spin with the included brushless driver when the duty cycle is below 8%. When scaled with Max_power at 0.8, the off_below parameter should be set to 0.1.

# To calibrate this setting, gradually lower the fan speed to determine the lowest input speed that reliably drives the fan without stalls.

# Set off_below to the duty cycle corresponding to this value (for example, 8% -> 0.08/Max_power -> 0.08/0.8 -> 0.1) or slightly higher.

# This parameter is the minimum input speed that will power the fan (expressed as a value from 0.0 to 1.0).

# When a speed lower than off_below is requested, the fan will instead be turned off.

# This setting may be used to prevent fan stalls and to ensure effective kick starts.

# To calibrate this setting, start with off_below set to 0.0 and the fan spinning.

# Gradually lower the fan speed to determine the lowest input speed that reliably drives the fan without stalls.

# Set off_below to the duty cycle corresponding to this value (for example, 12% -> 0.12) or slightly higher.

#Tachometer_pin:

# Tachometer input pin for monitoring fan speed. A pullup is generally required.

# This parameter is optional.

#Tachometer_ppr: 1

# When tachometer_pin is specified, this is the number of pulses per revolution of the tachometer signal.

#Tachometer_poll_interval: 0.0005

# When tachometer_pin is specified, this is the polling period of the tachometer pin, in seconds.

# The default is 0.0015, which is fast enough for fans below 10,000 RPM at 2 PPR.

# This must be smaller than 30/(tachometer_ppr*rpm), with some margin, where rpm is the

# maximum speed (in RPM) of the fan.
Marlin
Enable "FAN_SOFT_PWM" and set "SOFT_PWM_SCALE" to 5.
Duet Board
https://docs.duet3d.com/en/User_manual/Connecting_hardware/Fans_connecting
Printed Parts Instruction
Download Link:https://github.com/bigtreetech/Universal-Turbo-Kit/tree/master/3D%20Model/Voron2.4%26Trident
Firstly, print everything in the "Stealthburner Parts" folder. You will need the following extra parts to complete the printhead: 1x BTT KNOMI V2.0; 1x 15mm CPAP Tube; 2x Zip Ties
To complete the connection from printhead to the Blower, You will need to purchase the 15mm CPAP separately
Next, select one of the folders in "Exhaust parts" based on your preferred configuration and print everything in the folder. Here are the 4 configurations you can choose from:
1.Voron-Exhaust-UTK-SFS-without-fan: Redesigned version of the Voron exhaust hood with an integrated SFS V2.0 module, making use of the included Air Filter, without the 60mm exhaust fan.
This is the recommended configuration as it completely encloses the blower, keeping the noise level to a minimum.
For this configuration, you will need the following extra parts:
1x BIGTREETECH SFS V2.0 module
2.Voron-Exhaust-UTK-without-fan: modified Voron design V2.4 exhaust hood without a 60mm exhaust fan. This is the recommended configuration for non-SFS users as it completely encloses the blower, keeping the noise level to a minimum.
For this configuration, no extra parts are needed.
3.Voron-Exhaust-UTK-SFS-with-fan: this is a redesigned version of the Voron exhaust hood with an integrated SFS V2.0 module and a 60mm exhaust fan. A powerful 60mm fan is needed to maintain negative pressure in the printer enclosure due to the CPAP blower position; bear in mind that this will produce a high noise level, as the blower isn’t enclosed.
For this configuration, you will need the following extra parts:
1x BIGTREETECH SFS V2.0 module; 1x 60mm Axial Fan
4.Voron-Exhaust-UTK-with-fan: original Voron design V2.4 exhaust hood with a 60mm exhaust fan. A powerful 60mm fan is needed to maintain negative pressure in the printer enclosure due to the CPAP blower position; bear in mind that this will also produce a high noise level, as the blower isn’t enclosed.
For this configuration, you will need the following extra parts:
1x 60mm Axial Fan
The above design is remixed from the following designer, thank you for the inspiration:
https://www.printables.com/model/668556-modified-voron-exhaust-filter
https://www.printables.com/model/537863-ws7040-cpap-fan-mount-voron
https://www.printables.com/model/574324-stealthburner-knomi-can-sb22092240-cpap-nozzle-cam
https://www.printables.com/model/688145-knomi-cpap-stealthburner-sb2240-2209-no-camera/files
Product Purchase Link
Purchase Link: https://biqu.equipment/products/universal-turbo-kit
If you have any issues with the product, please submit a support ticket. https://biqu3d.com/pages/submit-a-ticket
Navigation:
BIQU Official Website: http://biqu3d.com
BIGTREETECH Official Website: http://bigtree-tech.com
Online Store: https://biqu.equipment
Community: https://community.biqu3d.com