SKR Pico
Product Profile
BTT SKR Pico V1.0 is a customized motherboard designed for VORON V0 printer, which launched by the 3D printing team of Shenzhen BIQU Innovation Technology Co., Ltd.
Product Link: https://biqu.equipment/products/btt-skr-pico-v1-0
Meet BIGTREETECH powerful motherboard SKR PICO V1.0
SKR PICO V1.0 - How to install SKR PICO motherboard on the Voron 0.1
Features Highlights
- Good-looking
- With Raspberry Pi ARM Cortex-M0+ MCU RP2040.
- Adopting new design heat sink, better heat dissipation & appearence
- Chip capacitors (MLCC):MURATA CAPACITOR
- The fuse(holder + fuse) is easy to install and remove.
- TYPE-C interface is connected to main control communication.
- Adopting Raspberry Pi, with optimal size design.
Specifications
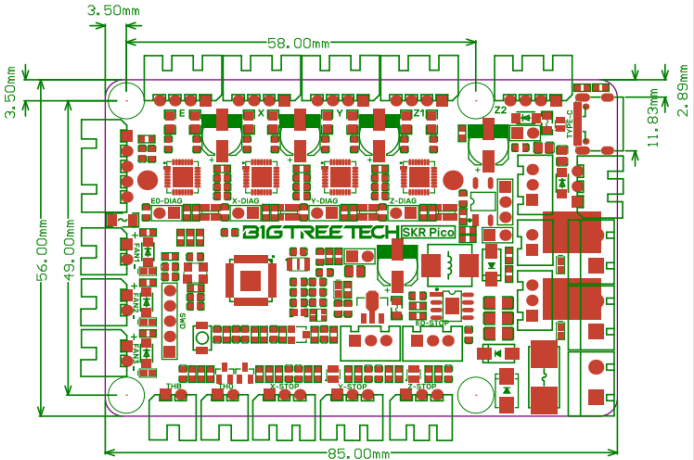
| External size | 85*56mm |
|---|---|
| Installation size | Please refer to BTT SKR Pico V1.0-SIZE.pdf |
| Board layer | 4 |
| MCU | ARM Cortex-M0+ RP2040 |
| Power input | DC 12/24V |
| Logic voltage | 3.3V |
| Motor driver | UART mode of the on-board TMC2209 |
| Motor driver interface | X, Y, Z1, Z2, E |
| Temperature sensor interface | TH0, THB, 2-way 100K NTC (RTD) |
| Communication with Raspberry Pi (Raspberry Pi) | TYPE-C, UART |
Dimensions

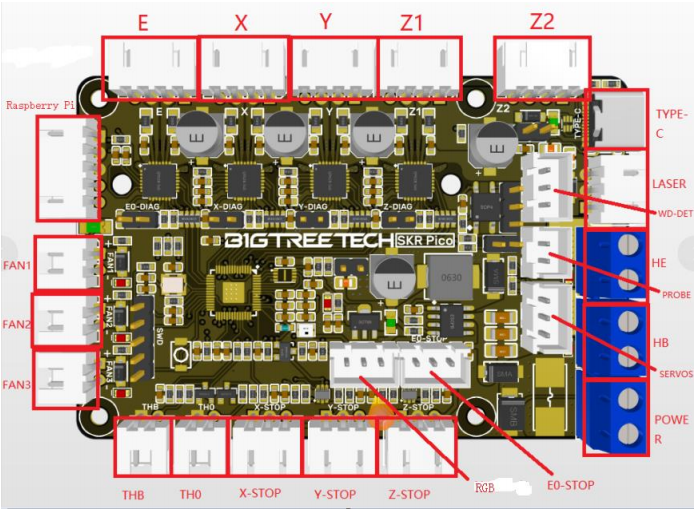
Peripheral Interface
Interface Diagram

Motherboard LED meanings
When the motherboard is powered on: LED6 - power indicator: the red light is on, indicating normal power supply. LED4 - hot bed HB status indicator: always on when heating, off when not heating LED5 - heating rod HE status indicator: always on when heating, off when not heating LED1 - FAN1 status indicator: on when turned on, off when turned off LED2 - FAN2 status indicator: on when turned on, off when turned off LED3 - FAN2 status indicator: on when turned on, off when turned off LED7 - RGB light, light color can be set
Interface Introduction
Sensorless homing function

The jump caps are connected to corresponding axis as show
NOTE: If you select this function, you cannot use external ENDSTOP!!!
Connection with RGB color Lights

Connection with BLtouch

Connection with Proximity switch
Connection with Proximity switch, Select the type of proximity switch as PNP or NPN by jumper

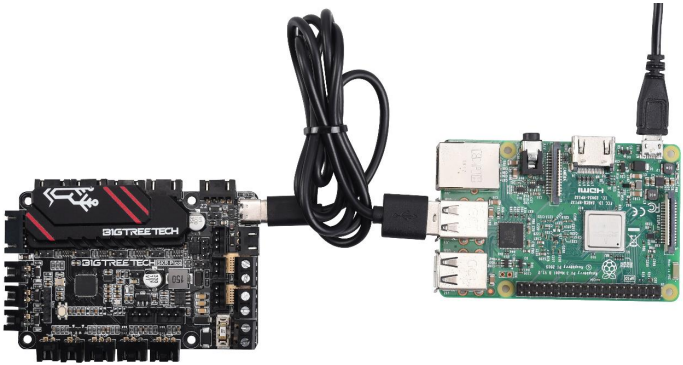
Connection with Raspberry Pi
a. Communication via USB

b. Communication via UART

Please refer to BTT SKR Pico V1.0-PIN.pdf for more details.
Firmware of Motherboard
-
How to get Contact our customer service or technical support to get. Log in the open source website to download: https://github.com/bigtreetech
-
Firmware update method
(1) Insert a jumper cap on the Boot pins of the motherboard and click the Reset button to enter the burn mode.

(2) Connect USB-C to computer, then you will see a USB flash drive named RPI-PR2, copy compiled klipper.uf2 file to the USB flash drive, the motherboard will automatically reboot and update the firmware, the computer will re-identify this USB flash drive means the firmware update is complete, unplug the jump cap and click the Reset button to enter normal working mode.

(3) Please refer to BTT SKR Pico V1.0-PIN.pdf for Firmware DIY.
Precautions
- If you want to use a motor drive current of more than 0.8A, it is recommended to use a fan to actively cool the drive chip.
- Do not remove the heat sink unless necessary. If it is to be removed, please ensure that the thermal conductive silicon film fits the bottom of the heat sink during installation, so as not to cause short circuit
- The wiring must be performed when the power is off.Please make sure the wiring is correct before power on to avoid damage.
- Please note that the jumper cap is correctly inserted.
Should you have any issues, please don't hesitate to contact us. We strive to provide you with the best quality products and services. If you have any good comments or suggestions, please feel free to share with us. Thank you for choosing BIGTREETECH products!