Panda Alarm
- Product Link: Buy Here
Important Notice:
-
Printer Monitoring Only: Panda Alarm is a monitoring-only device, meaning it reads the printer's status but does not control it. This key distinction ensures its core functionality remains unaffected by Bambu Lab firmware updates. For a detailed breakdown on which functions are affected or unaffected by updates, please consult the official Bambu Lab announcement.
-
Firmware: Ensure your device is running the latest firmware version.
-
Wi-Fi Support: Panda Alarm supports only 2.4G Wi-Fi connections.
-
Web UI Access: After connecting to the Panda Alarm AP hotspot in your phone settings menu, you will be redirected directly to the Web UI interface. Due to permission issues on some mobile phones, it may not be possible to upload MP3s, or firmware updates on this page. Please access the Web UI through a browser to perform file uploads.
-
GitHub Feedback: If you encounter any issues during use, or if you have suggestions for future hardware or firmware versions, feel free to submit them on GitHub to stay in touch with us.
-
Further Support: For questions not addressed in this wiki, please contact customer support at:
support01@bigtree-tech.com.
Product Overview
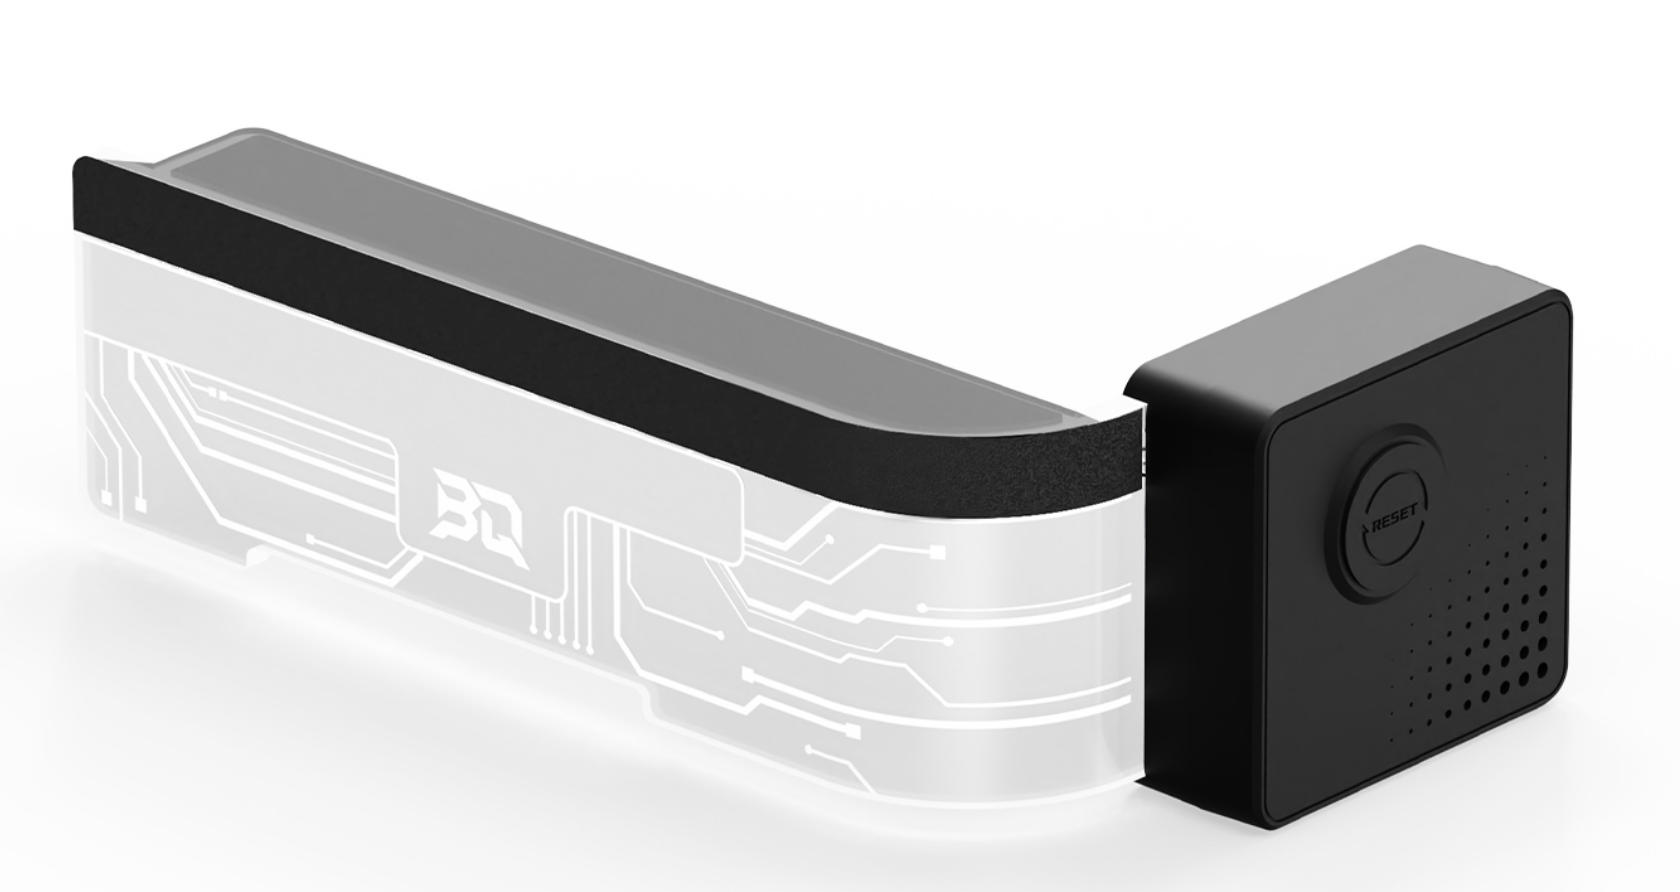
Panda Alarm is a wireless monitoring system that synchronizes your 3D printing farm. It provides immediate, at-a-glance status updates for P-series printers through synchronized RGB lighting and customizable audio alerts. The plug-and-play device sends real-time notifications for print completion, failure, and filament depletion. Manage all alerts remotely via the web interface or mobile app for streamlined farm operation. Panda Alarm transforms monitoring into a seamless, easy-to-understand experience, keeping you informed of your printer’s status at all times.
Product Features
-
Product Positioning: Wireless sound and light alarm system designed for 3D printing farms
-
Sound and Light Alarms: Alerts for print completion, print failure, and filament issues (such as filament runout)
-
Printer Status Display: RGB lighting effects based on printer status (similar to Bambu Lab H2D Style Status Indicator)
-
Customizable Alarms: Customize sound alarms and lighting effects via the Web UI
-
Remote Control: Control alarms and settings via a mobile app (launching soon)
-
Compatibility: Specifically designed for P-series printers
Specifications
| Microprocessor | Built-in ESP32-C3FH4 chip, RISC-V 32-bit single-core microprocessor, up to 160 MHz clock speed |
|---|---|
| Memory | 384 KB ROM, 400 KB SRAM, 4 MB integrated flash |
| Logic Voltage | 3.3V |
| Input Voltage | 5V |
| Current | 0.38A |
| Power Interface | USB-A |
| Lightboard Material | Acrylic |
| RGB LED Count | 9 LEDs |
| Outer Packaging Size | 196.0mm x 80.5mm x 81.0mm |
| Product Size | 170.4mm x 86.4mm x 55.4mm |
| Speaker Power | 3W |
| Audio Format | MP3 format supported |
| Communication | 2.4G Wi-Fi (IEEE 802.11 b/g/n) |
| Operating Temperature | 0℃ to +50℃ |
| Storage Temperature | -20℃ to +70℃ |
Product Dimensions

Installation Guide
Panda Alarm is designed for installation on the P1 series printer.
Installation on P1 Series Printer
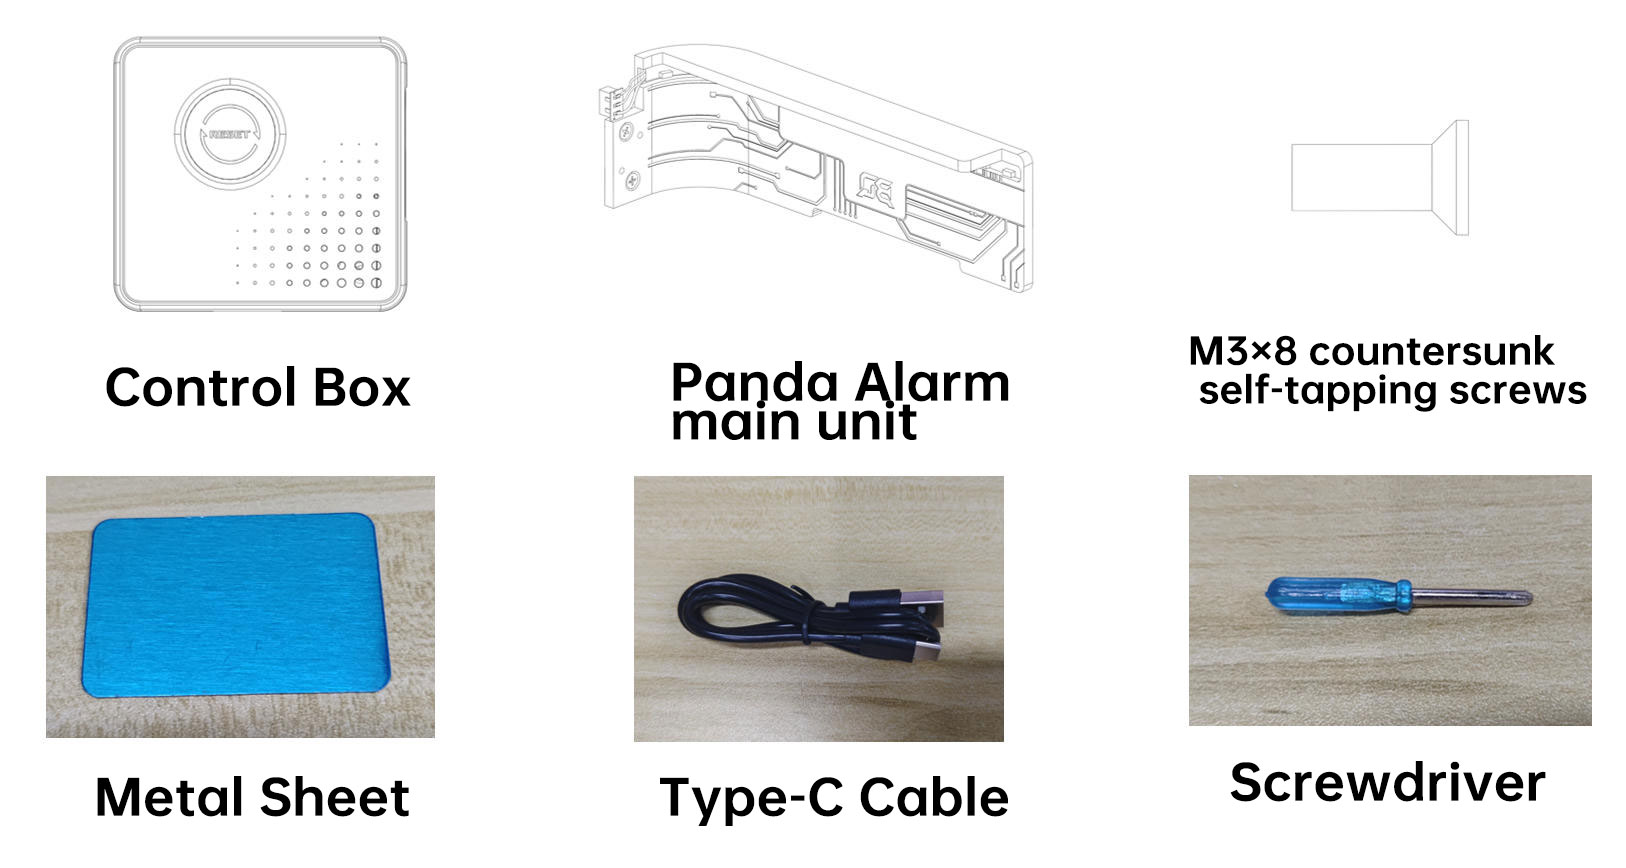
Panda Alarm Accessory List
Installation Steps
-
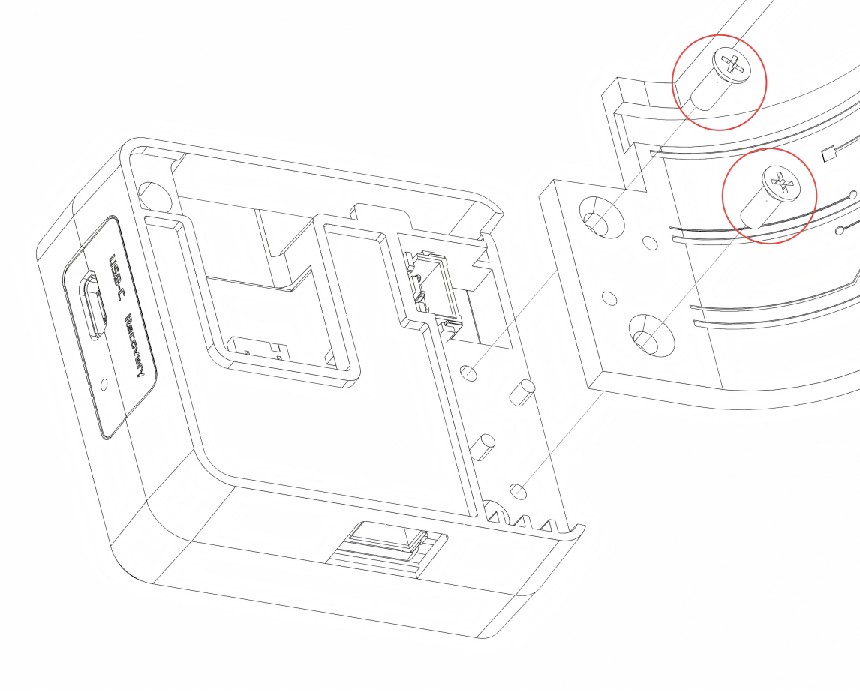
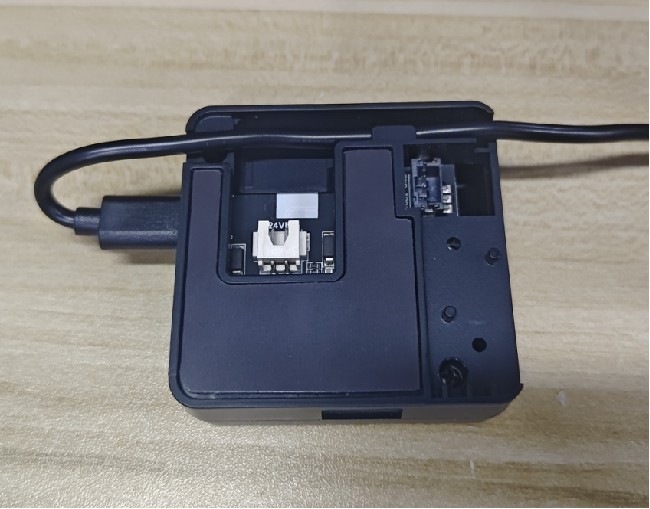
Remove the transparent Panda Alarm main unit from its packaging. Secure it to the control box using the two supplied M3×8 countersunk self-tapping screws.
-
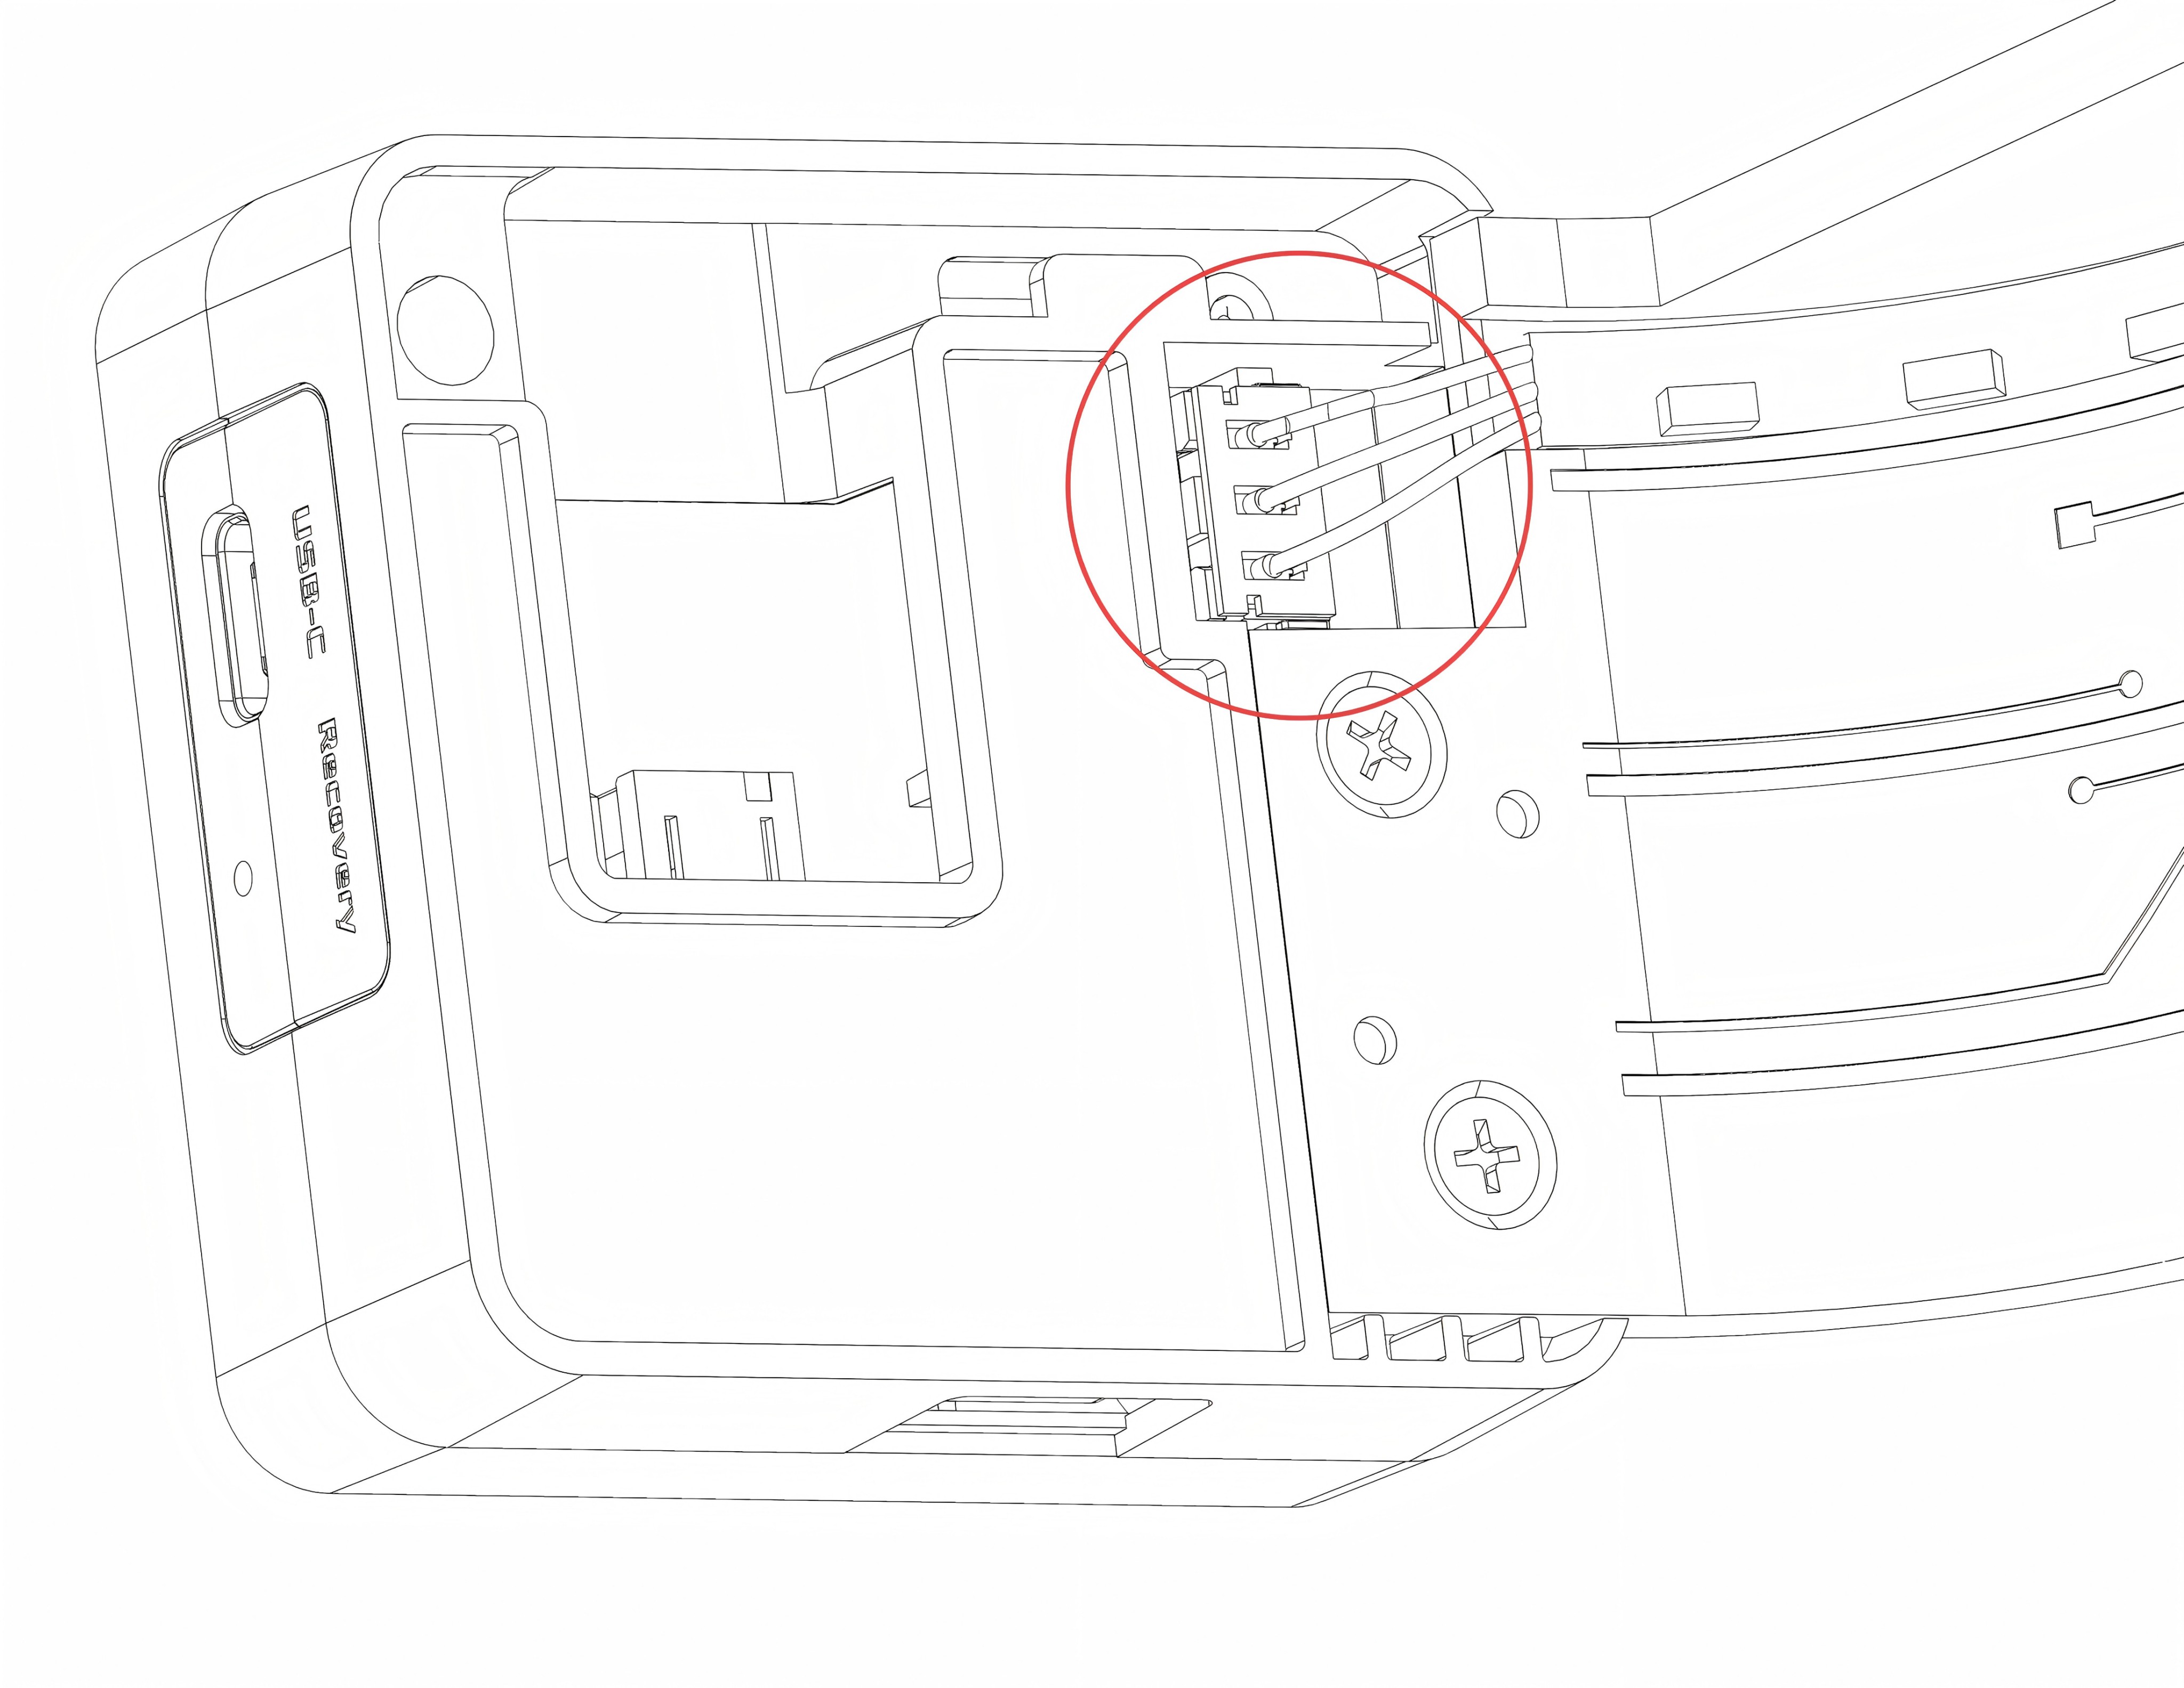
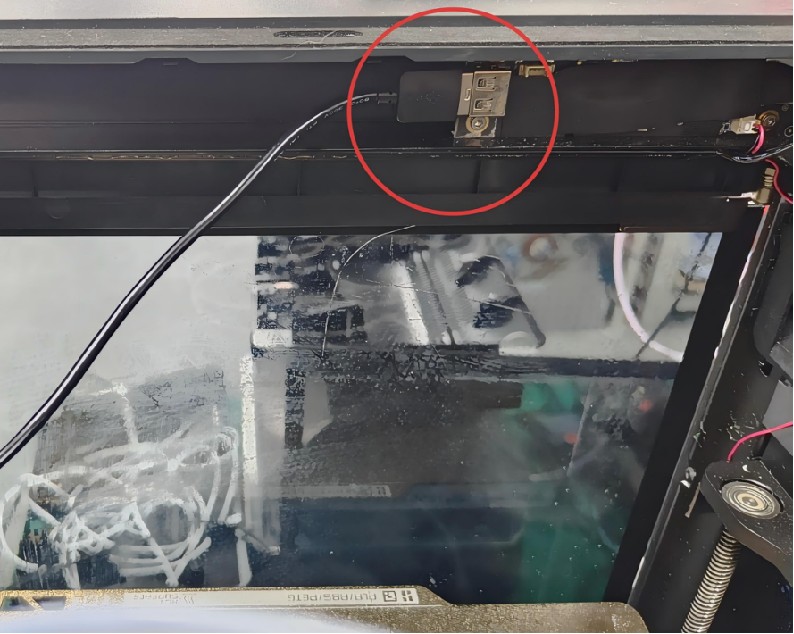
Plug the light strip connector on the Panda Alarm into the 3-pin interface on the control box, as shown below.
-
Plug the USB power cable into the printer's USB-A port, located in the upper groove of the P1 door panel. Access may require removing the printer's cover.
-
Feed the Type-C connector from the other end of the USB cable through the small hole on the upper-right side of the printer.

-
Insert the exposed Type-C connector into the Type-C port on the control box, ensuring the cable is routed appropriately, as shown.
-
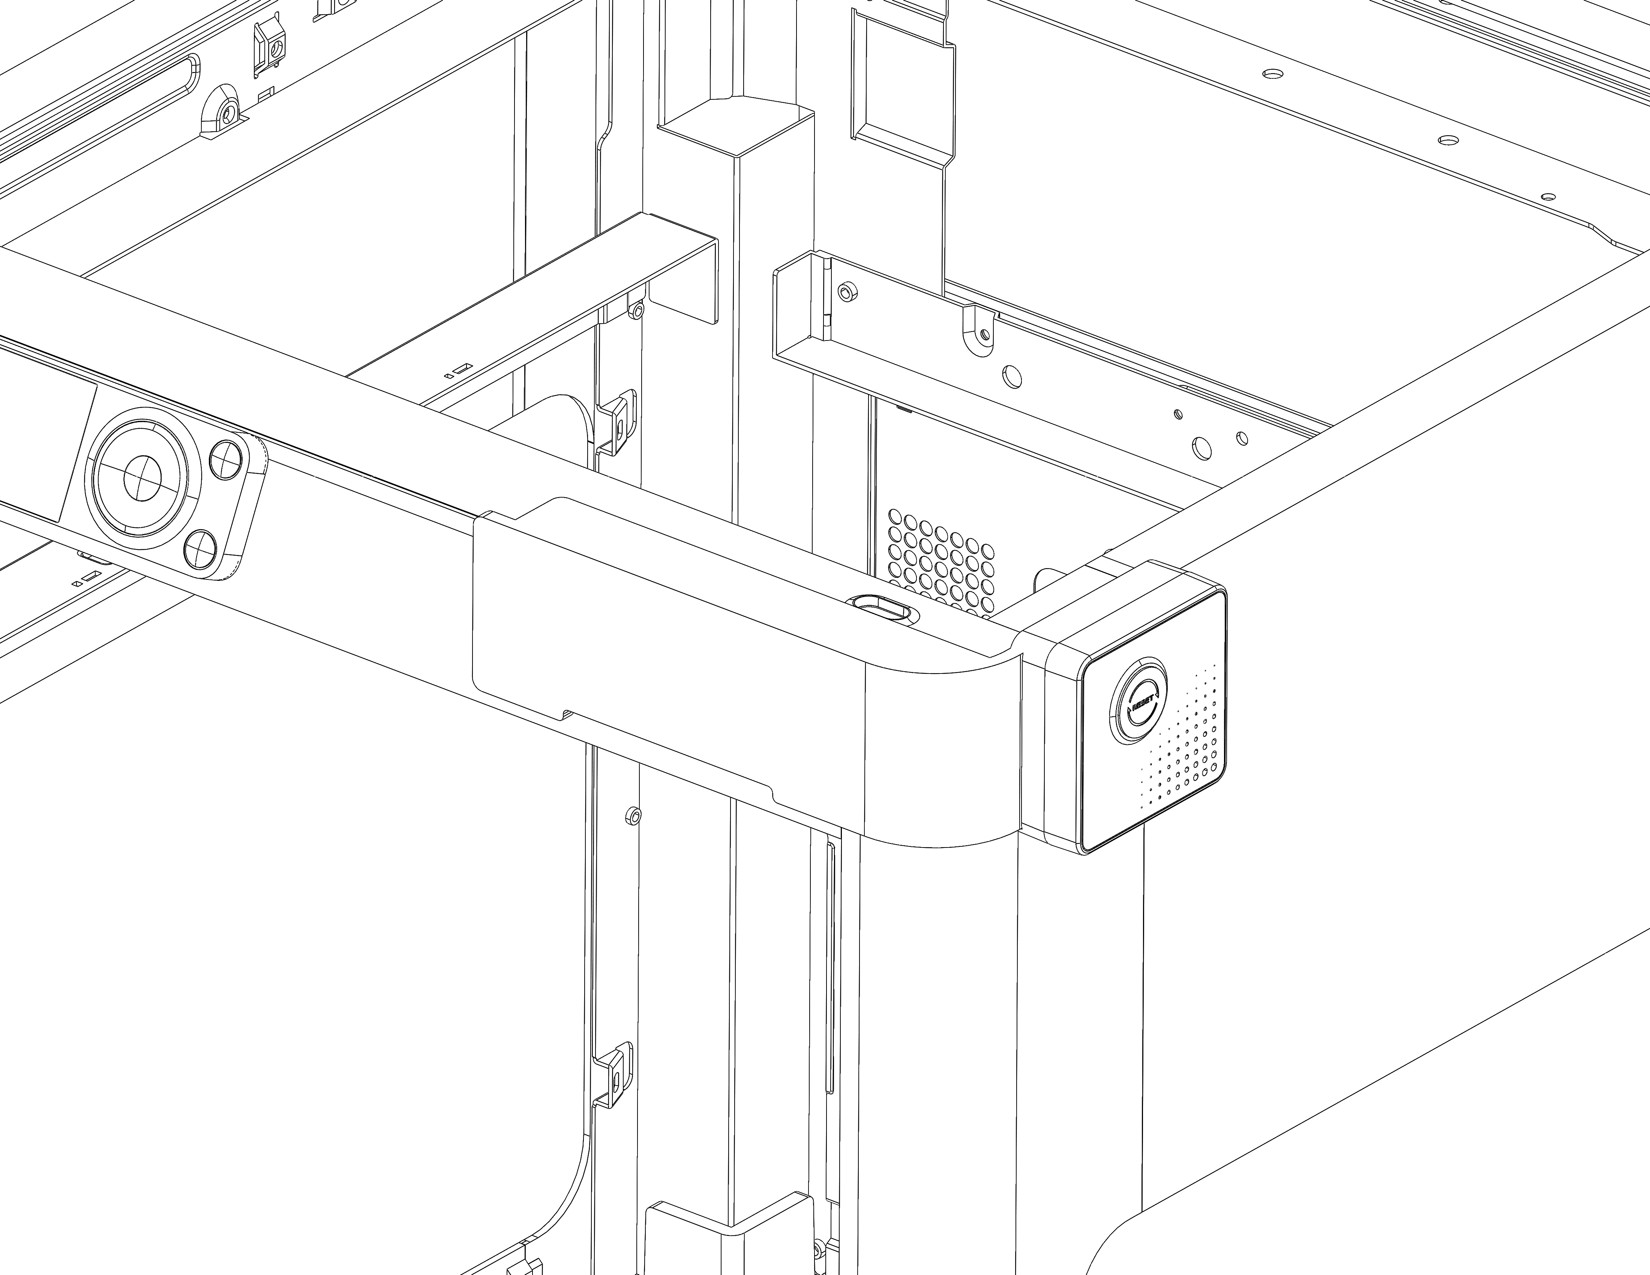
Determine the position for the metal sheet: Position the Panda Alarm unit on the printer's upper-right side, aligning the lightboard's curvature with the printer's. Secure the control box by attaching the included metal sheet over it.

-
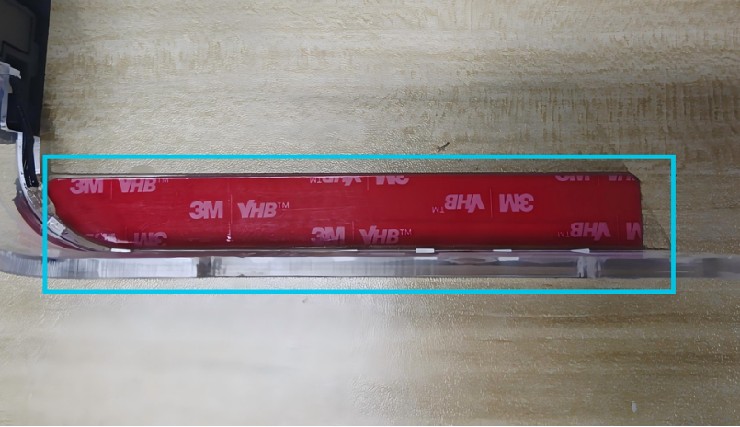
Peel off the protective backing from the double-sided tape on the Panda Alarm main unit.
-
Position the Panda Alarm unit along the upper-right curvature of the printer. Press it firmly to secure the top with the integrated double-sided tape.
Once the installation is complete, power on the Panda Alarm and proceed to configure it. Please refer to the First-Time Use Guide for configuration instructions.
First Connection
Access the Web UI configuration page.
-
Connect to Panda Alarm's AP Hotspot
After the first startup or after executing the Restore Factory Settings command, the Panda Alarm will display a blue marquee light effect - indicating that the device has not yet been bound to a printer. To configure and bind the printer, you’ll need to connect to the Web UI. Follow these steps to manually connect to the Panda Alarm's AP Hotspot:
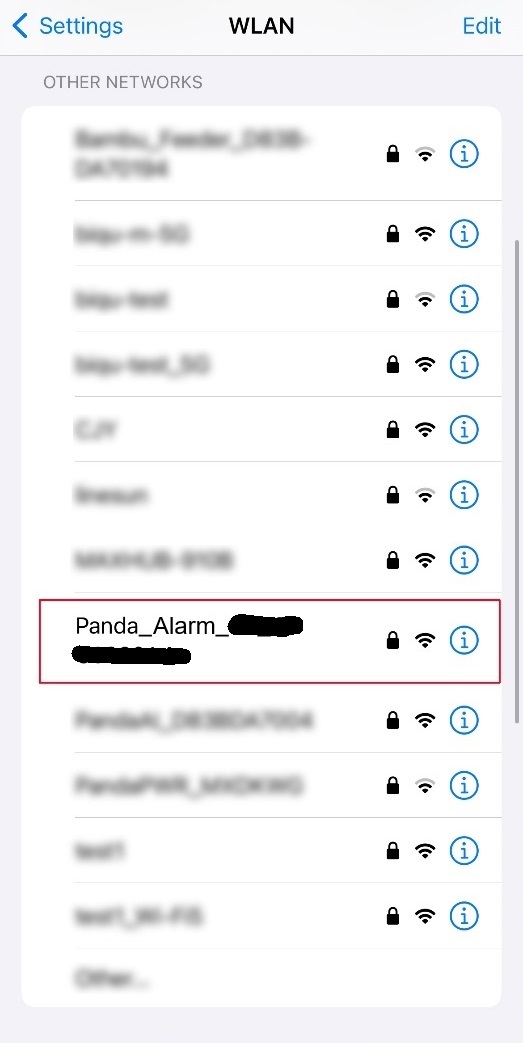
Example using an iPhone:
-
On your home screen, go to Settings → WLAN.
-
Turn on WLAN. Your device will automatically search for available networks.
-
Tap on the network starting with Panda_Alarm, then enter the default password: 987654321.
-
After connecting, you will see a blue checkmark next to the network name and the Wi-Fi icon in the upper-right corner of the display.
-
-
Once connected, a message will appear saying “Connected (Login/Authentication Required)”. Tap this message to open the Web UI configuration page. If the page doesn't load right away, wait 10–20 seconds. If it still doesn’t load, manually enter 192.168.254.1 in your browser to access the Web UI.
Connect Panda Alarm to the same Wi-Fi as the printer
-
Upon first connection, you will be directed to the Select Language screen. Choose your language and click Next.

-
The system will automatically scan for available Wi-Fi networks. Select the same network your printer uses. If the network is not listed, click Scan to rescan.

After the connection is established, a confirmation pop-up will appear. Click Bind Printer* to finalize the setup.
<img src=img/PandaAlarm/en/goto_printer.jpg width="300"/>
Bind Printer
Note: If the access code field is blank, the printer is likely in an unlinked cloud mode. Please configure the printer's network to "LAN Only Mode," or use Bambu Handy/Bambu Studio to complete the cloud account binding.
Auto Scan
-
In the Web UI, go to the Printer screen. Clicking Scan will search for Bambu printers on the same local network. The scan takes about 30 seconds, with an additional 20 seconds for each printer detected. Panda Alarm can recognize up to 20 printers per scan. If more than 20 printers are present, some may not be detected. If the scan does not detect the desired printer, click Scan again or use Manual Input to enter the information.
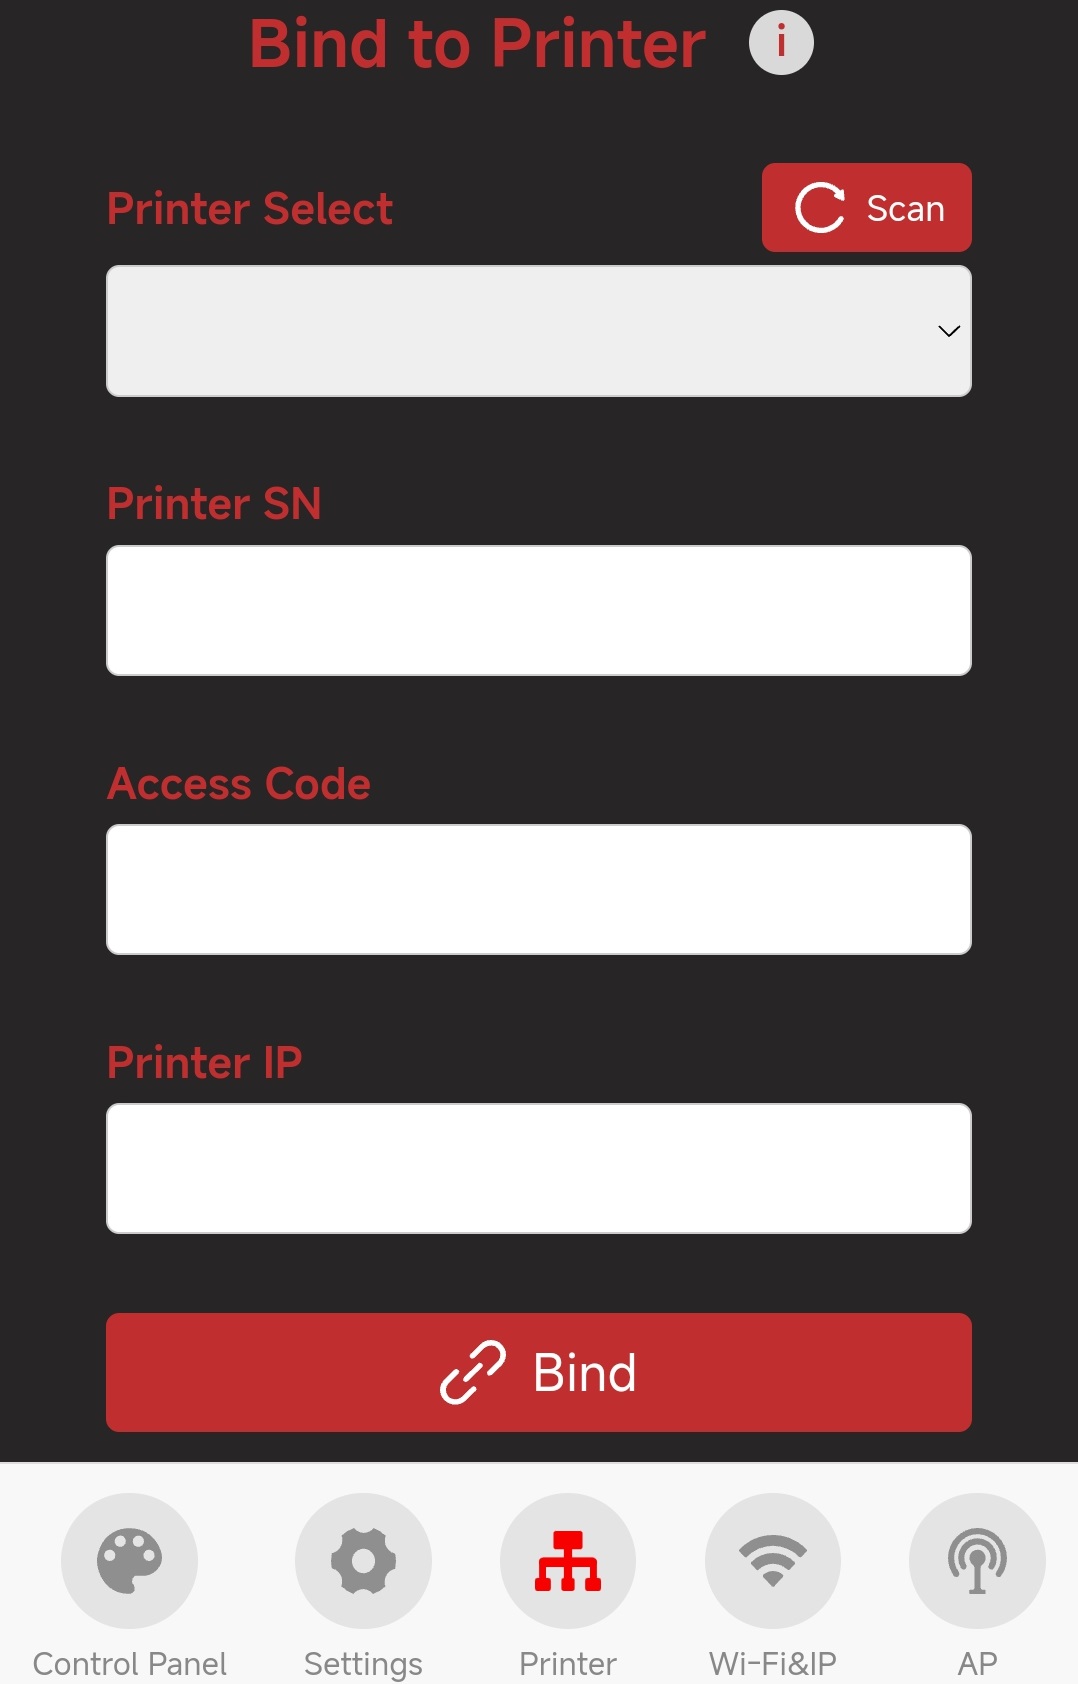
-
After scanning, select the printer you wish to connect to. The printer’s SN and IP will be automatically populated. Locate the Access Code on the printer and enter it into the Printer Access Code field on the Web UI.
-
P1 Series Printer
-
①
Settings-> ②WLAN-> ③OK
-
⑤
Access Code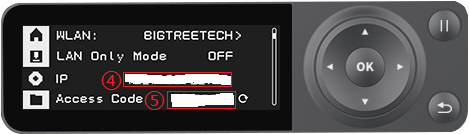
-
-
-
Click Bind to start the connection. If a Binding Successful pop-up appears, Panda Alarm has successfully connected to the printer.

-
Congratulations! Your Panda Alarm is now ready for use.
Manual Input
- Panda Alarm can detect up to 20 printers per scan. If there are more than 20 printers in your network, some may not be detected. You can use Manual Input to bind the printer by entering all necessary information.
- If fewer printers are present but the desired one is still not detected, try using Manual Input to bind it. If Panda Alarm cannot connect to the printer, router security settings may be preventing local network communication. For further assistance, please contact support at support01@bigtree-tech.com.
-
Enter the printer's SN, Access Code, and IP address into their corresponding fields in the Web UI.
-
P1 Series Printer
-
SN-
①
Settings-> ②Device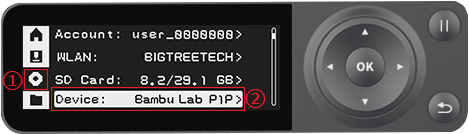
-
③
Printeris theSN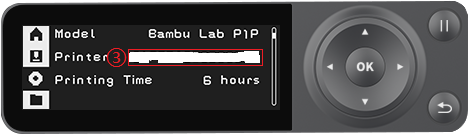
-
-
Access CodeandIP-
①
Settings-> ②LAN-> ③ -
④
IP, ⑤Access Code
-
-
-
-
Click Bind to begin the connection. If a Binding Successful pop-up appears, Panda Alarm has successfully connected to the printer.
-
Congratulations! You can now enjoy your Panda Alarm.
Light and Sound Effects
Device Status
The system provides 10 status alerts (3 system-level, 7 printer-level), each with a default light and sound effect as shown:
System-level Statuses
| System-level Status | Light Color | Light Effect | Sound Effect |
|---|---|---|---|
| OTA firmware/audio file update | White | Marquee | Silent |
| Unbound Printer (factory default) | Blue | Marquee | Silent |
| Binding Printer / Binding Error Retry | Yellow | Marquee | Silent |
Printer Statuses
The following 7 printer statuses share light effects and default colors consistent with Bambu Lab's official status lights.
| Printer Status | Light Color | Light Effect | Sound Effect | Remarks |
|---|---|---|---|---|
| Printer Idle | Default White |
Breathing Light | Silent | Color and brightness customizable via Web UI |
| Printing | Default White |
Constantly on based on progress percentage | Silent | Color and brightness customizable via Web UI |
| Print Paused | Default White |
Breathing based on progress percentage | Silent | Same color and brightness as Printing |
| Print Complete | Green | Constant on | Default Pulse Frequency Alarm |
Automatically goes to Idle after 30 seconds, 100% brightness, sound customizable via Web UI |
| Printer Error | Default Red |
Flashing | Default Pulse Frequency Alarm |
Color, brightness, and sound customizable via Web UI |
| Preparing Print | Yellow-Orange | Flowing Light | Silent | 100% brightness |
| Downloading Print File | Yellow | Flowing Light | Silent | 100% brightness |
Control Panel

-
① Enter the Control Panel Interface
-
② Product Name
-
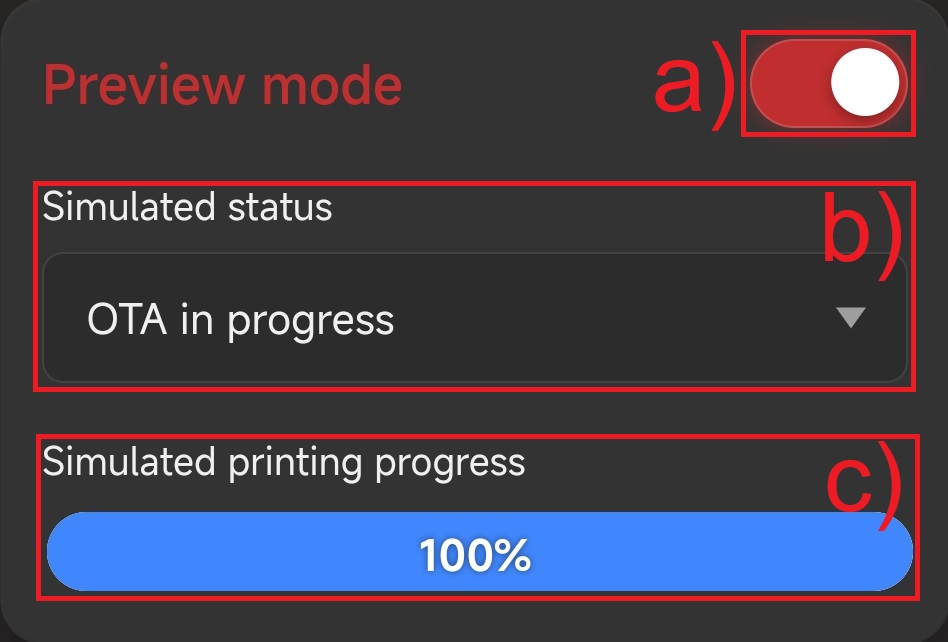
③ Preview Mode
Use this mode to test the device's light and sound effects. Select a simulated status to activate its corresponding alerts.
-
a) Toggle Preview Mode on/off.
Note: Preview Mode closes automatically if you exit the interface or log out.
-
b) Choose the simulated state. The device has the following 10 states:
- OTA in progress
- Unbound Printer
- Binding Printer
- Printer Idle
- Printing
- Print Paused
- Print Complete
- Printer Error
- Preparing Print
- Downloading Print File
-
c) Set the simulated print progress. This setting is only applicable for the Printing and Print Paused states.
-
-
④ Set the Device’s Light Effects

-
a) Toggle light effects on/off. This will only disable printer status light effects, but system-level status light effects will remain active.
-
b) Printer Idle (default is White)
c) Printing (default is White)
d) Printer Error (default is Red)
After clicking the corresponding button, an HSL color picker will appear, allowing you to set the color for each state.

-
1) HSL Color Picker (What is HSL?)
-
2) HSL Hue parameter range: 0 ~ 360°
-
3) HSL Saturation parameter range: 0 ~ 100%
-
4) HSL Lightness parameter range: 0 ~ 100%
-
5) The corresponding RGB hexadecimal value, where each value ranges from 0 ~ 255 (0x00 ~ 0xFF). You can adjust these values to select the desired color. For example, #FF5703 means:
- R (Red): 0xFF (255/255)
- G (Green): 0x57 (87/255)
- B (Blue): 0x03 (3/255)
-
6) The corresponding HSL values, H (Hue): 0 ~ 360°, S (Saturation): 0 ~ 100%, L (Lightness): 0 ~ 100%. For example, hsl(20, 100%, 51%) means:
- H (Hue): 20°
- S (Saturation): 100%
- L (Lightness): 51%
-
7) Preview area for the selected color.
-
-
e) Set the brightness for the Printer Idle, Printing, Print Paused, and Printer Error light effects.
-
-
⑤ Set the Device’s Sound Effects

-
a) Toggle sound effects on/off. This will disable all printer status sound effects, including Print Complete and Error sounds.
-
b) Set the sound effect for: Print Complete
c) Set the sound effect for: Error
Available sound options:
-
Pulse Frequency Alarm (default)
-
Status Notification Alarm (default)
-
Continuous Beeping Alarm (default)
-
Silent
-
User Custom Voice
-
-
d) Upload a custom Print Complete MP3 file.
e) Upload a custom Error MP3 file.
Note: Custom sounds are only available when User Custom Voice is selected. Only MP3 files under 288KB are supported.
-
f) Set the volume percentage for sound effects.
-
Other User Interface Descriptions
Wi-Fi & IP Interface
The first screen displayed in the Panda Alarm Web UI is the Wi-Fi & IP settings page.

-
① Enter the Wi-Fi & IP interface
-
② To reconfigure the Wi-Fi connection for Panda Alarm, click the Wi-Fi Network Configuration button to return to the Wi-Fi configuration screen.
Tip: Changing the Panda Alarm's Wi-Fi network will change its IP address, interrupting communication with devices on the old network. To maintain access during configuration, first connect your device directly to the Panda Alarm's hotspot, then update the network settings.
-
③ Once configured, ensure your devices are connected to the same Wi-Fi network as the Panda Alarm. Access the Web UI by entering its IP address in a browser. For convenience, bookmark this address.
-
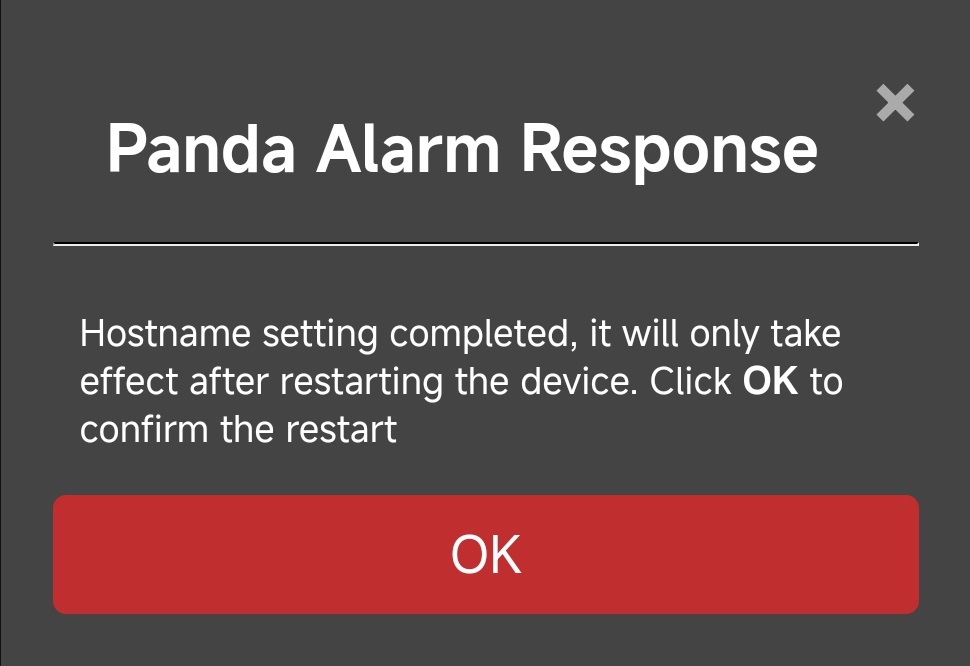
④ If your device is on the same network as Panda Alarm, you can access the Web UI using the hostname. The default hostname
PandaAlarm, accessible at http://pandaalarm.local (case-insensitive). If your device is using a VPN, this method may not work, and you should use the IP address instead.Users can customize the hostname by following these rules:
-
It must consist of letters (a-z, A-Z), numbers (0-9), and hyphens (-). The first character must be a letter.
-
The length must be between 8 and 32 characters.
After changing, click Set Hostname to apply the new hostname to Panda Alarm. A pop-up confirms the update was successful. The new hostname will take effect after a reboot. Click OK to reboot Panda Alarm immediately, or click the x button to close the window without rebooting.
-
AP Interface
The next screen in the Panda Alarm Web UI is the AP interface. The Panda Alarm AP controls the device's direct Wi-Fi hotspot. You can disable this hotspot, but it will automatically re-enable if the Panda Alarm loses its connection to the configured network, ensuring a fail-safe access point to reconnect if the configured Wi-Fi is unavailable.
Tip: If your device is connected to the Web UI through the Panda Alarm AP hotspot, disabling or changing the AP settings will disconnect your device. To maintain access, connect your device to the same Wi-Fi network as Panda Alarm before making any changes.

-
① Enter the AP interface.
-
② Enable/disable the Panda Alarm AP hotspot. Once disabled, you will no longer be able to connect to Panda Alarm through its hotspot. Before disabling, make sure to note the Panda Alarm IP address on the current Wi-Fi so you can still access the Web UI via IP.
-
③ Edit the Panda Alarm AP hotspot settings. The default configuration is:
Wi-Fi Name:
Panda_Alarm_xxxxxxxxxxxxWi-Fi Password:
987654321After changes, no reboot is required. The device will recreate the AP hotspot in the background.
-
④ Change the AP hotspot IP address. If the IP range conflicts with your router (for example, if both use
192.168.254.1), Panda Alarm will be unable to bind to the printer. To resolve this, change the Hotspot IP to a different range, such as192.168.253.1.After modifying the Hotspot IP, you must reboot the device for the new settings to take effect. If the following pop-up appears, the Hotspot IP has been successfully updated. Click OK to reboot Panda Alarm immediately, or click the x in the upper-right corner to close the pop-up without rebooting.
Wi-Fi password:
987654321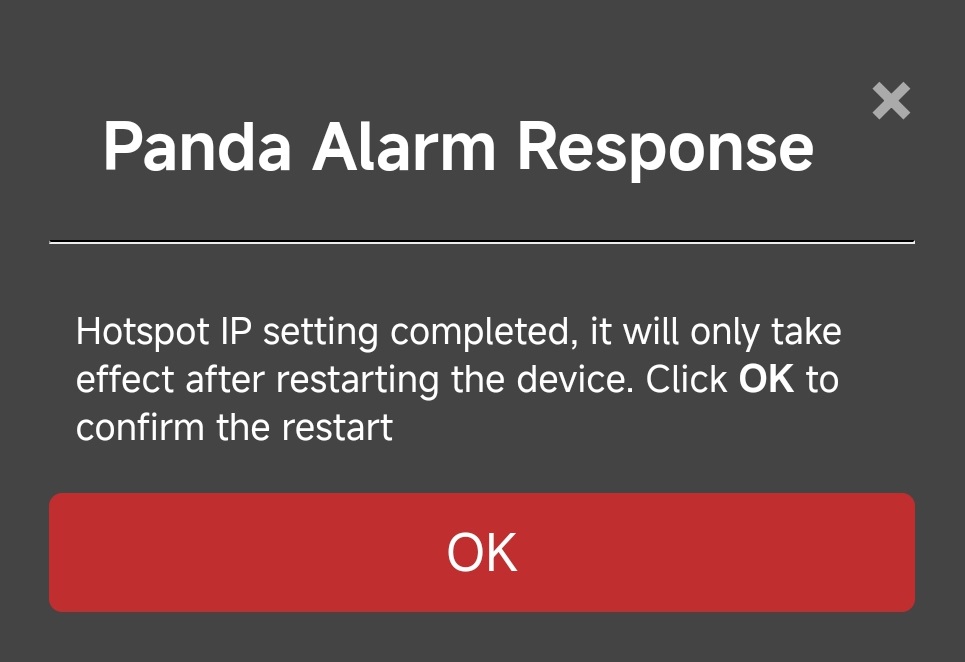
Settings

-
① Enter the
Settingsinterface -
② Choose the language for the Web UI
-
③ Device
sound effectaudio files data. Use this method to rewrite the factory default audio files only if the pre-installed audio files are corrupted. Note: Updating the .img file will overwrite theUser Custom Voice. -
④ Firmware information of the device
-
⑤ Restore Factory Settings
Restore Factory Settings
Restoring Panda Alarm to factory settings will erase all configurations, including language, connected Wi-Fi, custom hostname, custom AP hotspot name and password, bound printers, light effects, sound effects, and other settings. However, the
User Custom Voicewill be retained.
Restore Factory Settings via Web UI
-
Enter ① the
Settingsinterface, and click ② theRestore Factory Settingsbutton.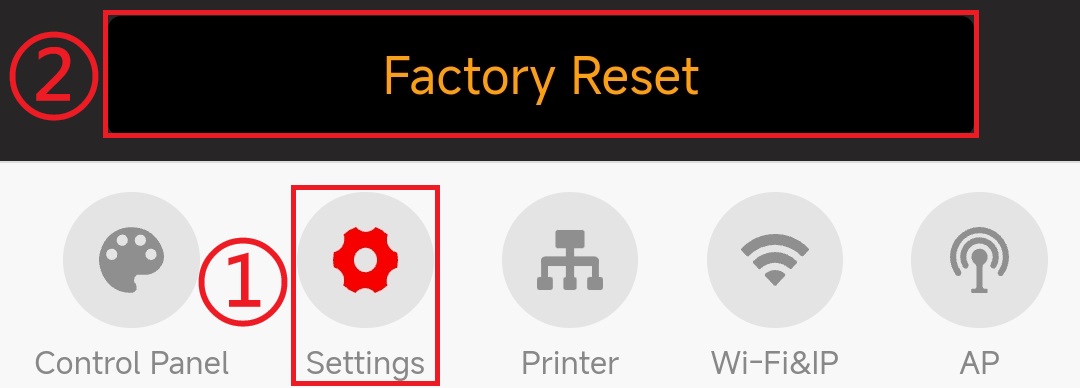
-
A confirmation pop-up will appear. Click ③
Yesto confirm the restoration of factory settings, and Panda Alarm will restore to factory settings and reboot.
Restore Factory Settings via Button
Use a sharp object to press and hold down the Recovery button for 5 seconds to initiate a factory reset and reboot.

Firmware
Feature Requests
To request new features for future firmware, please submit them to the Panda Alarm GitHub repository:
How to Update Firmware
OTA
-
Visit the Web UI configuration interface.
If Panda Alarm is already connected to Wi-Fi, you can connect the device to the same network and access the Web UI via IP to update the firmware. Alternatively, you can connect the device to Panda Alarm's AP hotspot to access the Web UI for the firmware update. You can choose either method.
-
Connect to the Wi-Fi network of Panda Alarm
-
Connect the device to the same Wi-Fi network as Panda Alarm (Wi-Fi or Ethernet).
-
Enter Panda Alarm's IP or hostname in the device’s browser. The default hostname is
http://pandaalarm.local. If using a VPN, the hostname access may not work; in which case, please use the IP to access the Web UI configuration page.
-
-
Update via Panda Alarm’s AP Hotspot
-
Connect the device to Panda Alarm’s AP hotspot.
Example using an
iPhone:-
On your home screen, go to
Settings->Wi-Fi. -
Turn on
Wi-Fi. Your device will automatically search for available Wi-Fi networks. -
Tap the network name starting with
Panda_Alarm, and enter the default password:987654321. -
After connecting to Panda Alarm’s Wi-Fi, a blue checkmark next to the network name and a Wi-Fi icon in the display's top-right corner will appear to confirm a successful connection.
-
-
After connecting to the AP, the network status should show
Connected (Login/Authentication Required). Tap this message to enter the Web UI configuration page. If the Web UI does not load after waiting 10-20 seconds, you can manually enter 192.168.254.1 in your browser to access the Web UI configuration page.
-
-
-
In the Web UI configuration interface, go to ①
Settings, click ②Select .bin File, then choose the firmware to update. After the update, the device will automatically reboot.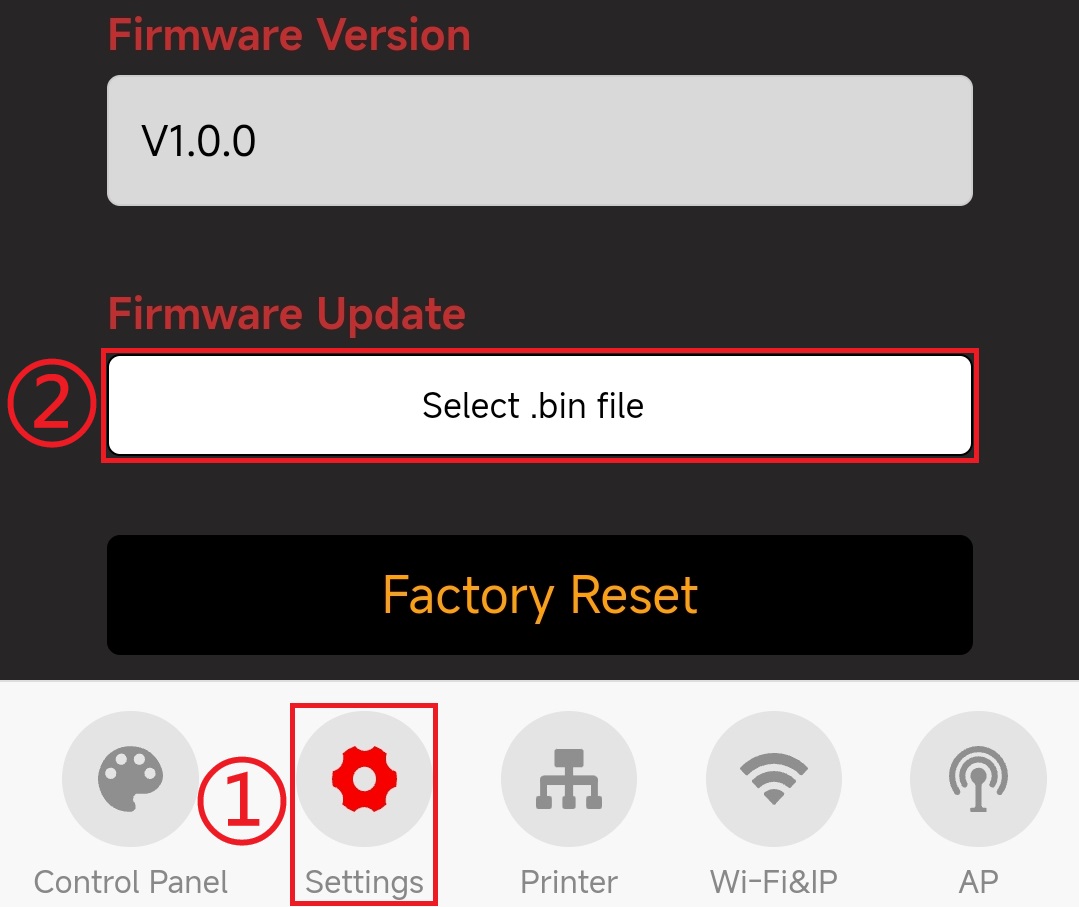
Flash Download Tool (Type-C Flash)
Note: Panda Alarm should support OTA updates freely. This manual update method is only required if the standard OTA update fails.
-
If your computer does not have the CH340 driver, please download and install it before continuing: CH341SER.EXE
-
Download Flash Download Tool

-
Download the Panda Alarm Firmware
-
Connect Panda Alarm to your computer using a
Type-Ccable. The device manager should automatically recognize a new COM port.
-
Open
flash_download_tool_3.9.8_6.exe, and configure it as shown below:ChipType:
ESP32-C3WorkMode:
DevelopLoadMode:
UART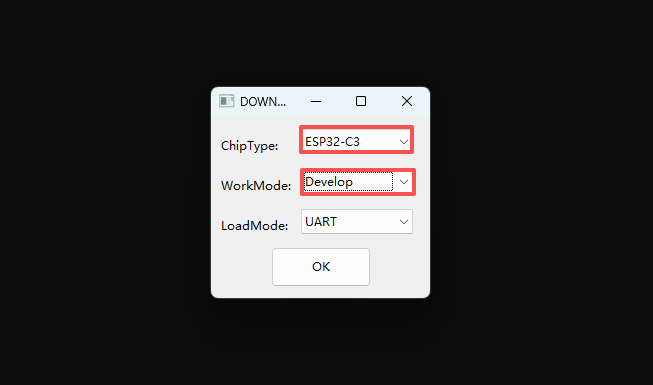
-
The flash tool configuration is as follows:

-
① Set the
.binfile burn address, and ensure the checkboxes are selected:panda_alarm_bootloader.binto0x0000panda_alarm_partition.binto0x8000panda_alarm_ota_data.binto0xe000panda_alarm_v1.0.0.binto0x10000panda_alarm_v1.0.0.imgto0x350000(audio file)
-
② Set the COM port to Panda Alarm’s actual port (viewable in your computer's
Device Manager->Ports), and set an appropriate baud rate. We recommend using460800. -
③ Click
STARTto begin flashing. Wait for the process to complete, then turn the device off and on to restart.
-
Firmware History
V1.0.0
- Initial factory release.
FAQ
-
Q: How is the
Printer Errorstatus recognized?
A: The system monitors theHMSandprint_errorfields in the MQTT data frame. An error is reported when their values match the following criteria:-
print_error: (Refer to this link for the meanings of the corresponding values)
The following values will be ignored and not considered as errors:0x0500401x(x means any value except4)
0x0500402x(x means any value exceptD,E,F)
0x05014xxx(x means any value)
0x07FE8006,0x07FE8007,0x07FEC006,0x07FEC009,0x07FEC00A,0x07FEC010,0x07FEC011,0x07FEC012,
0x07FF8006,0x07FF8007,0x07FFC006,0x07FFC009,0x07FFC00A,0x07FFC010,0x07FFC011,0x07FFC012,
0x18FE8006,0x18FE8007,0x18FEC006,0x18FEC009,0x18FEC00A,
0x18FF8006,0x18FF8007,0x18FFC006,0x18FFC009,0x18FFC00A,
0x05008079,0x03008054,0x03004067,
0x0300400C,0x0500400E,
0x05008030,0x0500C011,0x0C008002,
0x05004001,
0x0300800C,0x03008013,
0x12FF8007,0x12FFC003Any other values will be treated as errors.
If an error status is not triggered when it should be, or is triggered incorrectly, please report the issue on Github, including the
HMSandprint_errorvalues from Bambu Studio or Bambu Handy, or simply provide a screenshot of the error message. if you don't know the values.
Technical Support
Was this page helpful? If you have further questions about product usage or encounter other issues, please contact customer support: support01@bigtree-tech.com