Panda Cooler A1

- Product Link: Click to Buy
Revision Log
| Version | Date | Update Notes |
|---|---|---|
| v1.00 | Sept 8, 2025 | Initial Release |
Introduction
The Panda Cooler A1 is a high-performance printhead upgrade for your Bambu Lab A1 or A1 mini. This plug-and-play accessory actively cools the stepper motor, reducing temperatures by 15-25°C to ensure reliable performance during long prints. It also features a customizable RGB fan and nozzle light, allowing you to personalize your printer's style. It’s the perfect combination of enhanced functionality and sleek design.
Feature Highlights
-
Smart Cooling System: Powered by an integrated ESP32 chip, the Panda Cooler A1 intelligently monitors your print status. It automatically activates to cool the stepper motors while printing and turns itself off during pauses or when the print is done, ensuring a quiet and energy-efficient workspace.
-
H2D Style Status Color Indicator: The RGB lighting does more than just look good—it shows your print's progress. The colors display through clear stages (eg.; 30%, 60%, and 100% complete) so you can see how your print is doing from across the room.
-
Multiple Lighting Effects: Personalize your printer with 16 million colors and a variety of dynamic lighting effects to match your unique style and workspace aesthetic.
-
Independent Nozzle Lighting: A dedicated lighting system provides both style and function. Sync the nozzle light with the fan's RGB for a unified glow, or switch to adjustable white light for clear visibility to check print details and first-layer adhesion.
-
Web UI Wireless Control: Effortlessly customize your lighting through an intuitive web interface. You have full control over modes, colors, effects, brightness, and animation speed.
Specifications
-
Product Name: BIQU Panda Cooler A1
-
Shell Material: ABS
-
MCU: ESP32-C3-MINI-1-H4
-
Input Voltage: DCIN = DC24V
-
Logic Voltage: DC3.3V
-
Maximum Output Current: Rated: 0.25A
-
Compatibility: For Bambu Lab A1, A1 mini 3D Printer
Installation Guide
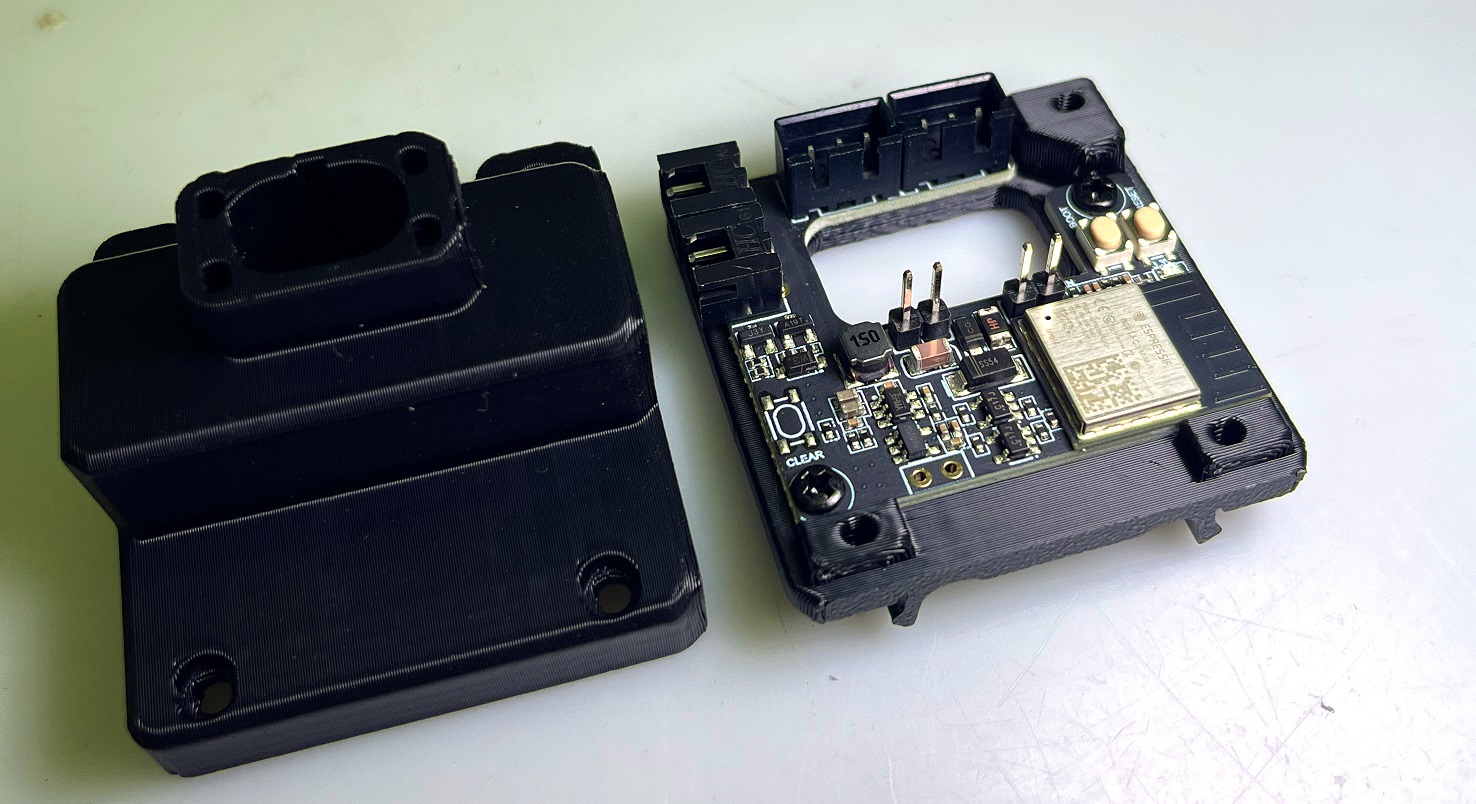
Package Contents
Please refer to the image below to verify the contents of your product package.

Installation Steps
-
Step 1: Preparation
Peel off the backing and apply the two adhesive washers over the mounting holes on the back of the nozzle light PCB.

⚠️ Note: Ensure the gaskets are applied to the side without LED beads.
-
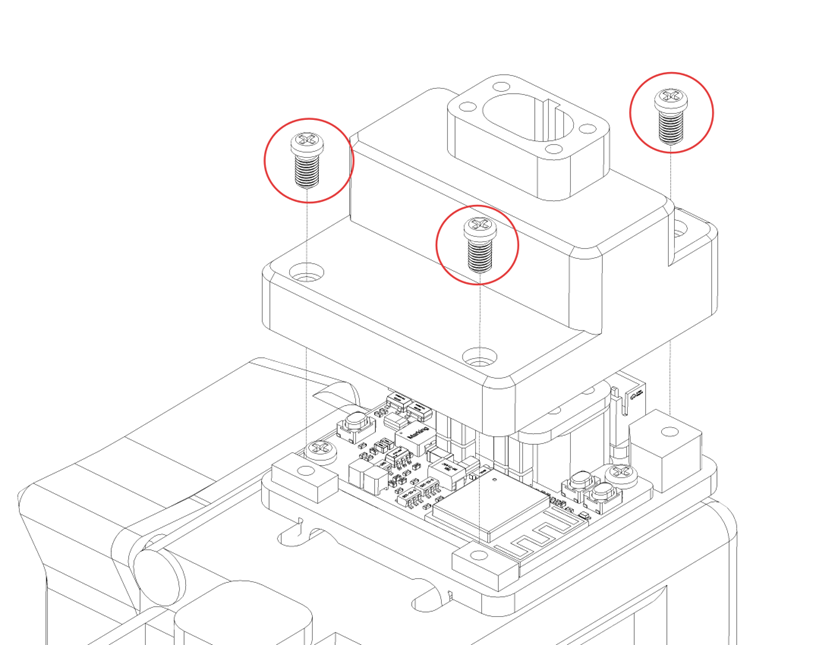
Step 2: Remove Original Screws
Remove the four original mounting screws.
-
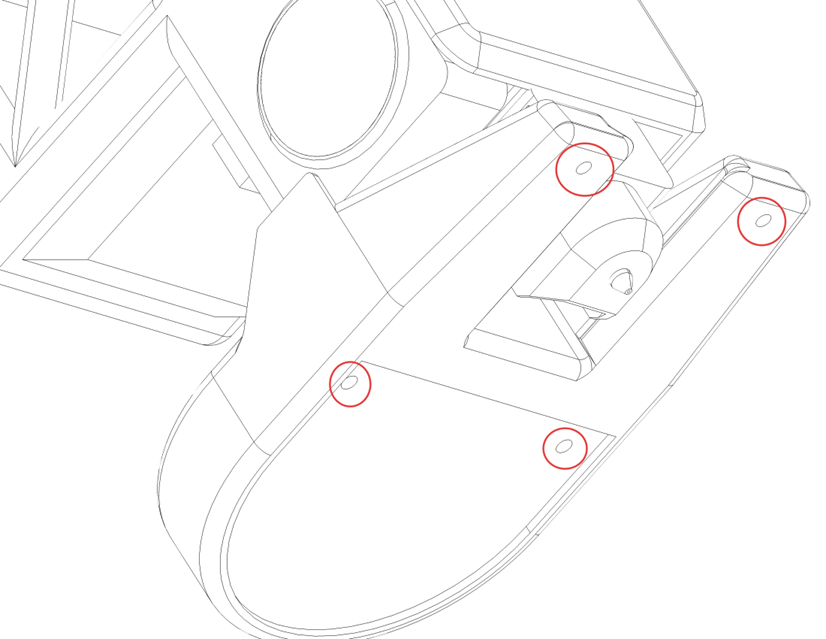
Step 3: Install Nozzle Light
Mount and secure the nozzle light using the included M1.7×8 and M1.7×10 self-tapping screws.
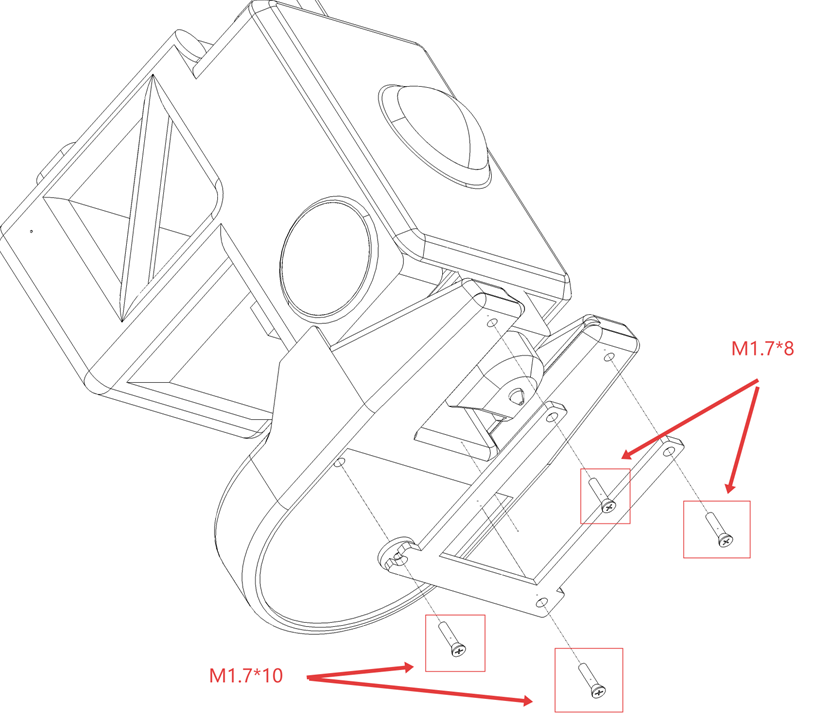
Important: The LED side must face toward the heated bed.
-
Step 4: Install RGB Fan Module
Secure the RGB fan module to the bracket on the left side of the printhead by simply clipping it on. Ensure it is firmly and evenly attached.
<img src=img/PandaCoolerA1/install4.png width="400"/>
-
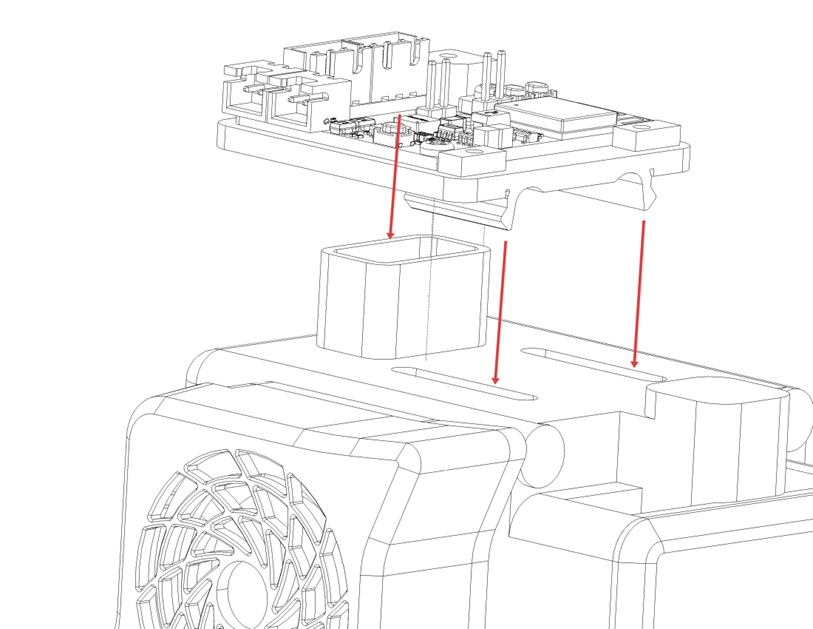
Step 5: Install Controller Module
- Separate the controller module into housing and control board PCB.
- Insert the control board into the two slots located above the printhead.
-
Step 6: Connect Power Supply
Insert the power tap into the USB port.

Key Point: Ensure all 4 pins are fully inserted and the connector is flush with the port.
-
Step 7: Secure Controller Module Housing
Use the included M2.6×8 self-tapping screw to secure the controller module housing to its PCB.
-
Step 8: Secure Type-C Cable
Use the included M2×25 self-tapping screw to secure the original Bambu Type-C cable.

-
Step 9: Connect Fan Power
Connect the cooling fan’s 2-pin connector to the 2-pin port shown in the diagram.

-
Step 10: Connect RGB Light Connector
Insert the fan RGB light connector into the corresponding 3-pin interface at the rear.
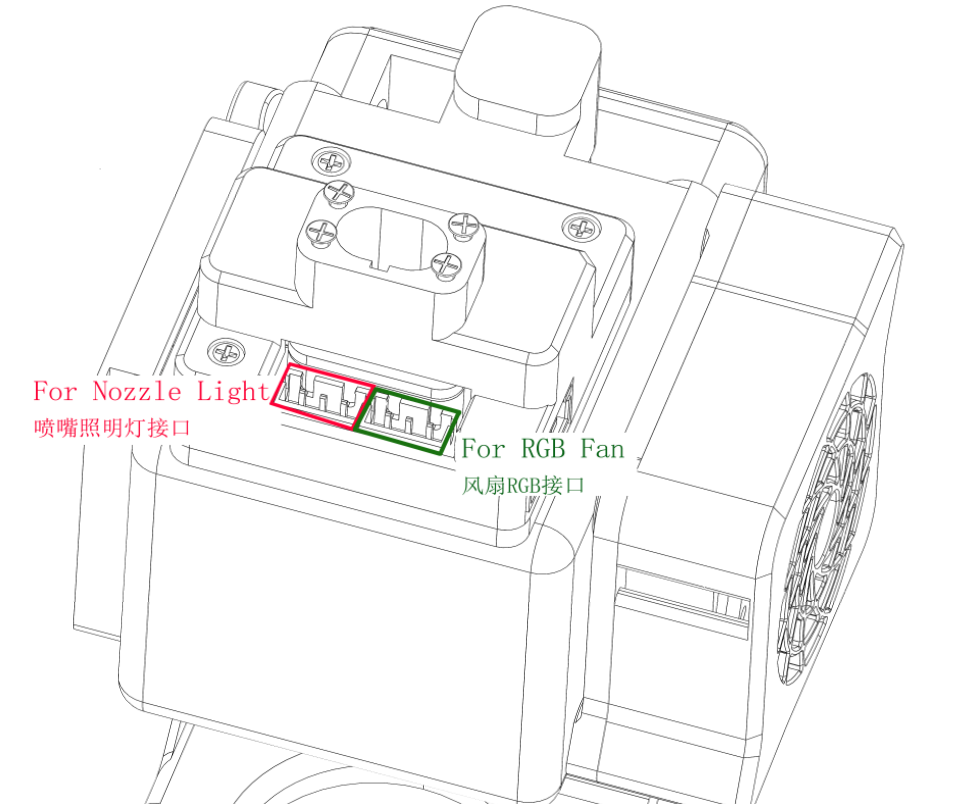
⚠️ Warning: Carefully verify the interface to avoid incorrect connections. Do not connect the bottom nozzle light connector at this time.
-
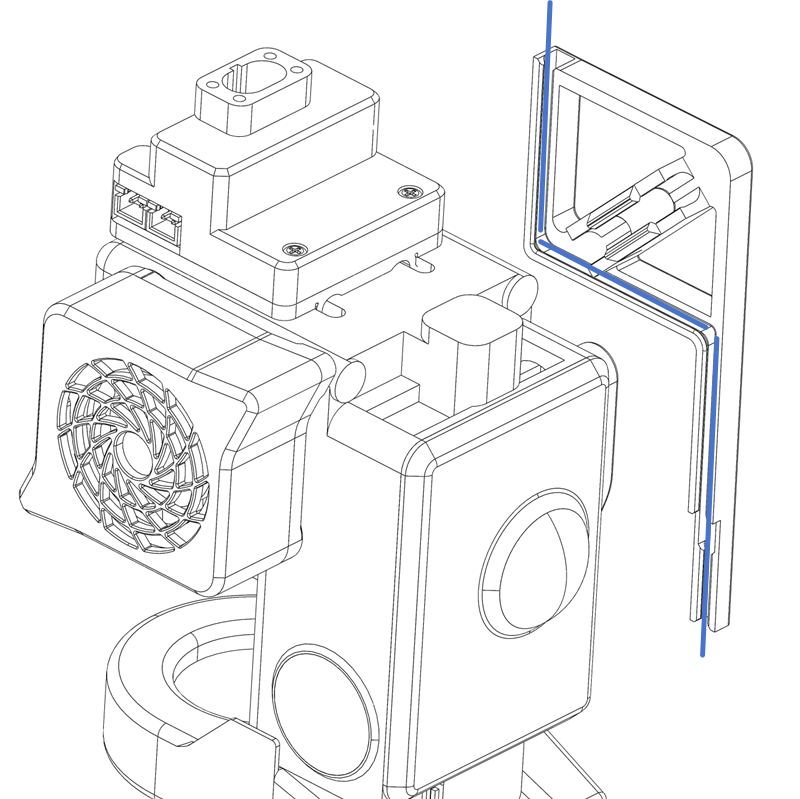
Step 11: Organize Wiring
Route the nozzle light wires into the cable guide slot.
-
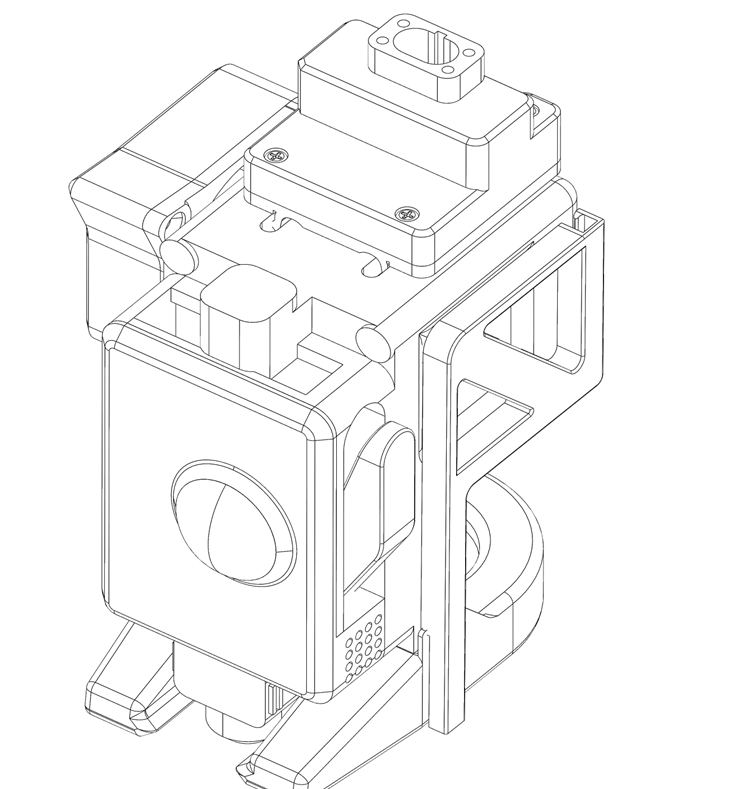
Step 12: Complete Installation
-
Secure the cable guide to the right-side bracket, ensuring it is firmly attached.
-
Connect the nozzle light connector to complete the installation.
-
First Connection
When you power up for the first time or restore factory settings, you'll see a flowing blue light, indicating that Panda Cooler A1 is not yet bound to the printer.
WiFi Connection Guide
-
Connecting to the Panda Cooler A1's WiFi_AP Hotspot
Panda Cooler A1 AP hotspot:
Panda_Cooler_A1_XXXXXXXXXX.The default password is
987654321.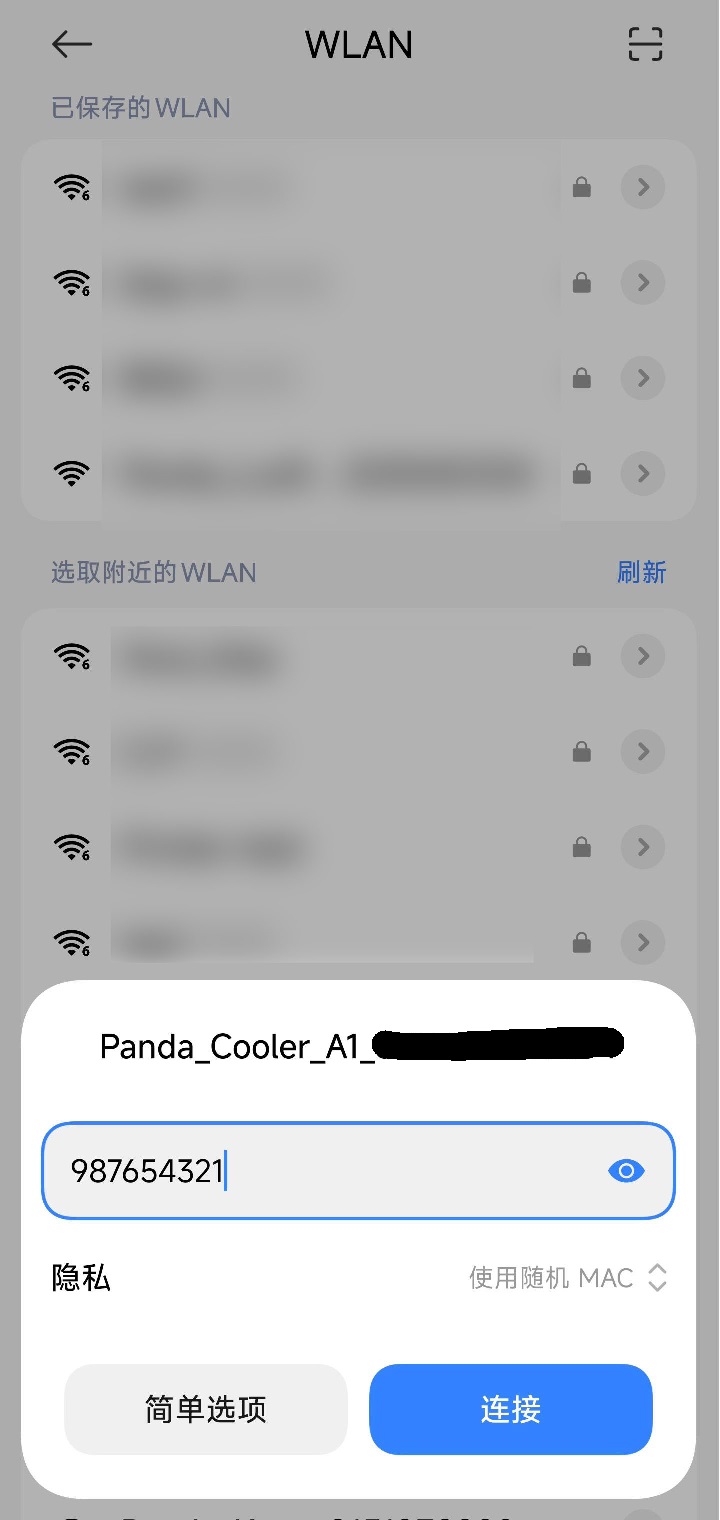
-
Accessing the WebUI
After connecting to the AP, open a browser on your computer and enter the default IP address:
192.168.254.1. On mobile devices, the Panda Cooler A1 Web UI will automatically appear, or you can manually enter the IP address in the browser:192.168.254.1(factory default IP). -
Select Language (Default: English)
After selecting a language, tap
Next.
-
WiFi Connection Page
-
Scan WiFi
After setup or a factory reset, this page will automatically scan for Wi-Fi networks. If your network doesn't appear, tap the "Scan" button to search again.
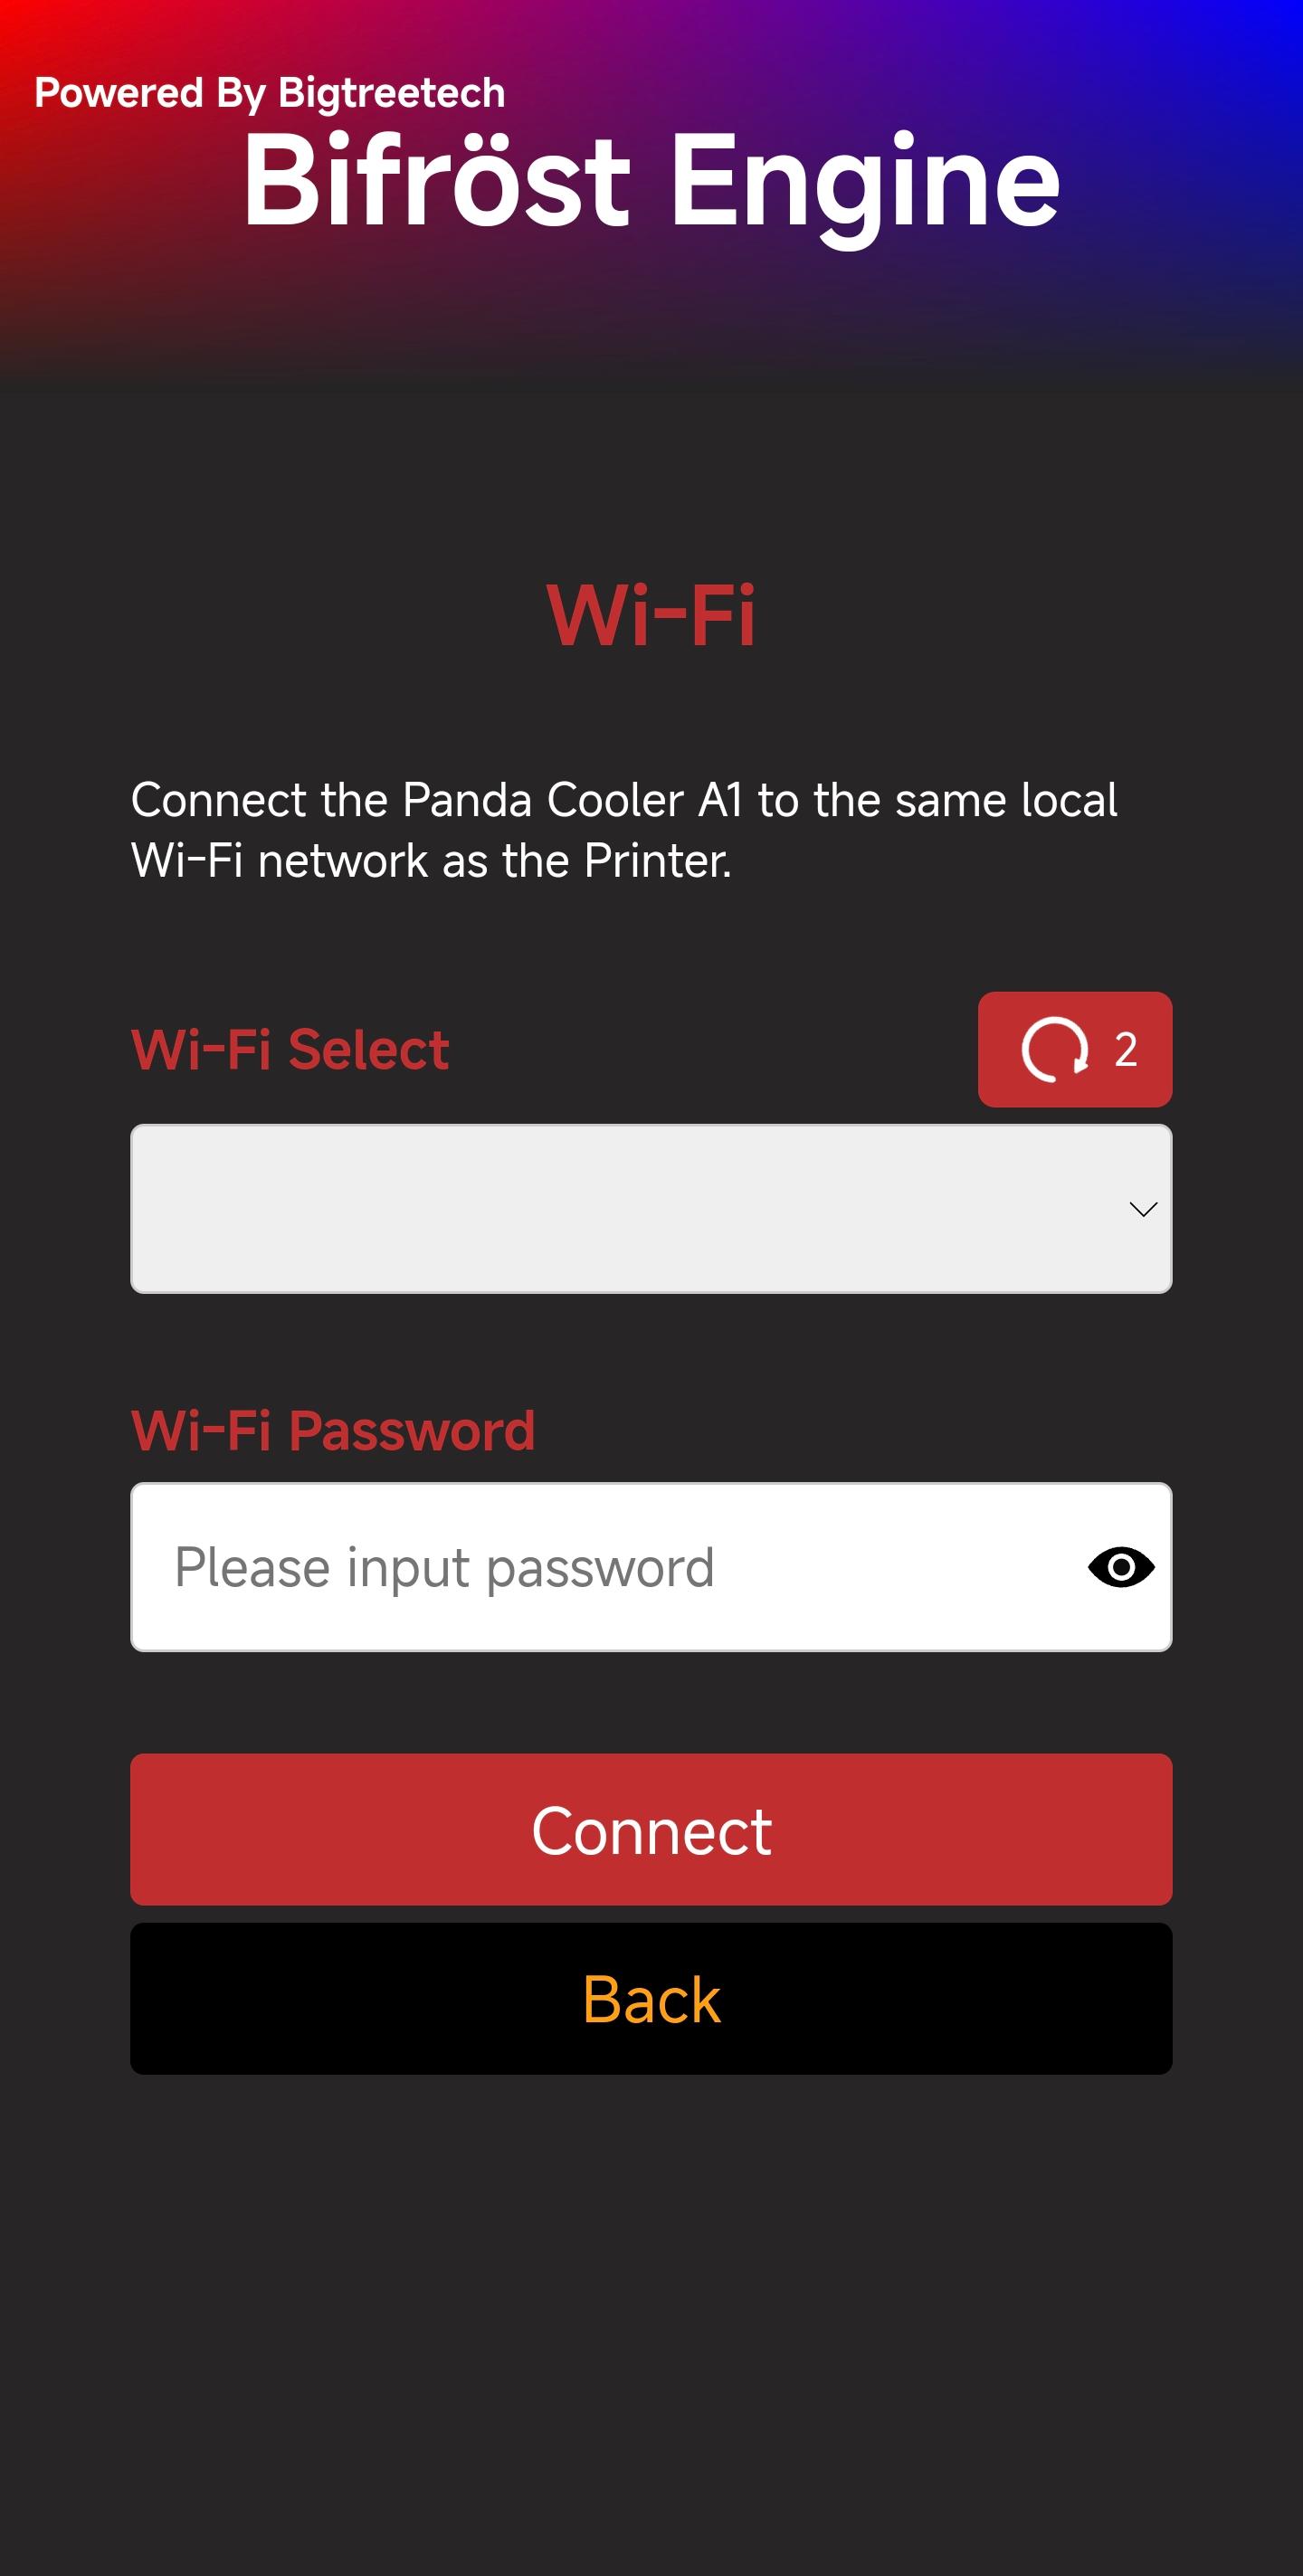
Once the scan is complete, a pop-up will appear notifying you that the scan is finished.

Select the WiFi network you want to connect to.

-
Connect to WiFi
Type your password and tap the
eye iconif you'd like to see the password you've entered.
Tap Connect, and the interface will switch to the WiFi connection page, showing
Connecting to WiFi.
After a moment, a pop-up will appear to confirm the WiFi connection status
Connection Failed:

Connection Successful: You can either bind the printer and proceed to the printer interface or tap
Cancelto stay on the WiFi page.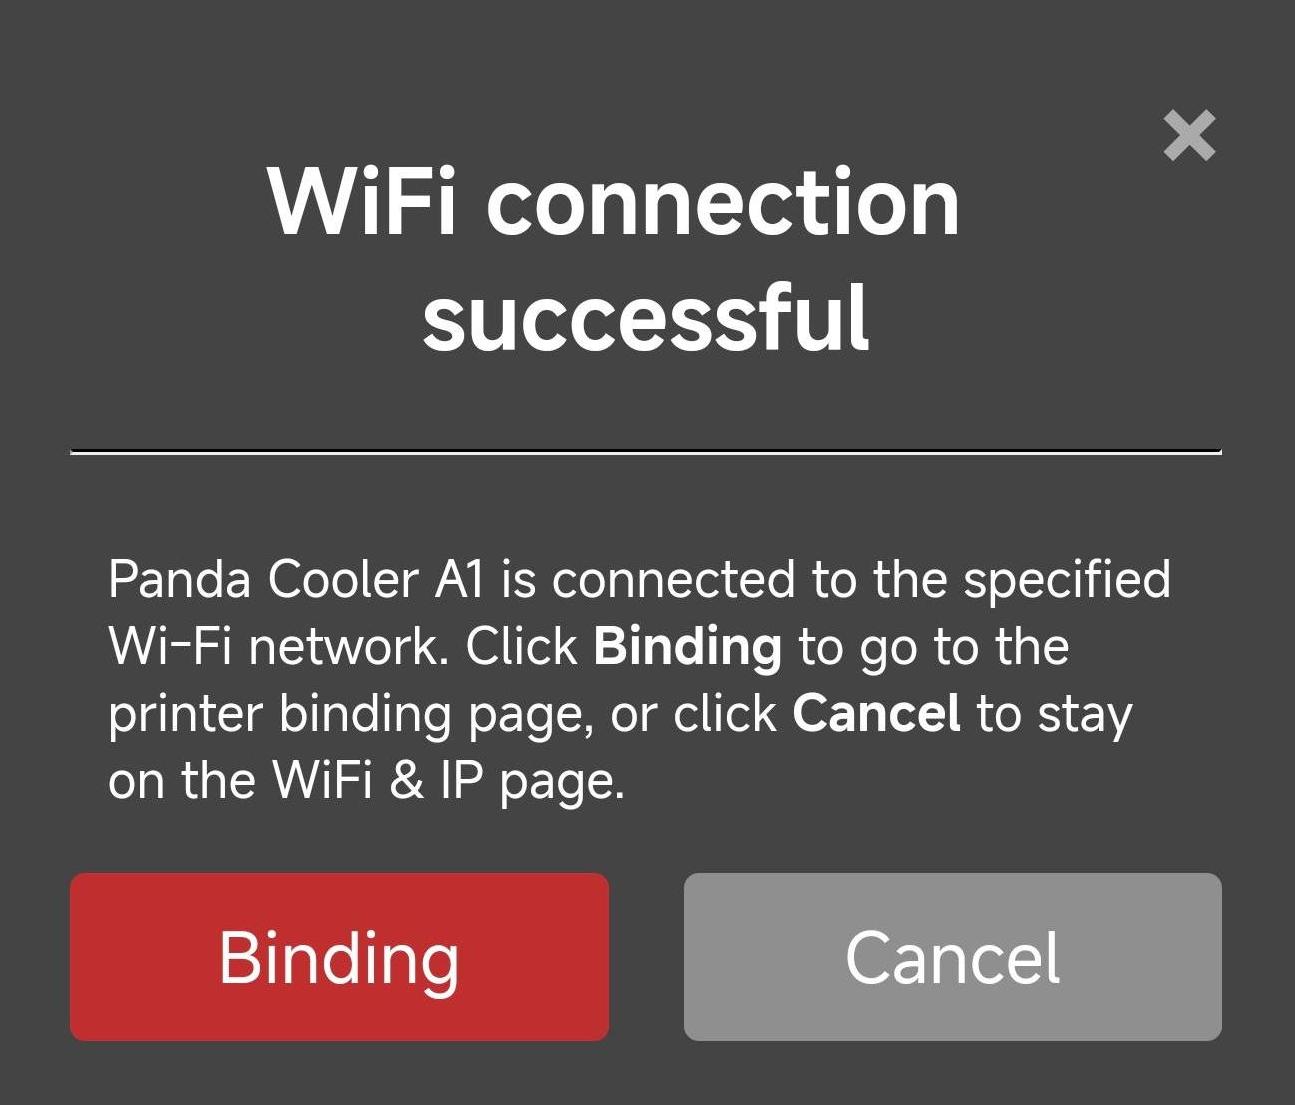
-
Printer Binding Page
-
Feature Introduction

-
① Printer Page Selection: When you tap the icon, it will turn red to indicate that you are on the Printer page.
-
② Scan for Printers on the Same Local Network
-
③ Select the Detected Printer
-
④ Enter Printer's SN Code
-
⑤ Enter Printer's Access Code
-
⑥ Enter Printer's IP Address
-
⑦ Confirm to Bind This Printer
-
-
How to Bind a Printer
-
Tap the
Scanbutton. After a short wait, a pop-up will appear confirming that the scan was successful.
-
Select the printer from the list. The printer's SN code and IP address will automatically fill in.

-
Enter the printer's
Access Code-
Find the
Access Codein the printer (Using A1 series printer as an Example)-
①
Settings
-
② -> ③
LAN Only Mode
-
④
Access Code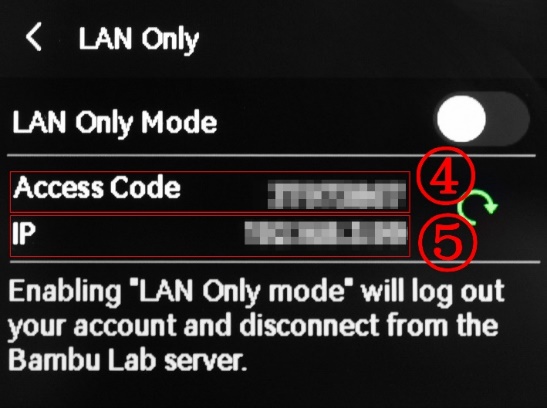
-
-
Enter
Access Codein the input box, and tapBindto bind the printer.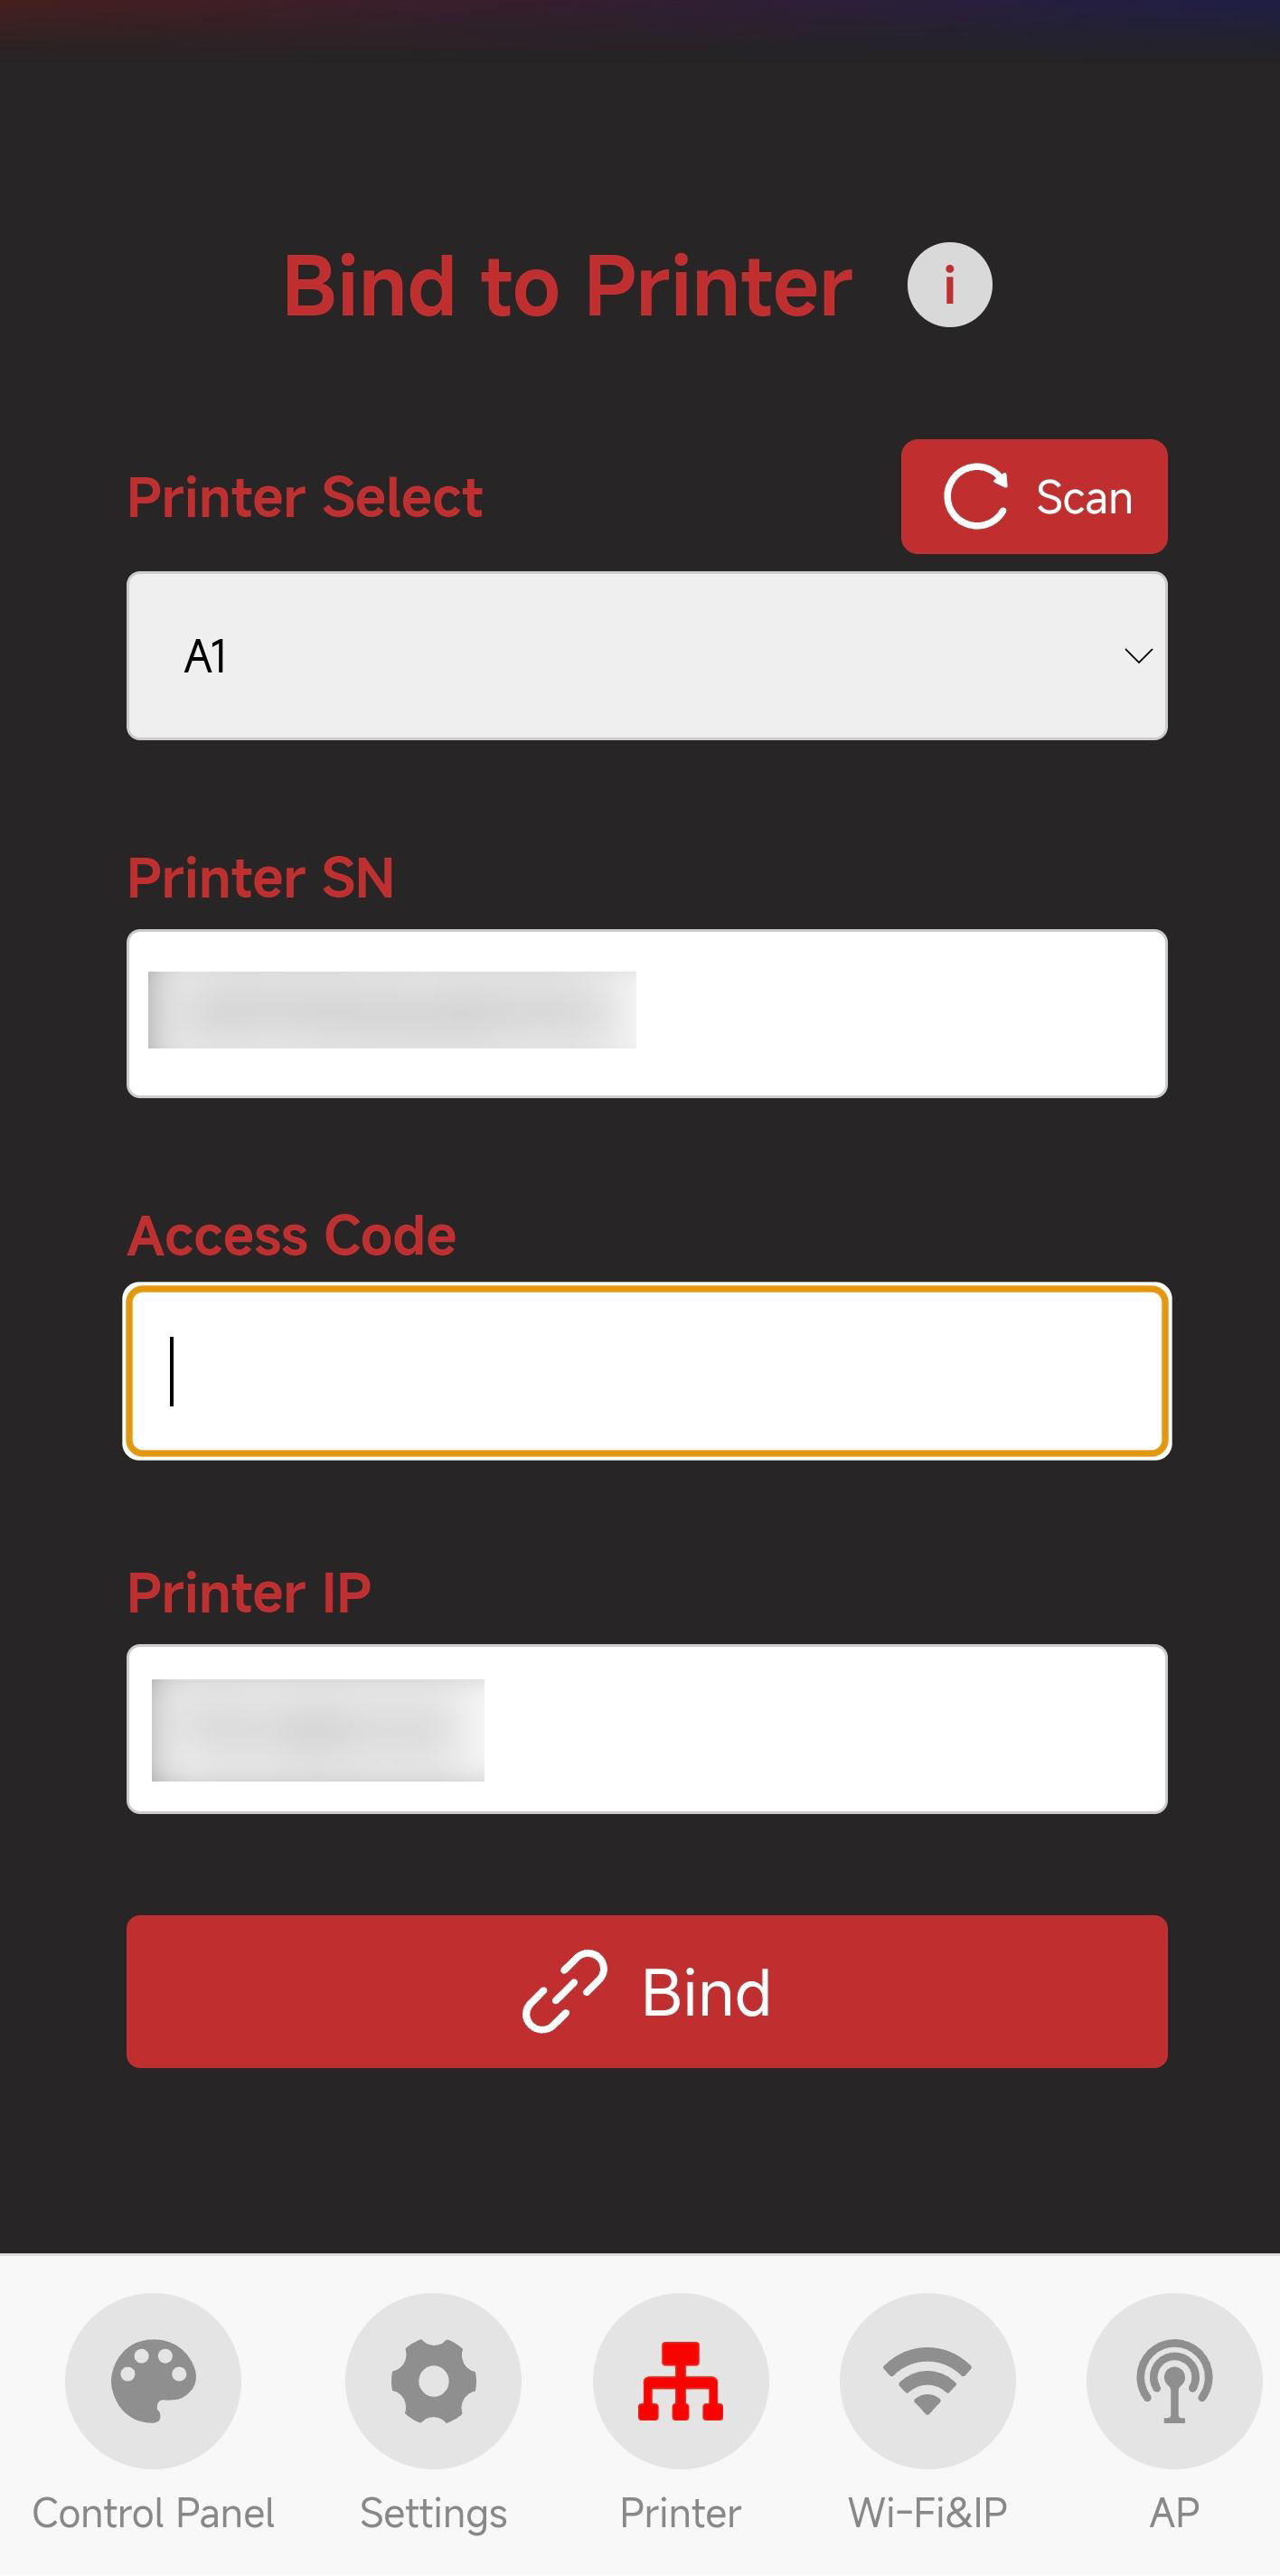

-
-
Introduction to Each Page
WiFi Page

-
① WiFi Page Selection: When you tap the icon, it will turn red to indicate that you are on the WiFi page.
-
② Current WiFi Connection Status
-
③ IP Address Icon: Tap the icon to display a pop-up. If the IP field is blank, ensure Panda Cooler A1 shows "Connected." If it says, "Not Connected," check your network settings.
-
④ IP Address Display: Entering this IP in your browser will take you to the Web page, as long as you're on the same local network.
-
⑤ WiFi Network Configuration Button: tap to go to the WiFi connection page
-
⑥ Host Name: The default hostname is "PandaCooler." If you forget the IP, you can use the hostname followed by "local" in the browser (e.g., http://PandaCooler.local). To modify the hostname, tap the text box to edit it, then tap "Set Hostname" to confirm.
-
⑦ Confirm Hostname Modification
AP Page

-
① AP Page Selection: When you tap the icon, it will turn red to indicate that you are on the AP page.
-
② AP Hotspot Switch
-
③ AP Name: Default is
Panda_Cooler_A1_XXXXXXXXXX -
④ AP Password: Default is
987654321 -
⑤ Hotspot IP: Default Hotspot IP is "192.168.254.1." If your router's IP range is "192.168.254.xxx," an IP conflict will prevent the device from binding to the printer. Change the Panda Cooler A1 hotspot IP to a different range.
-
⑥ Confirm Button: Tapping this button will restart the device. After the restart, you can connect to the AP hotspot.(How to connect to the AP hotspot)
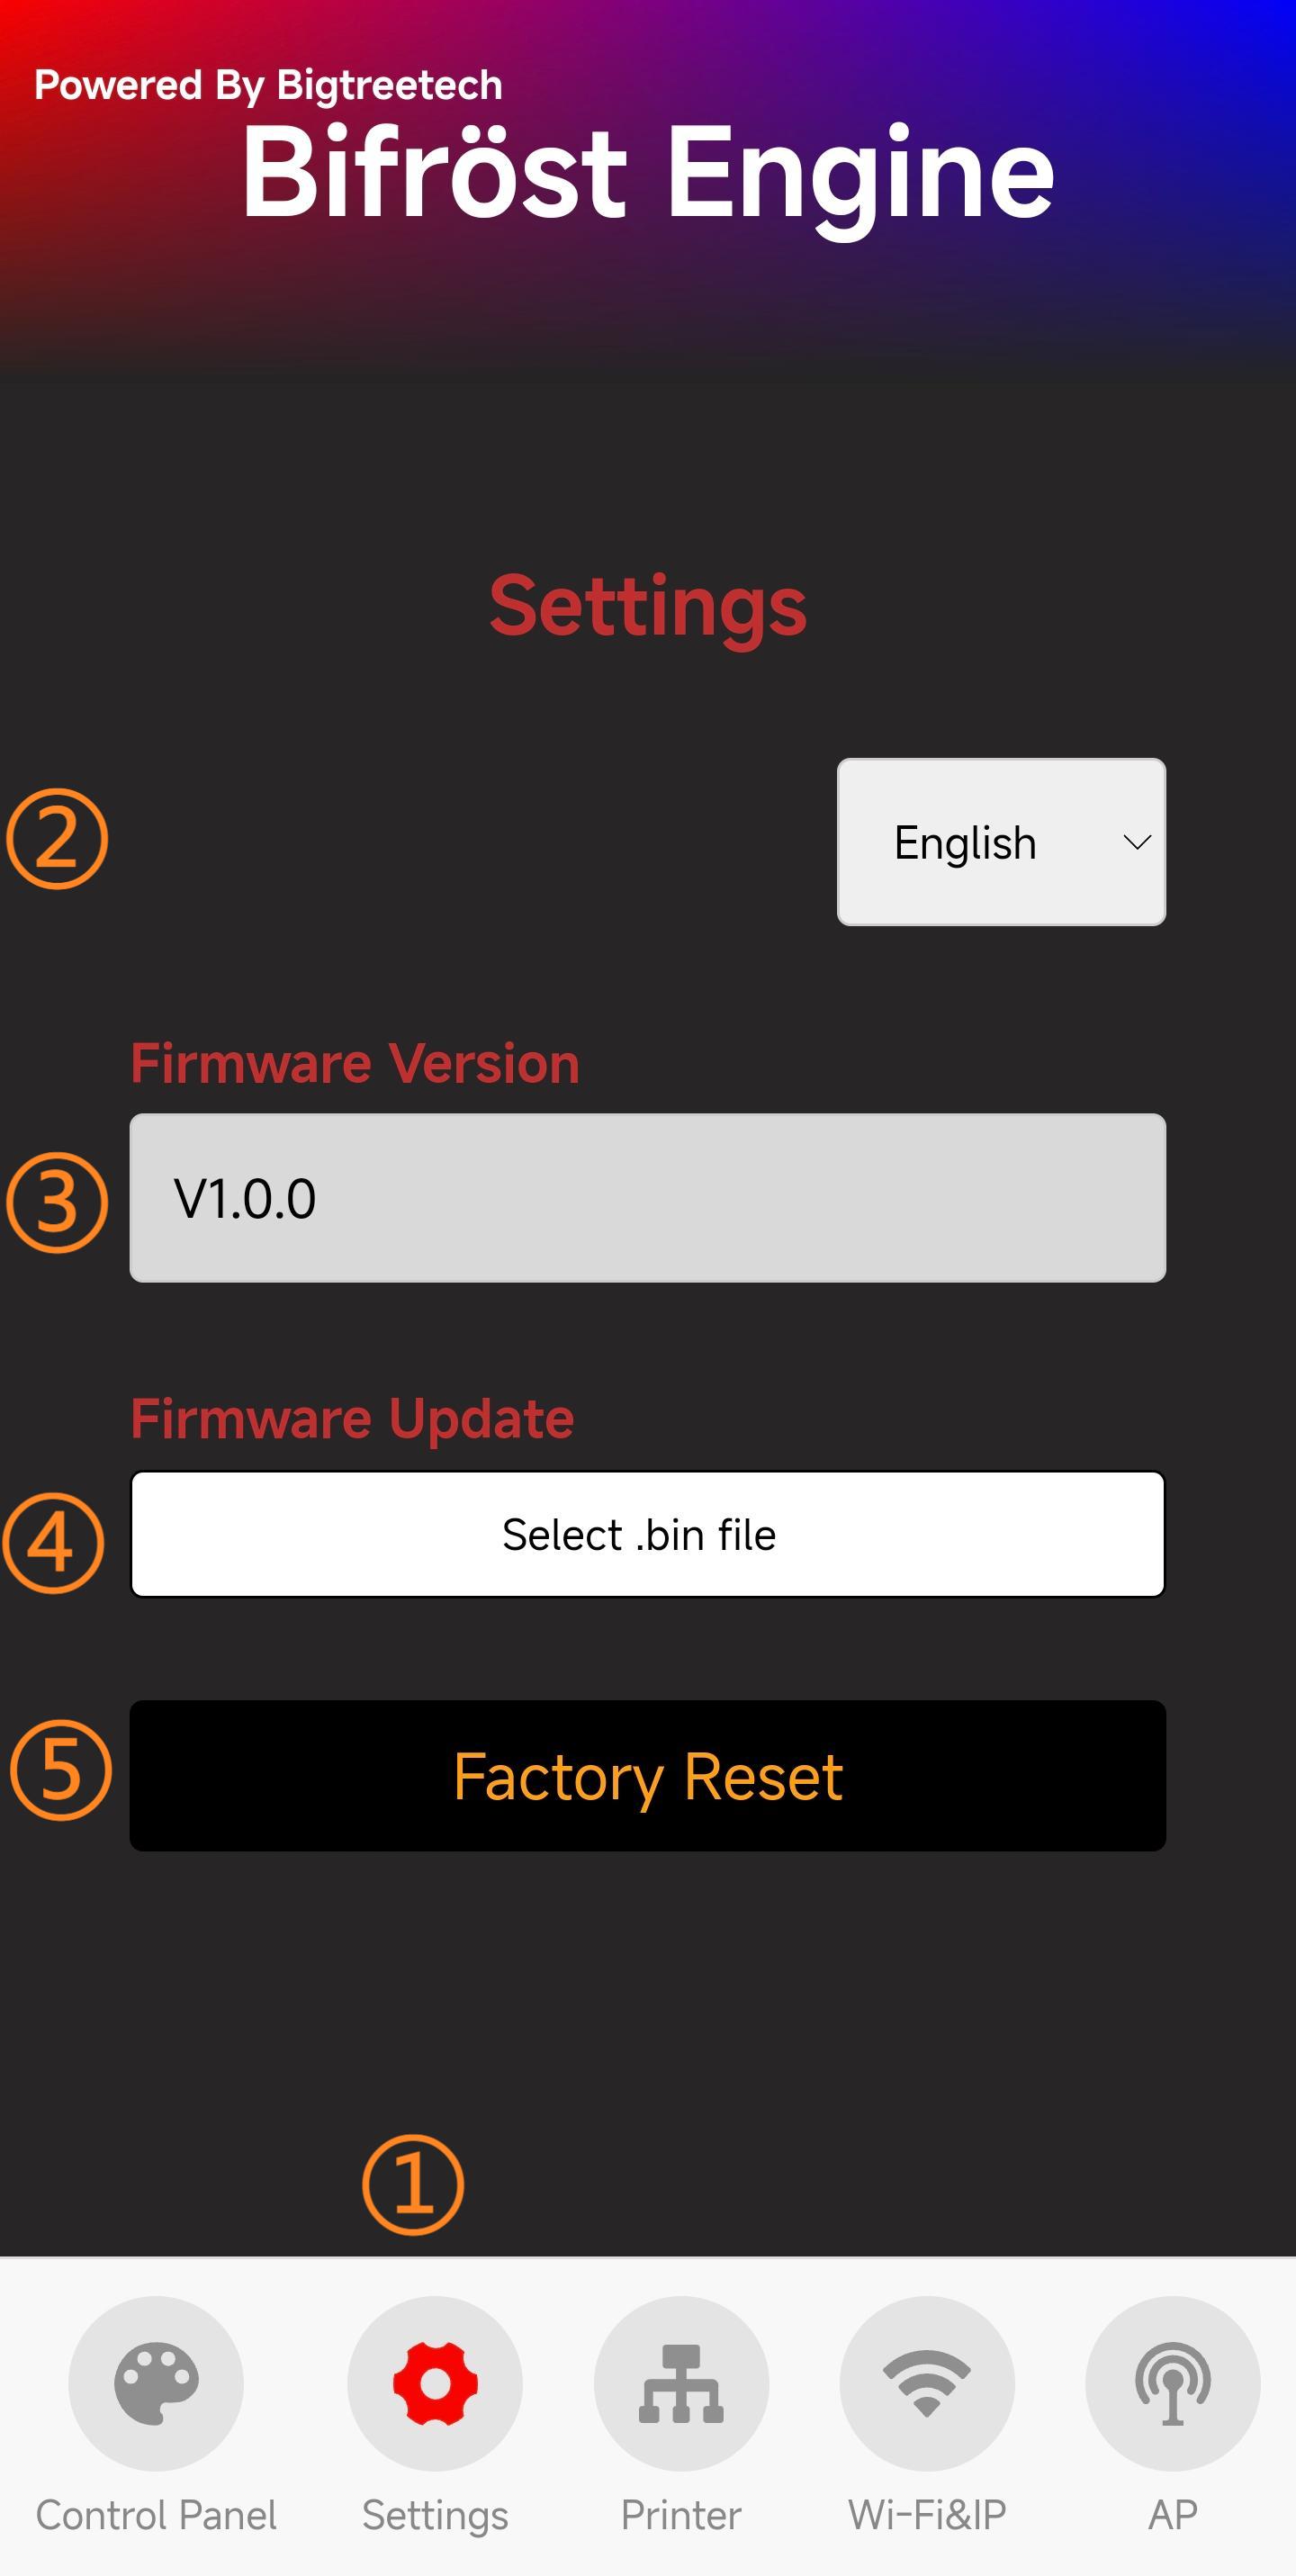
Settings Page
-
① Settings Page Selection: When you tap the icon, it will turn red to indicate that you are on the Settings page.
-
② Choose Language (Default: English)
-
③ Show Current Firmware Version
-
④ Firmware OTA Update:
-
Tap the 'Select .bin File' button to choose the bin file that requires OTA.
-
Wait for the progress to complete, and the device will automatically restart once the update is finished.

-
-
⑤ Tap to Confirm Restore Factory Settings
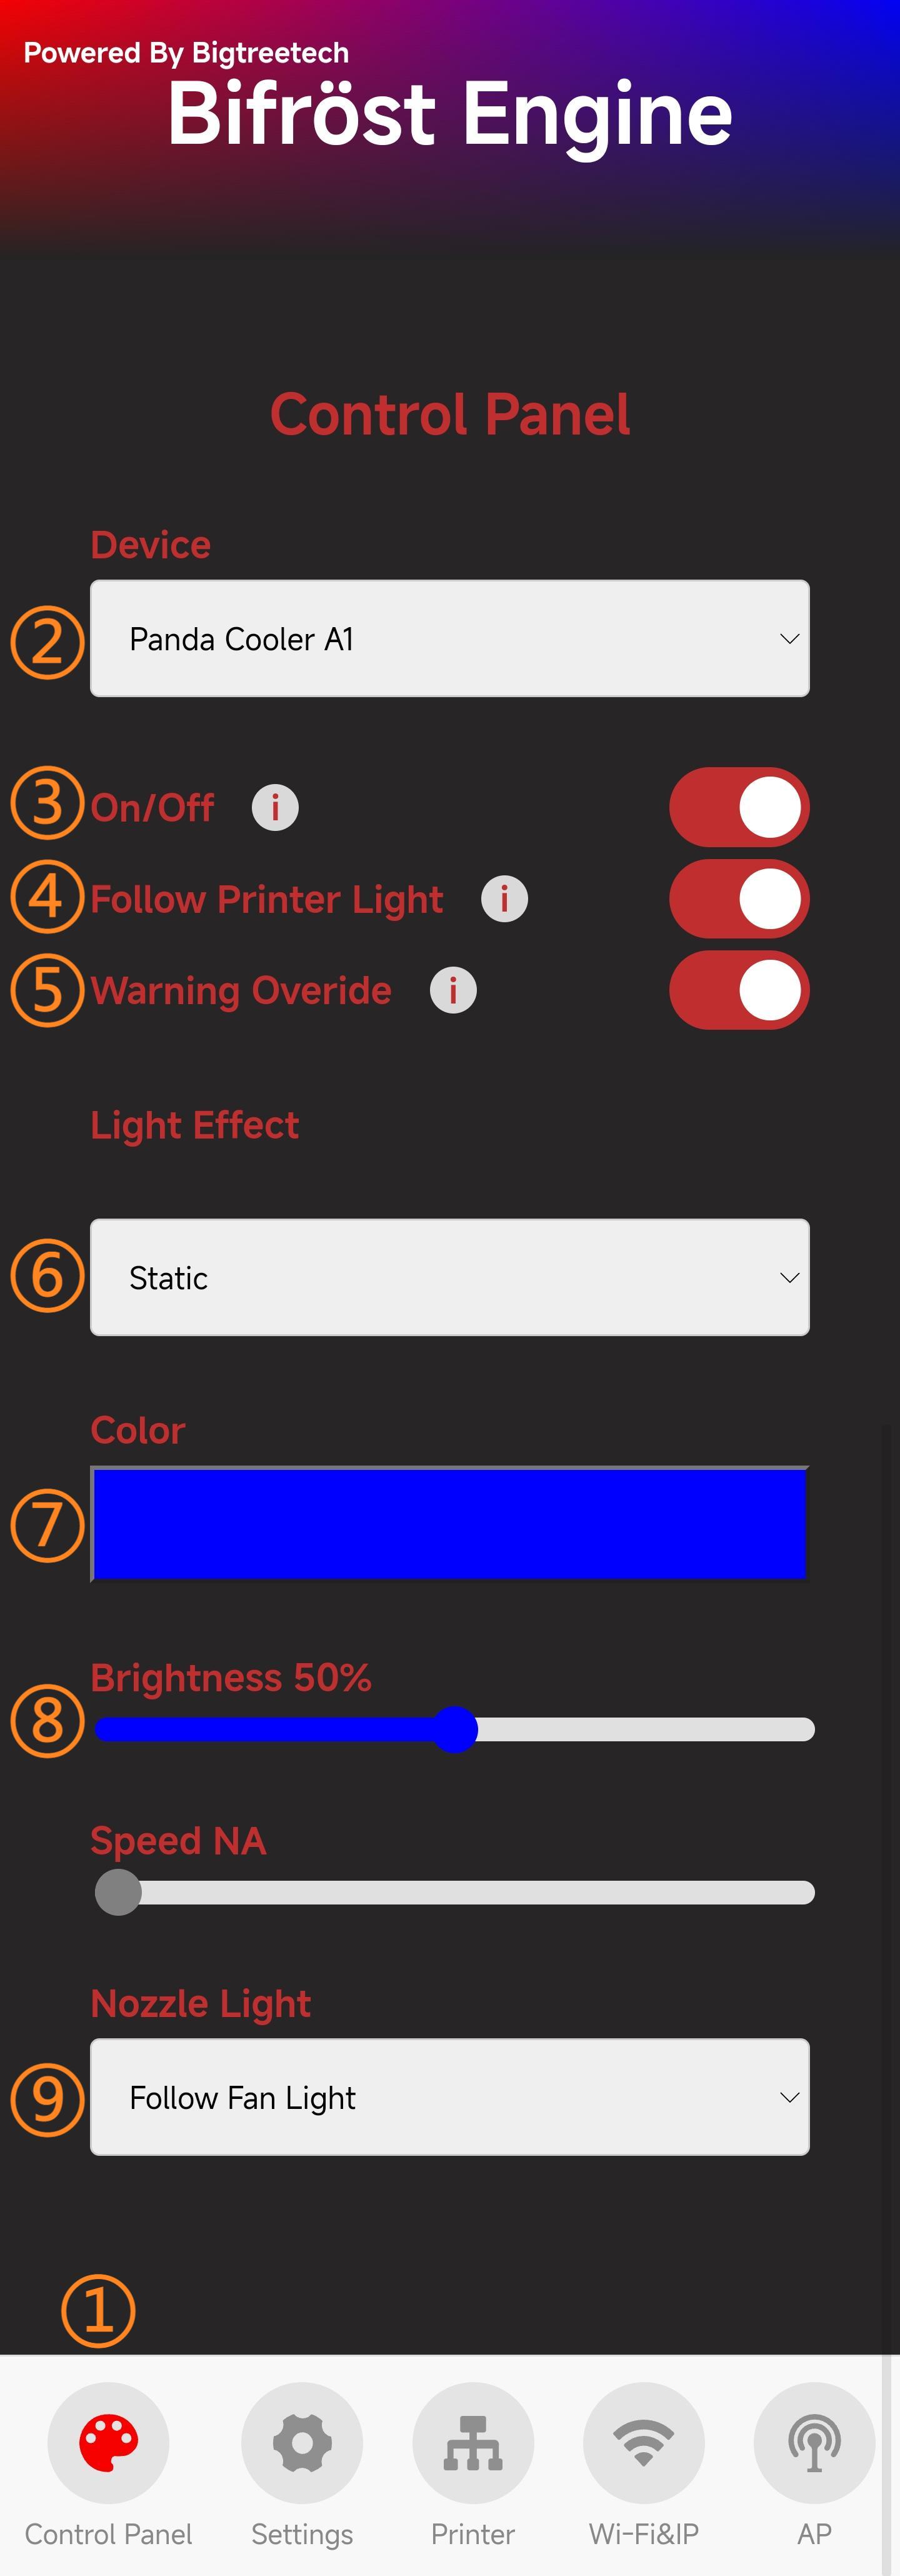
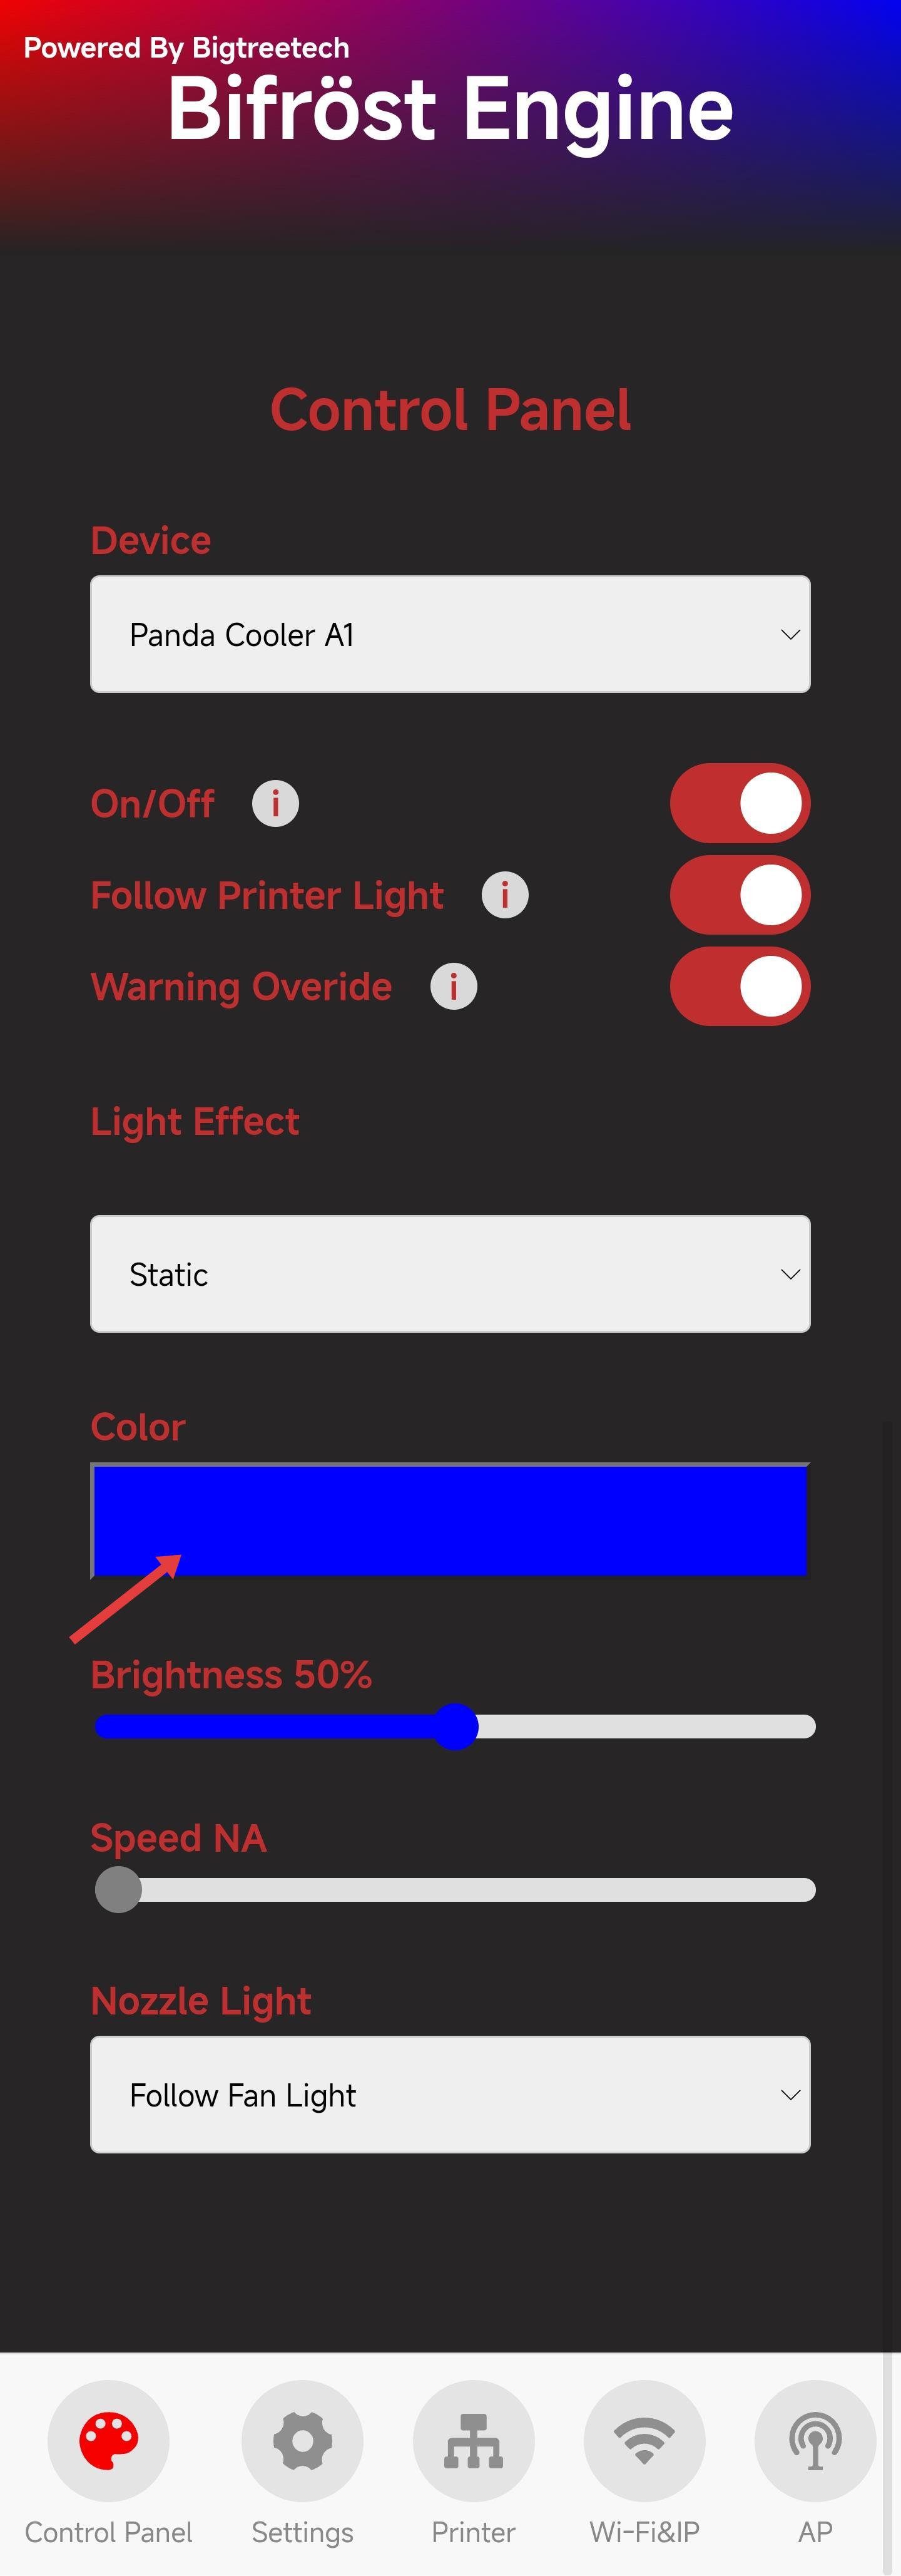
Control Page
-
① Current Device Name
-
② Turn on and off the RGB Light effects.
-
③ Automatically turns RGB effect ON and OFF following the printers stock light.
-
④ Override Red flashing warning light when printer is in error state.
-
⑤ Select the lighting effect and the current effect.
-
⑥ Light color setting.
-
⑦ Brightness.
-
⑧ Speed.
-
⑨ Nozzle Light Effect
Follow Printer Lighting
- When this switch is enabled, under conditions of bound printer, normal network connection, and main switch activated, the Panda_Cooler_A1 will automatically turn on when the printer (XE1 used as example) lighting is activated, and turn off when the printer lighting is deactivated.
Warning Switch
- When this switch is enabled, under conditions of bound printer, normal network connection, and main switch activated, the Panda_Cooler_A1 will automatically activate fault lighting effects (red flashing) when the printer encounters an error. This will override any other custom lighting effects.
Lighting Effects
-
The Panda_Cooler_A1 offers 9 lighting modes as shown in the image below: Static, Breathing, Strobing, Wave, Marquee, Color Cycle, Rainbow, Warning: Hot, and H2D Style Status Indicator.
Note: Rainbow and Color Cycle modes do not support custom colors, and Static mode speed cannot be adjusted
High Temperature Warning (Warning: Hot)

-
①: Indicates the Panda_Cooler_A1 colors for safe and high temperature printer conditions.
-
②: Controls the brightness speed in high temperature mode.
-
③: Allows selection of lighting effects (solid or flashing) for Safety and Danger alert modes respectively.
H2D Style Status Indicator

-
①: Indicates the lighting effect colors for specific printer status. Tap the info button next to each color for a detailed description.
-
②: Controls brightness in high temperature mode (speed cannot be customized).
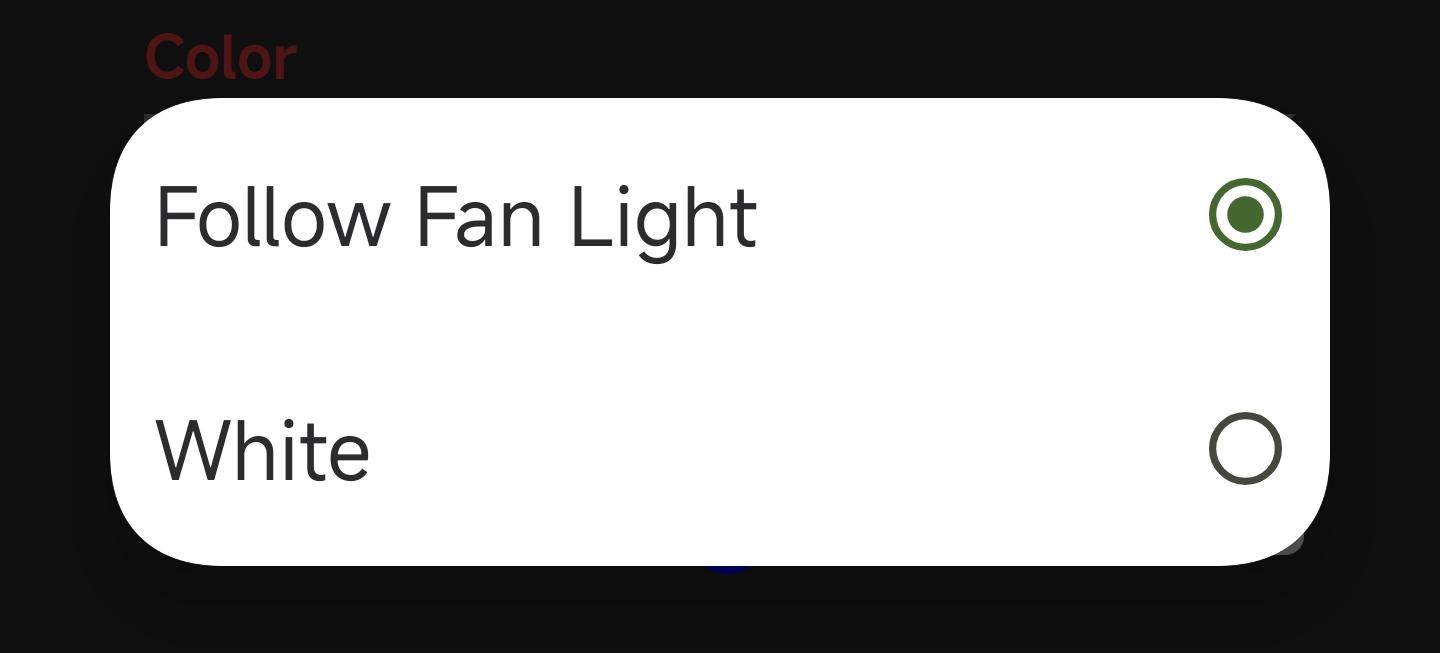
Nozzle Lighting Effects
- Tapping on the nozzle lighting effects reveals two options (Follow Fan Lighting and White Light Always On).
Custom Lighting Effect Colors
- Setting Colors (using Static mode as example,
Static mode speed cannot be adjusted)
In the control interface, select Static mode, then tap the color box to choose a color.
Navigate to the color setting interface. You can select from the preset color blocks above or customize your own. Here's a brief introduction to customization - click the white color block below.

Enter the color picker interface and select your desired color (sky blue used as example)
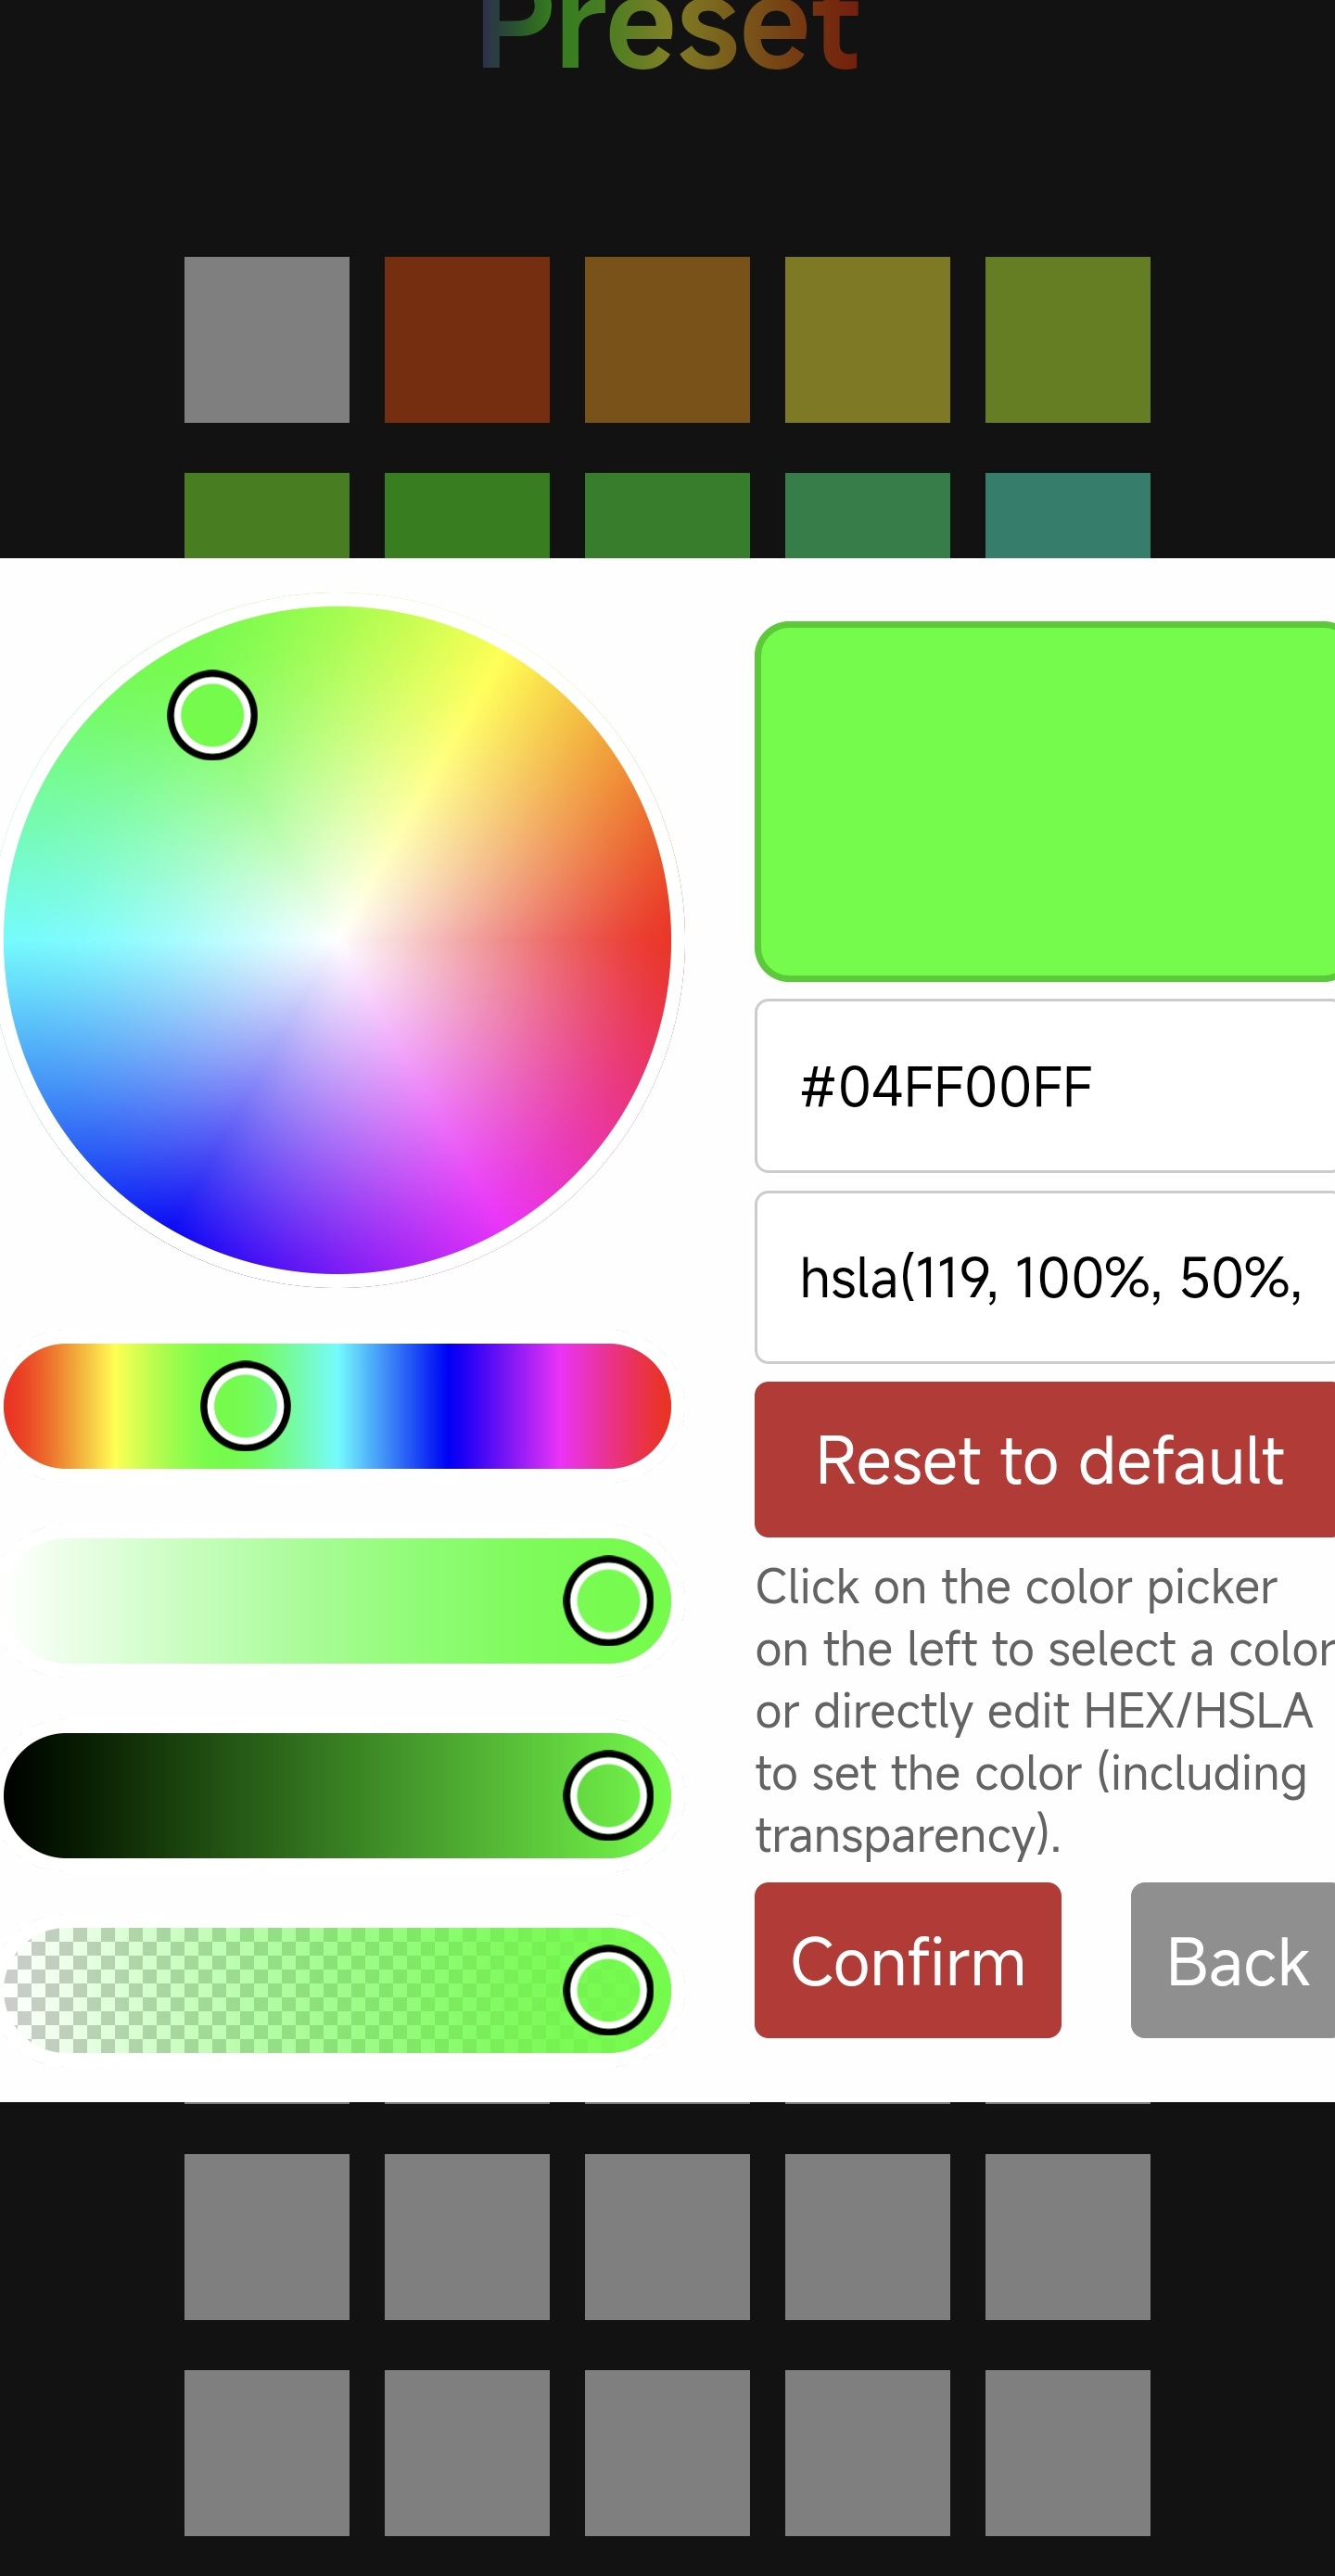
Tap Confirm

Setting successful!

- Factory default brightness and speed are both set to 50% (some modes do not support color or speed adjustment)
Firmware History
V1.0.0
- First-release factory firmware.
Feature Requests
If you'd like to see certain features in the upcoming firmware release, please submit a feature request on the official GitHub repository.