Panda Knomi 3D
- Product Link: Click to buy
Important Notice:
-
Printer Monitoring Only: The Panda Knomi 3D is a monitoring-only device, meaning it reads the printer's status but does not control it. This key distinction ensures its core functionality remains unaffected by Bambu Lab firmware updates. For a detailed breakdown of which printer features are impacted by updates, please consult the official Bambu Lab announcement.
-
Firmware: Ensure your device is running the latest firmware version.
-
Wi-Fi Support: The Panda Knomi 3D is compatible with 2.4GHz Wi-Fi networks only.
-
Invalid IP Message: If you see the message "Invalid IP, Adjusting" for an extended period, first check if you can control the printer normally using Bambu Handy or Bambu Studio. If the printer is unresponsive, the issue is likely your network environment and you should review your settings. If the printer operates correctly, please restart the Panda Knomi by turning it off and on. Should the problem continue after rebooting, contact customer support for further assistance at:
support01@bigtree-tech.com -
Web UI Access: After connecting to the "Panda Knomi 3D AP" hotspot in your phone's settings, you will be automatically directed to its Web UI. Please note that due to system permissions on some mobile devices, you may be unable to upload GIFs, IMG files, or firmware updates from this screen. To perform these actions reliably, please open the Web UI address directly in a mobile browser.
-
GitHub Feedback: We value your feedback. If you encounter any issues or have suggestions for improving future hardware or firmware versions, please feel free to submit them on GitHub. This is the best way to share your ideas and stay connected with our development process.
-
Further Support: For questions not addressed in this wiki, please contact customer support at:
support01@bigtree-tech.com.
Specification
| Specification | Details |
|---|---|
| MCU | Xtensa Dual-Core 32-bit LX6 ESP32 Clock frequency up to 240 MHz |
| Memory | PSRAM – 8 MB (4 MB RAM + 4 MB Himem), Flash – 16 MB |
| Logic Voltage | 3.3 V |
| Input Voltage | 5 V – 24 V |
| Rated Power | 0.65 W |
| Screen Outline Size | 34.6 mm × 37.9 mm × 3.5 mm |
| Screen Size | 1.28” |
| Resolution | 240 × 240 |
| Display Area | 32.4 (H) mm × 32.4 (V) mm |
| Display Driver IC | GC9A01 |
| Viewing Angle | Full View (All-Angle) |
| Backlight Brightness | 400 cd/m² |
| Communication | 2.4 G Wi-Fi (IEEE 802.11 b/g/n) |
| Operating Temperature | Panda Knomi 3D: –20 °C to +70 °C Plastic shell version: –30 °C to +130 °C |
| Storage Temperature | –30 °C to +80 °C |
| Backlight Lifetime | > 20,000 hours |
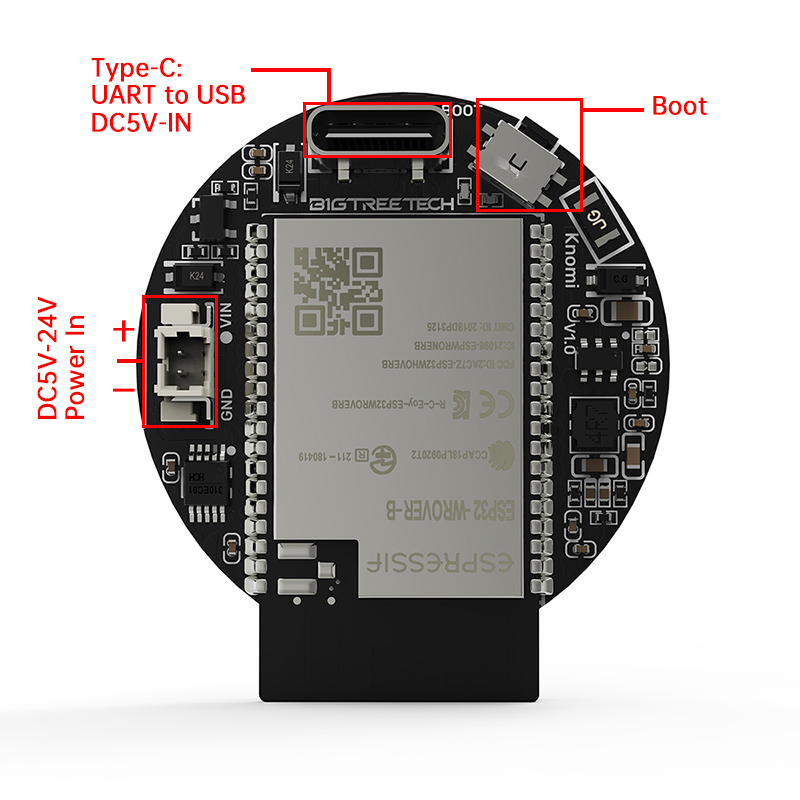
Dimensions and Interface

Mounting Guide
In this section, you will learn how to install the Panda Knomi 3D onto the A1 Series printer's toolhead.
A1 Series Toolhead Mount
-
Insert the lens.

-
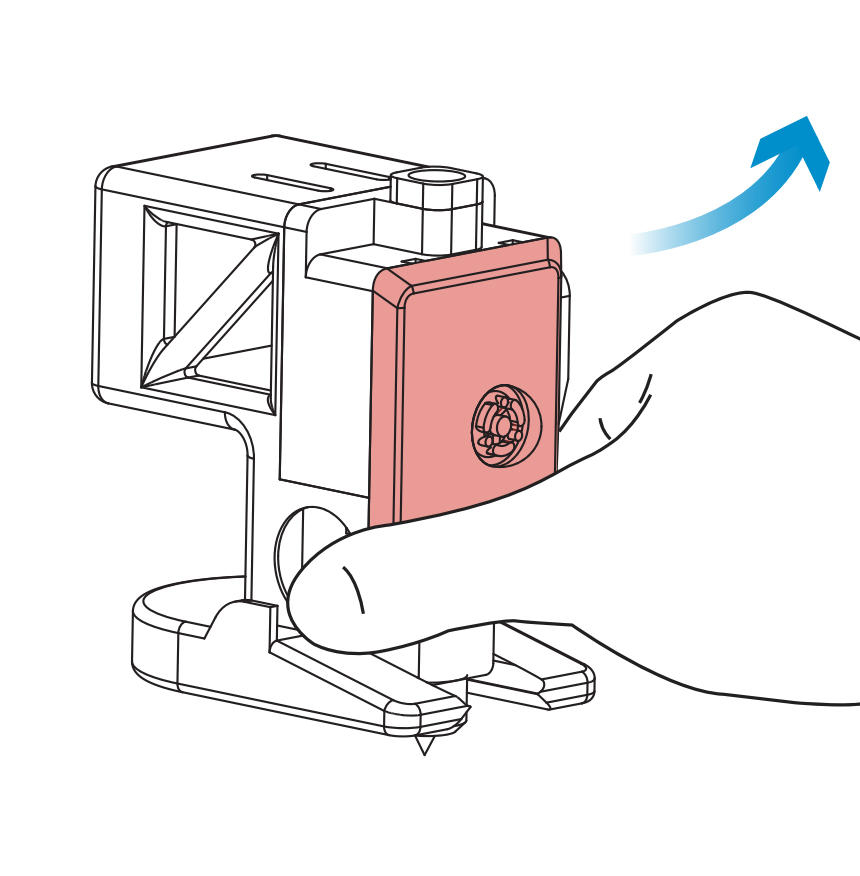
Gently peel off the protective cover.
-
Before installing the screen into the housing, carefully inspect both the lens and the screen surface for any dust, debris, or particles. Clean them promptly if any are found to prevent scratches or other damage during the installation process.
-
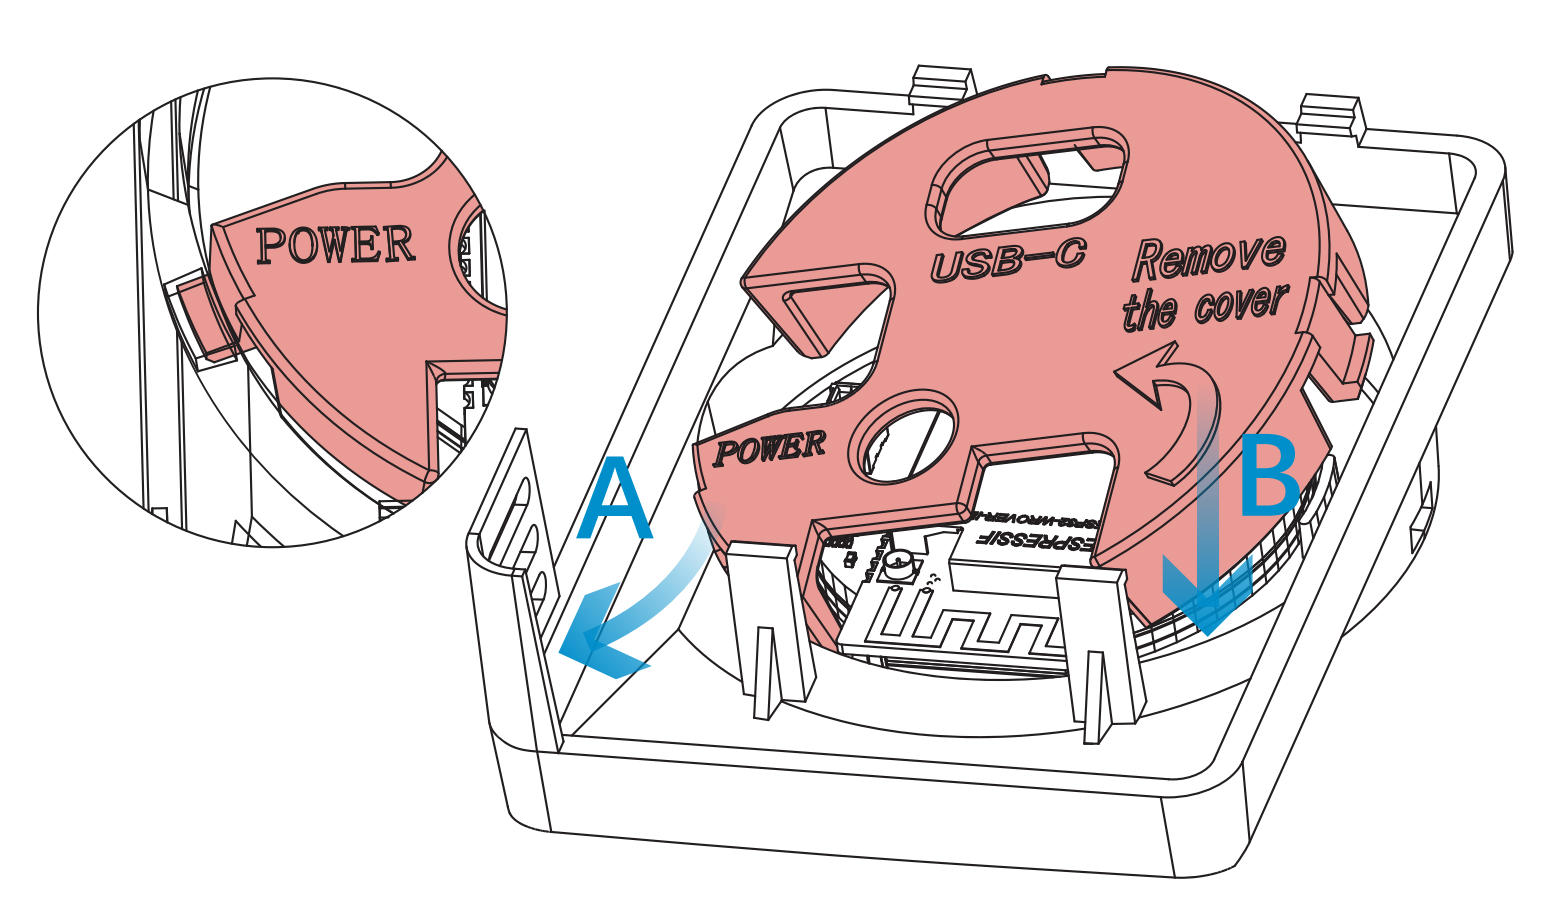
Align the cover with the locking tab, as shown by Arrow A. Then, gently press down in the direction of Arrow B until it clicks past the tab, securing it in place.
-
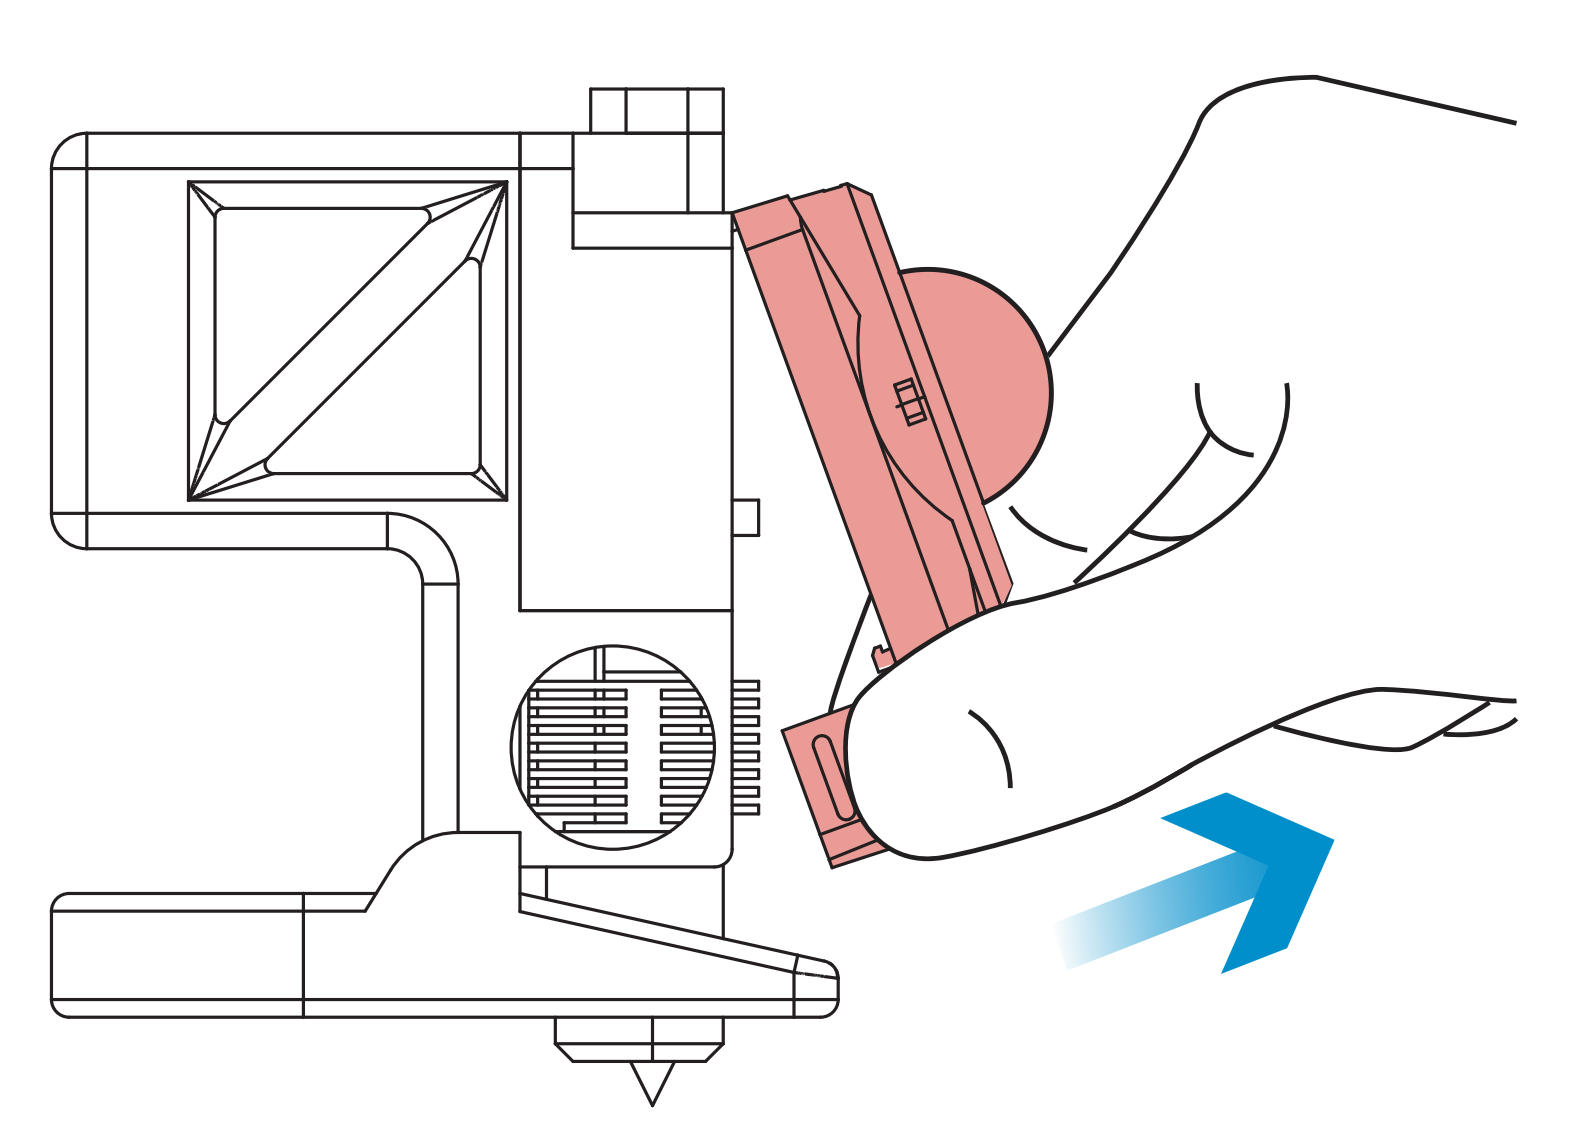
Press the Toolhead Cover from both sides to unlock and remove the cover.
-
Then remove the rotating wheel.

-
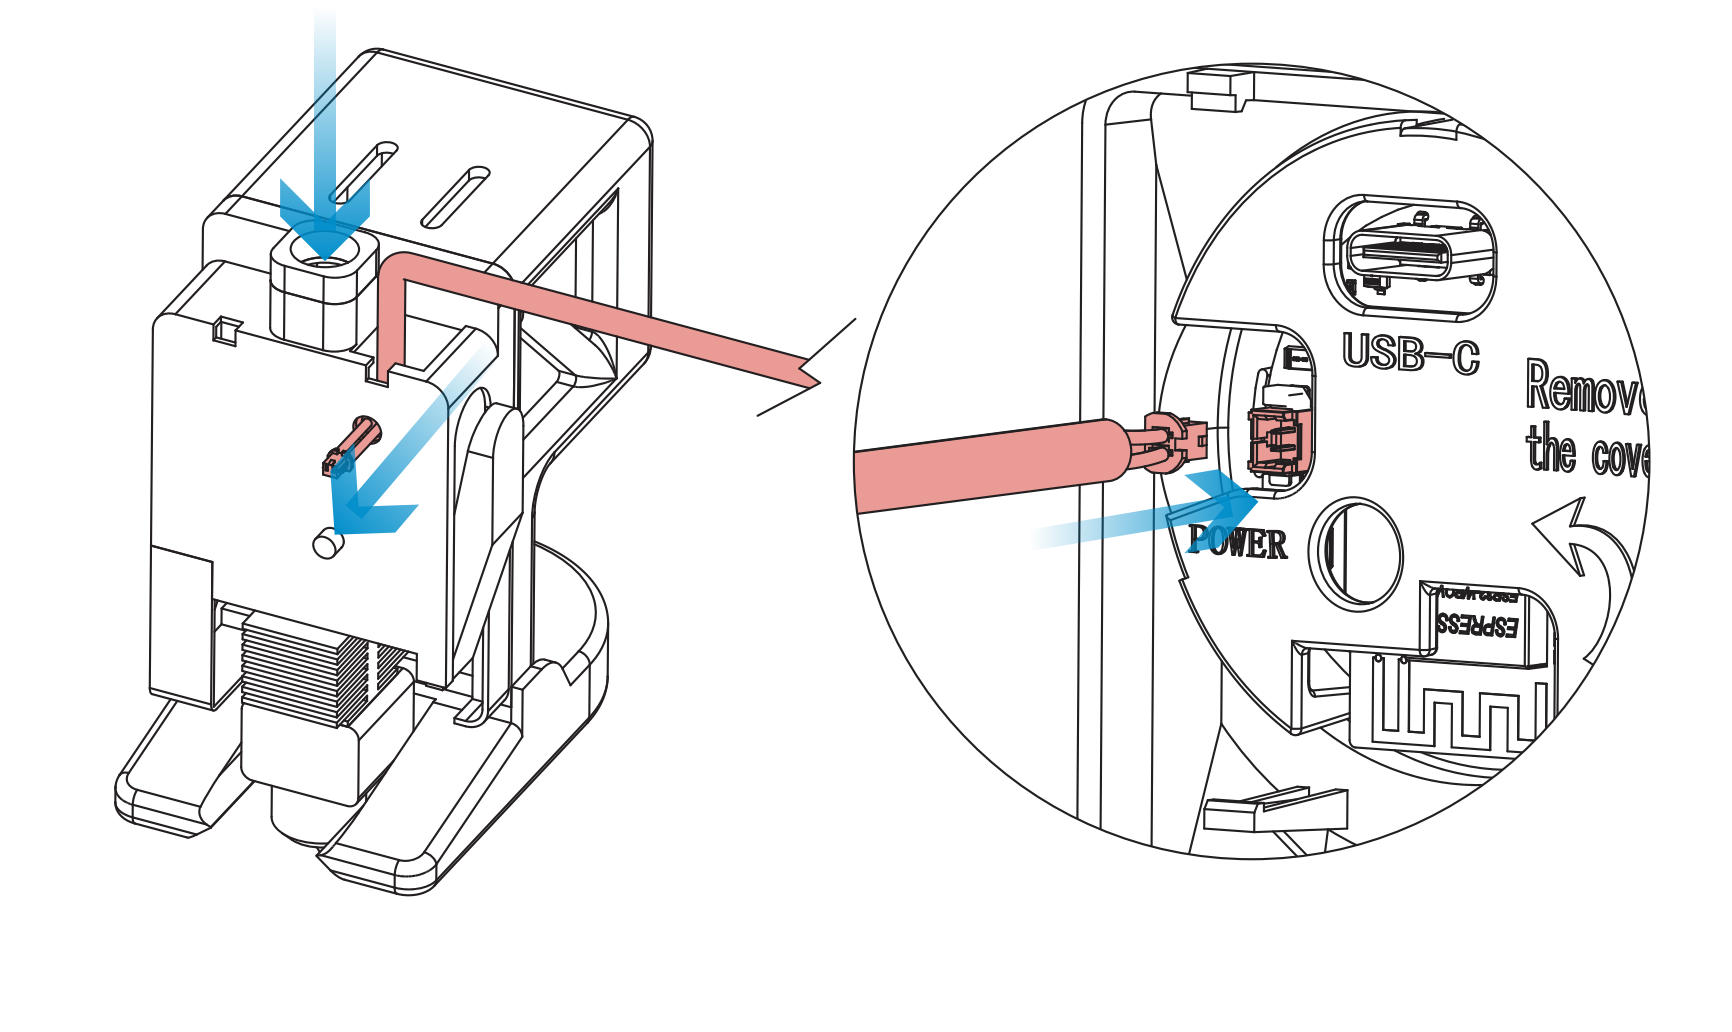
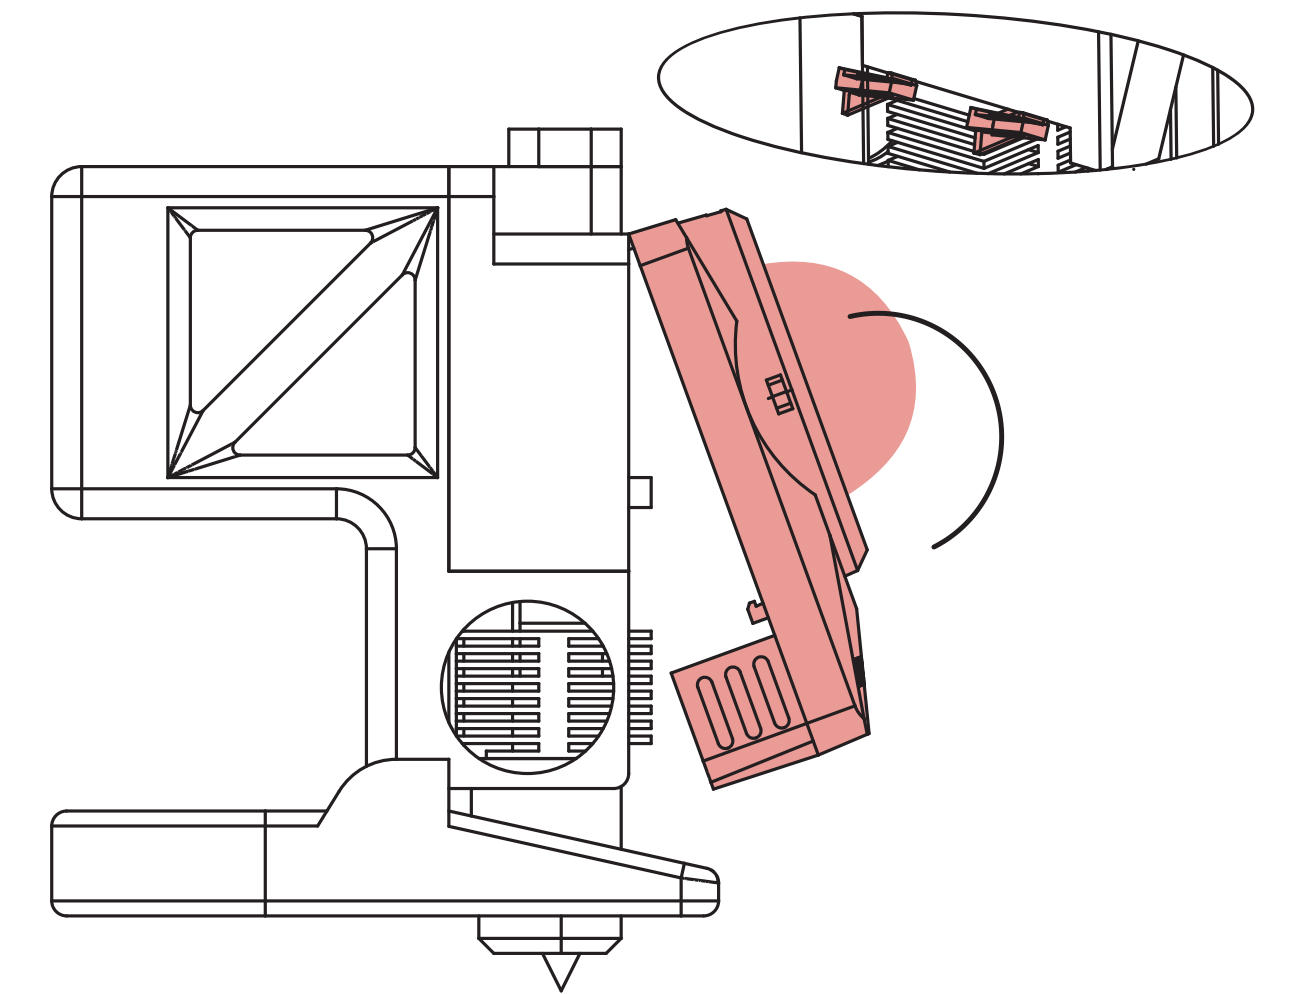
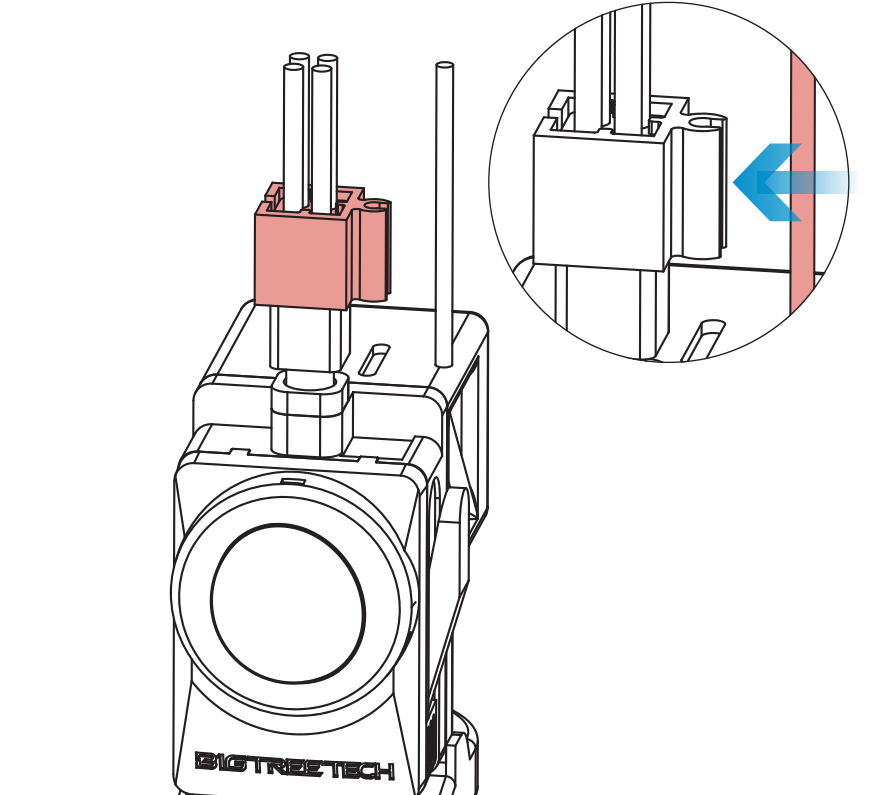
Pass the power cable through the designated holes. Then connect it to the Panda Knomi 3D power interface.
-
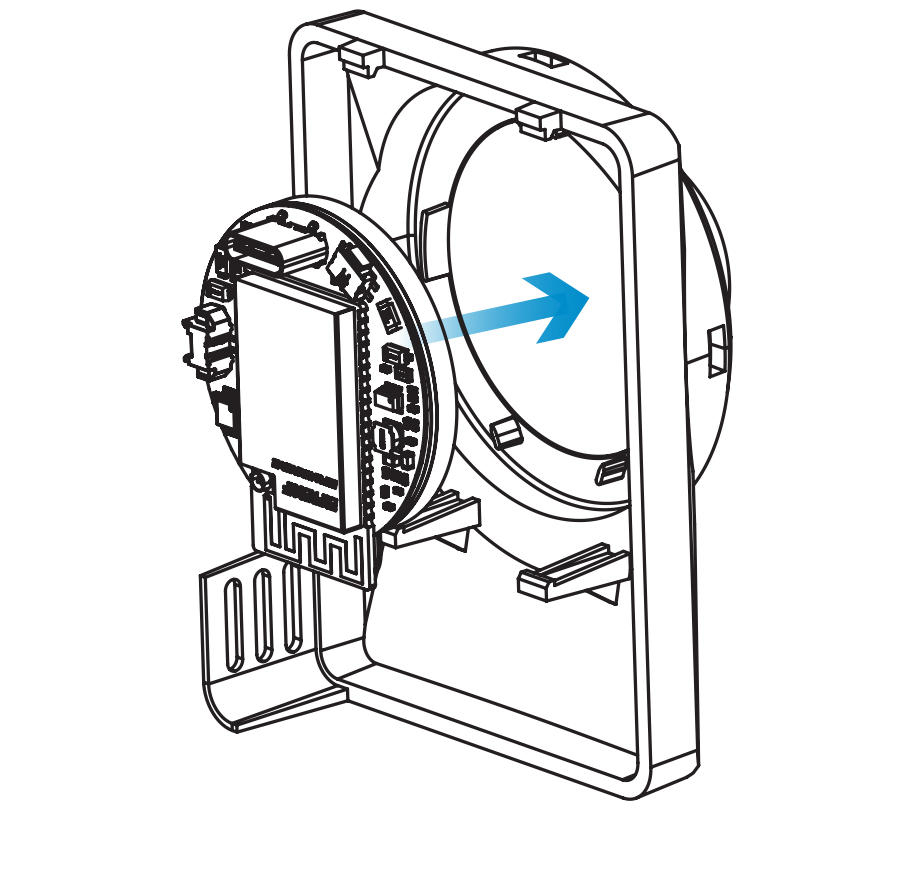
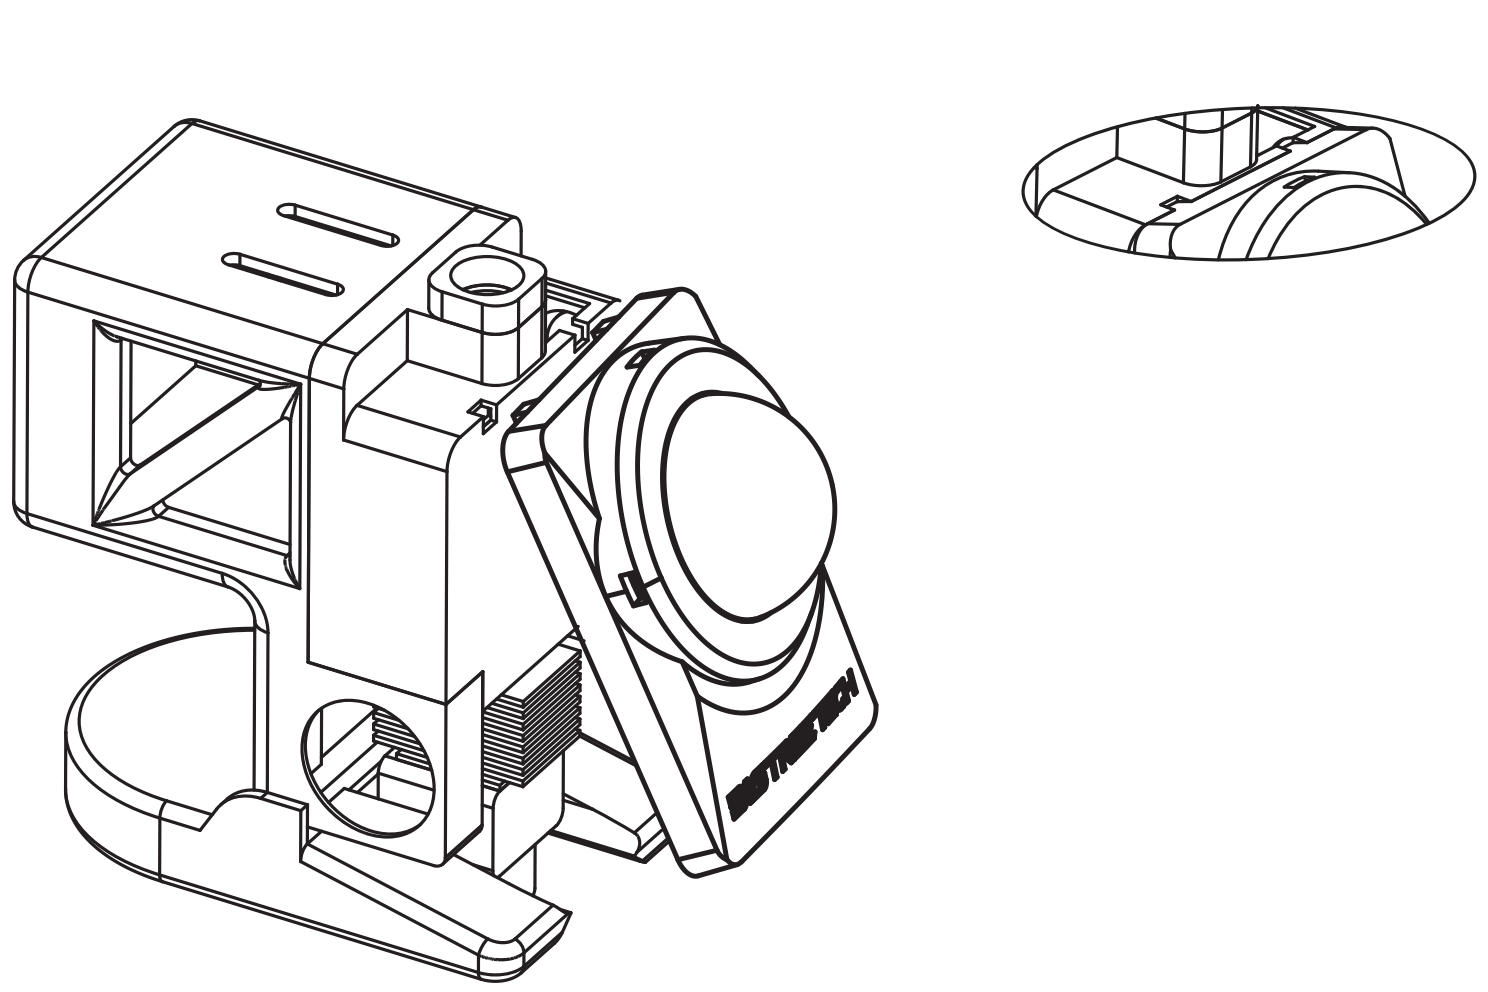
First snap the top of the Panda Knomi 3D into place, then gently press the bottom until it is fully secured.
-
To prevent the power cable from interfering with prints and to keep the printer setup tidy, we designed a printable cable clip. Please download, print, and install it.
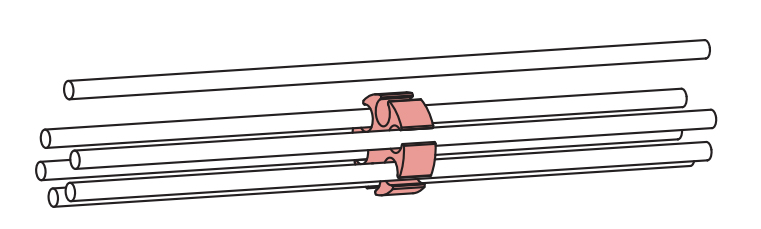
If you are using the AMS Lite, we have also provided a printable cable organizer. This organizer lets you bundle the PTFE tubes, toolhead cables, and the Panda Knomi 3D power cable together.
We also recommend using the included zip ties to gently bundle the toolhead cable with the Panda Knomi 3D power cable. When securing them, ensure the ties are not overly tight to avoid placing unnecessary strain on the cables.
-
Completing Installation on the A1 Series Toolhead.
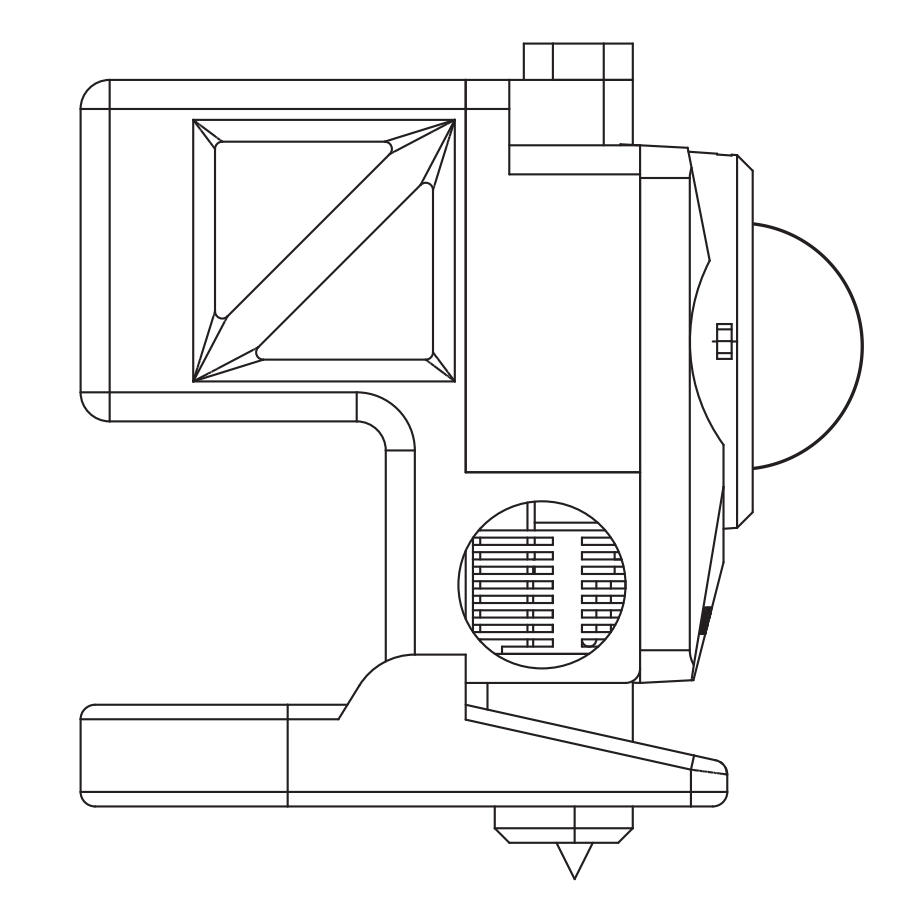
Congratulations on successfully installing your Panda Knomi to the A1 series toolhead. The following guide will demonstrate how to provide power for your A1 series setup.
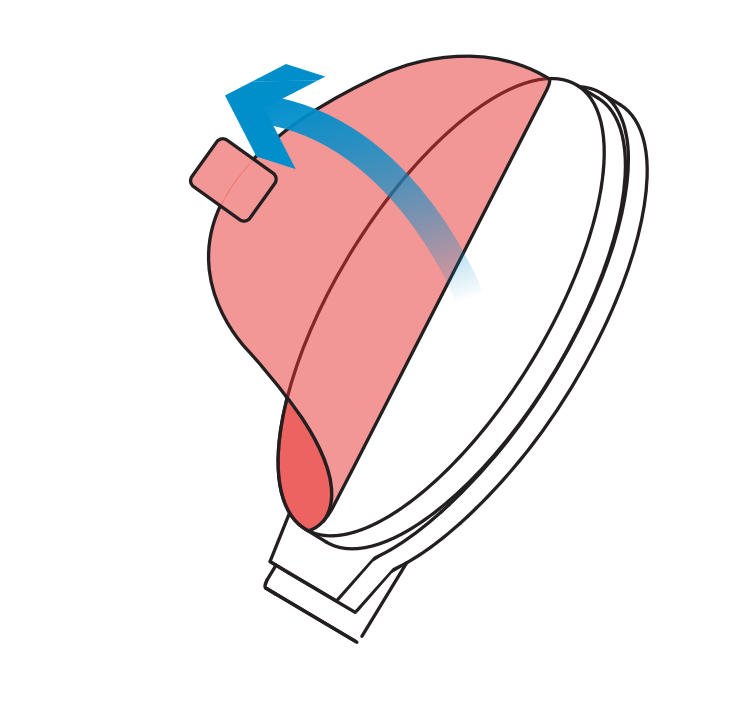
Disassembly Guide For A1 Series Toolhead
To disassemble the Panda Knomi 3D from the A1 series toolhead, please follow the method below.
-
Hold both ends of the housing and lift upward to remove the Panda Knomi 3D from the toolhead.
-
Use the cover opener to press against the blue highlighted slot shown in the figure. The back cover will pop open automatically, making it easy to remove. (You will need to first download the cover opener file from GitHub and print it yourself.

A1 Series Power
You are now ready to power on your device. IMPORTANT: MAKE SURE THAT YOUR PRINTER IS POWERED OFF BEFORE PERFORMING THIS STAGE.
Power Connection via the Printer
-
Connect the MX3.0 2-pin male connector of the Panda Knomi 3D power cable to the MX3.0 2-pin female connector of the adapter cable. Make sure the latch is aligned correctly—do not reverse the connection.

-
Locate an unused 4 pin power port at the rear(A1) or side(A1 mini) of the machine. Insert the MX3.0 4-pin connector on the other end of the adapter cable into the printer’s MX3.0 4-pin interface.

Power Connection via the Panda Branch Plus
If you do not want to draw power from the printer, or if the printer’s MX3.0 interface is already occupied, you can use the Panda Branch Plus. Simply plug the Panda Knomi 3D MX3.0 2-pin connector directly into the MX3.0 interface of the Panda Branch Plus to supply power.

You are now ready to power on the Panda Knomi 3D and begin the configuration process. Please refer to the First-Time Use Guide.
User Interface Description
First-Time Use Guide
Access the Web UI configuration page.
-
Connect to the Panda Knomi 3D AP Hotspot
After the first startup or after executing the
Restore Factory Settingscommand, you will see the following screen.
-
Scan the QR code on the Panda Knomi 3D to get the AP name and password. Connect to the AP with the default credentials:
Wi-Fi Name:
Panda_Knomi_3D_xxxxxxxxxxxxWi-Fi Password:
987654321Note: Most modern smartphones are equipped to scan QR codes directly through their camera app. This feature is typically available on devices running iOS 11 or later, and Android 9.0 or later. To ensure optimal QR code scanning performance, please verify that both your device’s operating system and camera app are updated to their latest versions. If your smartphone does not have this capability, alternative options include using third-party applications from the application store, like Google Lens. Alternatively, you can manually connect to the Panda Knomi’s hotspot using the default password "987654321" to access the Web UI.
-
If scanning the QR code doesn't work, you can go to the settings menu on the device to connect to the hotspot manually.
Using an iPhone as an example:
-
On your phone home screen, go to "Settings" → "WLAN".
-
Turn on "WLAN". Your device will automatically search for available networks.

-
Tap on the network name starting with
Panda_Knomi_3Dand enter the default password: "987654321." -
After successfully connecting to the Panda_Knomi_3D network, you will see a blue checkmark next to the network, and the Wi-Fi icon indicating a connection will appear in the top-right corner of the screen.
-
-
-
Upon connecting to the AP, a configuration interface should automatically appear. If not, manually enter 192.168.254.1 in a browser to access the settings.
Connect Panda Knomi 3D to the same Wi-Fi as the printer
-
Upon first-time configuration, the device will automatically take you to the Select Language screen. After setting your language preference, click Next.

-
On the Wi-Fi connection screen, Panda Knomi 3D will automatically scan for available Wi-Fi networks. Select the network your printer is connected to. If the printer’s Wi-Fi is not detected, click Scan to rescan.

-
Wait for the connection to be established. Once successful, a pop-up window will appear. Click Bind Printer to proceed to the Printer screen and complete the binding process.

Bind Printer
Note: If the access code field is blank, the printer may be in cloud mode and not linked to a cloud account. Please switch the printer to "LAN Only Mode" or use Bambu Handy/Bambu Studio to bind the printer to a cloud account.
Auto Scan
-
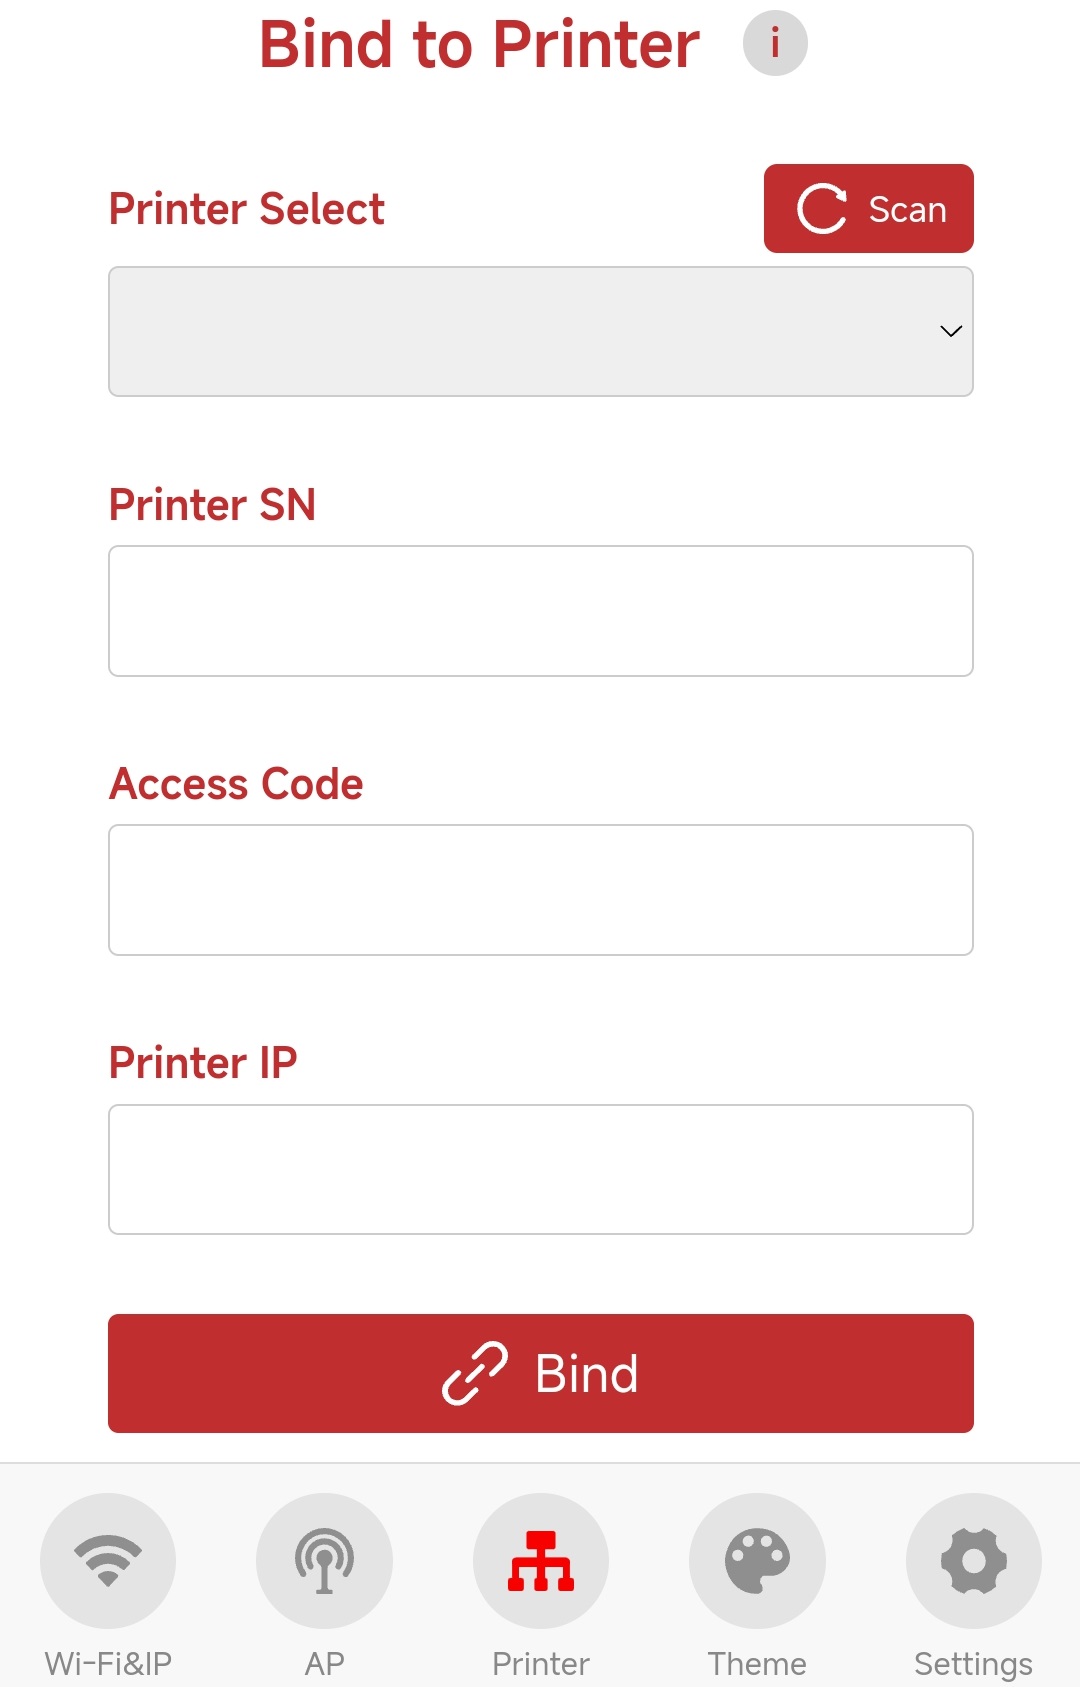
In the Web UI, go to the Printer screen. Clicking Scan will search for Bambu printers on the same local network. The scan takes about 30 seconds, with an additional 20 seconds for each printer detected. Panda Knomi 3D can recognize up to 20 printers per scan. If more than 20 printers are present, some may not be detected. If the scan does not detect the desired printer, click Scan again or use Manual Input to enter the information.
-
After scanning, select the printer you wish to connect to. The printer’s SN and IP will be automatically populated. Locate the Access Code on the printer and enter it into the Printer Access Code field on the Web UI.
-
A1 Series Printer
-
① Settings

-
② → ③ Local Network Mode

-
④ Access Code

-
-
-
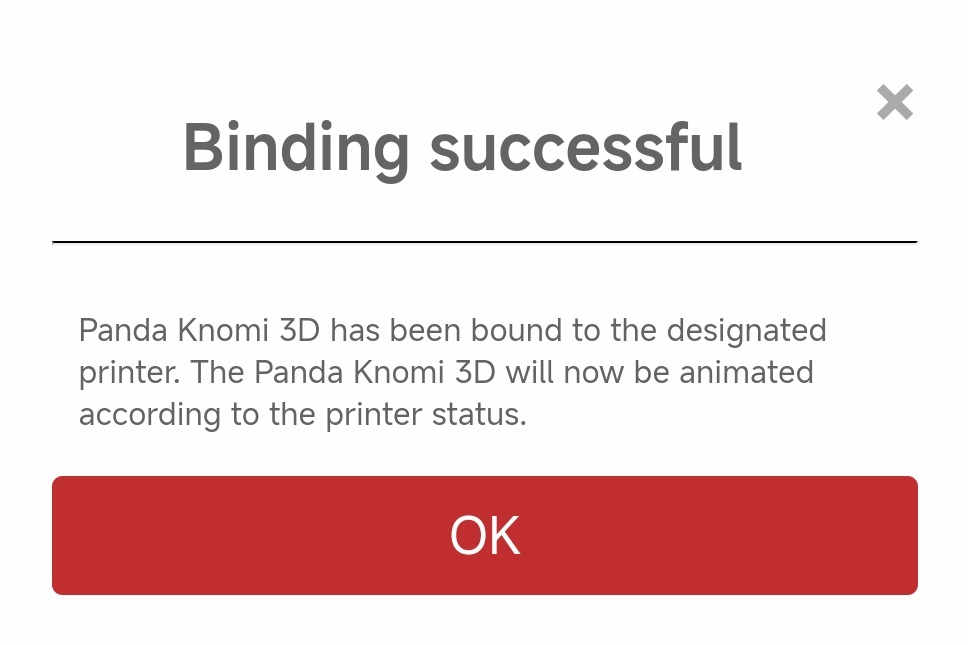
Click Bind to start the connection. If a Binding Successful pop-up appears, Panda Knomi 3D has successfully connected to the printer.
-
Congratulations! Your Panda Knomi 3D is now successfully set up and ready for use.
Manual Input
- Panda Knomi 3D can detect up to 20 printers per scan. If there are more than 20 printers in your network, some may not be detected. You can use Manual Input to bind the printer by entering all necessary information.
- If fewer printers are present but the desired one is still not detected, try using Manual Input to bind it. If Panda Knomi 3D cannot connect to the printer, router security settings may be preventing local network communication. For further assistance, please contact support at support01@bigtree-tech.com.
-
Find the SN, Access Code, and IP on the printer, and enter them into the corresponding fields in the Web UI.
-
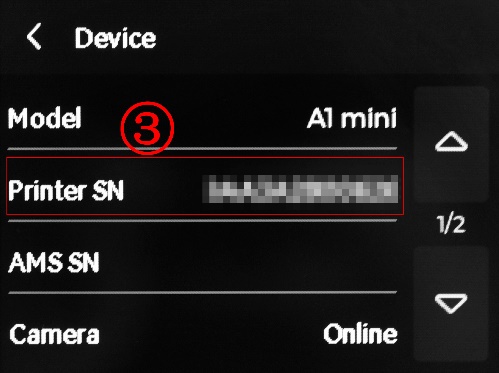
A1 Series Printer
-
SN
-
① Settings
-
② Device

-
③ Printer Serial Number is the SN
-
-
Access Code and IP
-
① Settings
-
② → ③ LAN Only Mode
-
④ Access Code, ⑤ IP
-
-
-
-
Click Bind to begin the connection. If a Binding Successful pop-up appears, Panda Knomi 3D has successfully connected to the printer.
-
Congratulations! You can now enjoy your Panda Knomi 3D.
Wi-Fi & IP Interface
The first screen displayed in the Panda Knomi 3D Web UI is the Wi-Fi & IP settings page.

-
① Enter the Wi-Fi & IP interface
-
② To reconfigure the Wi-Fi connection for Panda Knomi 3D, click the Wi-Fi Network Configuration button to return to the Wi-Fi configuration screen.
Tip: When Panda Knomi 3D switches to a different Wi-Fi network, its local network and IP address may change. If you change this setting on a device within the same network, communication with Panda Knomi 3D will be lost. The device will need to reconnect to the newly configured Wi-Fi. To avoid this, we recommend connecting your device to Panda Knomi 3D’s AP hotspot first, then changing the configuration.
-
③ Once the network configuration is complete, we recommend connecting your phone, computer, or other devices to the same Wi-Fi network as Panda Knomi 3D. Access the Web UI via the IP address in your browser’s address bar. You can also save the IP address as a bookmark on your home screen for easy access.
-
④ If your device is on the same network as Panda Knomi 3D, you can access the Web UI using the hostname. The default hostname is PandaKnomi3D, accessible at http://pandaknomi3d.local (case-insensitive). If your device is using a VPN, this method may not work, and you should use the IP address instead.
Users can customize the hostname by following these rules:
-
It must consist of letters (a-z, A-Z), numbers (0-9), and hyphens (-), with the first character being a letter.
-
It must be between 8 and 32 characters long.
After changing, click Set Hostname to apply the new hostname to Panda Knomi 3D. If a pop-up window appears, the hostname has been successfully updated. The new hostname will take effect after a reboot. Click OK to reboot Panda Knomi 3D immediately, or click the x button to close the window without rebooting.

-
AP Interface
The next screen in the Panda Knomi 3D Web UI is the AP interface. The Panda Knomi 3D AP is the Wi-Fi hotspot broadcast by the device, allowing a phone or computer to connect directly. You can disable the hotspot broadcast if you wish. However, please note that the Panda Knomi 3D is designed to automatically re-enable its hotspot if it loses the connection to your configured Wi-Fi network. This provides a fail-safe method to regain access and reconfigure the device should your network become unavailable.
Tip: If you are currently connected to the Web UI via the "Panda Knomi 3D AP" hotspot, you will be disconnected immediately if you disable or change the AP settings. To maintain a stable connection while adjusting these settings, please ensure your device is connected to the same local Wi-Fi network as the Panda Knomi 3D beforehand.

-
① Enter the AP interface.
-
② Enable/disable the Panda Knomi 3D AP hotspot.
-
Once disabled, you will no longer be able to connect to Panda Knomi 3D through its hotspot.
-
Before disabling, make sure to note the Panda Knomi 3D IP address on the current Wi-Fi so you can still access the Web UI via IP.
-
-
③ Edit the Panda Knomi 3D AP hotspot settings. The default configuration is:
Wi-Fi Name:
Panda_Knomi_3D_xxxxxxxxxxxxWi-Fi Password:987654321
No reboot is necessary after applying these changes. The device will automatically recreate the AP hotspot in the background.
-
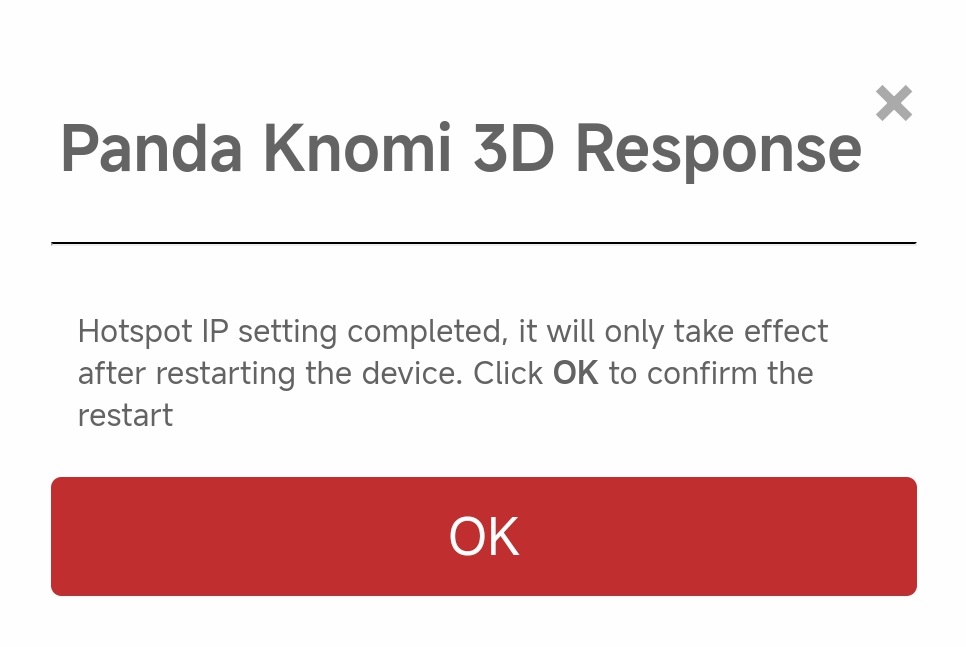
④ Change the AP hotspot IP address. If the IP range conflicts with your router (for example, if both use
192.168.254.1), Panda Knomi 3D will be unable to bind to the printer. To resolve this, change the Hotspot IP to a different range, such as192.168.253.1.After modifying the Hotspot IP, you must reboot the device for the new settings to take effect. If the following pop-up appears, the Hotspot IP has been successfully updated. Click OK to reboot Panda Knomi 3D immediately, or click the x in the upper-right corner to close the pop-up without rebooting.
Theme Settings and Share IMG
GIF Status Explanation
-
Due to hardware limitations, Panda Knomi 3D requires that the size of a single GIF not exceed 1.5MB (1536KB, 1MB = 1024KB), and the total size of all GIFs must not exceed 3MB (3072KB, 1MB = 1024KB).
-
In its factory state, the total space occupied by all pre-loaded GIFs is 2903.28 KB. This leaves 168.72 KB of available space for your custom images. Please note that the total size may differ slightly from the sum of individual GIFs listed in the table due to file system overhead and rounding of individual file sizes.
| File Name in Web UI | GIF Effect | Conditions for Display (Printer must be bound) | Factory GIF Size | Factory GIF Resolution (Width x Height) | |
|---|---|---|---|---|---|
| 1 | standby.gif |  |
The printer is idle. | 284.94KB | 240 x 240 |
| 2 | nozzle_heating.gif |  |
Nozzle is heating up. | 109.63KB | 240 x 240 |
| 3 | bed_heating.gif |  |
Bed is heating up. | 123.96KB | 240 x 240 |
| 4 | bed_leveling.gif |  |
Auto-leveling. | 77.73KB | 240 x 240 |
| 5 | homing.gif |  |
Homing. | 112.69KB | 240 x 240 |
| 6 | nozzle_cleaning.gif |  |
Nozzle is being cleaned. | 88.91KB | 240 x 240 |
| 7 | calibrating_flow.gif |  |
Calibrating extrusion flow. | 149.74KB | 240 x 240 |
| 8 | xy_mesh_mode_sweep.gif |  |
Calibrating resonance compensation. | 62.93KB | 240 x 240 |
| 9 | filament_check_location.gif |  |
Checking filament location. | 146.63KB | 240 x 240 |
| 10 | filament_cut.gif |  |
Cutting filament. | 46.78KB | 240 x 240 |
| 11 | filament_pull_back_cur.gif |  |
Retracting filament. | 112.66KB | 240 x 240 |
| 12 | filament_push_new.gif |  |
Loading new filament. | 121.32KB | 240 x 240 |
| 13 | filament_purge_old.gif |  |
Purging old filament. | 29.46KB | 240 x 240 |
| 14 | printing_ok.gif |  |
Printing complete. | 355KB | 240 x 240 |
| 15 | printing.gif |  |
Printing in progress. | 563.88KB | 240 x 240 |
| 16 | printer_error.gif |  |
The printer is in error. | 517.01KB | 240 x 240 |
Screen Saver
To prevent screen burn-in from long exposure to static images, Panda Knomi includes a built-in screen saver. Every 15 seconds, a screen saver GIF (non-customizable) will appear for 7.5 seconds.
-
The screen saver GIF is as follows:

-
The screen saver is active on the following interfaces:
-
Invalid IMG interface
-
'Hello' screen at factory settings
-
Wi-Fi scan completion
-
Wi-Fi connection failure
-
Wi-Fi password error
-
Binding printer interface
-
Printer scan completion
-
Printer SN error
-
Printer Access Code error
-
Theme Settings


-
① Enter the Theme interface.
-
② Choose the print progress display option, with the following 4 choices:
-
Overlay Percentage on GIF: While printing, the screen shows a custom GIF (factory GIF), with the real-time print progress overlaid.
-
Show Percentage Only: While printing, the screen shows only the real-time print progress.
-
Show GIF Only: While printing, the screen displays a GIF representing the printing process.
-
Alternate Between Percentage and GIF: While printing, the screen alternates between real-time print progress and the GIF, switching every 10 seconds.
-
-
③ Set the GIF color.

-
a) Click this button to open the GIF color settings interface.
-
b) HSL Color Picker (What is HSL?)
-
c) HSL Hue parameter ranges from: 0 ~ 360°
-
d) HSL Saturation parameter ranges from: 0 ~ 100%
-
e) HSL Lightness parameter ranges from: 0 ~ 100%
-
f) The corresponding RGB hexadecimal value of the color, where each value ranges from 0 ~ 255 (0x00 ~ 0xFF). You can modify these values to get the desired color. For example, #FF5703 means:
-
R (Red): 0xFF (255/255)
-
G (Green): 0x57 (87/255)
-
B (Blue): 0x03 (3/255)
-
-
g) The corresponding HSL value of the color, where H (Hue) ranges from 0 ~ 360°, S (Saturation) from 0 ~ 100%, and L (Lightness) from 0 ~ 100%. You can modify these values to get the desired color. For example, hsl(20, 100%, 51%) means:
-
H (Hue): 20°
-
S (Saturation): 100%
-
L (Lightness): 51%
-
-
h) Click to clear the selected color, and the GIF will return to its original color.
-
i) Preview area for the set color.
-
-
④ Check the GIF storage usage. Due to hardware limitations, the total size of all GIFs cannot exceed 3MB (3072KB). If the total size exceeds this, the Web UI will block the update and display a pop-up reminder.
-
⑤ Each GIF can be set individually, including color and custom GIFs.
You can turn on/off the Preview GIF switch to show/hide the Preview button. Click Preview GIF to enter preview mode, where the screen will display "Preview GIF" and you can view the effect of the custom GIF. To exit preview mode, turn off the Preview GIF switch or switch to a different interface.
Note for Custom GIFs
-
For optimal display, use GIFs that match the Panda Knomi 3D's screen resolution of 240 x 240 pixels. Any GIFs larger than the given resolution will not be fully displayed. We recommend using a tool like ILoveIMG's Resize GIF to adjust your files. Resize GIF.
-
Click Select images to choose a GIF, or drag and drop the GIF into the interface.
-
Check the Maintain aspect ratio box to avoid distortion.
-
Adjust the larger parameter in Width (px) or Height (px) to not exceed 240px. If both parameters are the same, you can adjust either one.
-
Click Resize IMAGES.
-
Once the resizing is complete, click the Download resized IMAGES button to save your new GIF.
-
-
The size of each individual GIF cannot exceed 1.5MB (1536KB), and the total size of all GIFs cannot exceed 3MB (3072KB).
-
A new GIF cannot be larger than the available space. The maximum size allowed is the combined total of the GIF you are replacing and the remaining free space. If a file exceeds this limit, the Web UI will reject it and display a warning pop-up. Check the remaining space in ④ and the size of each GIF in ⑤.
Example:
To replace Standby.gif with a new GIF, the factory GIF size is 63.61KB, and the remaining space is 407.75KB, so the new GIF size must not exceed 63.61KB + 407.75KB = 471.36KB.
-
-
⑥ Export the custom GIF as an IMG file for backup or sharing your custom GIF design.
-
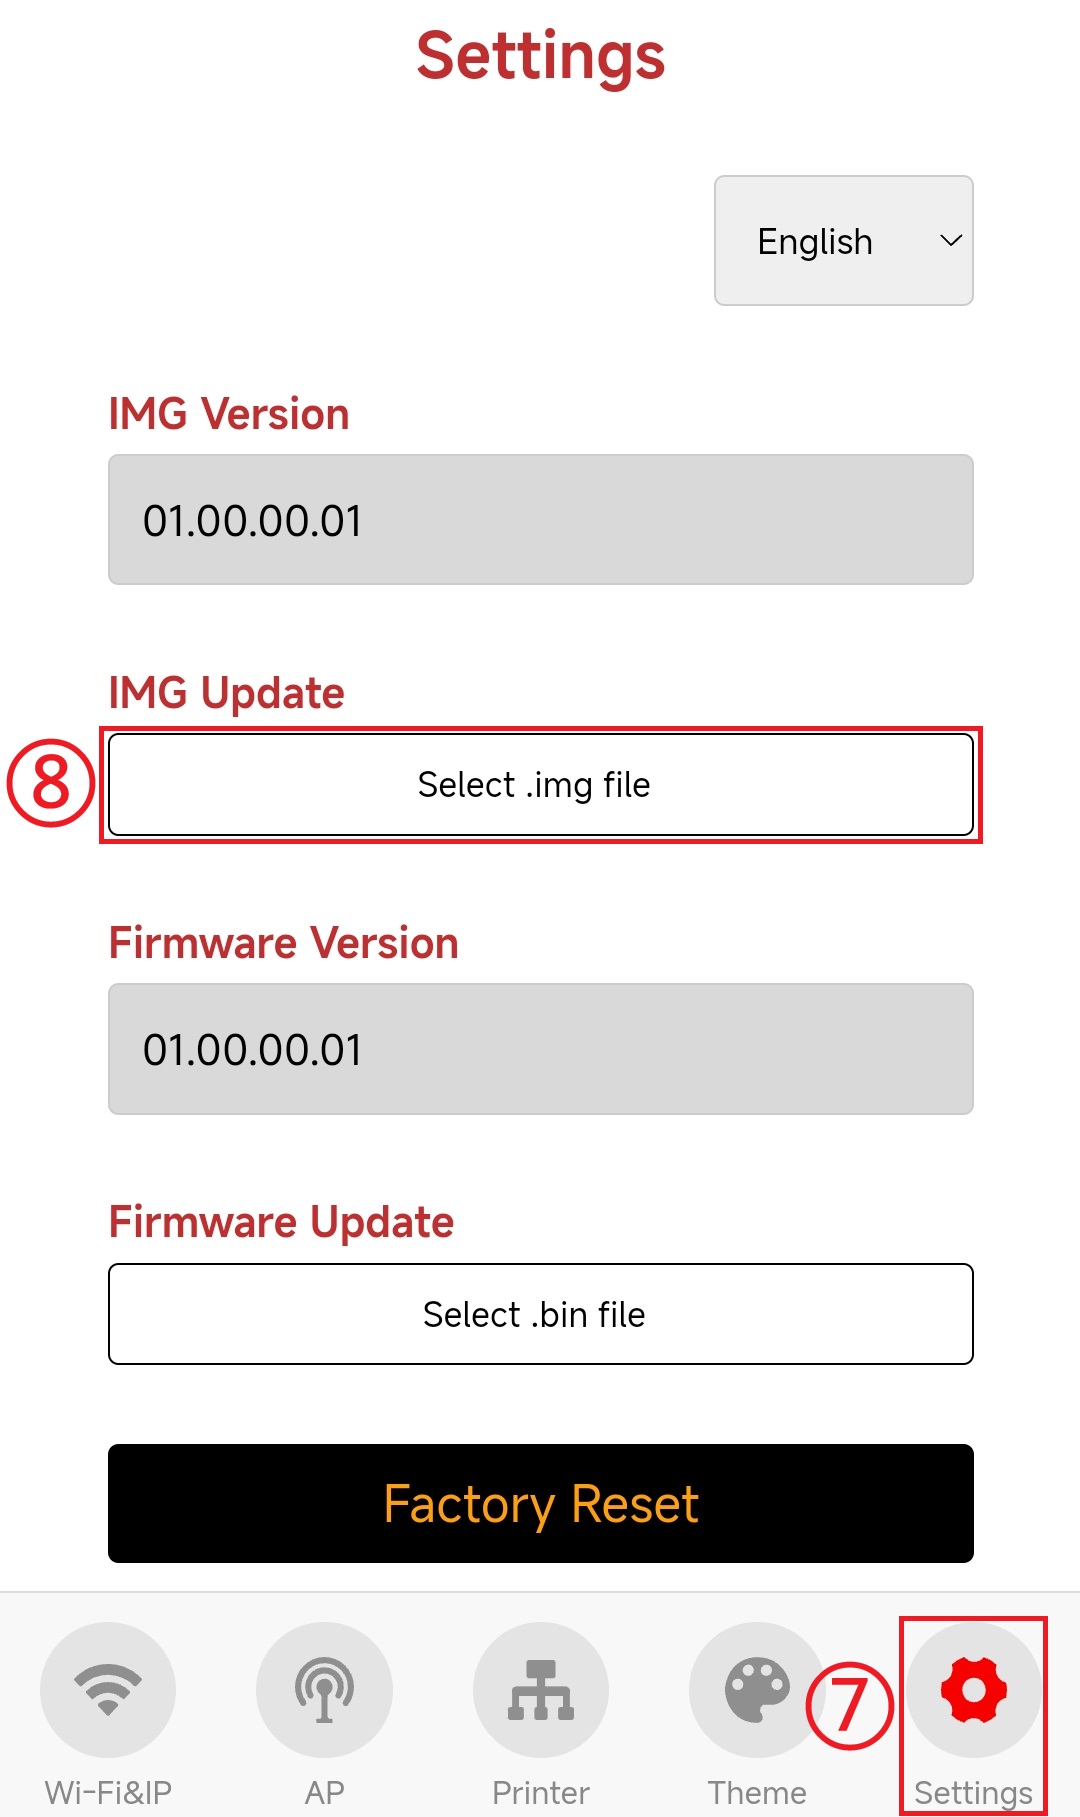
⑦ ⑧ Upload and update shared IMG files from others to Panda Knomi 3D.
Apply IMG File to Panda Knomi 3D
-
Download an IMG theme file:
-
Download
.imgfiles shared by other users in the community. -
Download from Panda Knomi 3D’s GitHub:
-
Visit Panda Knomi 3D’s GitHub.
-
Go to the IMG folder and choose your preferred IMG theme.
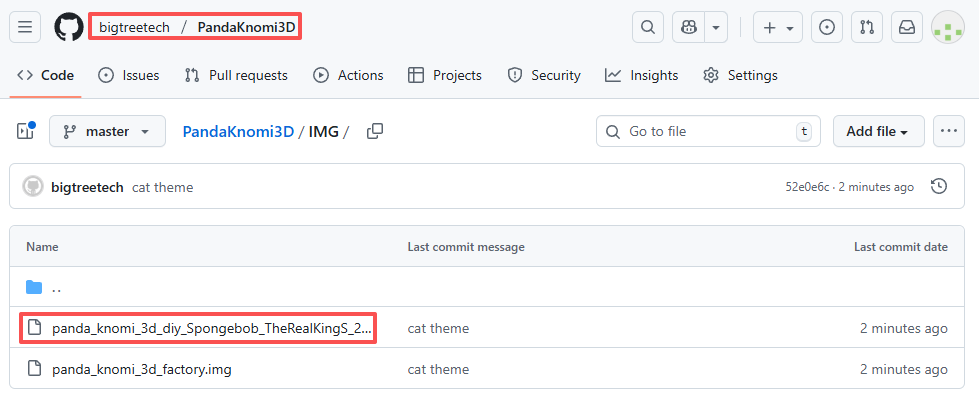
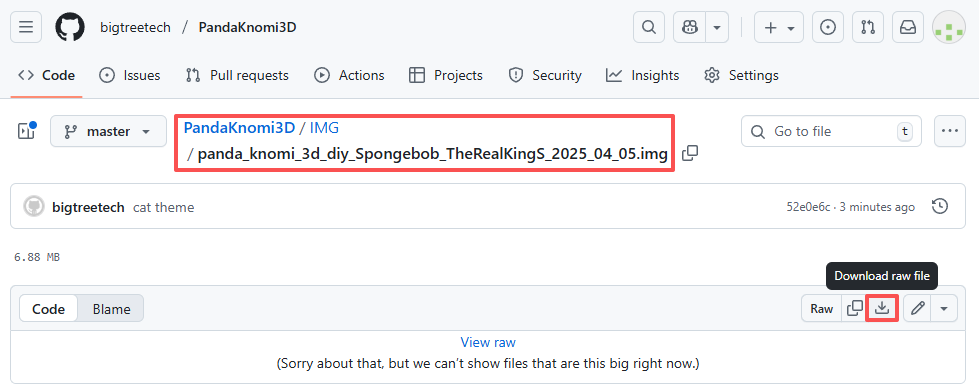
-
Click Download and save the file locally.
-
-
-
Go to the Panda Knomi 3D Web UI: ① Settings -> ② Select .img file, then select the downloaded
.imgfile. After updating, Panda Knomi 3D will automatically apply the new IMG file.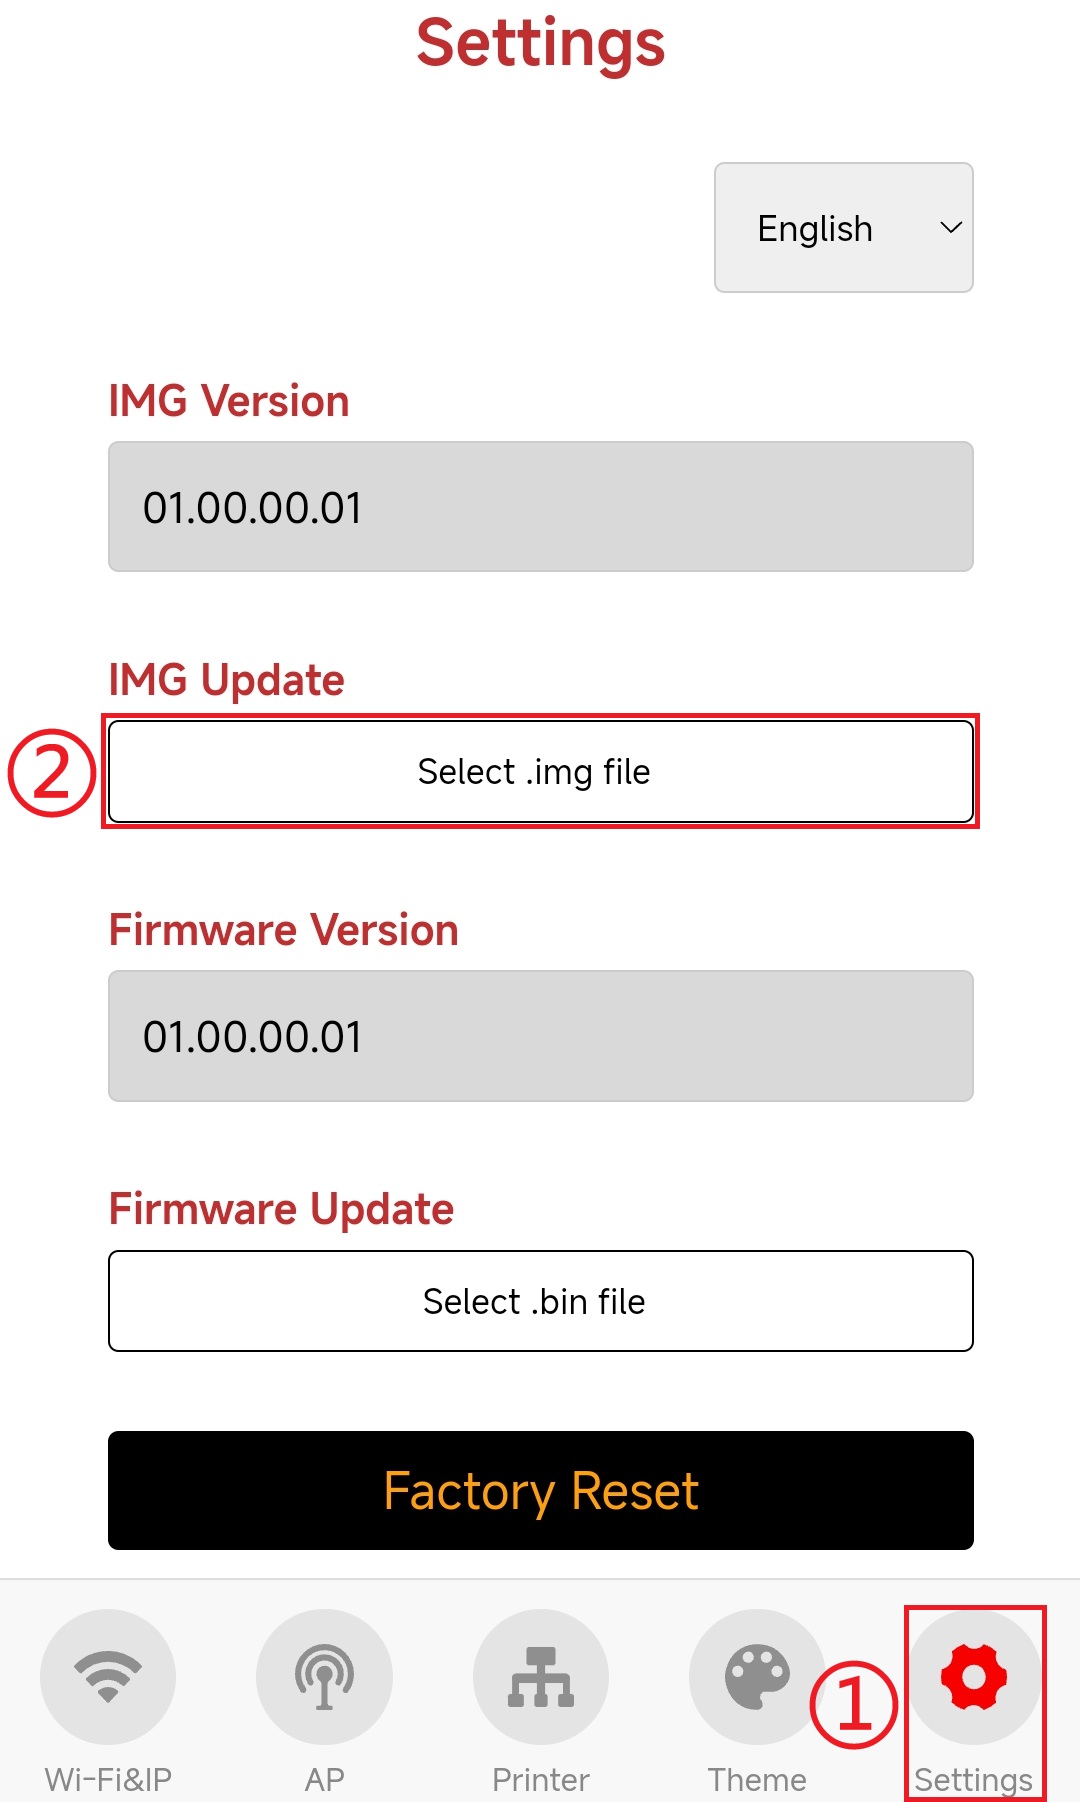
Export IMG from Panda Knomi 3D to Share
-
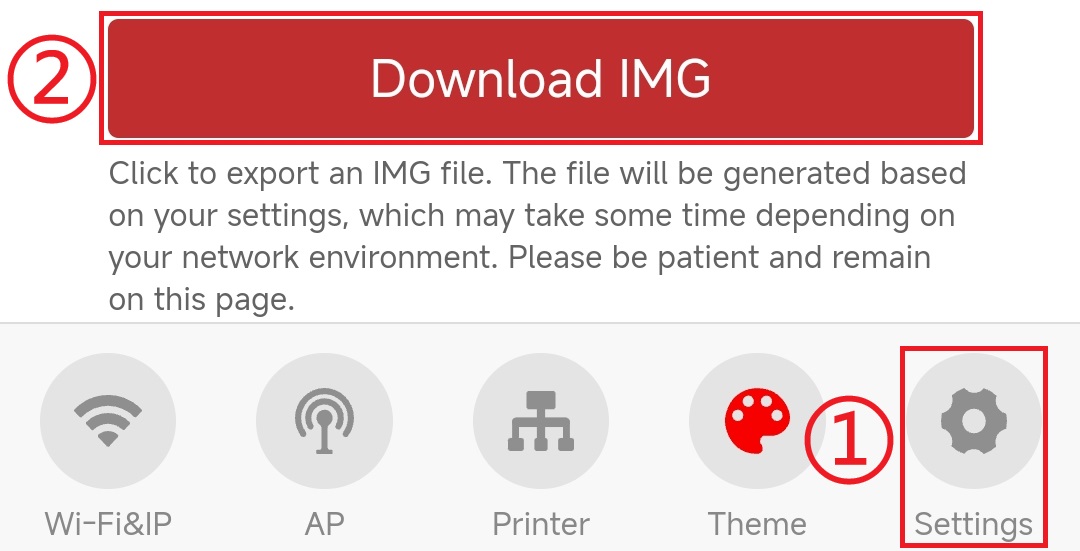
Enter the Panda Knomi 3D Web UI: ① Theme -> ② Export IMG, and wait for the IMG file to be exported.
-
Rename the exported IMG file using this format:
panda_knomi_3d_diy_<theme_name>_<author_name>_YYYY_MM_DD.img-
<theme_name>: Custom theme name. -
<author_name>: Author's alias or name. -
YYYY_MM_DD: Date in year_month_day format.
Example:
panda_knomi_3d_diy_theme_author_2025_02_22.img. -
-
Share the
.imgfile on GitHub:-
If you don’t have a GitHub account, please register here.
-
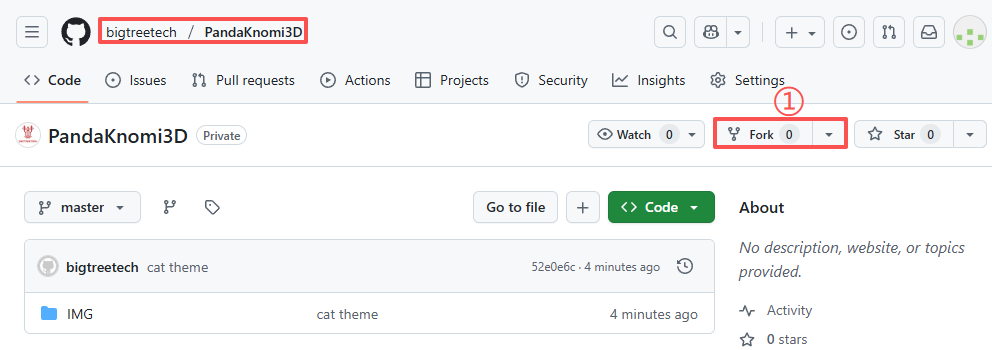
Visit Panda Knomi 3D’s GitHub.
-
Click ① Fork
-
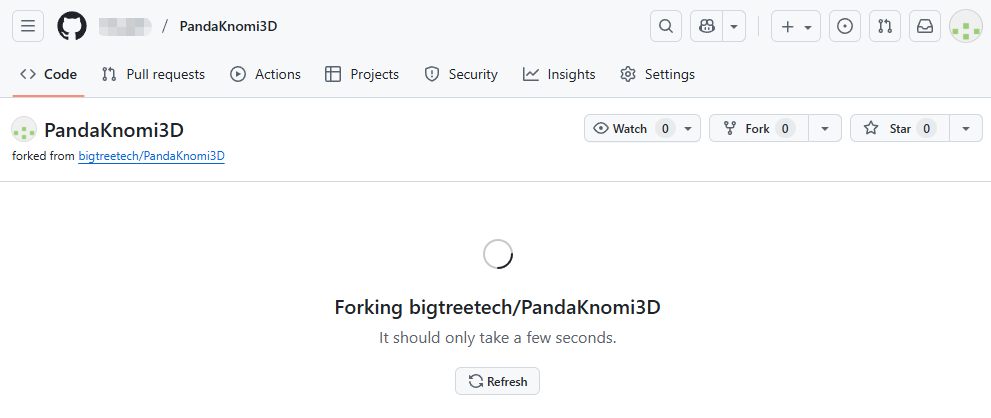
Click ② Create fork
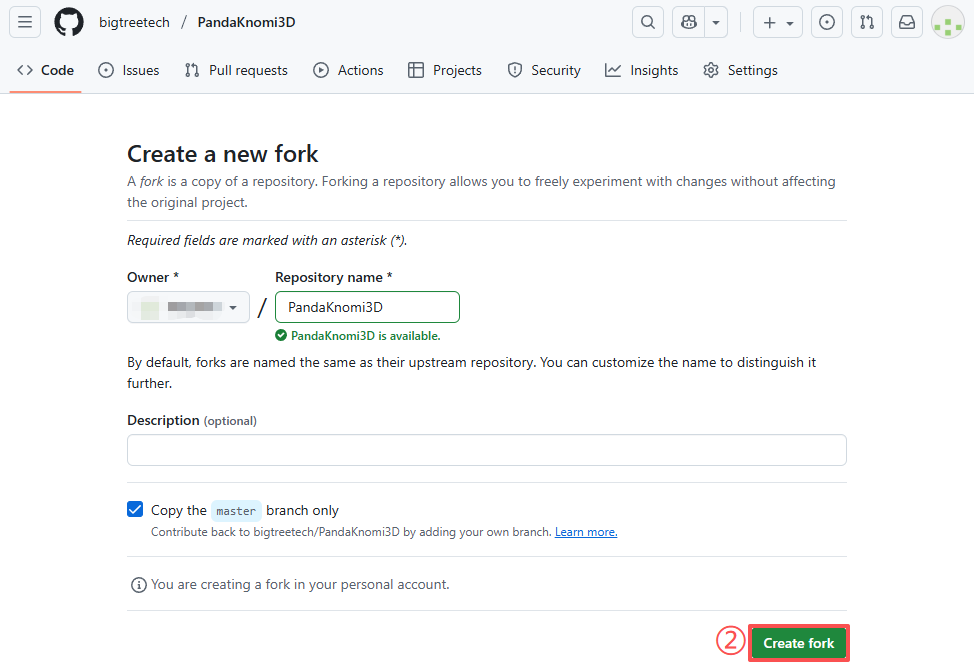
- Wait for the fork to complete
-
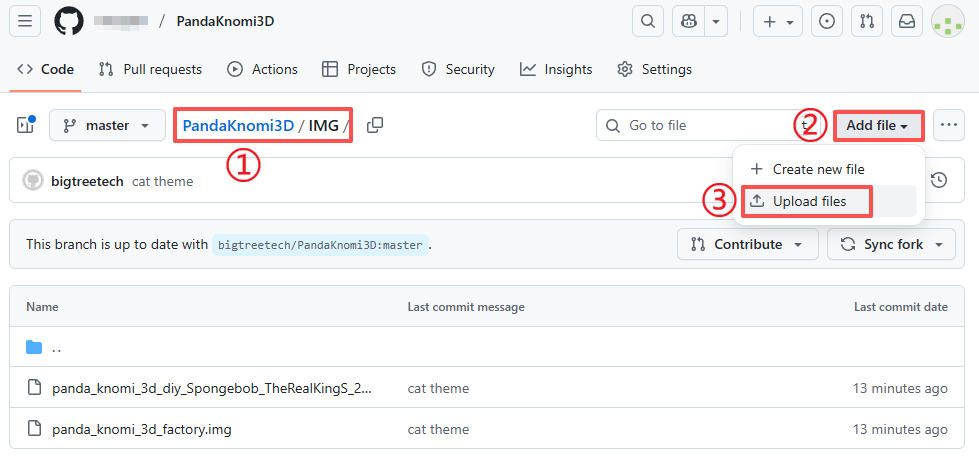
After forking is complete, ① go to the IMG folder -> ② Add file -> ③ Upload files
-
① Select the
.imgfile to upload, ② Enter a custom IMG title, ③ Write a description for the custom theme, ④ Commit file
-
① Contribute -> ② Open pull request

-
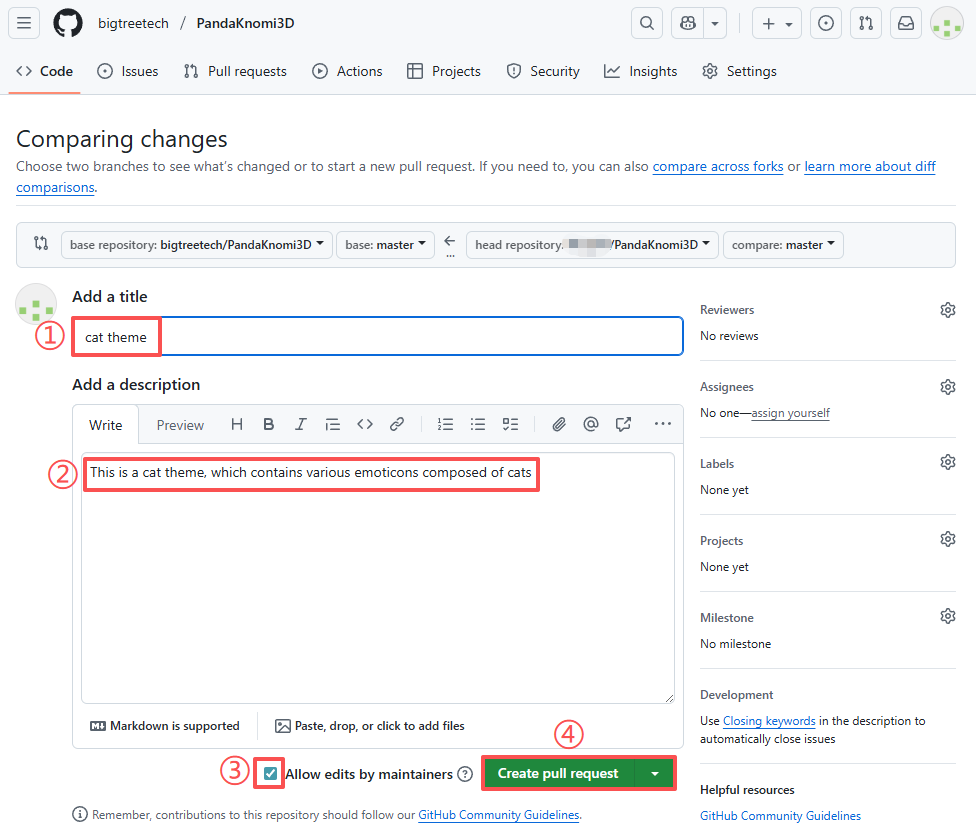
① Write a custom IMG title, ② Write a description for the custom theme, ③ Check Allow edits by maintainers, ④ Create pull request
-
Congratulations, you've completed sharing!
-
Restore Factory Settings
Please be advised that performing a factory reset will erase all personalized configurations on your Panda Knomi 3D. This includes your language setting, saved Wi-Fi network, custom hostname, AP hotspot credentials, all bound printers, and print progress display options. However, the theme color scheme will not be reset. Custom GIFs cannot be restored to the factory version; they can only be replaced by uploading a new GIF or updating an IMG file. The factory IMG file can be downloaded from Panda Knomi 3D GitHub.
Restore via Web UI
-
Go to ① Settings and click ② Restore Factory Settings.

-
A confirmation pop-up will appear. Click ③ Yes to confirm. Panda Knomi 3D will reset and reboot.

Restore via Hardware Button
Press and hold the Boot button on Panda Knomi 3D for 5 seconds. The device will reset to factory settings and reboot.

Firmware
Feature Requests
If you’d like to request new features for upcoming Panda Knomi 3D firmware releases, please submit them on the official GitHub repository:
How to Update Firmware
OTA
- Open the Web UI configuration page.
If Panda Knomi 3D is already connected to Wi-Fi, you can access the Web UI from any device connected to the same local network (via Wi-Fi or Ethernet). Alternatively, connect directly to the Panda Knomi 3D AP hotspot. Both methods work.
* **Option 1: Local Network Access**

    * Connect your device to the same local network as Panda Knomi 3D.

    * In your browser, enter the device’s IP address or hostname. The default hostname is: `http://pandaknomi3d.local`.

    * If a VPN is enabled, hostname resolution may fail. In that case, use the IP address directly.

* **Option 2: Connect via AP Hotspot**

    * Connect your device to the Panda Knomi 3D AP hotspot. Example (iPhone):

        * Go to **Settings** → **Wi-Fi**.

        * Enable Wi-Fi. Your device will scan for networks.

            <img src=img/PandaKnomi3D/en/wlan.jpg width="300"/>

        * Select the network starting with **Panda\_Knomi\_3D\_**, and enter the default password: `987654321`.

        * Once connected, a blue checkmark will appear next to the network name, and the Wi-Fi icon will be displayed in the status bar.

    * After connecting, you should see a **“Connected (Login/Authentication Required)”** prompt that redirects to the Web UI.

    * If not, wait 10–20 seconds. If it still fails, manually open [192.168.254.1](http://192.168.254.1) in your browser.
-
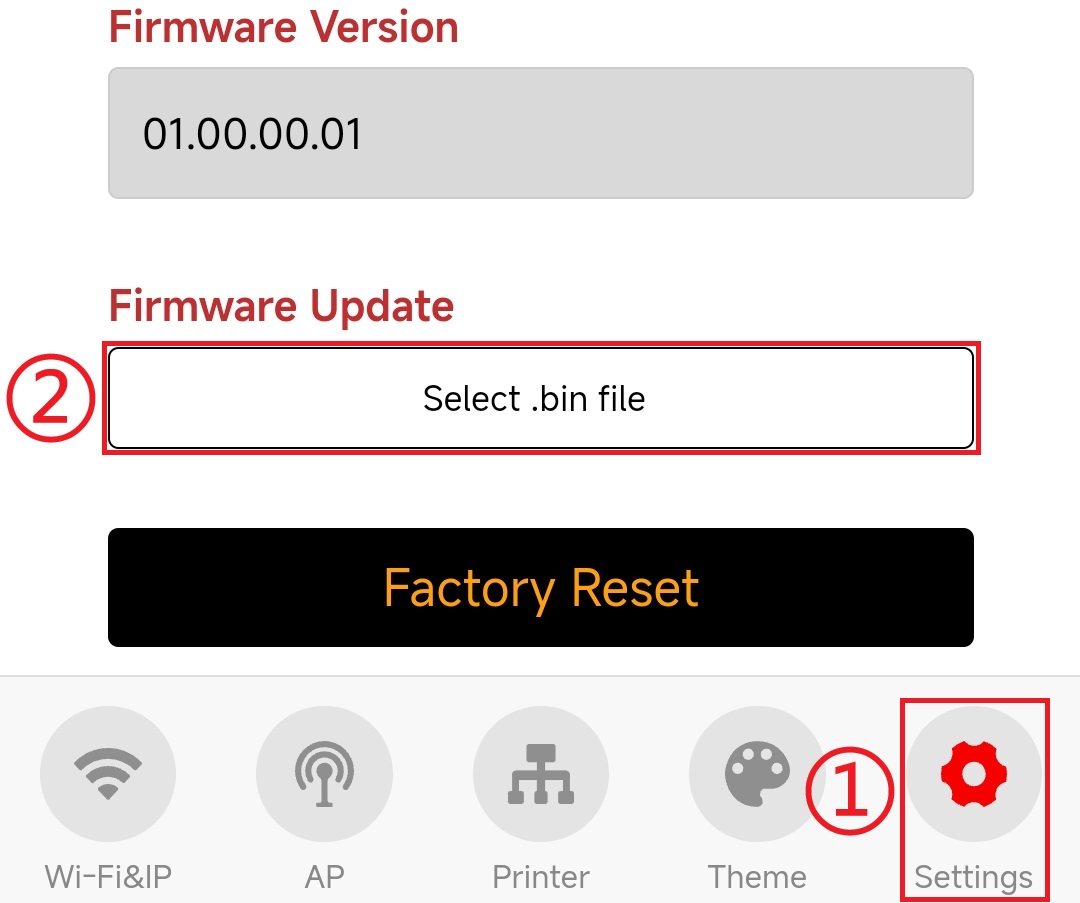
In the Web UI, go to ① Settings, click ② Select .bin File, choose the firmware file, and update. The device will reboot automatically after the update.
Flash_Download_Tool (USB Type-C Flashing)
Note: Panda Knomi 3D supports OTA updates by default. Use this method only if OTA is unavailable.
-
If your PC does not have the CH340 driver, download and install it: CH341SER.EXE.
-
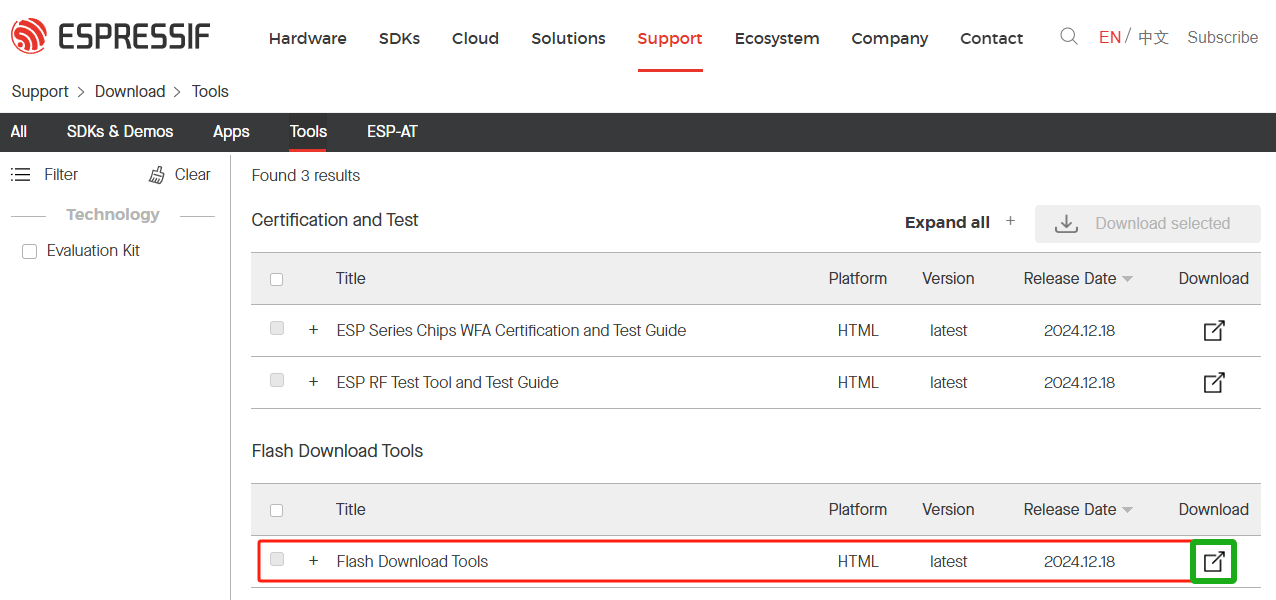
Download the Flash Download Tool.
-
Download the Panda Knomi 3D firmware.
-
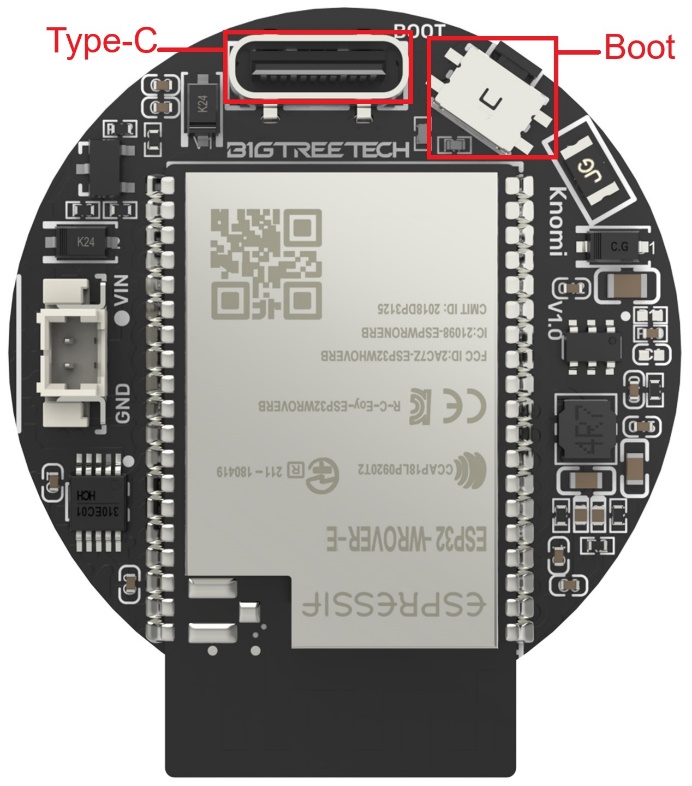
Hold the Boot button on Panda Knomi 3D and connect it to your PC with a Type-C cable. A new COM port should appear in Device Manager.
-
Open
flash_download_tool_3.9.8_6.exeand configure it as shown: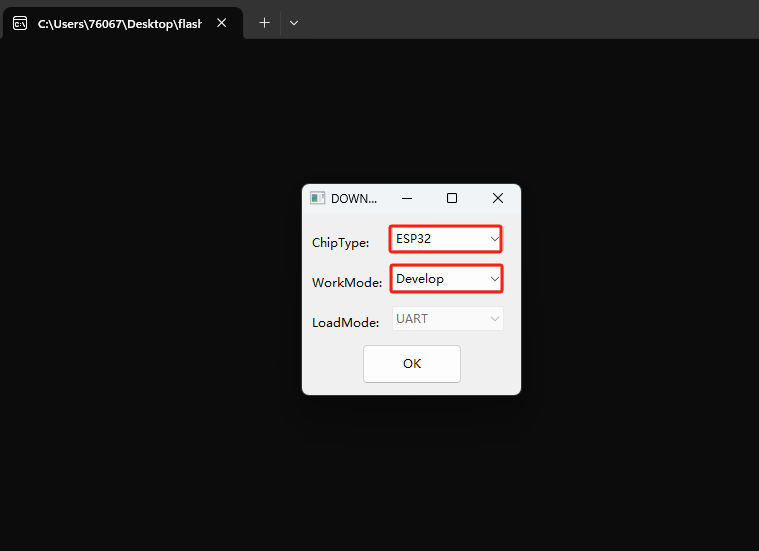
-
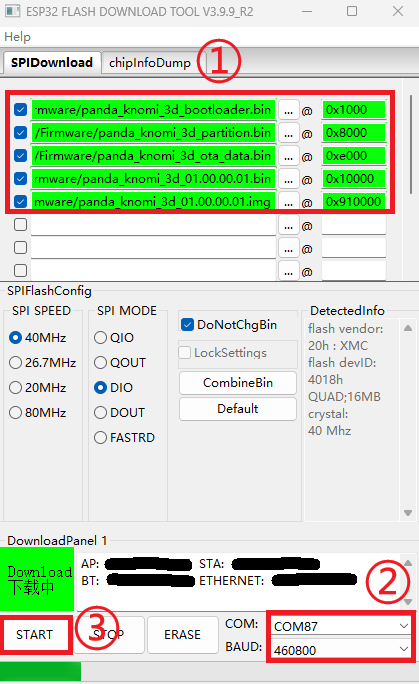
Configure the flashing tool as follows:
-
① Set the flashing addresses for the
.binfiles and enable all checkboxes:-
panda_knomi_3d_bootloader.bin→0x1000 -
panda_knomi_3d_partition.bin→0x8000 -
panda_knomi_3d_ota_data.bin→0xe000 -
panda_knomi_3d_01.00.00.01.bin→0x10000 -
panda_knomi_3d_01.00.00.01.img→0x910000
-
-
② Set the COM port to the correct Panda Knomi 3D port (check in Device Manager → Ports) and select a baud rate. Recommended: 460800.
-
③ Click START to begin flashing. When complete, power-cycle the device.
-
Firmware History
01.00.00.01
- Initial factory release.
Technical Support
Was this page helpful? If you have further questions about product usage or encounter other issues, please contact customer support: support01@bigtree-tech.com