EBB SB2209 USB V1.0
Product Profile
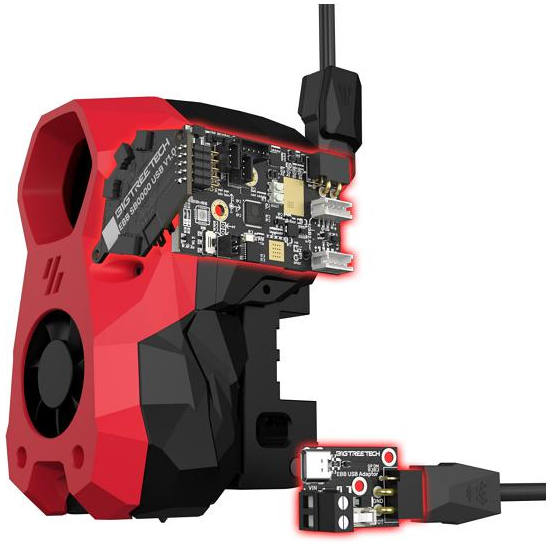
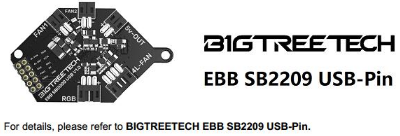
The BIGTREETECH EBB SB2209 USB V1.0 is a tool board designed for the Voron StealthBurner. It features convenient, user-friendly USB communication via a dual XT30 shielded cable for stable and high communication. It also includes an TMC2209 driver and LIS2DW accelerometer.
Feature Highlights
- Utilizes a high-performance MCU: RP2040 133MHz.
- The reserved BOOT and RESET buttons on the board allow users to enter DFU mode via USB to update the firmware.
- A specially designed circuit on the board protects the signal coming back from the thermistor, preventing MCU damage from shorted heater cartridge connections.
- The heater cartridge utilizes high-performance MOSFETs to increase the output capacity of this interface while reducing heat generation.
- Onboard HUB chip, reserved 3 USB ports to support multiple USB devices.
- The USB ports are equipped with ESD protection chips to prevent the MCU from being damaged by static electricity at the USB ports.
- Utilizes a high-speed signal conditioner to improve USB signal transmission and reduce disconnection risks.
- Comes with a dual XT30 interface shielded and grounded cable to minimize external interference.
- Utilizes more stable pin headers, increasing output capacity while avoiding poor contact risks.
- PH2.0 spacing sockets make DIY wiring terminals easier.
- DIY components, including connector housings, crimp terminals, and screws, are included for your convenience.
Specifications
| MCU | RP2040 Dual ARM Cortex-M0+ @ 133MHz |
|---|---|
| Input Voltage | DC12V-DC24V 9A |
| Logic Voltage | DC3.3V |
| Heating Interface | Heater Cartridge (HE0), max output current: 6A |
| Onboard Accelerometer | LIS2DW |
| Fan Ports | 2x PWM Fan Ports (FAN1, FAN2), 1x 4-pin Fan Port (4L-FAN) |
| Max Fan Output Current | 1A, peak 1.5A |
| Expansion Interfaces | Probe, RGB, USB2.0 x 3, I2C, Endstop, IND or FAN |
| Motor Driver | Onboard TMC2209 |
| Driver Mode | UART |
| Stepper Motor Interface | E0 |
| Temperature Sensor Interface | 1x 100K NTC (pull-up resistor is 2.2K), supports PT1000 |
| USB Communication Input Interface | XT30 2+2Pin |
| DCDC 5V Max Output Current | 1A |
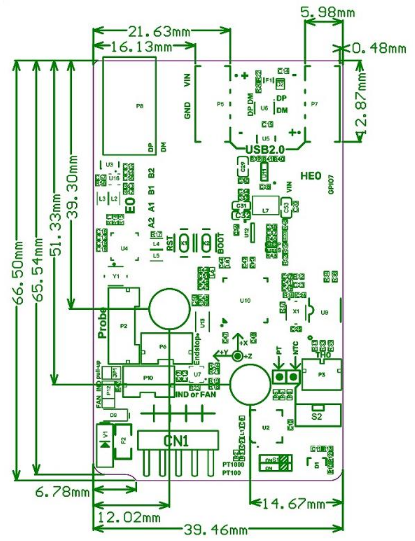
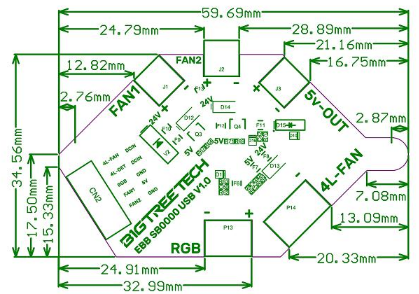
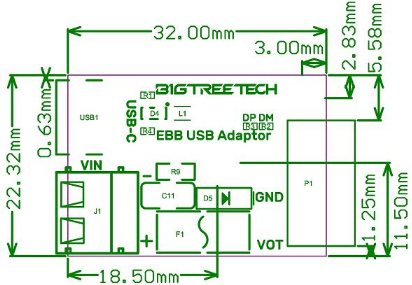
Dimensions
Peripheral Interface
Pin Description

Interface Introduction/Connection
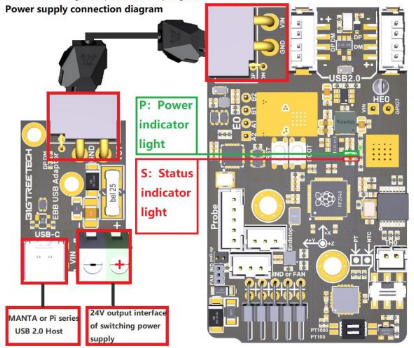
Power and USB Input Interface
When powered normally, the power indicator "P" stays on, and the status indicator "S" lights up when the program starts.
Heater Cartridge

100K NTC or PT1000
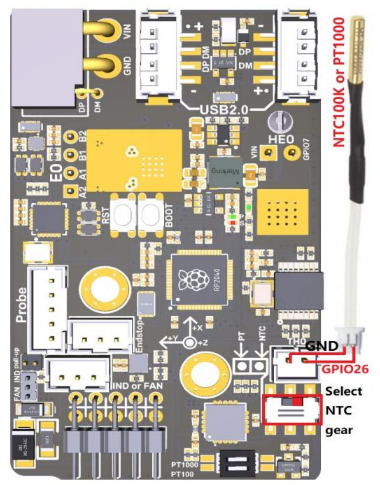
Note:
1. The factory default does not include the MAX31865 and related components.
2. The pull-up resistance value is 2.2K. When debugging the firmware, be careful not to incorrectly write it as 4.7K, as this can cause inaccurate temperature readings.
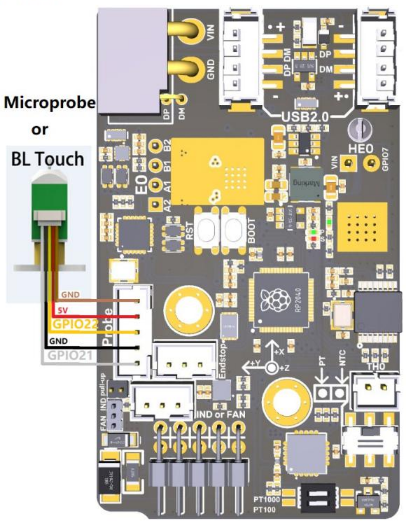
Probe
Endstop

Proximity Switch
Connecting the NPN Type Proximity Switch

Connecting the PNP Type Proximity Switch
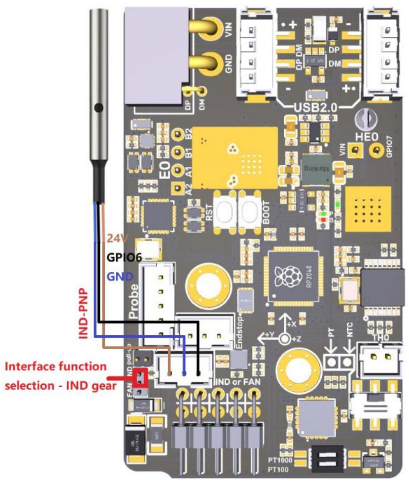
Note:
The interface only supports 24V proximity switches.
If using an NPN type proximity switch, use a jumper to short the two pins at the "pull-up" position.
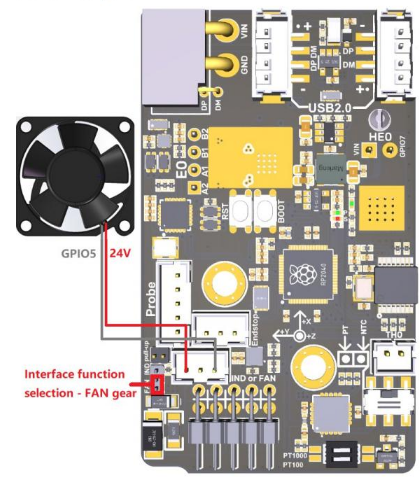
Connecting a Fan
Stepper Motor

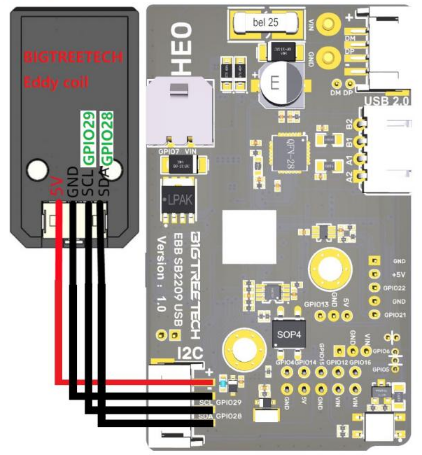
I2C
USB2.0

Note:
The three USB2.0 interfaces can only support one camera simultaneously.
It is recommended to use a camera with a resolution of 1080P or lower to maintain smooth performance.
Fan Connection and Voltage Selection
4-pin Fan
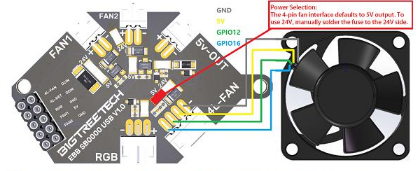
Note: The 4-pin fan interface defaults to 5V output at the factory. You will need to manually solder the fuse to the 24V side if you want to use 24V.
2-pin Fan
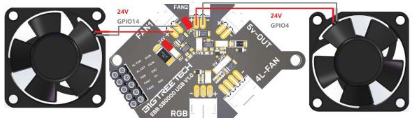
Note: The 2-pin fan interface defaults to 24V output at the factory. You will need to manually solder the fuse to the 5V side if they want to use 5V.
RGB
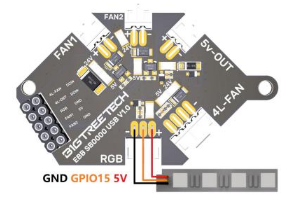
5V-OUT
KNOMI:
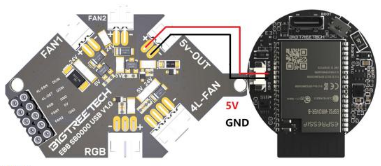
KNOMI 2:

Klipper
Compiling Firmware
1、After SSH connects to Raspberry Pi, enter the following in the command line:
Compile the firmware using the configuration below (if these options are not
available, update the Klipper firmware source code to the latest version).
[\*] Enable extra low-level configuration options

 Micro-controller Architecture (Raspberry Pi RP2040/RP235x)  --->

 Processor model (rp2040)  --->

 Bootloader offset (No bootloader)  --->

 Flash chip (GENERIC_03H with CLKDIV 4)  --->

 Communication Interface (USBSERIAL)  --->

2、After configuring, enter ‘q’ to exit the configuration interface. When asked to
save configuration, select ‘Yes’.
3、Enter make to compile the firmware. When make is completed, the required
klipper.uf2 firmware will be generated in the home/biqu/klipper/out folder.
Firmware Update
Raspberry Pi or CB1 firmware update through DFU
1、Use the adapter board to connect the BIGTREETECH EBB SB2209 USB V1.0 to Raspberry Pi/CB1, and ensure the power cable is also connected.
2、Hold down the Boot button, then press the Reset button once to enter DFU mode.
3、In the SSH terminal command line, enter
to query the DFU device ID.

Enter
to navigate to the klipper directory, then enter
to start flashing the firmware (note: replace 2e8a:0003 with the actual device ID obtained in the previous step).
4、After flashing, enter
to query the device Serial ID.
5、There is no need to manually press the Boot button to enter DFU mode for subsequent updates after the first flashing is completed. Directly enter
to flash the firmware (note: replace /dev/serial/by-id/xxx with the actual ID obtained in the previous step).
Configuring Klipper
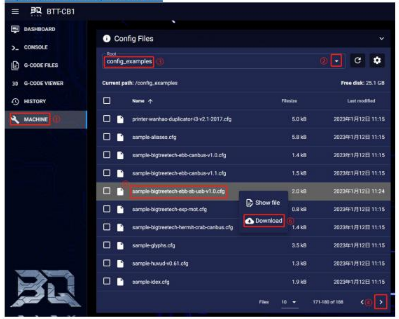
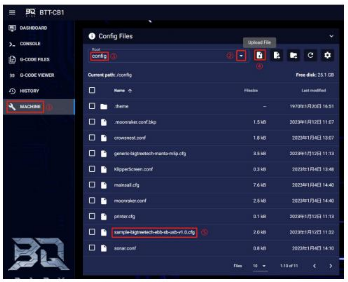
1、Access the mainsail web UI by entering the IP address of the Raspberry Pi into your browser. Using the path shown in the image below, download the reference configuration named sample-bigtreetech-ebb-sb-usb-v1.0.cfg. If this file is not found, update the Klipper firmware source code to the latest version or use the link to download it from GitHub:
https://github.com/bigtreetech/EBB
2、Upload the motherboard configuration file to Configuration Files.
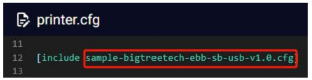
3、Add the mainboard configuration in the "printer.cfg" file:
[include sample-bigtreetech-ebb-sb-usb-v1.0.cfg]

4、Change the USB serial within the configuration file to match the actual ID of the motherboard.
5、Configure the specific functions of the module according to the instructions in the following link: https://www.klipper3d.org/Overview.html