Panda Touch

The CAD files for the Panda Touch can be downloaded here
Product Link: https://biqu.equipment/products/bigtreetech-panda-touch-5-display-for-bambu-lab-printers
Panda Touch Guide Video
IMPORTANT NOTE
The Panda Touch is currently compatible with all Bambu Lab printer firmware versions up until:
- P1P/S: 01.08.01.00
- X1C --> 01.08.02.00
- X1E --> 01.01.02.00
- A1 --> 01.04.00.00
- A1 Mini --> 01.04.00.00
It is possible that Bambu Lab may release a future firmware version that impacts the functions available on the Panda Touch. Bigtreetech will monitor all beta firmware versions, and if we find a firmware version that affects Panda Touch functionality, we will send out an alert via email, Aliexpress chat, and our social channels. Buyers can then decide whether or not they would like to perform the update at the risk of losing functionality. Note that the Panda Touch warranty does not cover lost functionality due to a Bambu Lab firmware update being performed.
Certain features of the Panda Touch, including initiating printing, controlling the motion system, adjusting temperatures, controlling fans, AMS settings/calibration, are likely to be affected by the authorization and authentication protection mechanisms in Bambu Lab's newly announced firmware which is currently only released for the X1 series. If using an X1 in cloud mode, these features may be unavailable. However, the ability to access printer status information, such as printing progress, nozzle temperature, and bed temperature, will remain unaffected while in cloud mode. To regain full control of X1 machines (or any machine with the new authentication firmware) when using the Panda Touch, you can manually enable Developer Mode under the LAN mode section.
For more details, please refer to the official announcements by BIQU and Bambu Lab: 1. https://bigtree-tech.com/blogs/news/announcement-on-bambu-lab-security-firmware-update 2. https://blog.bambulab.com/firmware-update-introducing-new-authorization-control-system-2/ 3. https://blog.bambulab.com/updates-and-third-party-integration-with-bambu-connect/
IMPORTANT USAGE INFORMATION
- When using "LAN Only" mode on a P1P or P1S, there is no need to connect the Panda Touch to a cloud account, and all printer functions will be available on the Panda Touch.
- When the printer is set to connect to the cloud, you will need to enable cloud mode functionality on the Panda Touch to retain the ability to control heaters and printing functions.
- Please check the firmware listing on the product page description to ensure that your printer firmware is compatible with the Panda Touch. Updating printer firmware to an incompatible version that may limit the functionality of the Panda Touch is not covered under the warranty.
- MicroSD card and USB drive files can currently only be read from the root directory and will only be recognized when models are sliced in Build Plate #1 in Bambu Studio and are in 3mf format. Folder browsing and thumbnail previews will come in a future firmware release.
- When running on its built-in lithium battery, the Panda Touch has a battery life of approximately 20 to 30 minutes, depending on the screen brightness. To maintain the battery and extend the lifespan of the product, it is advised to charge the Panda Touch or turn it off as soon as the battery runs out.
- The screen may flicker when the lithium battery is low on power. This flickering is normal and acts as a warning to users that the battery is almost empty. Users should then promptly charge the battery or turn off the Panda Touch.
- If you plan to turn your printer on and off frequently, we recommend running the Panda Touch on DC5V mode. This bypasses the battery and prevents it from going through many charge-discharge cycles. If you want to run off the battery, then simply flick the switch on the back of the Panda Touch to the battery power mode.
- Maximum Supported Capacity for USB Drive: 8GB.
Specifications
| MCU | Xtensa 32-bit LX7 dual-core ESP32S3R8 up to 240MHz clock speed. |
|---|---|
| Memory | PSRAM-8MB, Flash-16MB |
| Display Size | 5” |
| Resolution | 800 x 480 |
| Viewing Angle | IPS Full View |
| Display Colors | 16.7M |
| Communication | 2.4G Wi-Fi (IEEE 802.11 b/g/n) |
| Operating Temperature | 0-60°C |
| Operating Current (fully charged) | Screen active: 0.6A, Screen inactive: 0.2A |
| Operating Current (charging) | Screen active: 1.25A (0.95A for models after May 2024), Screen inactive: 0.85A |
| Logic Voltage | 3.3V |
| Built-in Battery | Enables Panda Touch portable use for up to 30 minutes. |
| Charging Time | 1.2 hours |
| Expansion Interfaces | I2C (For temperature/humidity sensors supported in future firmware, etc.) USB Drive (For reading 3mf files from USB drives - FAT32 only) |
Assembly Instructions
Overview

Charging Dock

- The power input has been outfitted with hot-plug protection, allowing users to hot-plug the power supply.
Packing List
 |
 |
|---|---|
| Panda Touch x 1 | Mounting Bracket x 1 |
 |
 |
| Magnetic Charging Dock x 1 | USB-C Charging Cable x 1 |
 |
 |
| M3x6 Screws x 4 Hex Key x 1 |
BTT Duck x 1 |
Installing Panda Touch
- Use the hex/allen key and the two M3x6 FHCS to assemble the Charging Dock and the Mounting Bracket as shown.

- Peel off the film from the bottom side of the Mounting Bracket.

- Ensure the printer surface is clean and free of oil, grease, etc., attach the assembled Charging Dock centrally atop the original screen. Apply pressure to adhere fully and allow 12 hours for optimal adhesion.

- Attach the Panda Touch to the Charging Dock.

Wiring and Power Connection
- Remove the foam covering the USB port on the printer to access the port.

- Thread the Charging Cable through the hole on the right side of the printer, then plug the USB-C end into the power input of the Charging Dock.

- Insert the USB-A end of the charging cable into the USB port on the printer to connect the power supply. Then arrange the cable in the clip as shown.
TIP: Be 100% sure that you have threaded the cable into the clips to prevent the tool head from catching it during a homing sequence.
 * You have three options on the rear power switch.
* In the
* You have three options on the rear power switch.
* In the OFF position, the battery will charge but the Panda Touch will not be powered up.
* When switched to the battery position, the USB will charge the battery and power the Panda Touch at the same time. If the Panda Touch is removed from the dock then the battery will take over and power it for up to 30 minutes. Upon being returned to the dock, the USB will once again resume charging and powering the Panda Touch. This mode is recommended for users who do not turn their printer on and off often. Note that there is no battery charge level indicator. The Panda Touch has been designed for brief periods of use away from a dock and not for prolonged mobile use.
* When switched to the DC 5V position, the Panda Touch is powered directly from the USB input, while still charging the battery. Removing it from the dock will power it off without the Panda Touch draining the battery. This mode is recommended for users who often turn their printer on and off as it will preserve battery charge cycles. If such users wish to use the Panda Touch in a portable mode then they can flip the switch to battery power after removing it from the dock.
 * Panda Touch has been successfully installed and powered on. Please follow the on-screen instructions for the next setup step.

User Interface Instructions
First Time Connection Guide
You will be presented with the screen below after booting for the first time or after executing the Restore Factory Settings command.
Language Selection Guide

- Choose a language for Panda Touch and press
Next
WiFi Connection Guide

-
During the initial setup the Panda Touch will scan for WiFi networks and then display up to 20 networks with the best signal strength. If you cannot find your desired network in the list then tap
Refreshand the Panda Touch will rescan for WiFi networks.NOTE: The current version of firmware does not support connecting to hidden WiFi networks. Also, when the Panda Touch is connecting to WiFi, it cannot perform the WiFi scanning task at the same time.
-
Click on the WiFi network that you would like to connect to in the list, and the keyboard interface will pop up. After entering the correct password, click "OK" to start connecting to WiFi. (Password length: 8~64 characters)
NOTE: If you are using a mesh network with several WiFi networks that share the same SSID then select the SSID with the strongest signal strength in the list.
- The connection status will be displayed next to the name of the WiFi network. A
Spinnergraphic means that WiFi is still attempting a connection, and a✔means the connection is successful. - After the connection is successful, the
Nextbutton will be enabled. ClickNextto enter the printer connection menu.
Printer Connection Menu

- There are two possible methods to connect the Panda Touch to a printer.
- Automatic Scanning (recommended).
- Manual data entry.
Finding Your Connection Details
During this process you may need to enter connection details. These can be found using the steps below.
P1P & P1S
- Navigate to "Settings->WLAN" on the LCD menu, and click "OK".

- Here you will find the IP addess and access code (only Access code is needed for automatic scanning).

- Find "Settings->Device" on the screen menu, and click "OK".

- Here you will find the serial number of the printer. This is only needed for manual entry mode.

Automatic Scanning
- For automatic scanning simply tap the
Scanbutton. Bambu Lab printers that are on the same WiFi network will be displayed in the scan results with theName,Printer IP,SNandModelinformation pre-populated. Pre-populating these fields helps to make adding printers easier and can result in fewer mistakes due to manual data input errors. The only data that you will need to enter is theAccess Codewhich can be found within the printer WiFi/LAN menu. Instructions on how to find your access code will be displayed on the Panda Touch screen by tapping the info icon in the bottom left. Printers which have previously been connected to the Panda Touch will still be displayed in the scan results however the Panda Touch will not allow them to be added again andAlready addedwill be displayed near to the printer icon. Once you have entered your access code you can confirm the connection or manually add some of the data below.
Manual Data Entry
- You can click on the printer icon on the left to enter the menu for selecting the printer model. You must set it according to the actual model of the printer you are connecting to. The Panda Touch will also perform some checks in the background to confirm the model. The available models are as follows:
- P1P
- P1S
- X1C
- A1 mini
- A1
After selecting a model using the icon, the content in the Model field will be filled with the corresponding model name.
- After selecting the printer model, there are 4 required fields. These fields contain information necessary to connect to and identify the printer. Tap the
iicon and swipe left and right for instructions on how to find this information on your printer. Name: a custom name for users to identify the printer. (length: 1~15 characters)Printer IP: for Panda Touch to connect to printer. (length: 7~15 characters)Access Code: for Panda Touch to connect to printer. (length: 8 characters)SN: for Panda Touch to connect to printer. (length: 15 characters)- There are 4 optional fields which may help you to identify certain parameters of the printer during later use.
Model: The model name identifies the exact model of the printer and defines what picture is associated with it.P1P,P1S,X1C,A1 mini,A1, or customized. (length: 0~15 characters)Filament Color: The color of the filament used by the printer. (length: 0~6 characters)Filament Material: The material of the filament used by the printer. (length: 0~6 characters)-
Nozzle Diameter: The diameter of the nozzle used by the printer. (length: 0~6 characters) -
Confirmbutton After filling in therequiredinformation, you can click theConfirmbutton to start connecting to the printer. The title bar of the Panda Touch will display the status of the connection.
Cloud Mode Functionality
If any of your P1P/S printers are not set to LAN Only mode then you are going to need to enable cloud connectivity to them from the panda touch in order to control the functions below:
* Heating
* Starting prints
* Pausing prints
* Stopping prints
Follow the steps below to enable cloud connectivity to those printers that need it.
Add a Bambu Cloud Account
- Tap to jump to the settings page and then tap the
Login BambuLab accountbutton.
 * Select your region by tapping the arrow at the top right of the resulting pop up.
* Users in China use mobile phone numbers, while users in global regions use email addresses.
* Press 'Send code' button to get code from email.
* Select your region by tapping the arrow at the top right of the resulting pop up.
* Users in China use mobile phone numbers, while users in global regions use email addresses.
* Press 'Send code' button to get code from email.
 * Tap the confirm button once you've entered the login details.
NOTE: Currently, two factor authentication needs to be turned off in order to enable cloud mode on the Panda Touch. If you would like to keep it enabled then you can turn it off, enable cloud mode on the Panda Touch and then turn it back on. Note that you will likely need to repeat this process every three months as the login details will expire on the Panda Touch after that period.

Synchronize the printers under the account to the local device
- After a successful login, you can choose to convert the communication between all of your existing printers and Panda Touch to cloud mode.
- We recommend only converting all of the printers if all of your machines run using cloud mode. If any use LAN Only mode then it is better to manually set each machine to cloud mode as described in How To Change Working Mode Between The Panda Touch and Printer.

- If you want to convert your existing printers to cloud mode then tap "Yes".
- During this process, the printers must be on the same network as the Panda Touch. In case of a poor network connection, you may need to re-edit the printer's IP address.

- Once a printer works in cloud mode you will notice a green cloud associated with its card in the multi printer view. The cloud indicates the communication method between the printer and Panda Touch.
- You will also notice a green arrow pair to indicate the connection status with that printer.

How to delete a account
- Click the "X" button in the upper right corner of the account information to delete the account information saved on Panda Touch.
- After deleting the account information, the communication mode between Panda Touch and the printer will be changed to local mode. Note that this will not set the printer itself to
LAN Onlymode but rather it will tell the Panda Touch to only speak to the printer using LAN mode which may result in the loss of some functions.

How To Change Working Mode Between The Panda Touch and Printer
- Navigate to the printer/group card page.
- Find the printer that you would like to enable or disable cloud connectivity for.
- Scroll down to the
Editbutton for that printer. - Select
Enable cloudto set that printer to clould connectivity mode.TIP You must have a cloud account entered into the settings menu otherwise you will not be able to set any printers to cloud mode.

Keyboard interface
①: Use this key to hide or show the entered information.
②: Switch between upper and lower case letters.
③: Switch to `Symbol input`.
④: Switch to `Number input`.
-
Letter input:

-
Symbol input

-
Number input

Display of Print Tasks and SD Card Thumbnails on the Home Screen

Note: Only displays print tasks initiated from Bambu Studio with .3mf files of size <=20MB. The X1 series printers do not support this feature. Thumbnail Mismatch: A mismatch will only occur if the timestamp of an image in the 'image' folder matches the timestamp of another print file. Enhanced loading thumbnails: There is a option for loading thumbnails in setting page, if you turn on this then it will bring a long delay for start printing from u-disk and do something from the sd-card panel.
Filament Control
The Panda Touch allows users to configure the type and color of the filament being used on their external spool holder and their AMS. Users can also load and unload Filament using this menu.
When performing any actions, please ensure that the correct AMS unit and filament slot is selected. You will know that the filament is selected when it has a red border around it. If nothing has been selected then the Load and Unload buttons will be greyed out.

Filament Drying
The Panda Touch facilitates drying filaments on both the X1 series and P1S printers.
* Tap the “Dyring” button

- Follow the subsequent steps as displayed on the screen.

Skip Objects
Note : Begin printing tasks via the Bambu Studio or the Handy app.

HMS (Health Management System)

- Tap the title bar of Panda Touch, and the HMS notification center menu will expand.
- When a new HMS notification is detected, Panda Touch will automatically expand the HMS notification center.
- The upper left corner of the title bar will display the number of the printers that have sent HMS notifications.
- Click on the corresponding HMS notification to pop up the wiki link QR code for troubleshooting this problem.
- Click
Xto ignore this notification. - Click
Ignore Allto ignore all notifications. Note: the Panda Touch will ignore notifications from all printers but the X1C. Since the X1C repeatedly sends notification information at regular intervals, ignored notifications may reappear shortly thereafter.
Grouping logic
The Panda Touch allows you to create up to 10 groups that can each contain individual or multiple printers.
How To Add A Group
- Tap + in the connected printer list to pop up the multi function menu.

- Choose the add group option.

-
Choose the printers which you want add to the group and ensure that you select which one should be the leader (other printers in the group will follow the commands sent to the leader).

-
Tap next, input the group name and click "OK".

- You now can see the group in the printer list, tapping this group will allow you to control the whole group but the controls presented will be those of the group leader.
Switch Between Group and Individual Printer Control
- To control an individual printer, simply click on the card that corresponds to it and you will notice the name in the top bar change to the name of that printer. You can now send commands to it in isolation even if it is part of a group.
- If you send a command to an individual printer that takes some time (such as homing) and then you send a command to a group that it belongs to, the second command will be ignored if the first is still busy.
- To control an entire group, simply click on the card that corresponds to that group and you will notice the name in the top bar change to the name of the group and the name of the leader, separated by a forward slash. You can now send commands to the leader and other printers in the group will follow.

Considerations For Printing From USB
When trying to print from USB, please take note of the important points below.
- Ensure that the file system of the USB flash drive is formatted as FAT32.
- Export the
.3mffile from either Bambu Studio or Orca Slicer using theExport plate sliced fileoption.

- Write the sliced
.3mffile to the root directory of the USB flash drive - Panda Touch only supports files that are sliced on
Build Plate #1in Bambu Studio. - Panda Touch only supports
.3mffiles and does not support.gcodefiles. - Panda Touch only supports reading files in the root directory and does not support reading files in folders.
- Insert the USB flash drive into the Panda Touch, and then go to the
USB flash drivemenu.

Start Printing With One Printer
- Tap to choose the file on the USB disk or SD card to print.
-
Set printing parameters. Depending on the printer, you may be presented with:
Bed LevelingFlow Calibration(P1PandP1Sdo not have this feature, so these models of printers will not display this option.)TimelapseUse AMS(Panda Touch will automatically identify whether this printer has AMS plugged in and then determine whether this option needs to be displayed.)Auto Power-Off(Automatically detects the online Panda PWR and enables the automatic power-off feature.)RST Usage(Automatically detects the online Panda PWR and resets the power usage of Panda PWR)
-
Please make sure that the sliced
.3mffile is compatible with the selected printer. -
If using an AMS, please make sure that the filaments in the AMS tray are consistent with those in the sliced
.3mffile as there is no ability to dynamically map filaments at the start of the print. -
If you started the print from USB then the Panda Touch will start to upload the files in the USB flash drive to the root directory of the printer's MicroSD card. To avoid issues with the upload, please ensure that:
- There is an MicroSD card inserted into the printer.
- The remaining capacity of the MicroSD card is sufficient to write the files to be uploaded.

-
Printing will begin once the upload is complete. For very large
.3mffiles the transfer time may take some minutes to each printer. -
After starting the print the Panda Touch will automatically jump to the main interface and display printer data.

Group Printing
- Group printing is only supported with files stored on a USB disk.
- Tap to choose the file on the USB disk to print.
- Set printing parameters. Depending on the printers in the group, you may be presented with:
Bed LevelingFlow Calibration(P1PandP1Sdo not have this feature, so these models of printers will not display this option.)TimelapseUse AMS(Panda Touch will automatically identify whether this printer has AMS plugged in and then determine whether this option needs to be displayed.)Auto Power-Off(Automatically detects the online Panda PWR and enables the automatic power-off feature.)RST Usage(Automatically detects the online Panda PWR and resets the power usage of Panda PWR)
- Tick box print options for a particular group will be based on the functionality available for the most functional machine in the group. For example, you are using a group which contains X1C\P1P\P1S, you will have the lidar scan option available but this option will only be sent to the printers in the group that support it.

- Panda Touch will generate a list of available printers for you choose from.
-
Printers and groups that are already busy will be excluded from this list. This means that if a single printer in a group is already busy then you will be unable to print to any printers in that group. This allows groups to always remain in sync with each other.
-
Please make sure that the sliced
.3mffile is compatible with the selected printer(s). -
If using an AMS, please make sure that the filaments in the AMS tray(s) are consistent with those in the sliced
.3mffile as there is no ability to dynamically map filaments at the start of the print. -
The Panda Touch will start to upload the file in the USB flash drive to the root directory of the printer(s) MicroSD card. To avoid issues with the upload, please ensure that:
- There is an MicroSD card inserted into the printer(s).
- The remaining capacity of the MicroSD card is sufficient to write the files to be uploaded.

- Printing will begin once the upload is complete. For very large
.3mffiles the transfer time may take some minutes to each printer.

- After you start a print you will be taken to the print summary page where the status of each printer in the group is summarized on individual cards.
Group Printing Summary Page
When a group is selected and multiple printers in the group are busy printing, the Panda Touch will display the Multiple printing menu as shown below.

The following group controls exist from this menu:
①: Turn ON/OFF the chamber LED of the printers in the group.

②: Stop all print jobs in the group.

③: Pause/Resume all print jobs in the group.
Group Printing Delay Function
The group printing is delayed based on this time, and if the current printer heats up or the time is up, the print job is sent to the next one.

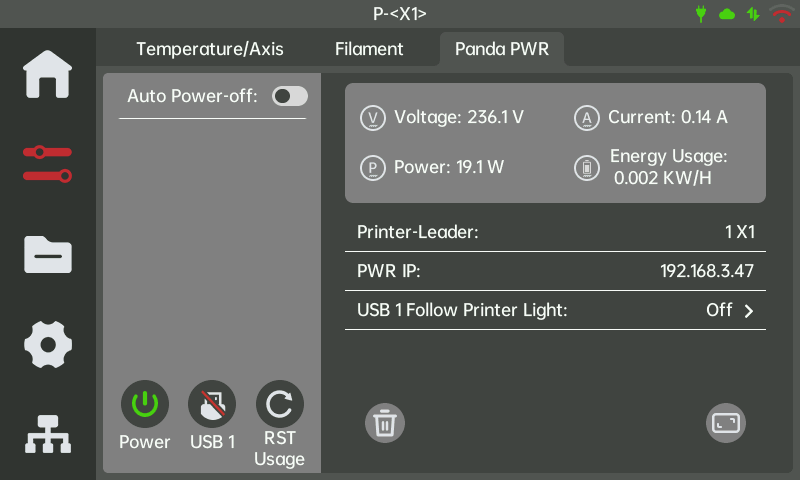
Connecting with Panda PWR
Binding Panda Touch and Panda PWR
- Open the Panda PWR page
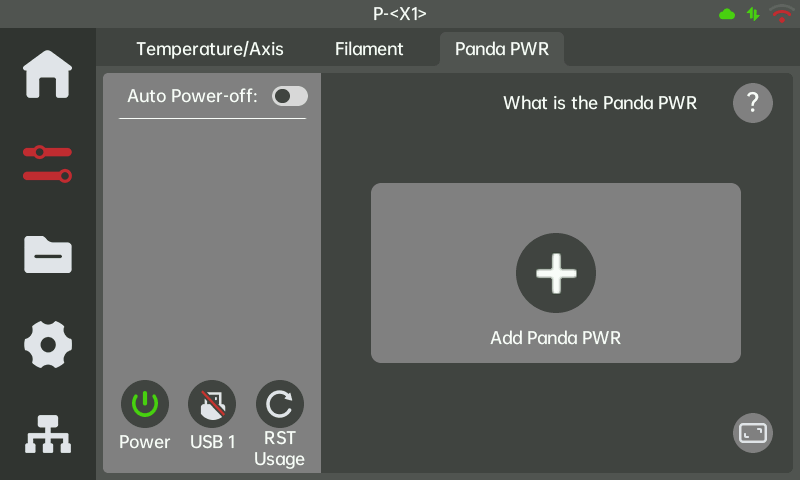
- Press and hold the "Bind" button until the blue light starts flashing (approximately 3 seconds).
-
Place the Panda Touch on the Panda PWR to establish the connection.
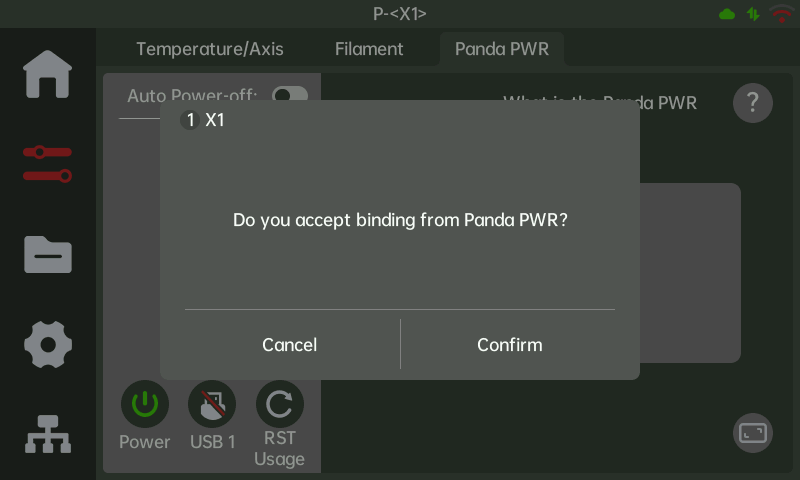
-
After successful binding, the data of Panda PWR will be displayed on this page.
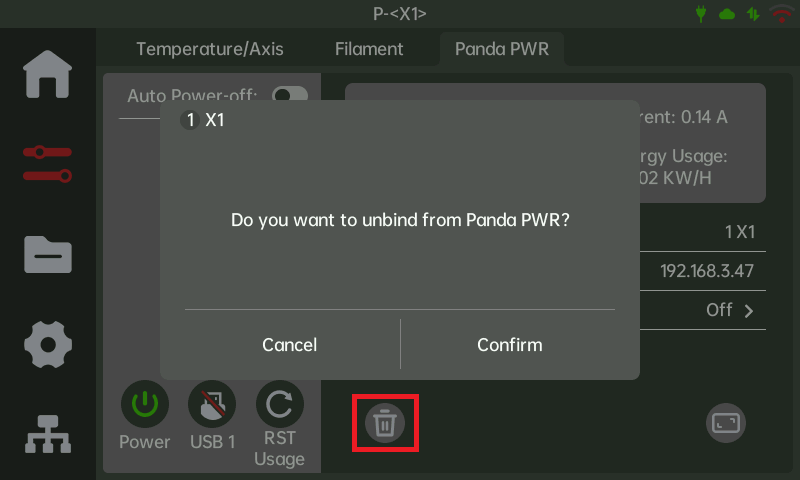
Unbinding from Panda PWR
- To bind Panda PWR to another device, unbind the current connection first.
Shutdown After Printing
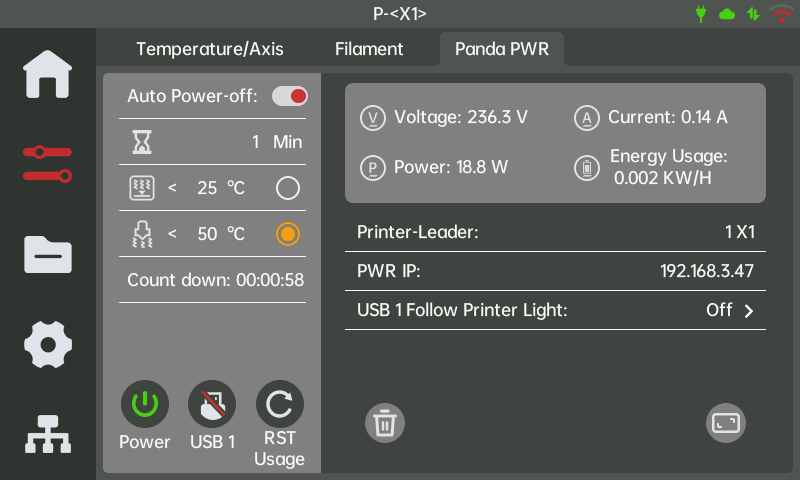
Enable the automatic power-off feature to have the printer shut down automatically after printing. Set the countdown timer and temperature threshold; the countdown begins once conditions are met, and Panda PWR will cut off the power upon countdown completion.
-
Activate the Automatic Power-Off
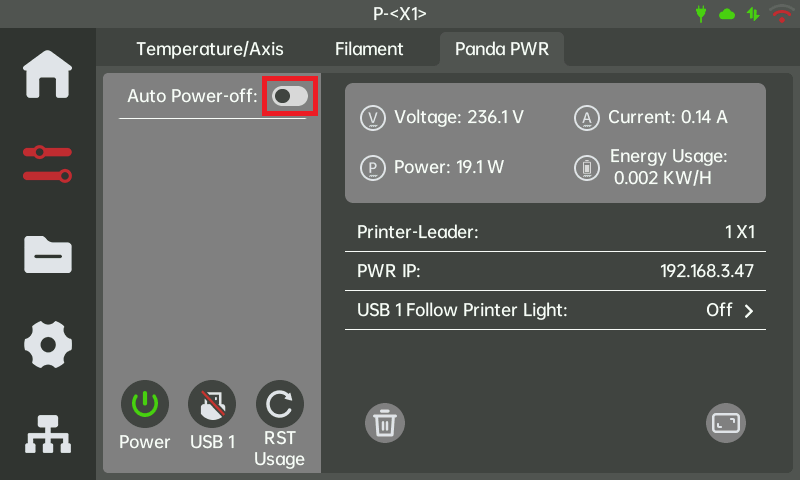
-
The countdown starts automatically when the printer is online and the temperature reaches the set limit. The countdown pauses if conditions are not met and resumes once they are.
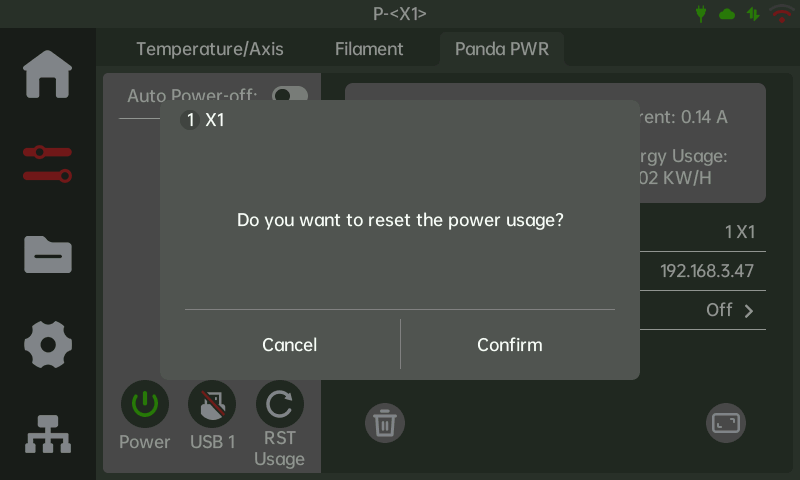
Reset Power Usage
To reset the recorded power consumption data, click the "RST Usage" button.
Hiding the Panda PWR Control Interface
- Navigate to the settings menu, tap on Panda PWR, and select 'Off'.

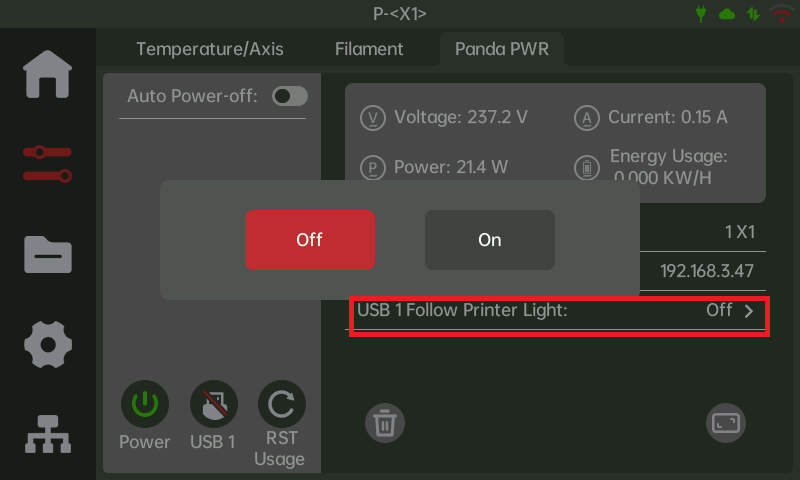
USB1 Follows Printer Lights
- Set to ON: USB1 will mimic the printer's LED status. When the LED is on, USB1 outputs 5V; when off, the output is disabled.
- Set to OFF: USB1 functions manually and does not respond to the printer's LED status.
Sorting Function for SD Cards and USB Drives
Sort by Name
Click "Name" to sort alphabetically from 'A' to 'Z' or reverse. Sorting by Chinese names is currently unsupported.

Sort by Date
Click "Date" to sort by date from newest to oldest or vice versa.

Thumbnail Preview of USB Files
Click the icon in the lower right corner to switch to thumbnail view.

Click again to return to the file list view.

Note: Only 3mf files generated by Bambu Studio are supported for thumbnail previews. If the thumbnail is not displayed correctly, consider re-slicing with Bambu Studio.
File Folder Access for SD Cards and USB Drives
-
Tap on a directory to switch to it

-
USB Drive

-
SD Card

Reprinting
Reprinting from the Home Screen

Note: To reprint, ensure the file is stored in the default directory on the printer’s SD card (selectable between Cache or the root directory via Panda Touch settings).
Reprinting from History

Change the Default Directory on the printer’s SD card

Adding New Languages

-
German (Deutsch)

-
Spanish (Español)

-
Japanese (日本語)

How To Change The Panda Picture
Use this tool to change the picture of the panda.
* Ensure that the firmware version of Panda Touch is 1.0.6 or above.
* Please ensure that the image you want to replace meets the following requirements:
* Pixel width less than 280
* Pixel height less than 306
* Pixel depth 32-bit color
* Image format PNG.
* Upload the yml file if you need to replace the label on the UI of Panda Touch.
* Panda Touch UI Translation

-
Click generate button.

-
Open the web ui from Panda Touch and update filesystem by this .img file.
Panda Sense
Temperature and Humidity Display
-
printing

-
Printer Standby

-
Temperature/Axis page

Troubleshooting
Connection Troubleshooting
Connect Failed

This prompt means that the Panda Touch cannot establish a connection with the printer. There are generally several which can cause this:
-
The printer and Panda Touch are not on the same LAN - Check if the WiFi connected to the printer and Panda Touch is the same SSID. If not, connect them to the same SSID.
-
The router restricts communication between devices within the LAN - This is usually the case when using the "guest" network of a wireless router. It is recommended to the devices to a normal WiFi network instead of a guest WiFi network.
-
Incorrect printer IP address - The incorrect IP address was typed into the Panda Touch or the IP address of the printer has been changed by the router. Check that the IP address within the Panda Touch matches that of the printer. In a future firmware update, the Panda Touch will be able to automatically find and heal connections that have been broken due to the router changing the IP address of the printer.
-
Incorrect printer SN code - An incorrect SN code was entered. Check that the SN of the printer matches that within the Panda Touch.
-
Weak WiFi signal - Both the Panda Touch and printer have icons displaying WiFi signals, please try to ensure as strong a WiFi signal as possible.
Authentication Failed

This prompt means that Panda Touch can establish a connection with the printer but authentication has failed. This is usually caused by an incorrect access code. Please check whether the printer's access code matches the set one. An incorrect access code are usually caused by the following:
- Input error.
- Clicking the refresh access code button on the printer resulting in the code changing.
- Enabling / Disabling the printer's LAN mode resulted in the printer generating a new access code.
- Exiting or logging back into the Bambu Lab account resulted in the printer generating a new access code.
Firmware
Feature requests
If there is something you would like to see in a future release of the Panda Touch firmware, please let us know by logging a feature request on the official Panda Touch Github repository.
How to update firmware
Note: Updating versions V1.0.2 and above requires sending two files to Panda Touch. One is the firmware file (.bin) and the other contains the graphics and fonts (.img). This will help us to add more languages to the Panda touch in the future. Be sure to download both the .bin and .img files.
Over The Air Updates
- Download the firmware binary file (Download link in Firmware History) to the device being used to perform the update. This can be a computer or a mobile device running an OS such as iOS or Android. Hereafter it will be referred to as the "computer".

- Connect the Panda Touch to the WiFi on the same LAN as the computer.
- Find the IP address of the Panda Touch from the
Networkmenu.

- Enter the Panda Touch's IP address in the computer's browser to access the web UI, and then click "Update FW" button.

- Click the "Choose File" button, then select the downloaded firmware binary file. The Panda Touch will automatically start updating.

- After the update is completed, the Panda Touch will automatically restart and run the new firmware.

How to update img file
- When the img section of the new firmware changes, the user interface will ask you to update the img file.

- Download the img file to the device being used to perform the update. This can be a computer or a mobile device running an OS such as iOS or Android. Hereafter it will be referred to as the "computer".

- Enter the Panda Touch's IP address in the computer's browser to access the web UI, and then click "Update File" button.

- Click the "Choose File" button, then select the downloaded img file. The Panda Touch will automatically start updating.

- After the update is completed, the Panda Touch will automatically restart and be ready to run the latest firmware.

Firmware History
V1.0.7.1
Bug Fixes
- Panda Sense Issue: Panda Sense temperature values not updating.
- Skipping Objects Not working: Can not select object.
- Reprint function Not working: Synced with Bambu's latest cloud print request format (custom filaments temporarily unsupported).
- Printing with AMS Not working: Added configurable AMS mapping to resolve AMS printing issues. (supports AMS-1 only, custom filaments unsupported).
- Thumbnails in other directories not displaying.
- Sd-card File year information missing.
Functional Optimizations
- Increased thumbnail Size: Increased homepage thumbnail resolution from 128 * 128 to 280 * 306 when printing via Bambu Studio/Handy app.
- Real-time printer model updates in background.
V1.0.7
Bug Fixes
- Printer Name Synchronization Issue: Ensures printer names are updated in real-time from the server.
- Axis Direction Error Issue: Resolves issues with incorrect Y-axis and Z-axis movement on A1 and A1 mini printers.
New Features
- Skip Objects Support: Allows users to skip objects during the print process.
- Filament drying: Adds filament drying functionality specifically for P1S.
V1.0.6.3
Bug Fixes
- Fixed Crash when start printing: Crash when start a print task from u-disk.
- Fixed Crash in OTA page: Crash when click ssid of wifi in OTA page.
Functional Optimizations
- Stop loading thumbnail when printing.
[V1.0.6]
New Features
- Supports Panda Sense for Displaying Temperature and Humidity.
- Supports thumbnail display of print tasks and SD card on the home screen: Only displays print tasks initiated from Bambu Studio with .3mf files of size <=20MB. Note: The X1 series printers do not support this feature.
- Supports quick reprint from the home screen after printing completion: The print file must be stored in the default directory on the printer's SD card (default directory can be set to Cache or root directory in Panda Touch settings).
- Display and Initiate from Print History Records: Currently supports displaying the latest 12 print records only.
- Folder Directory Access: Includes access for both SD card and USB drives.
- Filament Management Interface: Displays the currently loaded filament with a new UI closer to the official operating experience.
- AMS Interface Humidity Display: Displays a humidity icon and data in the bottom right corner.
- Expanded Filament Type Selection in Filament Management Interface: Filament editing now synchronized with the types settable via the Handy APP.
- Group Printing Delay Function: Allows delayed printing operations when initiating group printing via USB drive.
- Hide Panda PWR Control Interface: Option to enable/disable in Panda Touch settings.
- Multilingual Display: Currently supports German, Spanish, and Japanese. Each language uses a different .img file, selectable as the third language option.
Functional Optimizations
- Pre-Selection Options Before Printing: The Auto Power-Off feature of Panda PWR is now by default set to off.
- Optimization of New_Panda File Verification: Device checks the file upon power-up to avoid update interruptions that could prevent startup.
- Optimized Chamber Temperature Display Icon.
- Improved IMG File Generation: New new_panda files can now be generated using the online tool.
Bug Fixes
- Fixed Access Code Data Synchronization Issue: Discrepancies in Access code data retrieved from the cloud server can cause loss of SN data, making it impossible to connect to the printer.
V1.0.5.1
- change the login method: login by email code.
V1.0.5
- New Panda PWR Binding Mode for Intelligent Power Management of Bambu Lab Printers
- Features a Panda PWR management interface to display printer power and energy consumption, with control over the.
- By equipping each printer with a Panda PWR, a single Panda Touch can manage the power for up to 10 printers.
- In the print initiation window of Panda Touch, you can access preset Panda PWR options for:
- One-click activation for automatic shutdown post-printing, ensuring energy efficiency.
- One-click reset for tracking electricity usage per print job.
- Note: This feature requires the use of the BIGTREETECH Panda PWR product.
- New Sorting Feature for SD Card and USB Drive Filenames
- Enhanced functionality to sort print files by name, simplifying file retrieval.
- New USB Drive File Thumbnail Preview
- Supports thumbnail displays for up to 24 3mf files, created by Bambu Studio, with options to toggle between list and thumbnail views for easy identification of print file contents.
- Optimized Button Sequence for Bed Leveling
- Adjustments to the bed leveling buttons sequence align with the lifting logic of the P1/X1 series, enhancing intuitive operation.
- Enhanced WiFi Connection Experience
- Improved WiFi setup: entering an incorrect password will not trigger an automatic reconnection, conserving processor resources.
- Corrected a display error in fan speed.
- Fixed a bug preventing the X1 series heated bed from reaching temperatures above 100℃.
V1.0.4.1
- To fix the bug: Setting the nozzle material in versions prior to V1.0.4 causes a crash after upgrading to V1.0.4.
V1.0.4
- Added the ability to log in to the Bambu account on the settings page, supporting the addition of printers to enable cloud mode.Cloud mode means the communication method between the printer and Panda Touch. This resolves the issue of not being able to initiate printing and heating functions on Bambu P-series printers using the latest firmware via Panda Touch.
- Added the ability to switch locally added printers to cloud mode in Panda Touch.
- Added a WiFi automatic reconnection feature, which supports automatic connection to the strongest WiFi signal within the same SSID. This resolves the issue of not being able to automatically connect to the strongest same-name WiFi in Mesh networks.
- Added the ability to sort print files stored on the printer's SD card and external USB drives connected to Panda Touch from newest to oldest.
NOTE: We have removed this firmware. Please use the latest version of the firmware.
V1.0.3
- Add Multi-group feature.
- Add the ability to change picture of Panda.
- Add auto select external filament slot with no AMS.
- Add the feature when operating the axis during a print, a prompt pops up indicating that the operation is not allowed.
- Add self healing IP address.
- Add ability to control screen brightness.
- Add the feature when adding a new printer, the number of scanning printers increases from 10 to 20.
- Add reprint function, only supports printing tasks launched from Panda touch, will not take action after restarting.
- Fix unable to load/unload when print is paused.
- Fix german filenames are now displayed correctly, ä ü ö ß characters are displayed.
- Fix wiFi connection instability. If WiFi falls off the network the Panda Touch will attempt three forced disconnect-reconnect cycles. If these still fail then the user is alerted and given an option for a manual reboot.
- Fix use BSSID as the primary key for WiFi connections instead of SSID.
V1.0.2
- Add multi-language option, support chinese.
V1.0.1
- First released factory firmware.
The section below discusses how the logic of this firmware version worked. For the latest control logic please refer to the main sections of the user guide.
Grouping logic
the Panda Touch has 4 settable control modes:

Master: A single machine that acts as the source of instructions for itself and possibly other machines.- The temperature, filament, and file list in the MicroSD Card displayed by Panda Touch are all derived from this printer.
- Panda Touch requires that a single printer is set at the
Masteras the source of this information. - All controls on
Temperature/AxisandFilamentmenus are in reference to theMaster. - The Panda Touch will monitor all
print errorandHMSmessages from theMasterin the background and either send them to the notification center if they are non-critical or display them with a pop-up if they are critical. - You can start print jobs directly on the master using its internal SD memory.
Slave: Slave machines will follow the instructions that the user sends to theMaster. For example, instructions such ashome,heating,setting filament informationandload/unload filamentwill be followed by all slave machines. This design is for batch control of printers in print farms, so it is recommended that the model and filament (AMS) ofSlavemachines are the same as those ofMaster. If they are different, please useSlavemode with caution.- All controls on
Temperature/AxisandFilamentmenus will take effect onSlavemachines. - There can be none or multiple
Slavemachines at the same time. - The Panda Touch will monitor all
print errorandHMSmessages from theSlavemachines in the background and either send them to the notification center if they are non-critical or display them with a pop-up if they are critical. - You can start a print job on a
Slaveprinter using an external USB drive and selecting the slave printer. Sync: An independent machine that does not follow the instructions sent to the master and slave machines.- There can be none or multiple
Syncmachines at the same time. - The Panda Touch will monitor all
print errorandHMSmessages from theSyncmachines in the background and either send them to the notification center if they are non-critical or display them with a pop-up if they are critical. - You can start a print job on a
Syncprinter using an external USB drive and selecting the slave printer. - you cannot control sync printers using the
Temperature/AxisandFilamentmenus. They must be temporarily set toMasterin order to do this. In a future firmware version the grouping scheme will be adjusted such that this is possible. Disconnected: The Panda Touch will close the connection to any printers in this state and no instructions will be sent to it.
Start printing from the printer's MicroSD card
- Make sure the MicroSD card is inserted into the
Masterprinter and formatted as FAT32. -
Go to the
Master printer's MicroSD cardmenu.

-
Panda Touch only supports files are sliced in
Build Plate #1in Bambu Studio. - Panda Touch only supports
.3mffiles and does not support.gcodefiles. - Panda Touch only supports reading files in the root directory and does not support reading files in folders.
- The file list displayed in this menu is from the
Masterprinter. If we want to print files from another printer, we can set the printer we want to print to as theMaster. - Just like the steps in Start printing from USB flash drive, select the printer to start printing.
Multiple printing
When a printer in the sync state is printing, or multiple printers in other states are printing at the same time, the Panda Touch will display the Multiple printing menu as shown below.
The following group controls exist from this menu:
- ①: Turn ON/OFF the chamber LED of the printer in the current print list.
- ②: Stop all print jobs in the current print list.
- ③: Pause/Resume all print jobs in the current print list.
Technical Support
Did this page help you? If you have any further questions about product usage or encounter other issues, please feel free to contact our after-sales email at service001@biqu3d.com.